RabbitMQ Cluster with Quorum Queues — DevOps Zero to Hero Guide
RabbitMQ is widely used for communication between applications and microservices. Running RabbitMQ on a single server can create a single…
RabbitMQ Cluster with Quorum Queues — DevOps Zero to Hero Guide
RabbitMQ is widely used for communication between applications and microservices. Running RabbitMQ on a single server can create a single point of failure if the node goes down. To avoid this problem, RabbitMQ clustering and quorum queues are used for high availability and reliability.
In my previous blog, we covered RabbitMQ fundamentals and Spring Boot integration. In this blog, we will build a 3-node RabbitMQ cluster with Spring Boot integration from a DevOps perspective and perform real-time failover testing. We will verify quorum replication, leader election, producer/consumer behavior, and troubleshoot common cluster issues step by step.
Architecture Overview
We created a 3-node RabbitMQ cluster with Spring Boot producer and consumer applications.
| Node  | Hostname       |
| ----- | -------------- |
| Node1 | rabbitmq-node1 |
| Node2 | rabbitmq-node2 |
| Node3 | rabbitmq-node3 |
All nodes participate in:
- cluster communication
- quorum replication
- leader election
- failover recovery
Spring Boot applications connect to the RabbitMQ cluster for producer and consumer communication.

Important RabbitMQ ports
RabbitMQ clustering requires multiple ports for communication between applications and cluster nodes.
| Port  | Purpose                          |
| ----- | -------------------------------- |
| 5672  | RabbitMQ AMQP                    |
| 15672 | RabbitMQ Management UI           |
| 4369  | Erlang Port Mapper               |
| 25672 | Inter-node Cluster Communication |
The most important clustering ports are:
4369
25672
Without these ports:
- cluster communication fails
- quorum replication fails
- leader election issues occur
- node connectivity problems happen
During our setup, port 25672 was very important for successful quorum replication and inter-node communication.
Step1: Install RabbitMQ
For Erlang and RabbitMQ installation, follow my previous RabbitMQ with Spring Boot setup blog.
Make sure RabbitMQ is installed and running successfully on:
rabbitmq-node1
rabbitmq-node2
rabbitmq-node3
Verify the RabbitMQ service:
sudo systemctl status rabbitmq-serverRabbitMQ service should be active in the 3 nodes
Step2: Configure Hostname Resolution
Configure hostname on all RabbitMQ nodes.
For Node1: sudo hostnamectl set-hostname rabbitmq-node1
For Node2: sudo hostnamectl set-hostname rabbitmq-node2
For Node3: sudo hostnamectl set-hostname rabbitmq-node3
update /etc/hosts on all nodes
sudo vi /etc/hosts

172.31.16.6     rabbitmq-node1
172.31.17.191   rabbitmq-node2
172.31.16.225   rabbitmq-node3
Verify connectivity:
ping rabbitmq-node1
ping rabbitmq-node2
ping rabbitmq-node3
Expected:
- all nodes should resolve successfully
- inter-node communication should work correctly
Proper hostname resolution is mandatory for RabbitMQ clustering and quorum replication.
Step3: Configure erlang cookie
RabbitMQ clustering requires the same Erlang cookie on all nodes for authentication.
Check the Erlang cookie on node1:
[ec2-user@rabbitmq-node1 spring-amqp]$ sudo cat /var/lib/rabbitmq/.erlang.cookie
USDTUFSBTEZMLPRGZVNS
Copy the same cookie value to:
- rabbitmq-node2
- rabbitmq-node3


Update permissions in all RabbitMQ nodes:
sudo chmod 400 /var/lib/rabbitmq/.erlang.cookie
sudo chown rabbitmq:rabbitmq /var/lib/rabbitmq/.erlang.cookie
Restart RabbitMQ service on all nodes:
sudo systemctl restart rabbitmq-serverVerify the status:
sudo systemctl status rabbitmq-serverExpected:
- RabbitMQ should start successfully
- no cookie mismatch errors should appear
- nodes should communicate properly
Erlang cookie mismatch is one of the most common RabbitMQ clustering issues.
Step4: Configure Firewall Ports
RabbitMQ clustering requires firewall access between all cluster nodes.
Open required ports on all RabbitMQ servers:
sudo firewall-cmd --permanent --add-port=5672/tcp
sudo firewall-cmd --permanent --add-port=15672/tcp
sudo firewall-cmd --permanent --add-port=4369/tcp
sudo firewall-cmd --permanent --add-port=25672/tcp
sudo firewall-cmd --reload
Step5: Enable RabbitMQ Management Plugin
Follow the RabbitMQ Management Plugin setup from my previous RabbitMQ with Spring Boot blog.
Follow below commands
sudo rabbitmq-plugins enable rabbitmq_management
sudo systemctl restart rabbitmq-server
sudo rabbitmq-plugins list | grep management
http://<NODE-IP>:15672
Example: http://172.31.16.6:15672
Step6: Create RabbitMQ Cluster
On rabbitmq-node2 and rabbitmq-node3, run the below commands to join them with rabbitmq-node1.
Stop RabbitMQ application:
sudo rabbitmqctl stop_appReset RabbitMQ node:
sudo rabbitmqctl resetjoin cluster:
sudo rabbitmqctl join_cluster rabbit@rabbitmq-node1Start RabbitMQ application:
sudo rabbitmqctl start_appThis will form RabbitMQ cluster Successfully
Step7: Verify RabbitMQ cluster status
Verify cluster status from any RabbitMQ node:
sudo rabbitmqctl cluster_status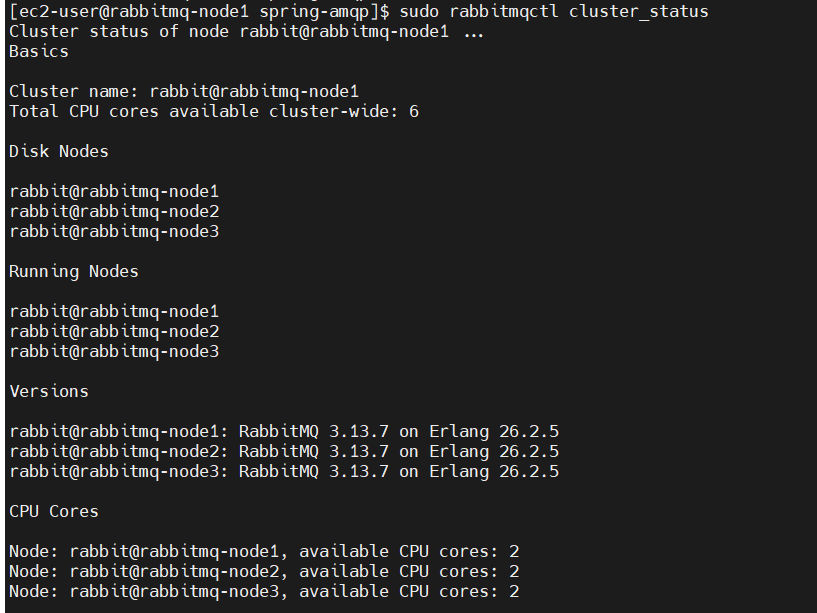
All nodes should appear successfully in the cluster.
This confirms:
- cluster setup successful
- inter-node communication working
- RabbitMQ cluster healthy
The Sample Overview UI data

step8: Configure Quorum Queues
For quorum queue testing, Spring Boot producer and consumer applications were configured with quorum queue support
Queues used:
- green_black_queue
- orange_black_queue
- quorum_test_queue
These queues were created as:
quorum queuesto support:
- high availability
- automatic leader election
- failover recovery
- distributed queue management
Spring Boot applications were connected to the RabbitMQ cluster for producer and consumer communication testing.
This setup helped validate:
- quorum queue behavior
- queue distribution
- leader failover
- message processing across cluster nodes.
step9: Verify Quorum Queues
Verify quorum queue status:
sudo rabbitmqctl list_queues name type leader members

The output confirms that quorum queues were created successfully across multiple RabbitMQ cluster nodes.
Example:
green_black_queue leader → rabbitmq-node2
quorum_test_queue leader → rabbitmq-node3
orange_black_queue leader → rabbitmq-node3
Each queue has:
- one leader node
- remaining member nodes
This shows:
- quorum replication working
- leader election working
- high availability enabled across the cluster
Even if one node goes down, another node can continue handling the queue successfully.

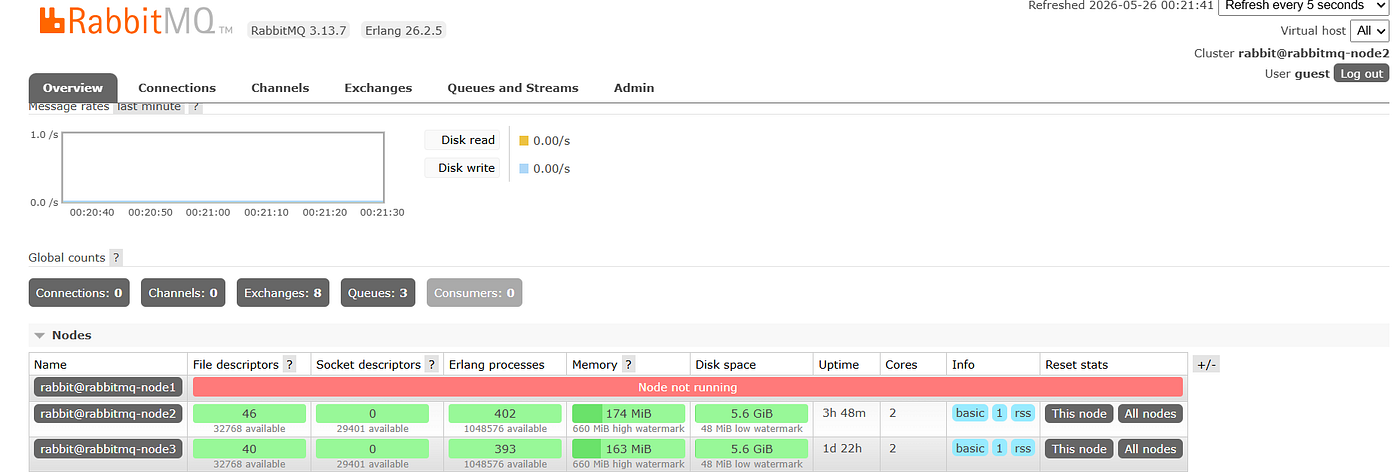
Note: If any RabbitMQ nodes goes its displayed in Overview tab RabbitMQ UI
Here rabbitmq-node1 went down
Conclusion
RabbitMQ clustering and quorum queues provide a reliable solution for building highly available messaging systems. In this setup, we successfully created a 3-node RabbitMQ cluster, configured quorum queues, and verified leader distribution across multiple nodes.
This implementation helped us understand:
- RabbitMQ clustering
- quorum queues
- leader election
- high availability
- inter-node communication
메타데이터
- post_id
- 095db859deeb
- slug
- rabbitmq-cluster-with-quorum-queues-devops-zero-to-hero-guide-095db859deeb
- url
- https://medium.com/@nagendraparchuri1208/rabbitmq-cluster-with-quorum-queues-devops-zero-to-hero-guide-095db859deeb
- canonical_url
- https://medium.com/@nagendraparchuri1208/rabbitmq-cluster-with-quorum-queues-devops-zero-to-hero-guide-095db859deeb
- author_url
- https://medium.com/@nagendraparchuri1208
- status
- ok
- fetched_at
- 2026-06-09 15:37:30