BUILDING A SNORT-3 IDS FROM ZERO TO LIVE ALERTS
Part-2 — Writing Rules That Catch Real Attackers
BUILDING A SNORT-3 IDS FROM ZERO TO LIVE ALERTS
Part-2 — Writing Rules That Catch Real Attackers
1. Introduction & Why Custom Rules Matter
At the end of Part 1 you had roughly 4,646 rules loaded and alerts streaming into a terminal. That feels like victory until you read those rules carefully and realise something quietly inconvenient about them. They are written for everyone, not for you. They catch generic CVE shellcode, well known malware C2 domains, decade old worm signatures. They do not know your network, your attackers, or the specific shapes of trouble you actually care about. The community rule set is a fence around the property. Custom rules are the cameras pointed at the doors.
This is Part 2 of the series. It covers Lab 3, the lab where you stop being a Snort user and start being a Snort author. By the end of this blog you will have written 10 custom detection rules covering reconnaissance, brute force, web application attacks, and covert channels, generated matching attack traffic for every single one, and built a one liner verification script that confirms each SID has fired at least once.
1.1 What Changes Between Lab 2 and Lab 3
Lab 2 taught you how to read alerts. Lab 3 teaches you how to create them. The mental flip is bigger than it sounds. Reading is reactive: an alert appears, you decide whether it matters. Writing is proactive: you decide in advance what matters, encode it as a pattern, and trust the engine to find it in real traffic. Every commercial SIEM, every SOC playbook, every red team detection engineering job in the world ultimately reduces to that one skill.
1.2 The Six Traps That Kill Lab 3
Before the code, the wisdom. Every one of these is a silent failure mode. The rule loads, Snort runs, no error appears, and yet the SID never fires. Read each of these with the rule it ruins, so when the verification script reports hits=0, you know exactly which trap caught you.
1.2.1 Trap 1 — SID Collisions
Lab 1’s local.rules already uses SIDs 1000001 to 1000004 for the verification rules. If you naively reuse 1000001 to 1000010 for Lab 3, Snort’s rule loader silently drops the duplicates and keeps only one. There is no warning, no error, just rules that look loaded but never fire.
✓ Fix
Use SIDs 1000101 to 1000110 in a separate file lab3.rules. Numbering by hundreds (instead of incrementing one at a time) gives you headroom for future labs without ever colliding again.
1.2.2 Trap 2 — Wrong Direction
A common instinct is to write Lab 3 rules as $EXTERNAL_NET -> $HOME_NET. That sounds right, internet attackers hitting your internal hosts, but it is wrong for this lab. Our Attacker (192.xxx.xx.x) lives inside HOME_NET (192.xxx.xx.x/xx). Traffic from inside HOME_NET to inside HOME_NET never matches an $EXTERNAL_NET -> $HOME_NET rule because the source IP is by definition in HOME_NET, not in !$HOME_NET.
✓ Fix
All Lab 3 rules use any -> any direction. In production with real external attackers you would tighten this back to $EXTERNAL_NET -> $HOME_NET, but for a self contained lab any -> any is correct.
1.2.3 Trap 3 — Content Modifier Syntax
In Snort 3, content modifiers like nocase, offset, depth, distance, and within must be comma attached to the content: directive, not separated by semicolons:
content:”UNION”,nocase; # correct Snort 3 syntax
Use the wrong syntax and Snort either fails to load the rule with a confusing error, or worse, loads it but never matches anything. The options threshold:, dns_query, and http_user_agent also need attention since they have specific Snort 3 requirements.
✓ Fix
Use detection_filter: for rate based thresholding. Use simple content:”X”,nocase; matching at the TCP/UDP level rather than HTTP buffer specific selectors like http_uri or http_header (which require their own setup). For HTTP traffic we just match content against the raw TCP payload, port 80 is selector enough.
1.2.4 Trap 4 — HTTP Rules Need Something Listening on Port 80
This is the most painful trap because it looks obvious in hindsight and is invisible in foresight. Rules 4 to 8 all match on HTTP payload patterns (UNION SELECT, OR 1=1, <script, ../, Nikto). For Snort to see the payload, the TCP handshake has to complete and the HTTP request has to actually be sent. But the Sensor VM has nothing listening on port 80 by default. When curl or nikto tries to connect, the Sensor’s kernel rejects the SYN with a TCP RST, the handshake never completes, and curl reports “Connection refused” before any payload bytes ever travel.
The payload Snort needs to match on never appears on the wire. No payload, no content match, no alert.
✓ Fix
Install Apache on the Sensor before running the HTTP test block. It accepts the TCP handshake, the HTTP request payload flows, Snort sees it, the rules fire. A one liner Python HTTP server (python3 -m http.server 80) also works, but only when nothing else is bound to port 80. We use Apache here because it is closer to a real web server and survives reboots.
1.2.5 Trap 5 — DNS Rules Need pkt_data AND Attacker Sourced Traffic
Two compounding issues, both invisible:
(a) Snort 3’s DNS inspector pre-parses DNS packets into typed buffers (dns_query, dns_resp, etc.) before rule evaluation. A plain content:”malware” directive may get scoped to one of those inspector buffers rather than the raw packet payload, and silently match nothing.
(b) When the Sensor itself runs nslookup malware.example.com, the query is sent to 127.0.0.53 (systemd-resolved on the loopback interface), not out through ens5. Snort is sniffing ens5, so it literally cannot see the packet. The query happens, the response comes back, and Snort never registers the event.
✓ Fix
(a) Prepend pkt_data; to the rule to force the content search against the raw packet payload. (b) Generate the test traffic from the Attacker to the Sensor’s IP using nc -u -w1 192.168.10.9 53. UDP/53 from Attacker to Sensor crosses ens5, where Snort is listening. The Sensor has no DNS service on port 53, so the kernel will reject the packet, but Snort’s libpcap captures it before the kernel rejection.
1.2.6 Trap 6 — Log Permissions Silently Hide Alerts
/var/log/snort/alert_fast.txt is owned by ubuntu with mode 0640. A grep without sudo returns nothing. Not “permission denied”, not an error, just a silent empty result. You spend an hour debugging a rule that was firing perfectly all along.
✓ Fix
Always run verification commands with sudo, or wrap them in sudo bash -c ‘…’. This is also why the verification script in section 8 starts with sudo bash -c.
📌 Read these six again before you write the rules
Every one of them is a silent failure. The rules will load, Snort will run, the alert file will exist, and yet specific SIDs will report hits=0. The fixes are tiny (single words, single flags) but the symptoms are identical to “the rule is broken.” The traps are the lab.
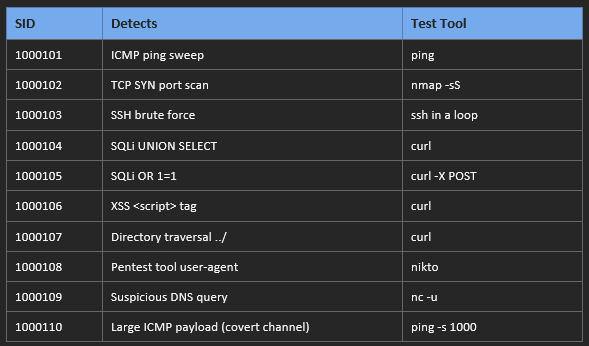
1.3 The 10 Rules at a Glance
2. Recap & Mental Model
Before we write a single rule, picture where they go and how Snort finds them.
2.1 Where lab3.rules Lives in the Load Chain
In Lab 1 your snort.lua already had this block:
ips = {
enable_builtin_rules = true,
variables = default_variables,
rules = [[
include /usr/local/etc/snort/rules/local.rules
include /usr/local/etc/snort/rules/snort3-community.rules
]]
}
local.rules already holds the four verification rules from Lab 1 (SIDs 1000001 to 1000004). We are going to add a third file, lab3.rules, with SIDs 1000101 to 1000110, and include it from the same block. Keeping the two files separate is not cosmetic, it is a survival decision. Snort’s rule loader silently drops duplicates when two rules share a SID, so collision proof numbering is the difference between alerts firing and alerts vanishing.
2.2 Anatomy of a Snort 3 Rule
Every rule, no matter how complex, has the same shape:

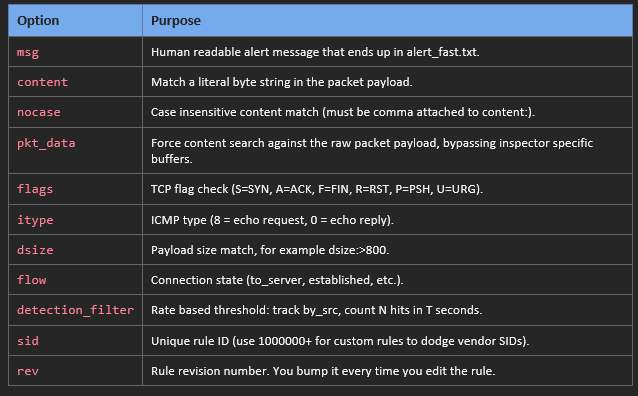
The options block is where the intelligence lives. These are the eleven options Lab 3 actually uses:
2.3 Confirm Snort 3 Is Still Running From Lab 1
Before we touch anything, prove the Lab 1 stack is still up. If the Sensor was stopped, start it before continuing.
sudo systemctl status snort3 — no-pager
ip -br addr
ls -l /var/log/snort/alert_fast.txt
You should see Active: active (running) for snort3.service, your ens5 interface listed as UP with its private IP, and an alert_fast.txt that has been growing since Lab 2.

3. Install Apache on the Sensor (HTTP Listener)
Before writing any rules, set up the HTTP listener. Rules 4 to 8 all need a working webserver on the Sensor so the payload actually travels.
On the Sensor VM
sudo apt update
sudo apt install -y apache2
sudo systemctl enable — now apache2
Verify Apache is listening on port 80
curl -I http://localhost
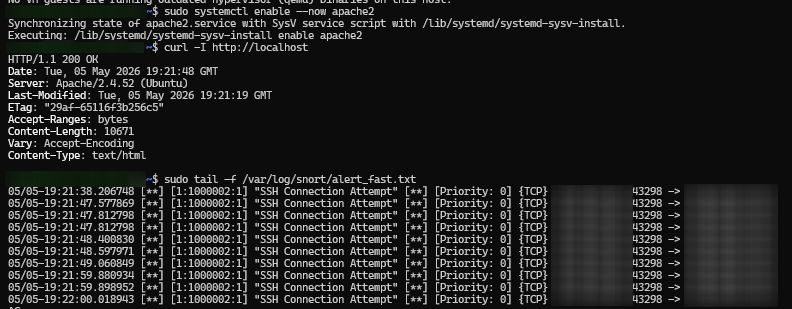
You should get back an HTTP/1.1 200 OK with Server: Apache/2.4.52 (Ubuntu). That confirms Apache is bound to port 80 and ready to accept the test traffic.

4. The 10 Rules, Grouped By Attack Phase
The rules are not random. They map to the cyber kill chain. Reconnaissance first, then access, then exploitation, then exfiltration. Reading them in that order makes their structure obvious.
4.1 Reconnaissance (Rules 1 & 2)
These rules use detection_filter because a single ping or a single SYN is not an attack, it is a normal packet. What makes it reconnaissance is rate: many of them, from one source, in a short window. detection_filter:track by_src, count N, seconds T says “only fire after seeing N matches from the same source IP within T seconds.” This is one of the most powerful primitives in the Snort 3 language.
Rule 1, Ping Sweep
alert icmp any any -> any any (msg:”LOCAL Ping Sweep Detected”; itype:8; \
detection_filter:track by_src, count 10, seconds 5; sid:1000101; rev:1;)
Rule 2, TCP SYN Port Scan
alert tcp any any -> any any (msg:”LOCAL TCP SYN Port Scan”; flags:S; \
detection_filter:track by_src, count 50, seconds 5; sid:1000102; rev:1;)
itype:8 matches ICMP echo requests (pings). flags:S matches a bare SYN packet, the hallmark of a half-open scan. The thresholds (10 pings in 5 sec, 50 SYNs in 5 sec) are tuned for the test workload. In production you would raise them to reduce noise.
4.2 Credential Access (Rule 3)
Rule 3, SSH Brute Force
alert tcp any any -> any 22 (msg:”LOCAL SSH Brute Force”; \
detection_filter:track by_src, count 5, seconds 30; sid:1000103; rev:1;)
Same detection_filter pattern, lower count and longer window because real SSH brute force is slower than a port scan. Five attempts in 30 seconds is below most failed login lockout thresholds. That is why we monitor it. A patient attacker stays below the OS level lockout but above the IDS threshold.
4.3 Web Application Attacks (Rules 4 to 8)
The five HTTP rules are the heart of Lab 3. Each one matches a payload pattern that almost certainly indicates malicious intent, even in isolation.
Rule 4, SQLi UNION SELECT (both keywords in same packet)
alert tcp any any -> any 80 (msg:”LOCAL SQLi UNION SELECT”; \
content:”UNION”,nocase; content:”SELECT”,nocase; sid:1000104; rev:1;)
Rule 5, SQLi OR 1=1 (classic auth bypass)
alert tcp any any -> any 80 (msg:”LOCAL SQLi OR 1=1 Injection”; \
content:”or 1=1",nocase; sid:1000105; rev:1;)
Rule 6, XSS Script Tag
alert tcp any any -> any 80 (msg:”LOCAL XSS Script Tag”; \
content:”<script”,nocase; sid:1000106; rev:1;)
Rule 7, Directory Traversal
alert tcp any any -> any 80 (msg:”LOCAL Directory Traversal Attempt”; \
content:”../”; sid:1000107; rev:1;)
Rule 8, Pentest Tool User-Agent (Nikto)
alert tcp any any -> any 80 (msg:”LOCAL Pentest Tool User-Agent”; \
content:”Nikto”,nocase; sid:1000108; rev:1;)
A few things to notice:
• Rule 4 chains two content: directives. Both keywords must appear in the same packet for the rule to fire. That dramatically cuts false positives. The word “UNION” alone is far too common in legitimate web traffic.
• Rule 7 omits nocase because ../ is symbolic, not alphabetic. Case insensitivity has no meaning for a slash.
• Rule 8 catches Nikto by user agent. Most pentest tools advertise themselves in the User-Agent header. Sophisticated attackers spoof the UA. Lazy ones do not. Catching the lazy ones is still worth it.
⚠ Comma, not semicolon
Look closely at every content:”X”,nocase;. The comma between “X” and nocase is what Snort 3 requires. Get this wrong and either the rule fails to load, or it loads silently broken. This is the single most common reason Lab 3 rules don’t fire on the first try.
4.4 Reconnaissance & Exfiltration (Rules 9 & 10)
Rule 9, Suspicious DNS Query (pkt_data; is mandatory)
alert udp any any -> any 53 (msg:”LOCAL Suspicious DNS Query”; \
pkt_data; content:”malware”,nocase; sid:1000109; rev:1;)
Rule 10, Large ICMP Payload (covert channel / data exfil indicator)
alert icmp any any -> any any (msg:”LOCAL Large ICMP Payload”; \
itype:8; dsize:>800; sid:1000110; rev:1;)
Rule 9 is the one most students get wrong. The pkt_data; directive is the magic word that forces content matching against the raw payload rather than DNS inspector buffers. Without it, the rule loads cleanly but matches nothing. I will show you exactly that failure later in the screenshots of section 7.
Rule 10 detects the “ping data exfiltration” pattern. A normal ping carries 56 bytes of payload. A ping -s 1000 carries 1000 bytes. Real users do not need 1000 byte pings. Attackers using ICMP as a covert channel often do. The dsize:>800 threshold splits the two cleanly.
5. Writing lab3.rules
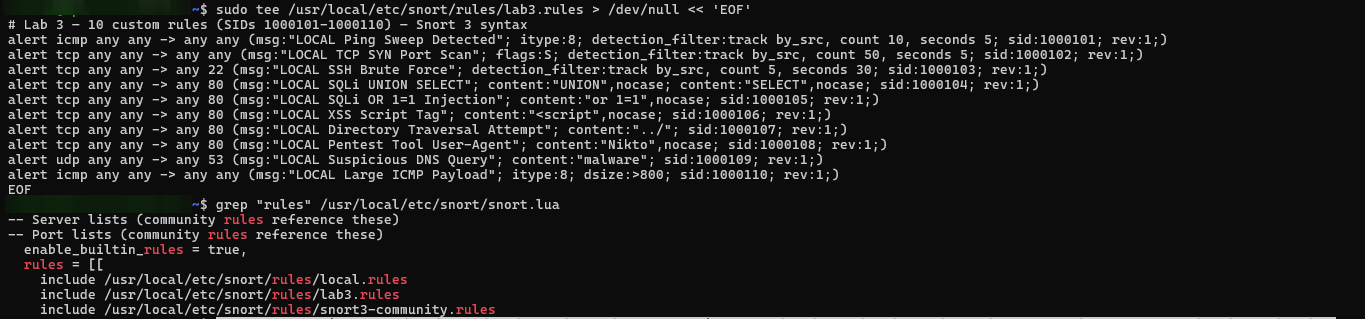
Now the actual command. Drop the entire rule set into /usr/local/etc/snort/rules/lab3.rules in one heredoc:
sudo tee /usr/local/etc/snort/rules/lab3.rules > /dev/null << ‘EOF’
Lab 3, 10 custom rules (SIDs 1000101 to 1000110)
Direction is any -> any to match Attacker traffic from inside HOME_NET
1. Ping Sweep
alert icmp any any -> any any (msg:”LOCAL Ping Sweep Detected”; itype:8; \
detection_filter:track by_src, count 10, seconds 5; sid:1000101; rev:1;)
2. TCP SYN Port Scan
alert tcp any any -> any any (msg:”LOCAL TCP SYN Port Scan”; flags:S; \
detection_filter:track by_src, count 50, seconds 5; sid:1000102; rev:1;)
3. SSH Brute Force
alert tcp any any -> any 22 (msg:”LOCAL SSH Brute Force”; \
detection_filter:track by_src, count 5, seconds 30; sid:1000103; rev:1;)
4. SQLi UNION SELECT
alert tcp any any -> any 80 (msg:”LOCAL SQLi UNION SELECT”; \
content:”UNION”,nocase; content:”SELECT”,nocase; sid:1000104; rev:1;)
5. SQLi OR 1=1
alert tcp any any -> any 80 (msg:”LOCAL SQLi OR 1=1 Injection”; \
content:”or 1=1",nocase; sid:1000105; rev:1;)
6. XSS Script Tag
alert tcp any any -> any 80 (msg:”LOCAL XSS Script Tag”; \
content:”<script”,nocase; sid:1000106; rev:1;)
7. Directory Traversal
alert tcp any any -> any 80 (msg:”LOCAL Directory Traversal Attempt”; \
content:”../”; sid:1000107; rev:1;)
8. Pentest Tool User-Agent (Nikto)
alert tcp any any -> any 80 (msg:”LOCAL Pentest Tool User-Agent”; \
content:”Nikto”,nocase; sid:1000108; rev:1;)
9. Suspicious DNS Query
alert udp any any -> any 53 (msg:”LOCAL Suspicious DNS Query”; \
pkt_data; content:”malware”,nocase; sid:1000109; rev:1;)
10. Large ICMP Payload
alert icmp any any -> any any (msg:”LOCAL Large ICMP Payload”; \
itype:8; dsize:>800; sid:1000110; rev:1;)
EOF
Now wire the new file into snort.lua. A one liner with sed adds the new include right after the existing local.rules line:
sudo sed -i ‘s|include /usr/local/etc/snort/rules/local.rules|include /usr/local/etc/snort/rules/local.rules\n include /usr/local/etc/snort/rules/lab3.rules|’ /usr/local/etc/snort/snort.lua
Confirm both includes are now present
grep “rules” /usr/local/etc/snort/snort.lua
You should see three include lines: local.rules, lab3.rules, and snort3-community.rules.
Validate the config, then restart Snort so the new rules load:
sudo snort -c /usr/local/etc/snort/snort.lua -T 2>&1 | grep -iE “error|fatal|warning|successfully” | tail -10
Look for: “Snort successfully validated the configuration (with 0 warnings).”
sudo systemctl restart snort3
sleep 2 && sudo systemctl status snort3 — no-pager | head -3
Expect: Active: active (running)


✓ Rules loaded
If snort -T exits with “0 warnings” and systemctl shows active (running), all 10 rules are in the engine. They will not fire until matching traffic appears, and that is the next section.
6. Testing Every Single Rule
Open two SSH windows on the Sensor. Window A keeps a live tail on the alert file. Window B is your shell. Then a third window on the Attacker generates the traffic.
WINDOW A (Sensor), live alert monitor
sudo tail -f /var/log/snort/alert_fast.txt
6.1 Install the Attack Toolkit on the Attacker
On the Attacker VM
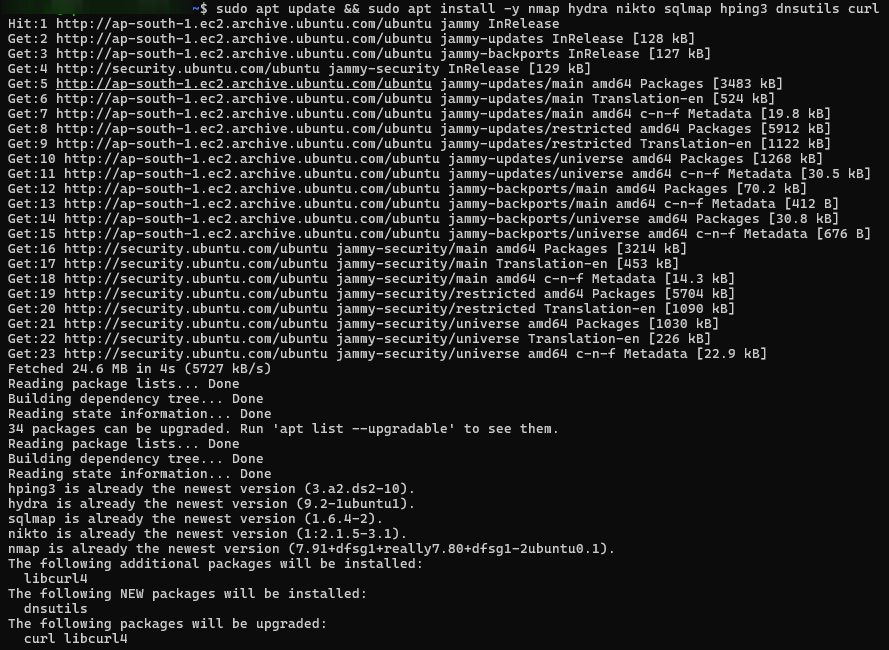
sudo apt update && sudo apt install -y nmap hydra nikto sqlmap hping3 dnsutils curl
If your Attacker is brand new, this pulls roughly 24 MB. Most of these (nmap, hydra, sqlmap, nikto, hping3) come pre installed on the Ubuntu image we used, so the install is mostly a no op except for dnsutils (which gives us nslookup if we want it for debugging).
6.2 A Quick Aside — Why python3 -m http.server Fails Here
If you tried to start a Python HTTP server on the Sensor after installing Apache, you would see this:
sudo nohup python3 -m http.server 80 > /tmp/httpd.log 2>&1 &
sleep 1 && sudo ss -tlnp | grep ‘:80 ‘
[1]+ Exit 1 sudo nohup python3 -m http.server 80 > /tmp/httpd.log 2>&1
LISTEN 0 511 :80 :* users:((“apache2”,pid=…))
Apache already owns port 80, so Python exits immediately with [1]+ Exit 1. This is not a failure of either tool. It is a reminder that port 80 is a singleton. Apache is the listener for the rest of this lab.

6.3 Run the Eight Attack Tests From the Attacker
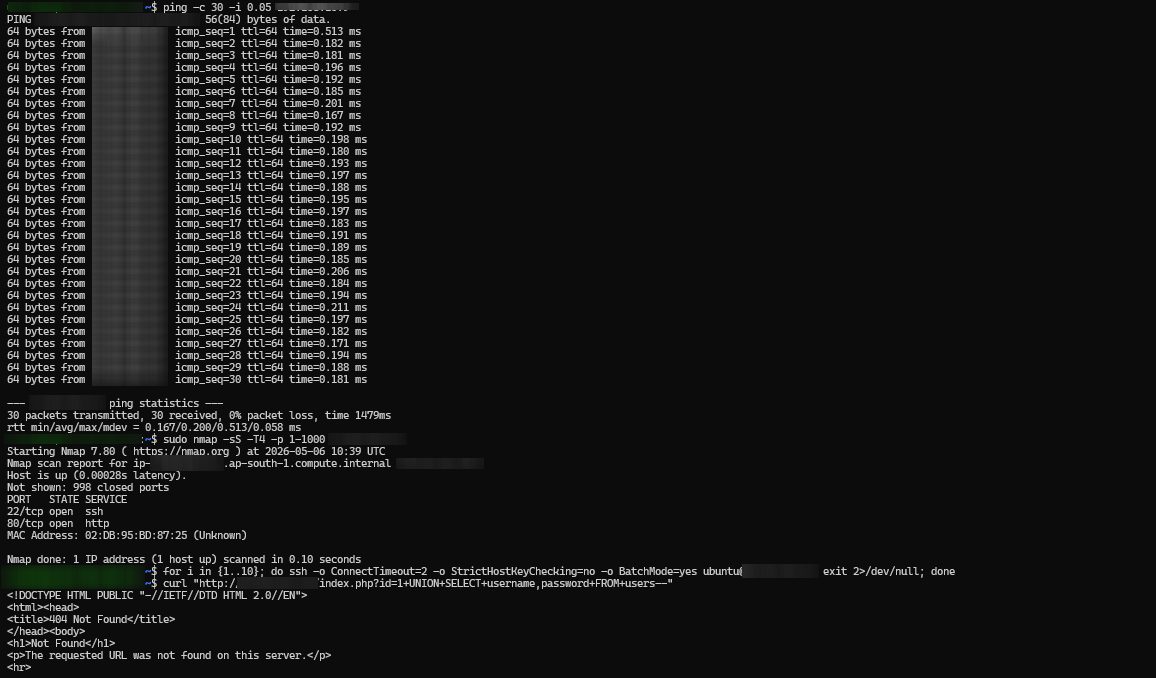
Test 1, Ping Sweep (SID 1000101)
ping -c 30 -i 0.05 192.168.10.9
Test 2, TCP SYN Port Scan (SID 1000102)
sudo nmap -sS -T4 -p 1–1000 192.168.10.9
Test 3, SSH Brute Force (SID 1000103)
for i in {1..10}; do
ssh -o ConnectTimeout=2 -o StrictHostKeyChecking=no -o BatchMode=yes \
ubuntu@192.168.10.9 exit 2>/dev/null
done
Test 4, SQLi UNION SELECT (SID 1000104)
curl “http://192.168.10.9/index.php?id=1+UNION+SELECT+username,password+FROM+users--"
Test 5, SQLi OR 1=1 POST (SID 1000105)
curl -X POST -d “username=admin&password=’ or 1=1 — “ “http://192.168.10.9/login"
Test 6, XSS (SID 1000106)
curl “http://192.168.10.9/search?q=<script>alert(1)</script>"
Test 7, Directory Traversal (SID 1000107)
Test 8, Pentest Tool User-Agent (SID 1000108)
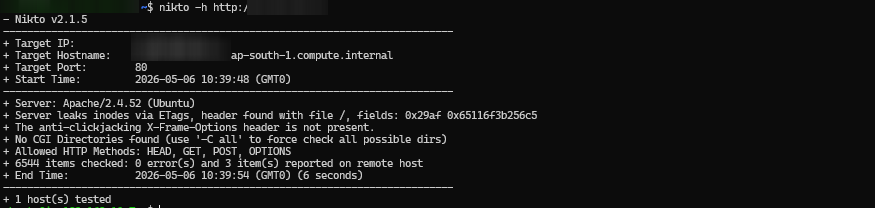
nikto -h http://192.168.10.9
BatchMode=yes in the SSH loop is critical. It prevents SSH from prompting for a password, so all ten attempts finish in seconds instead of hanging on the first prompt. nikto alone generates thousands of HTTP requests, which is why its hit count will be the highest in the verification.

6.4 The Large ICMP Test (Run From the Sensor)
Rule 10 wants ICMP echo requests with a payload larger than 800 bytes. The -s 1000 flag tells ping to send 1000 byte payloads:
Test 10, Large ICMP Payload (SID 1000110), run on Sensor
sudo ping -c 5 -s 1000 8.8.8.8
The destination (8.8.8.8) does not matter. What matters is that the ICMP packet leaves the Sensor’s ens5 interface, where Snort sees it. Default ping payload is 56 bytes, well below the 800 byte threshold, so accidentally generated ICMP traffic from monitoring tools will not trigger false positives.
6.5 First Verification Run — and the One That Comes Up Zero
Run the verification script (the one liner from section 8). Pay close attention to SID 1000109:
sudo bash -c ‘for sid in $(seq 1000101 1000110); do
count=$(grep -c “[1:${sid}:” /var/log/snort/alert_fast.txt)
msg=$(grep “[1:${sid}:” /var/log/snort/alert_fast.txt | tail -1 | \
sed -E ‘“‘“‘s/.[**] “([^”]+)”./\1/’”’”’)
printf “SID %d hits=%-5d %s\n” “$sid” “$count” “$msg”
done’
On a first run where you tried nslookup malware.c2.tk from the Sensor (the obvious instinct), you will see this:
SID 1000101 hits=40 LOCAL Ping Sweep Detected
SID 1000102 hits=1698 LOCAL TCP SYN Port Scan
SID 1000103 hits=220 LOCAL SSH Brute Force
SID 1000104 hits=6 LOCAL SQLi UNION SELECT
SID 1000105 hits=1 LOCAL SQLi OR 1=1 Injection
SID 1000106 hits=254 LOCAL XSS Script Tag
SID 1000107 hits=205 LOCAL Directory Traversal Attempt
SID 1000108 hits=6295 LOCAL Pentest Tool User-Agent
SID 1000109 hits=0
SID 1000110 hits=15 LOCAL Large ICMP Payload
Nine out of ten rules fired. SID 1000109 is silently dead. This is exactly Trap 5 from section 3.

6.6 Fix Rule 9, Then Generate DNS Traffic the Right Way
The rule itself needs pkt_data; to escape the DNS inspector buffer, and the test traffic needs to come from the Attacker so it crosses ens5. Do both:
Patch rule 9 in place on the Sensor, bump revision to 2
sudo sed -i ‘/sid:1000109/c\alert udp any any -> any 53 (msg:”LOCAL Suspicious DNS Query”; pkt_data; content:”malware”,nocase; sid:1000109; rev:2;)’ /usr/local/etc/snort/rules/lab3.rules
Validate and restart Snort to load rev:2
sudo snort -c /usr/local/etc/snort/snort.lua -T 2>&1 | grep -iE “error|fatal|successfully” | tail -5
sudo systemctl restart snort3
sleep 2 && sudo systemctl status snort3 — no-pager | head -3

Now generate the DNS test traffic from the Attacker with nc. UDP/53 from Attacker to Sensor crosses ens5, where Snort is listening. The Sensor has no service on port 53, so the kernel rejects the UDP packet, but Snort’s libpcap captures it before the kernel rejection. That is the secret of how this rule fires against a host with no DNS server running.
Test 9, Suspicious DNS Query (SID 1000109), RUN ON ATTACKER
for i in 1 2 3 4 5; do
echo “malware-c2-suspicious-dns-query-$i” | nc -u -w1 192.168.10.9 53
done

ℹ Fallback if nc is not on the Attacker
Use the Python equivalent:
python3 -c “ import socket s = socket.socket(socket.AF_INET, socket.SOCK_DGRAM) for i in range(5): s.sendto(b’malware suspicious dns lookup test ‘ + str(i).encode(), (‘192.168.10.9’, 53)) “
6.7 Re-run the Verification
sudo bash -c ‘for sid in $(seq 1000101 1000110); do
count=$(grep -c “[1:${sid}:” /var/log/snort/alert_fast.txt)
msg=$(grep “[1:${sid}:” /var/log/snort/alert_fast.txt | tail -1 | \
sed -E ‘“‘“‘s/.[**] “([^”]+)”./\1/’”’”’)
printf “SID %d hits=%-5d %s\n” “$sid” “$count” “$msg”
done’
This time:
SID 1000101 hits=40 LOCAL Ping Sweep Detected
SID 1000102 hits=1698 LOCAL TCP SYN Port Scan
SID 1000103 hits=349 LOCAL SSH Brute Force
SID 1000104 hits=6 LOCAL SQLi UNION SELECT
SID 1000105 hits=1 LOCAL SQLi OR 1=1 Injection
SID 1000106 hits=254 LOCAL XSS Script Tag
SID 1000107 hits=205 LOCAL Directory Traversal Attempt
SID 1000108 hits=6295 LOCAL Pentest Tool User-Agent
SID 1000109 hits=5 LOCAL Suspicious DNS Query
SID 1000110 hits=15 LOCAL Large ICMP Payload
Every SID has hits greater than zero. Lab 3 is done.

7. Troubleshooting — If Any SID Still Shows Zero
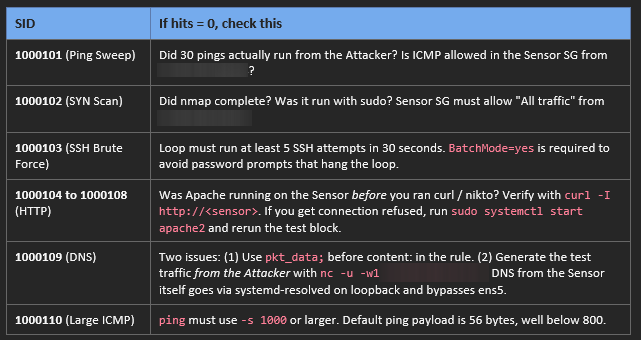
The fixes are almost always one of two shapes: either a piece of traffic was never generated (no listener, no sudo, wrong source VM), or a rule directive is in the wrong syntax (missing comma, missing pkt_data;). Reread section 3 if you are stuck.
✅ Lab 3 Complete
✓ 10 custom rules written to a dedicated lab3.rules file with collision proof SIDs
✓ Apache installed as the HTTP listener so payloads actually reach Snort
✓ All rules syntax validated by snort -T with zero warnings
✓ Snort 3 service restarted with the new rules live
✓ Eight attack types generated from the Attacker, one from the Sensor
✓ DNS rule debugged and patched live with pkt_data; and rev:2
✓ Verification script proves every SID fired with hits greater than zero
✓ All six classic Lab 3 traps avoided
8. What You Actually Just Learned
The 10 rules are not the lesson. The lesson is the structure of detection thinking. Look back at what you did:
-
You decided what bad behaviour looks like (a fast burst of pings, a UA string of “Nikto”, a 1000 byte ICMP payload).
-
You encoded the behaviour as a pattern in a domain specific language.
-
You generated the bad behaviour in a controlled environment.
-
You verified that your pattern caught your behaviour.
-
You debugged the gap between intent and execution when the pattern did not fire.
Every detection engineer at every SOC on earth does exactly that loop, every day. The tools change (Splunk, Sigma, YARA, Suricata, Elastic, Sentinel), but the loop is identical. Lab 3 is the first time you ran the loop end to end on real traffic. The next time you read a Threat Intelligence report and someone says “indicators include the user agent string XYZ”, you will know exactly how to turn that sentence into a rule and prove it works.
9. What’s Next in Part 3
Writing one rule at a time and proving it fires is the unit test of detection engineering. The next blog steps up to the integration test. In Part 3 you will run a complete multi phase attack simulation against the Sensor, starting with reconnaissance, escalating through enumeration and credential access, pivoting into a web application exploit, and ending in data exfiltration over a covert channel. You will not run isolated commands. You will run a script that chains them together the way a real attacker would. Then you will sit beside your alert tail and watch Snort detect the entire kill chain in real time, one phase after another, and you will see the alert stream itself become a narrative of an attack in progress.
After that, in the final blog of the series, we flip Snort from seeing attacks to stopping them. The same engine you have built over four labs becomes an inline IPS using NFQ DAQ and iptables, and you will write drop rules that not only alert but actively block matching packets in flight. The same or 1=1 payload that fired SID 1000105 will, in IPS mode, never reach the application at all.
메타데이터
- post_id
- 14b2a3b4372a
- slug
- building-a-snort-3-ids-from-zero-to-live-alerts-14b2a3b4372a
- url
- https://medium.com/@adevani20045/building-a-snort-3-ids-from-zero-to-live-alerts-14b2a3b4372a
- canonical_url
- https://medium.com/@adevani20045/building-a-snort-3-ids-from-zero-to-live-alerts-14b2a3b4372a
- author_url
- https://medium.com/@adevani20045
- status
- ok
- fetched_at
- 2026-06-15 20:49:13