Configure Azure Active-Active VPN with BGP (Unifi)
Introduction
Configure Azure Active-Active VPN with BGP (Unifi)
Introduction
This guide walks through setting up an Active-Active Site-To-Site VPN between an Azure Virtual Network Gateway and an on-premises Firewall (Unifi in this example) using BGP for dynamic route advertisement.
BGP is used instead of static routes to provide a resilient tunnel pair where both Azure gateway instances are active simultaneously, giving you automatic failover without manual intervention or traffic loss if one tunnel goes down.
BGP also provides a scalable solution, as static routes can become difficult to manage as networks grow.
Prerequisites
Before you begin, ensure you have:
- An Azure subscription with Contributor access
- An on-premises firewall that supports BGP and ECMP (Equal Cost Multi Path)
- An Understanding of general network routing
- An Azure Virtual Network (VNet) with a GatewaySubnet configured, with an Address Space that does not overlap your existing on-premises network
- An Understanding of Azure Networking
Active-Active vs Active Passive.
Azure VPN Gateways operate in either Active-Standby or Active-Active mode.
In Active-Standby Mode, one instance handles traffic while the other acts as a Standby Unit ready to take over operations if the Primary Instance fails.
If the primary instance fails in an Active-Standby configuration, the secondary instance takes over. However, there is a brief disruption to traffic while the gateways switch over and the IPsec tunnels are re-established.
In an Active-Active Mode, both VPN Gateway instances handle traffic simultaneously, each with its own public IP and BGP peer address.
Your on-premises device establishes two IPsec VPN Tunnels, and BGP peers (one to each Azure VPN Gateway instance).
This ensures that traffic continues to flow if one of the gateway instances fails.
The cost for VPN Gateway is the same for both Active-Active and Active-Passive configurations as both provide two VPN Gateway Instances.
Active-Active mode is recommended unless there is a specific requirement that prevents its use (for example, an on-premises firewall that does not support ECMP).
Network Topology
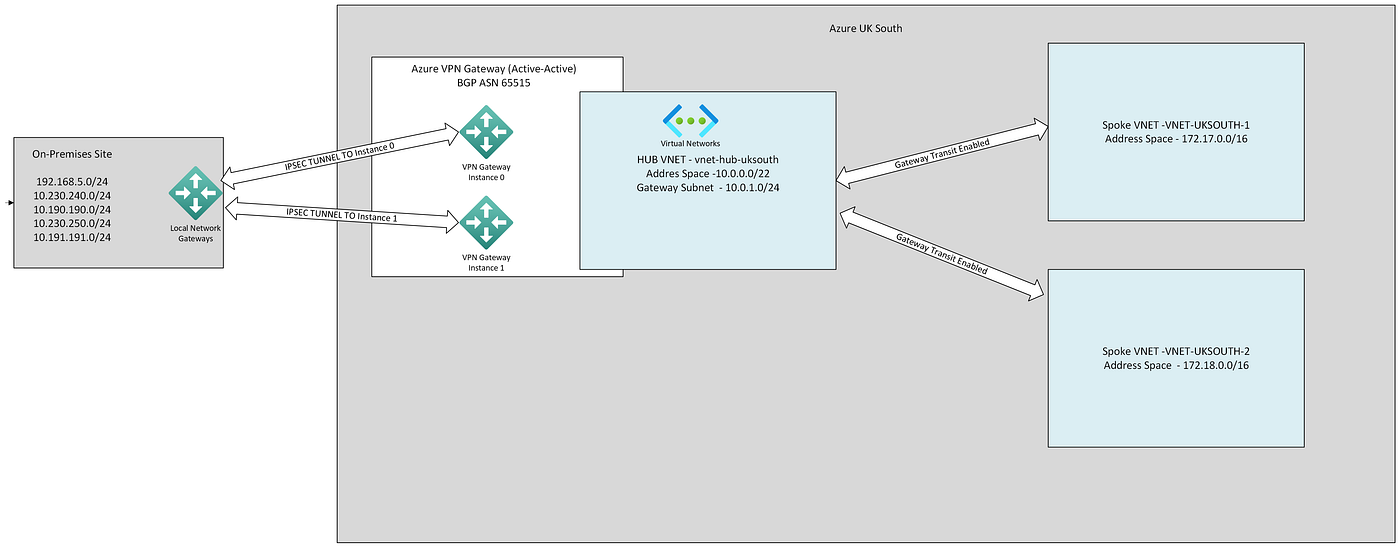
We are following the following “Active-active VPN gateways” topology in this scenario
In our Lab environment we have the following
Unifi Firewall with BGP ASN 65000 advertising the following Networks
192.168.5.0/24, 10.230.240.0/24, 10.190.190.0/24, 10.230.250.0/24, 10.191.191.0/24
Azure Hub and Spoke Topology with one Hub VNET (10.0.0.0/22) , and Two Spoke VNET’s (172.17.0.0/16, 172.18.0.0/16.
The Spoke VNET’s are peered to the Hub VNET with Gateway Transit Enabled as the VPN Gateway is deployed into the Hub VNET.
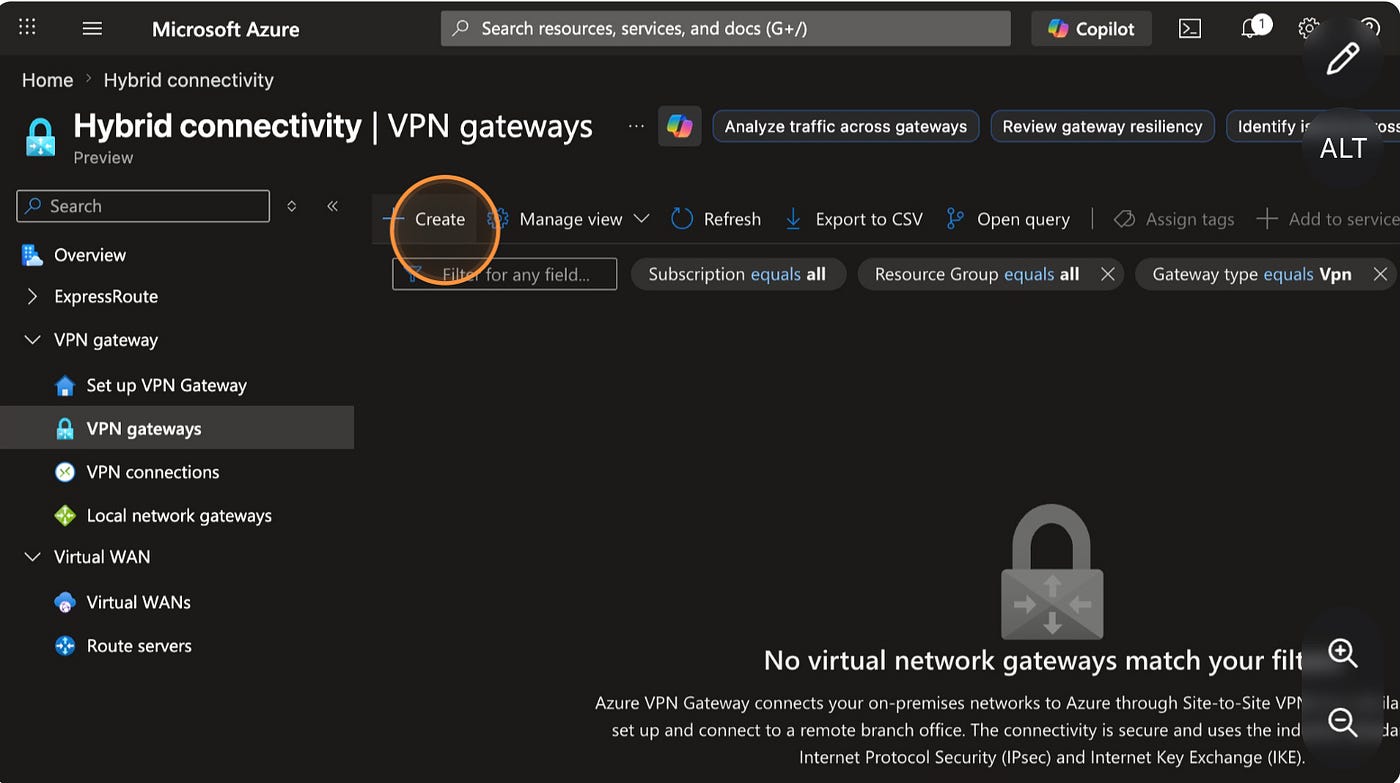
Deploy Virtual Network Gateway
- Navigate to https://portal.azure.com/#home
- Click the Search Bar at the top of the page and type “Virtual Network Gateway”
- Click “Create” to create the Virtual Network Gateway
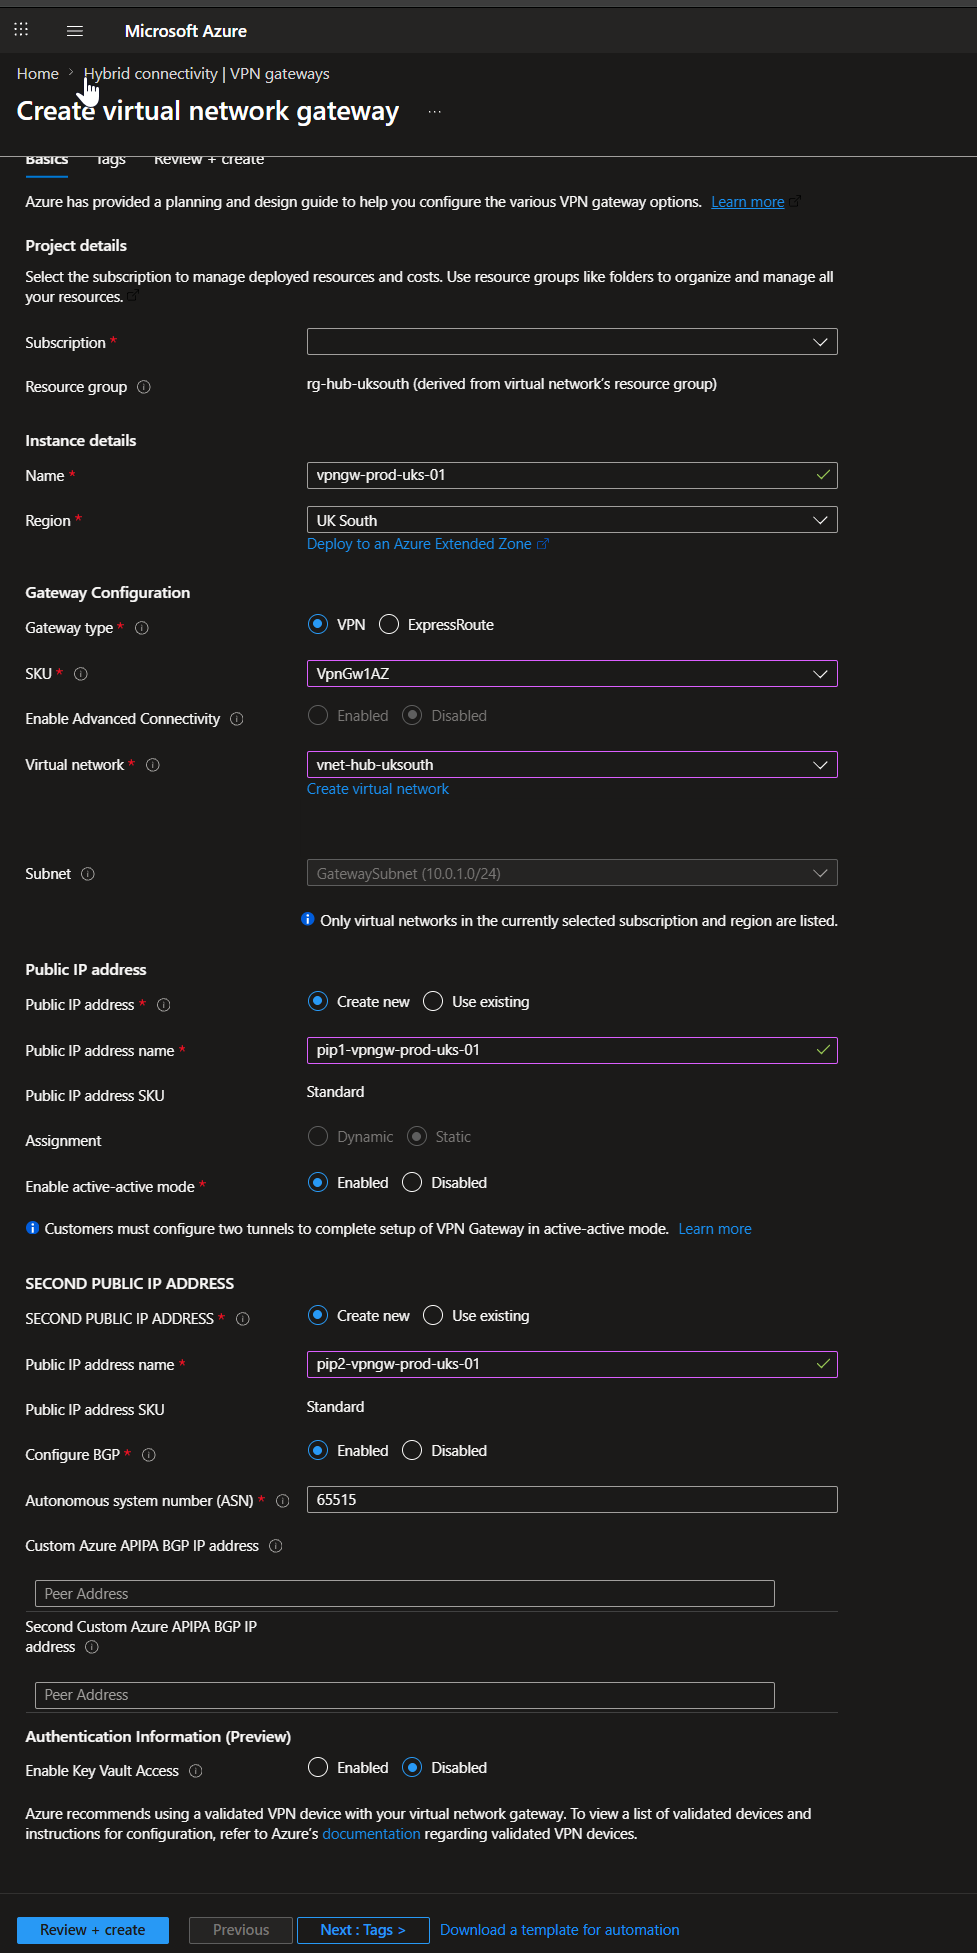
- Create the VPN Gateway as shown below.
We have deployed the VPN Gateway into our Hub Virtual Network.
- Review and create the resource.
Create Local Network Gateway
Azure Local Network Gateways are Azure resources that represent your on-premises location for routing purposes.
A Local Network Gateway needs to be created for each Site connecting to Azure.
In this case, we need to create one Local Network Gateway to connect our Azure VPN Gateway to an on-premises UniFi firewall.
In Advanced Scenarios, some Sites may need multiple Local Network Gateways where Dual ISP Tunnels/Active-Active On-Premises Firewalls are present, however this is outside of the scope of this guide.
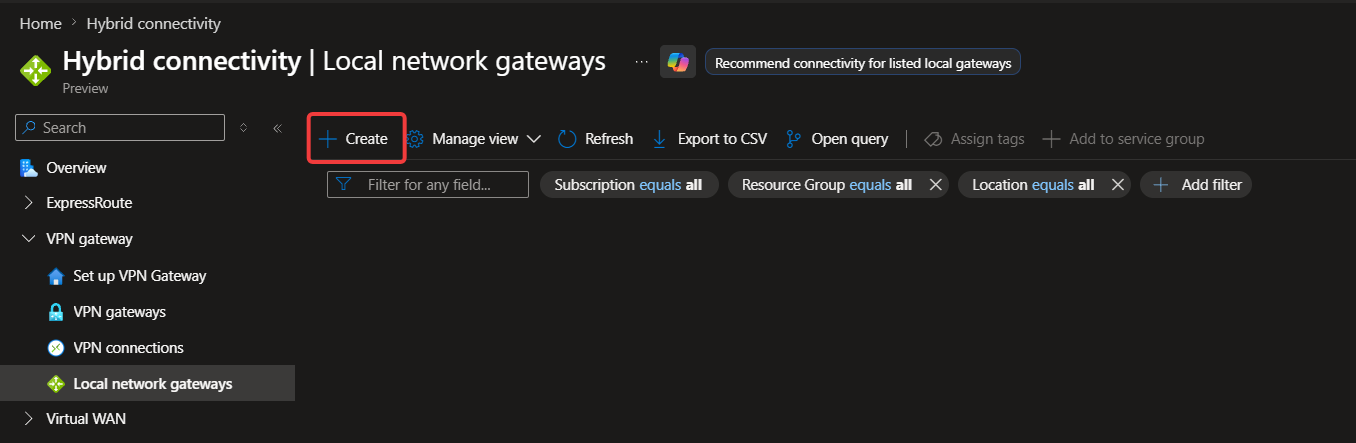
- Navigate to https://portal.azure.com/#home
- Click the Search Bar at the top of the page and type ““Local Network Gateway”
- Click “Create” to Create the Local Network Gateway Resource
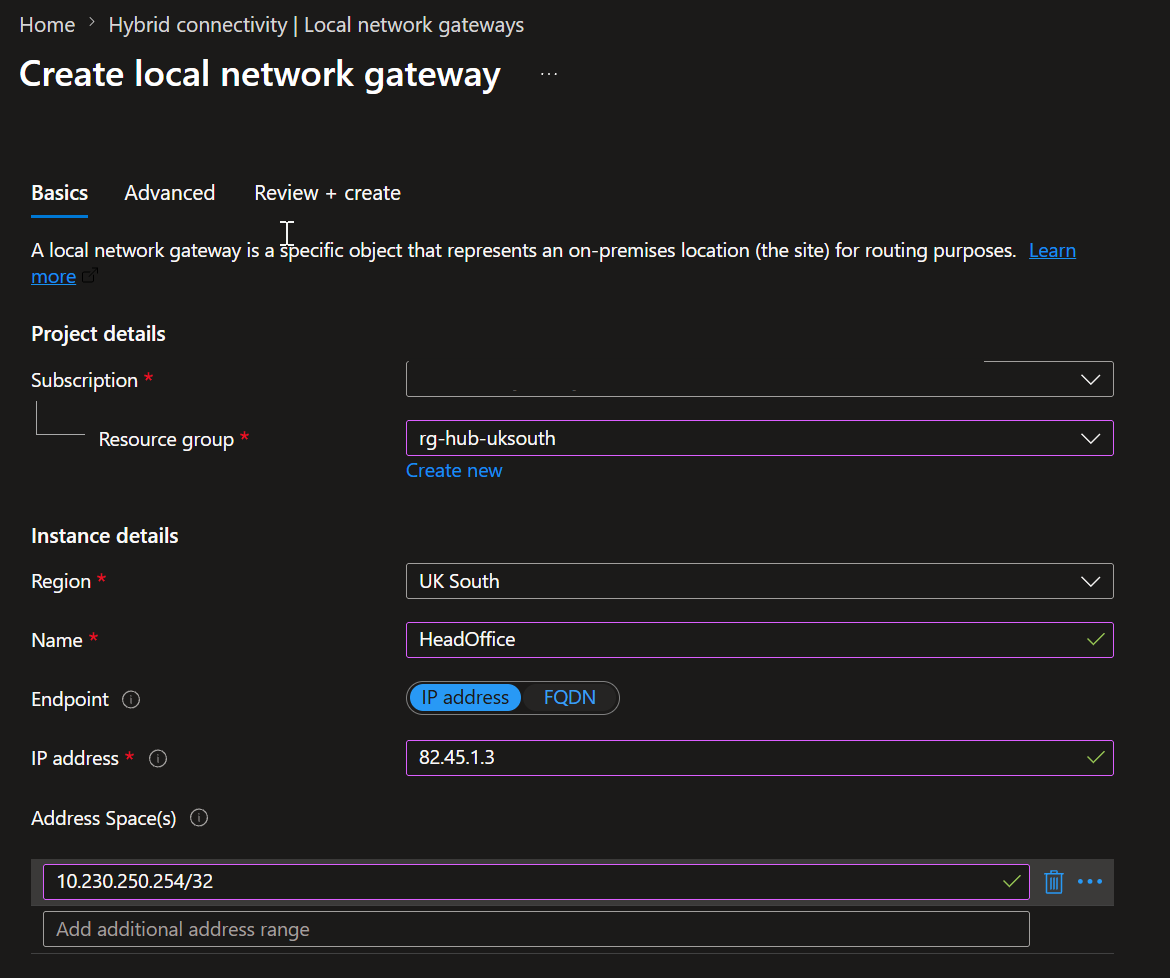
-
The Local Network Gateway should be in the same Subscription, Location and Resource Group as the VPN Gateway.
-
The Name should be something that references your on-premises site (such as Head Office).
-
The Endpoint should be your WAN Interface IP of the On-Premises Firewall.
-
If we were using Static Routing we would need to add all of the on-premises subnets into the Address Spaces Field.
We do not want to do this as we are using BGP and routes will be dynamically exchanged
In the Address Space Box, we instead add the BGP Peer IP of our on-premises device which will be used by the Azure VPN Gateway.
In this example we are using 10.230.250.254 which is the IP Address of one of our Virtual Interfaces on the Unifi Firewall
(We could use any available Virtual Interface such as 10.230.240.254)

- Click Next to go to the Advanced Tab and Configure the BGP settings.
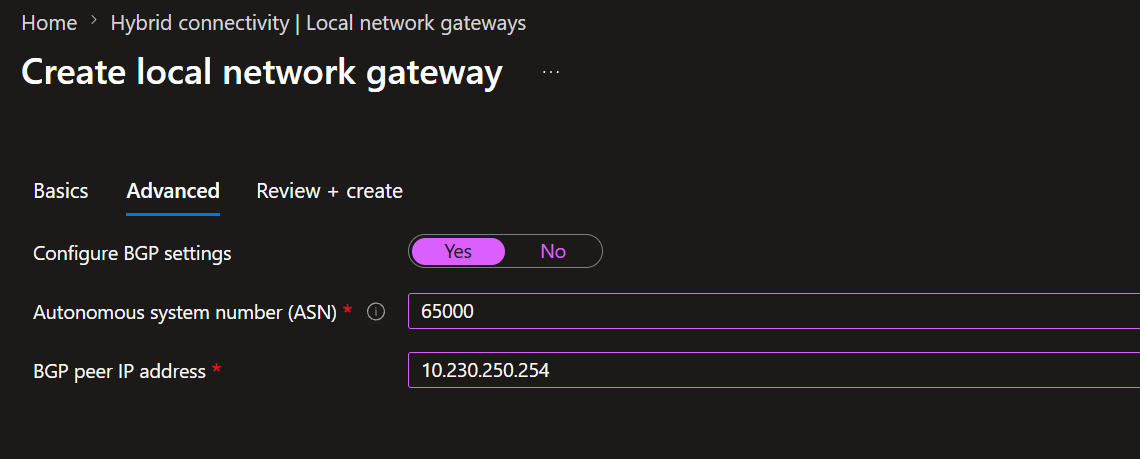
65000 is the ASN of our on-premises device
10.230.250.254 is the IP of our BGP Endpoint on the on-premises device (as explained above )
-
Review and Create the Resource.
-
Only One Local Network Gateway is required in this configuration.
Connect Local Network Gateway to Azure VPN Gateway
Now that we have the Azure VPN Gateway and Local Network Gateway in place, we can now create the VPN Connection from the Azure Side.
Once the VPN Connection is created, Azure will attempt to connect to the on-premises Network device configured in the Local Network Gateway.
- Navigate to https://portal.azure.com/#home
- Click the Search Bar at the top of the page and type “Virtual Network Gateway”, and Select the Virtual Network Gateway we created earlier.
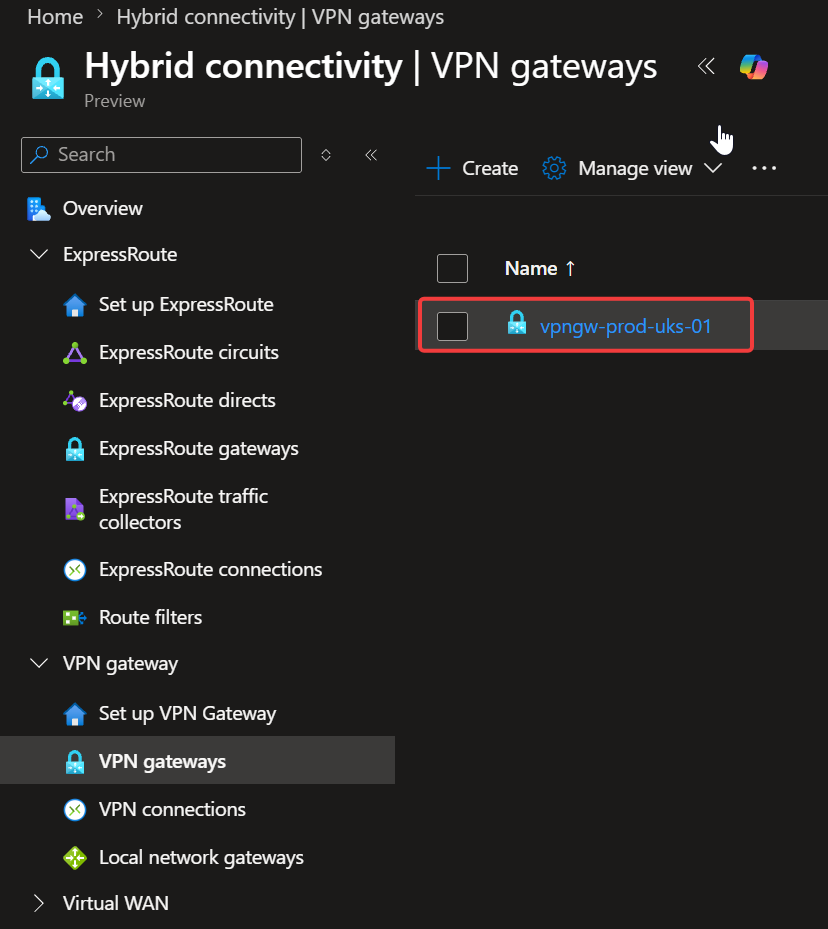
- Go to Connections, and Click “Add”
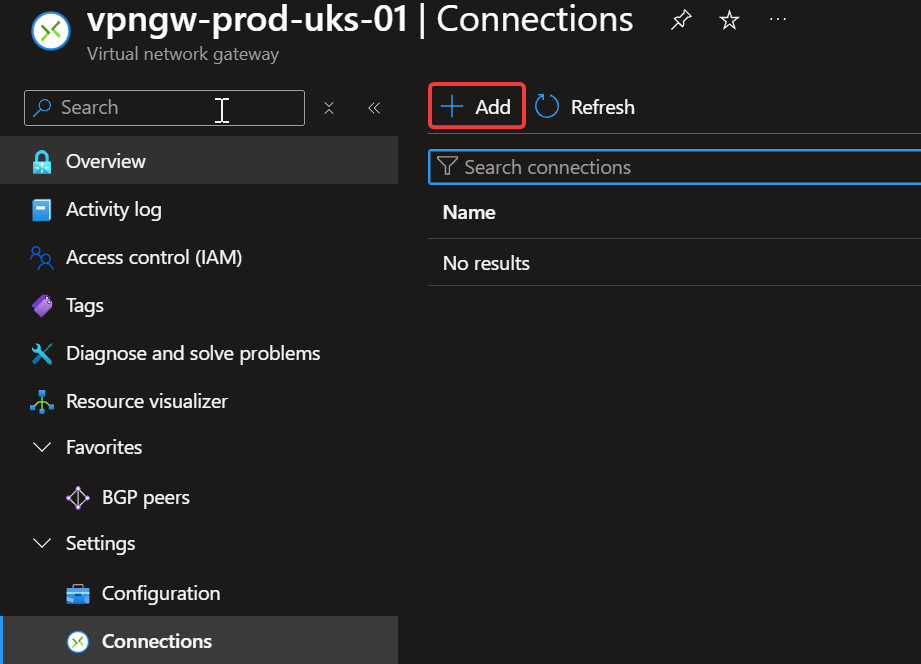
-
Complete the Basic Information as shown below. We should use the Same Subscritpion, and Resource Group as the VPN Gateway.
-
The Connection Type Should be “Site-to-Site (IPsec)”
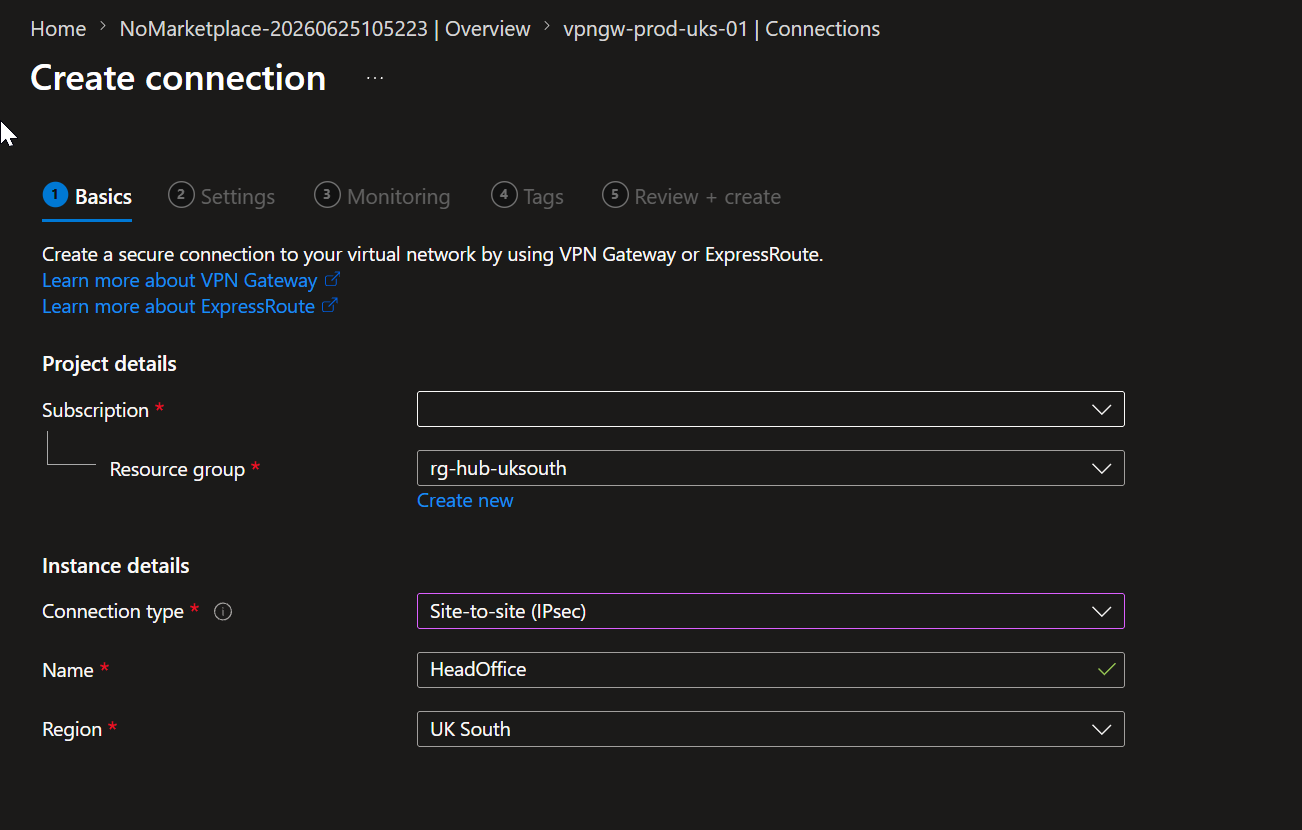
- Complete the Settings in the “Settings” Tab.
Ensure that BGP is enabled.
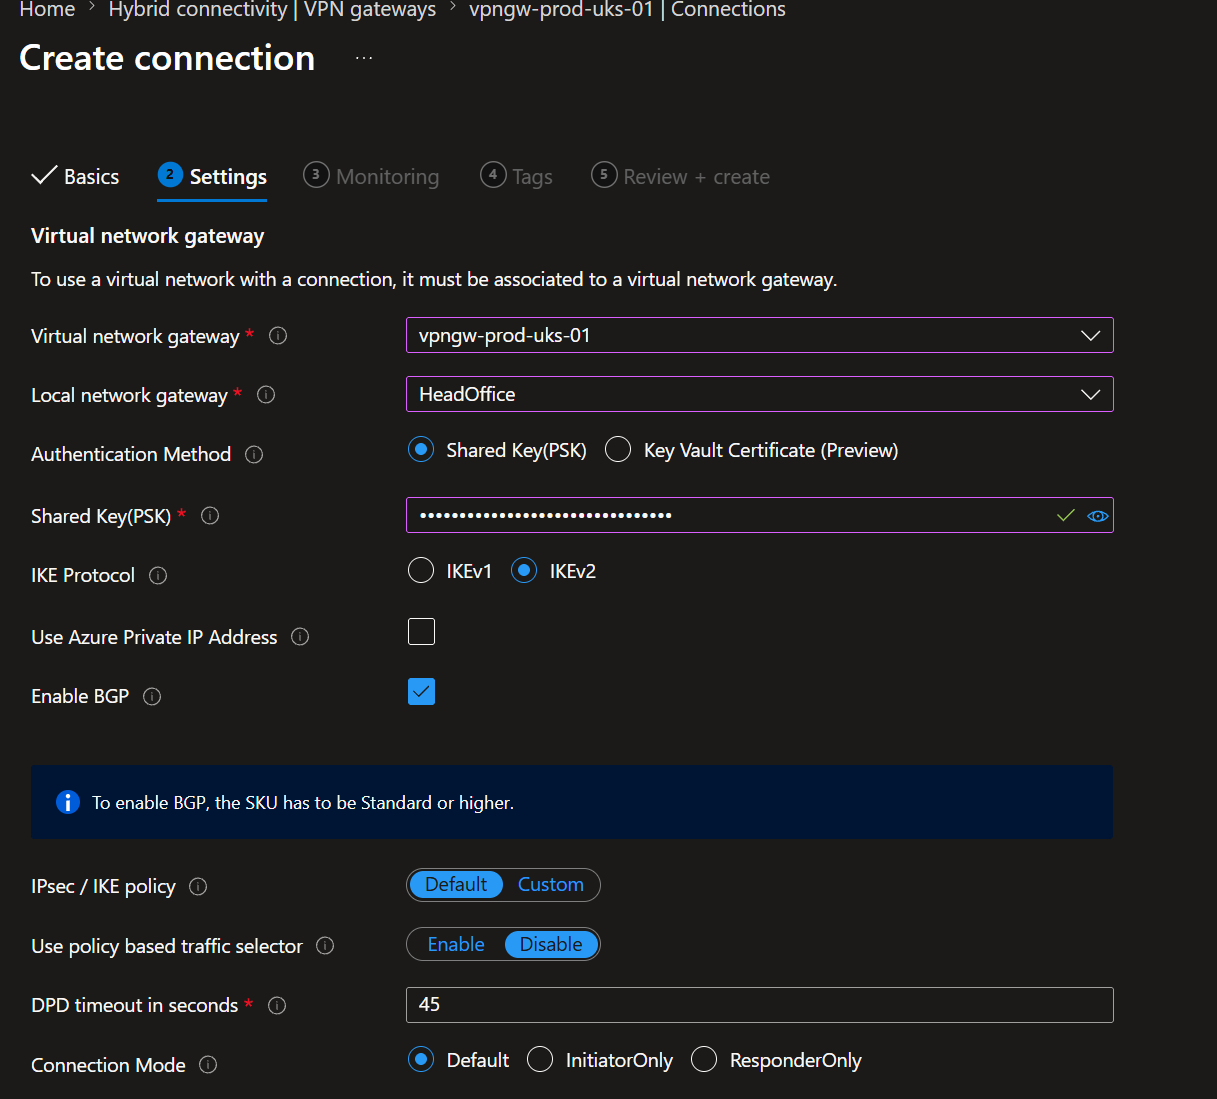
We have left the “IPsec/IKE Policy” as Default which will allow connections using the VPN Proposals shown in the following article for simplicity.
About VPN devices for connections — Azure VPN Gateway | Microsoft Learn
If preferred, you can set “IPsec/IKE Policy” to Custom and configure the specific VPN Proposal settings rather than using the Default Configuration.
-
Review and create the connection.
-
Once the Connection is created, Azure will attempt to establish an IPsec tunnel and BGP Peer with the on-premises firewall.
We can see this is currently in an “Unknown” state as we have not yet configured the IPSEC Tunnel on our on-premises Firewall.
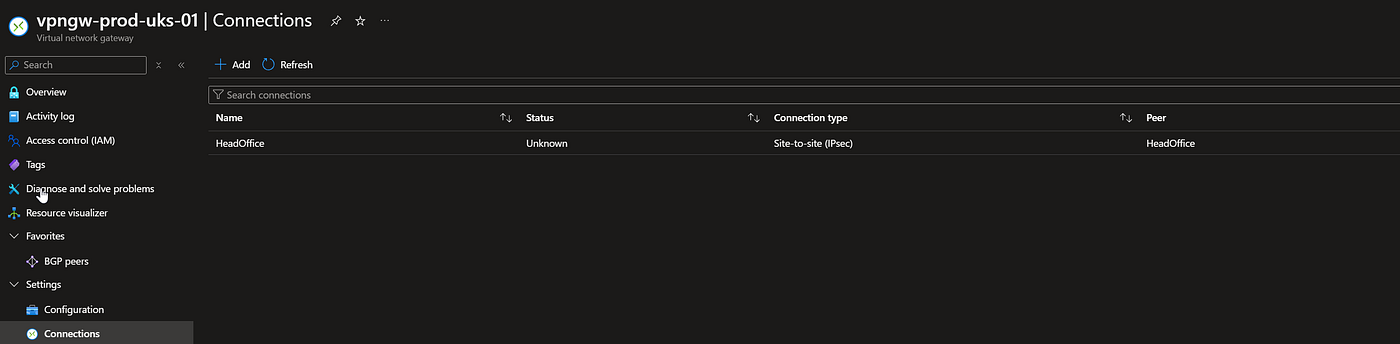
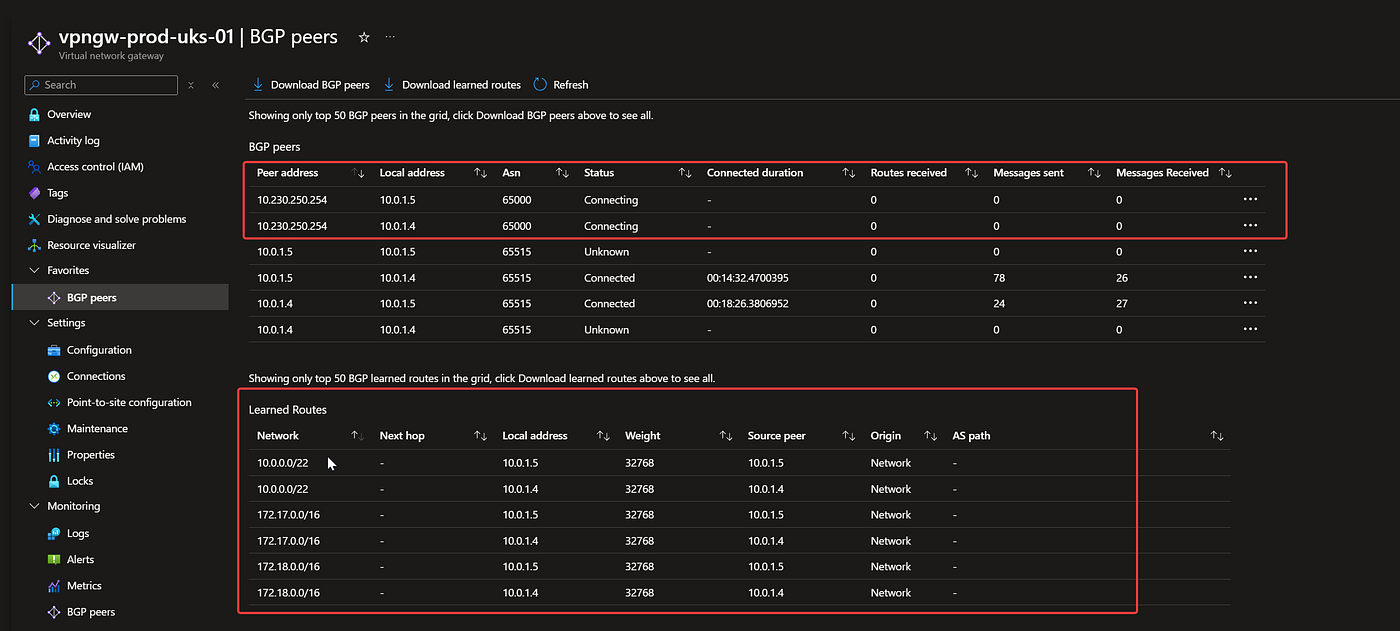
- We can also see the that the BGP Peer 10.230.250.254 is not connected, and we are not learning any routes from the ASN 65000
Configure Unifi Site-to-Site VPN with Azure.
- Navigate to the Azure VPN Gateway and note the Public IP address and BGP Peer IP Address for the Primary and Secondary Gateways.
This will be needed in the next step
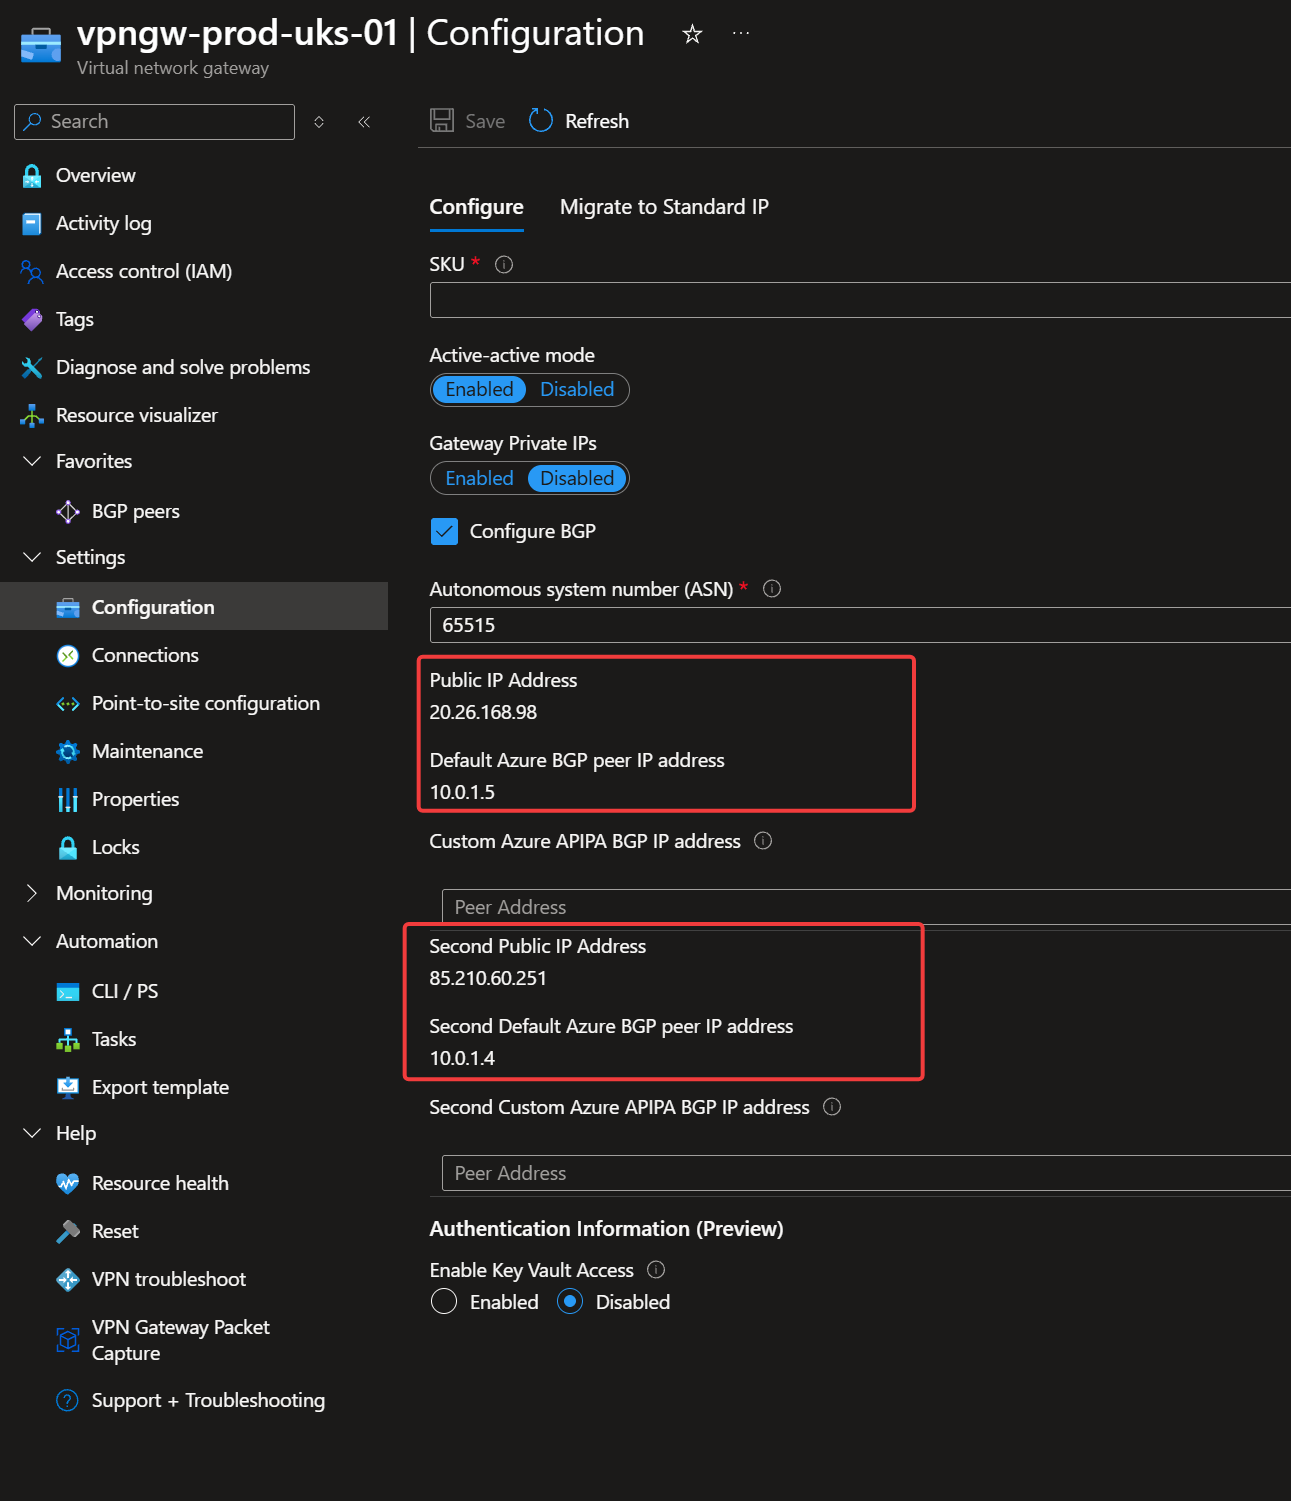
2.Login to the on-premises Unifi Firewall
- Navigate to “VPN > Site-to-Site-VPN and Click “Create New”

- Configure the Primary Site-To-Site VPN using the below example
Remote IP/ Host Name — This should be the “Public IP Address” taken from the Azure VPN Gateway.
Tunnel IP — This should be disabled.
Azure expects both VPN tunnels to establish BGP sessions using the same on-premises BGP peer address configured in the Local Network Gateway.
We are using the VLAN Interface for BGP as this is a “Shared” Interface and available to both tunnels
Remote Subnets — This should be the “Default Azure BGP peer IP address” only as the Firewall needs to know a route to reach the Azure BGP Interface.
Pre-Shared Key — This should match what was entered when we created the Azure VPN Connection
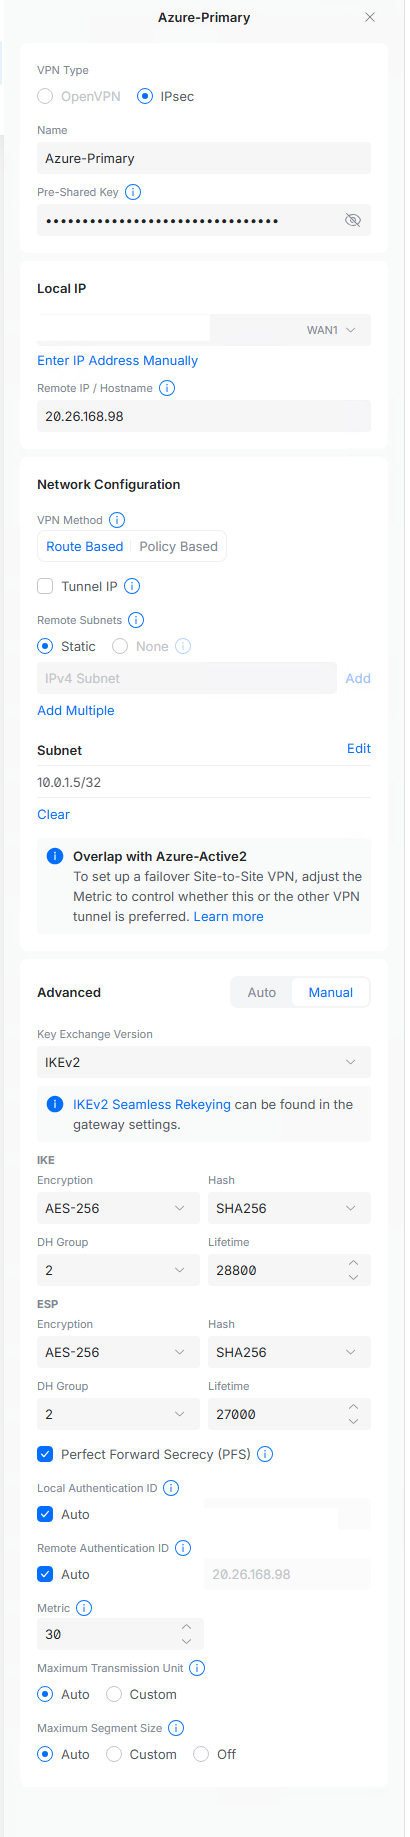
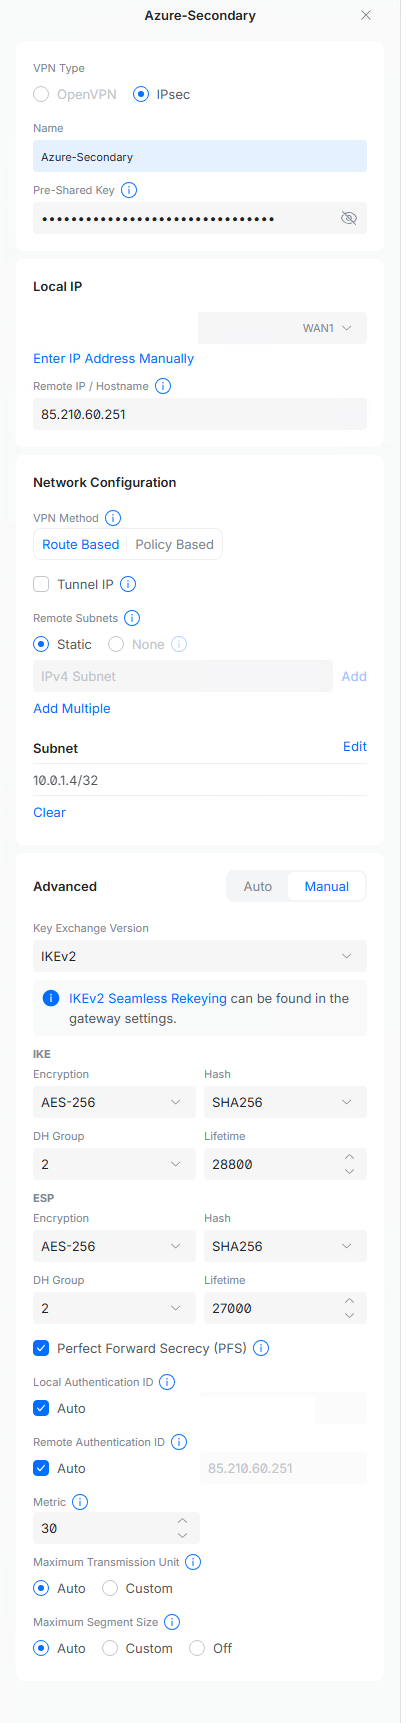
- Configure the Secondary Site-To-Site VPN using the below example
Remote IP/ Host Name — This should be the “Second Public IP Address” taken from the Azure VPN Gateway.
Tunnel IP — This should be disabled.
Azure expects both VPN tunnels to establish BGP sessions using the same on-premises BGP peer address configured in the Local Network Gateway. We are using the VLAN Interface for BGP as this is a “Shared” Interface and available to both tunnels
Remote Subnets — This should be the “Second Default Azure BGP peer IP address” only as the Firewall needs to know a route to reach the Azure BGP Interface.
Pre-Shared Key — This should match what was entered when we created the Azure VPN Connection
- Once the VPN Tunnels are created, we should see that the connection is established

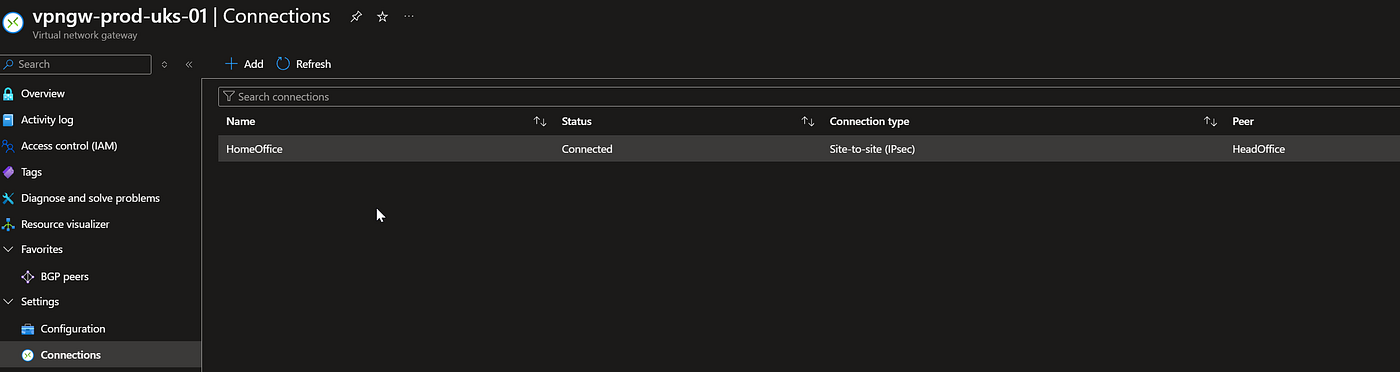
Confgure BGP on Unifi
Although the IPSEC Tunnels between the on-premises Firewall and Azure are now connected, we still need to configure BGP on the Unifi Firewall.
- Login to the on-premises Unifi Firewall
- Navigate to BGP and Click “Create New Route”
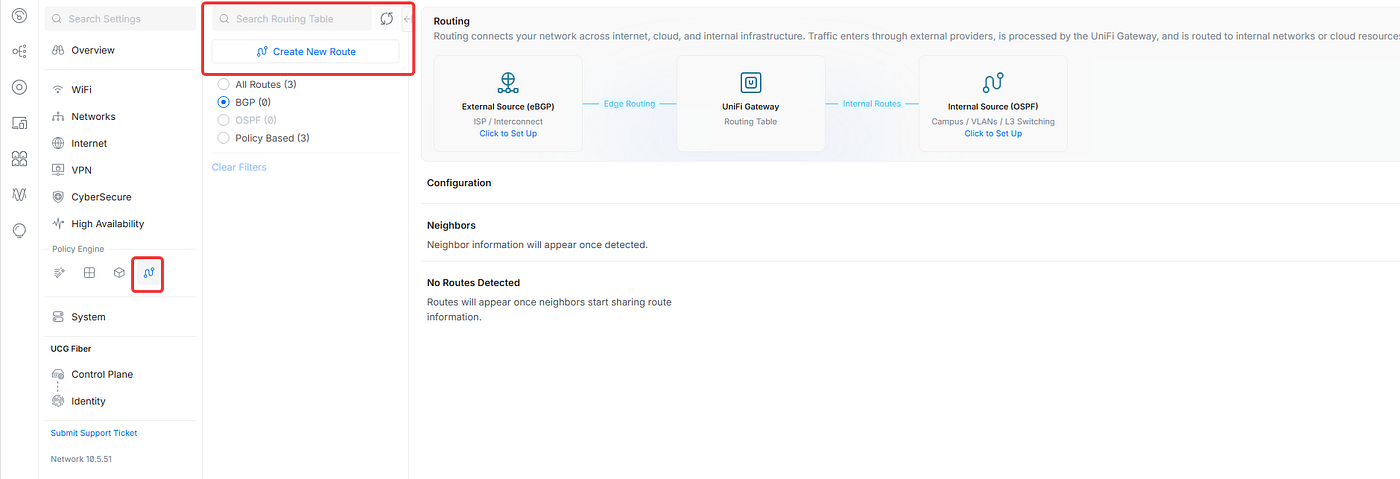
- Select “BGP” as the route type and enter a Friendly Name for the BGP Config.
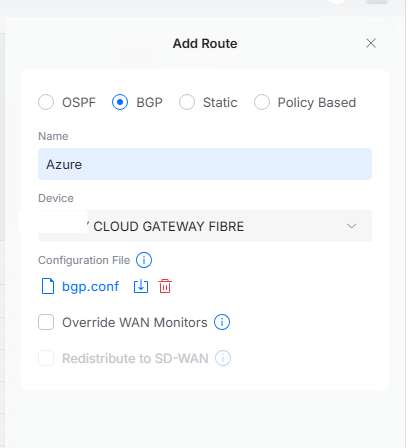
- Create a File Called “BGP.Conf” and upload your BGP Configuration.
I have provided an example Unifi BGP Configuration File.
You will need to update this to match your Azure BGP Peer IP’s and the Networks you wish to advertise to Azure.
Remove all comments (Text in Bold) before using the Example .Confg File!
router bgp 65000
# This is the ASN of our on-premises Firewall
no bgp ebgp-requires-policy
#This allows BGP to receive all routes without Filters. In Production Filters should be used to control what routes can be learned.
neighbor 10.0.1.4 remote-as 65515
#BGP IP of our Primary Azure Instance
neighbor 10.0.1.5 remote-as 65515
#BGP IP of our Secondary Azure Instance
neighbor 10.0.1.4 ebgp-multihop 10
#The Azure BGP Peer is not directly connected so we need to allow multihop
neighbor 10.0.1.5 ebgp-multihop 10
#The Azure BGP Peer is not directly connected so we need to allow multihop
address-family ipv4 unicast neighbor 10.0.1.4 soft-reconfiguration inbound neighbor 10.0.1.5 soft-reconfiguration inbound
# On-Premises Networks to Advertise over BGP network 192.168.5.0/24 network 10.230.240.0/24 network 10.190.190.0/24 network 10.230.250.0/24 network 10.191.191.0/24
- If Configured Correctly, we should learn the Routes from our Azure Hub VNET and the attached Spokes Via BGP.
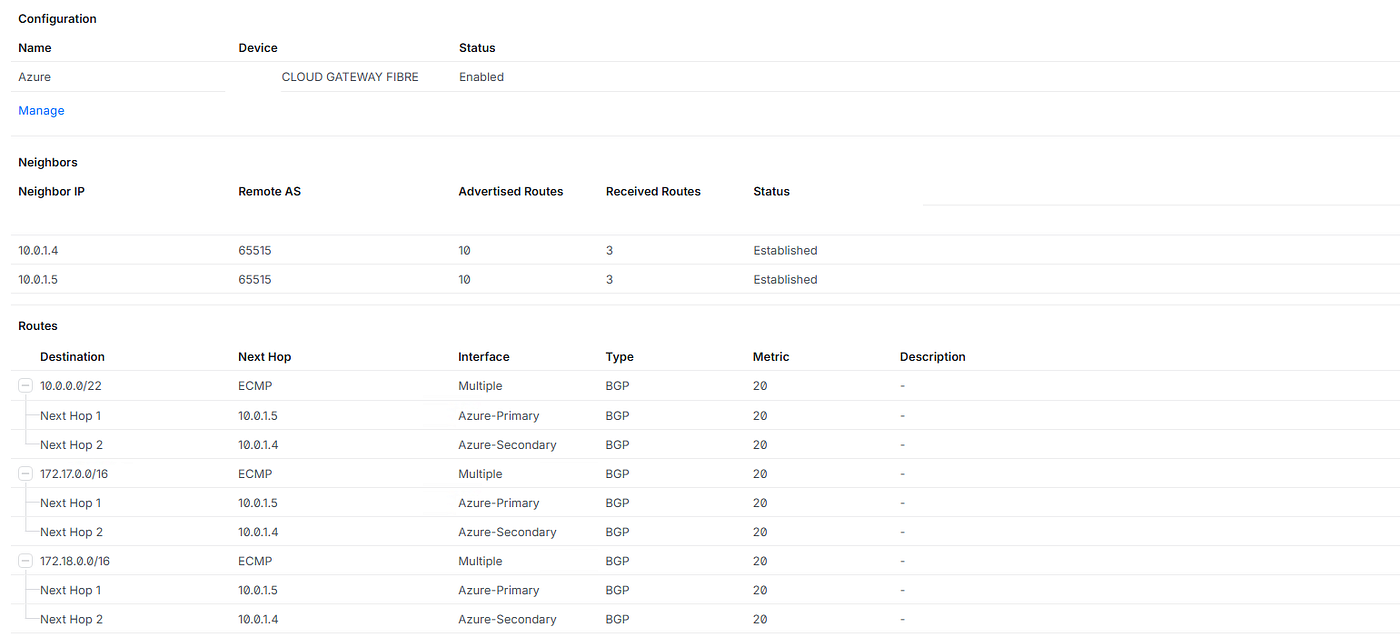
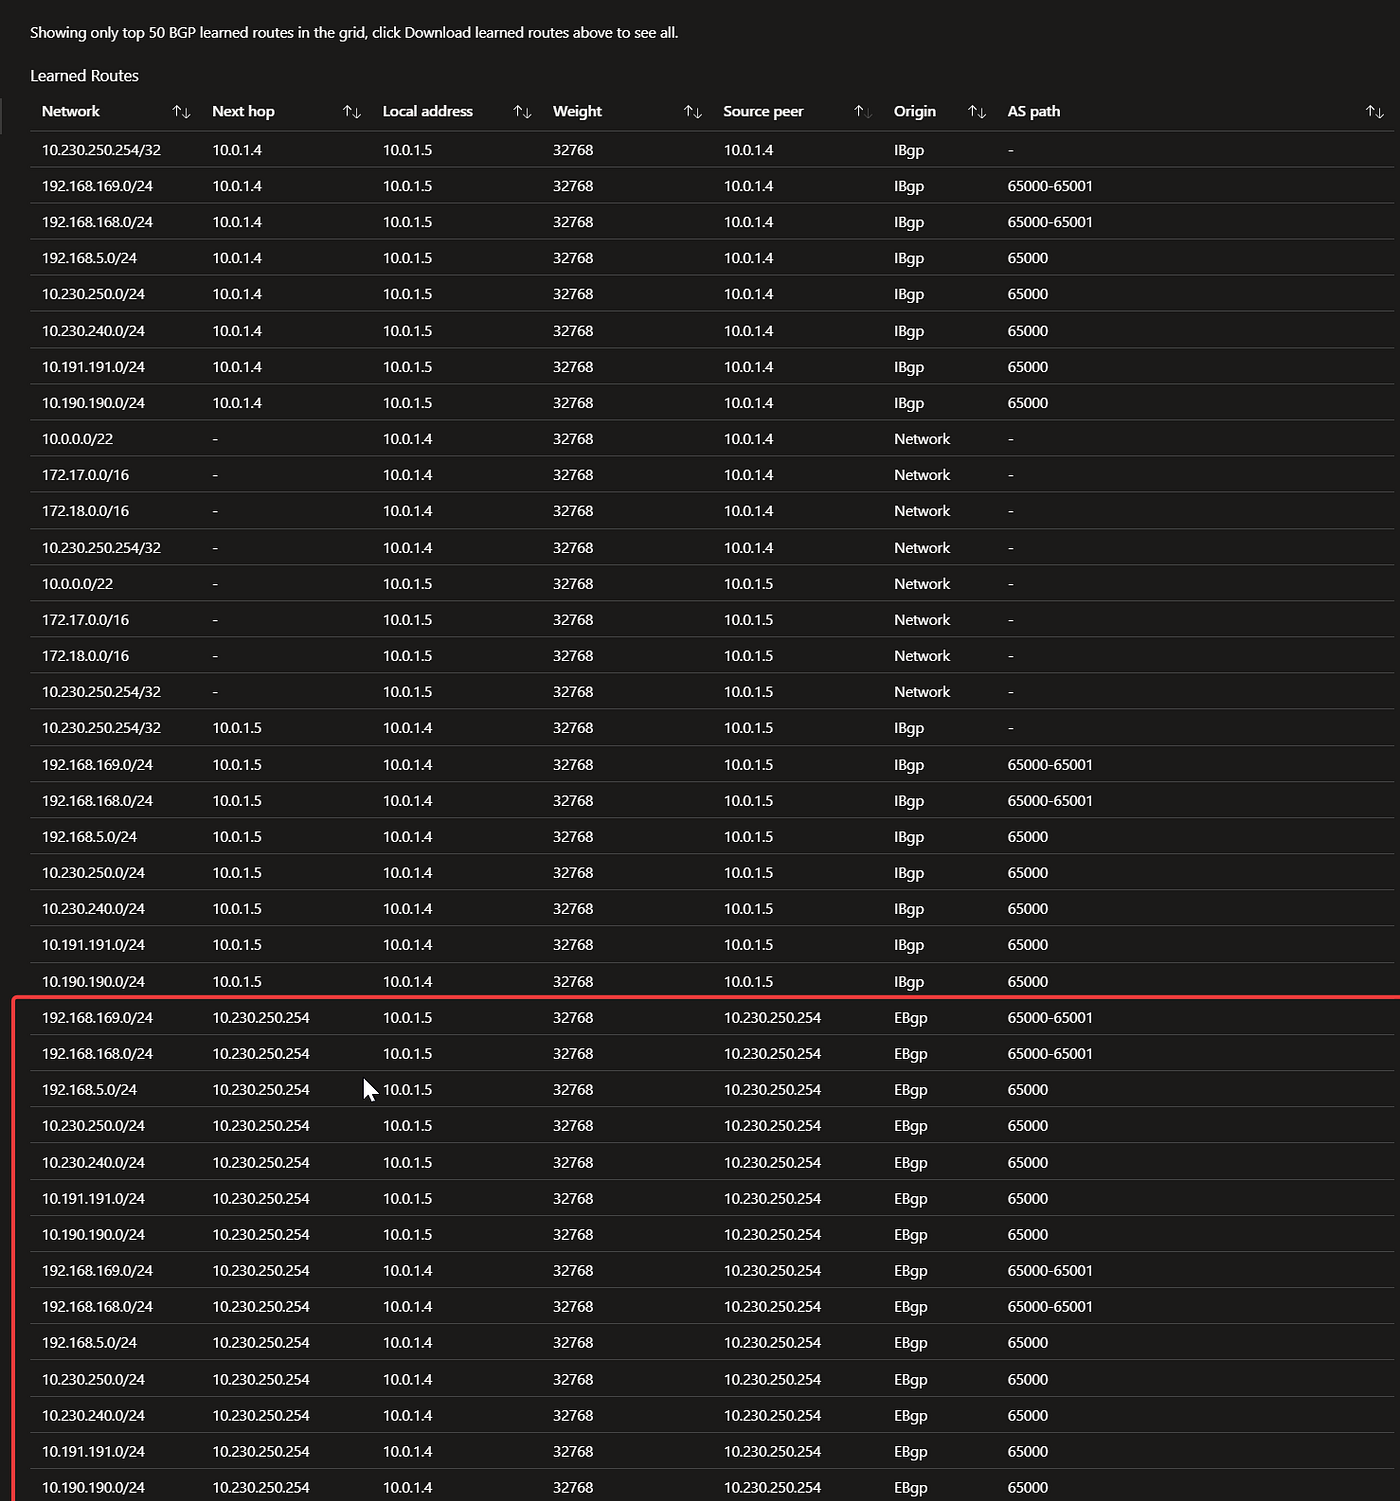
- We can see from the Above Screenshots that our on-premises Firewall has the next hop as “ECMP” and Azure Learns each route twice (one for each tunnel).
This is expected and confirms our BGP configuration is correct.
If you only learn the route once, or Unifi Shows only a specific tunnel as the Next Hop instead of ECMP, you likely have a configuration issue with one of your IPSEC tunnels or BGP peers.
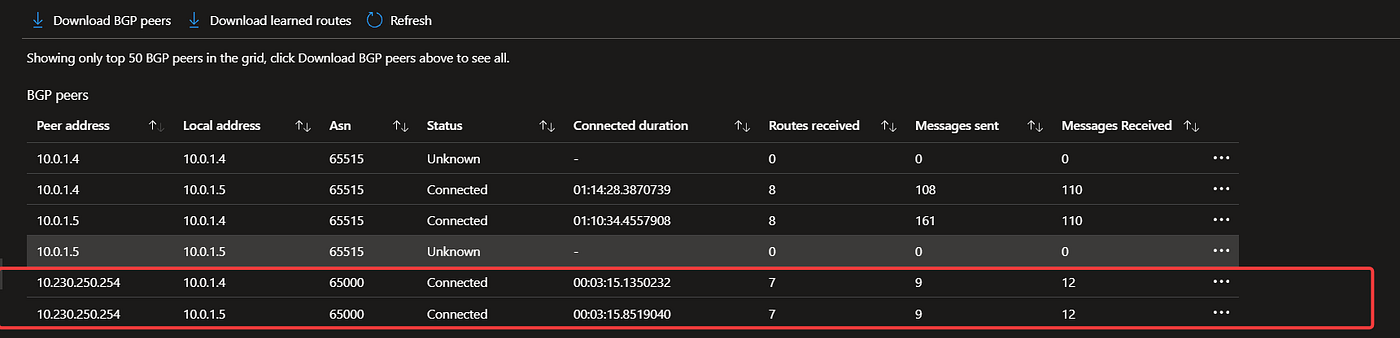
- The BGP Peer in Azure should show as Connected to the on-premises BGP Peer IP for both Connections.
메타데이터
- post_id
- eaefc2a8a2b4
- slug
- configure-azure-active-active-vpn-with-bgp-unifi-eaefc2a8a2b4
- url
- https://medium.com/@garryevanson18/configure-azure-active-active-vpn-with-bgp-unifi-eaefc2a8a2b4
- canonical_url
- https://medium.com/@garryevanson18/configure-azure-active-active-vpn-with-bgp-unifi-eaefc2a8a2b4
- author_url
- https://medium.com/@garryevanson18
- status
- ok
- fetched_at
- 2026-07-09 17:36:58


