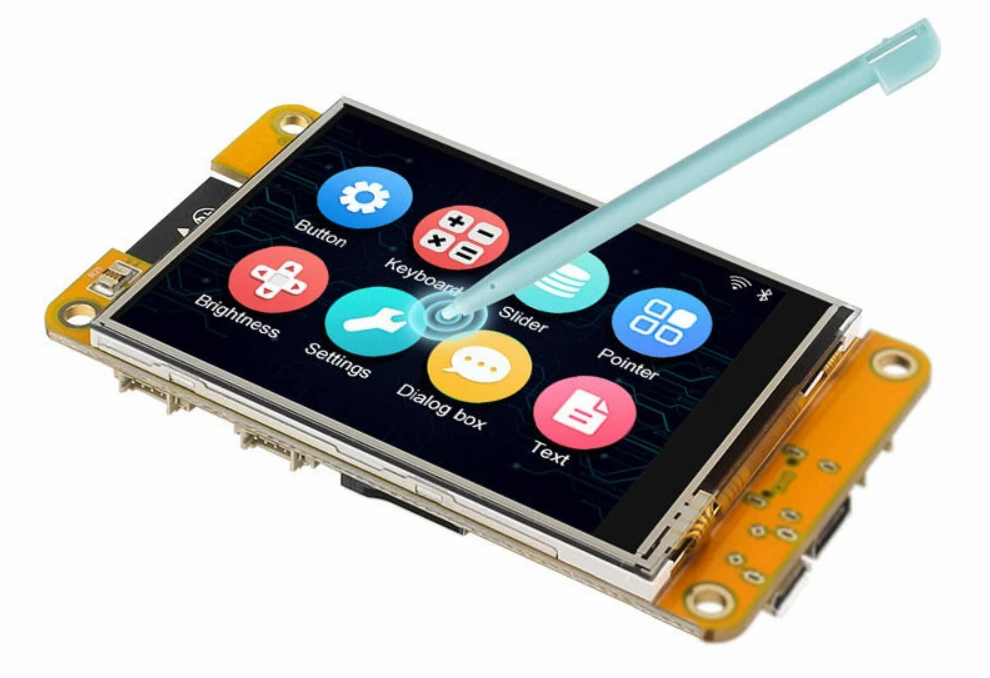
บทที่ 19 ESP32 การแสดงผล 7-Segment 4 DIGIT (TM1637)
📺 📟 🌏ในบทนี้จะนำเสนอการแสดงผลออกทาง 7-Segment หรือ LED 7 ส่วน จำนวน 4 หลัก
บทที่ 19 ESP32 การแสดงผล 7-Segment 4 DIGIT (TM1637)
📺 📟 🌏ในบทนี้จะนำเสนอการแสดงผลออกทาง 7-Segment หรือ LED 7 ส่วน จำนวน 4 หลัก

IoT Education Kit
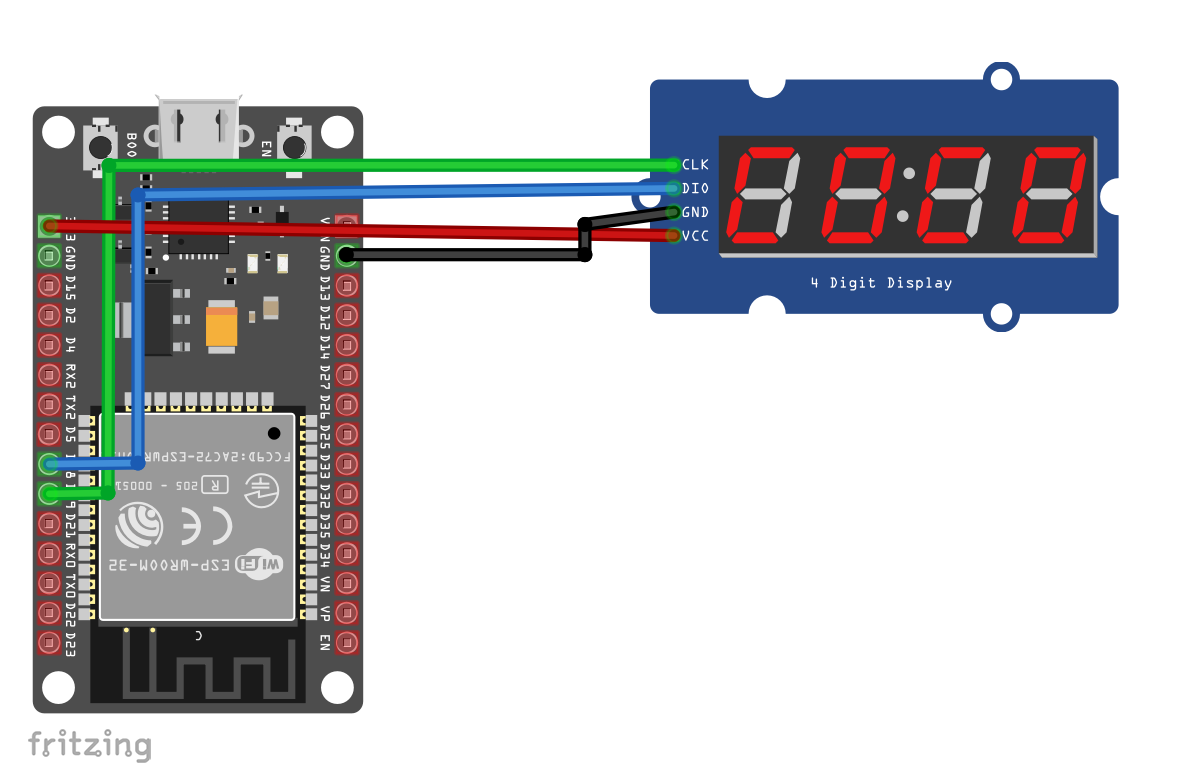
การเชื่อมต่อจอ 7-Segment กับบอร์ด ESP32 จะใช้สายสัญญาณจำนวน 4 เส้น โดยมีการเชื่อมต่อ ดังนี้
CLK — ขา 19
DIO - ขา 18
GND- GND
VCC — 3V3
ขั้นตอนต่อไป จะเป็นการติดตั้งไลบรารี่ ของจอ 7-Segment ในโปรแกรม Arduino IDE ซึ่งมีขั้นตอนดังนี้
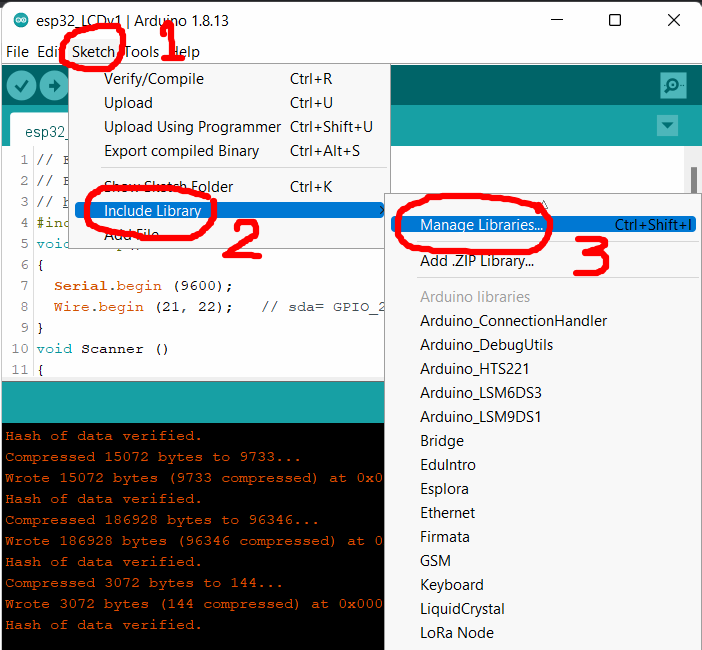
- ไปที่เมนู Sketch เลือก Include Library จากนั้นกดที่เมนู Manage Libraries
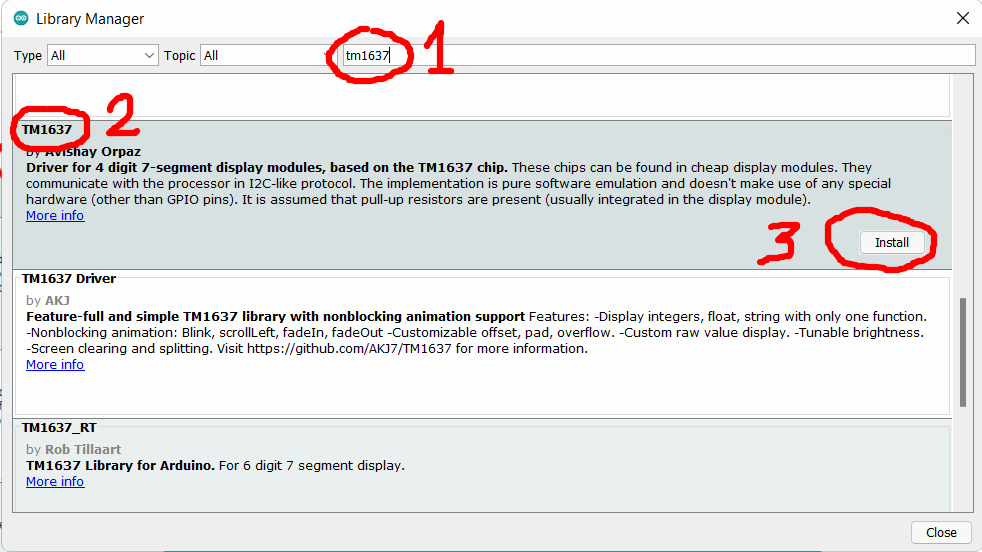
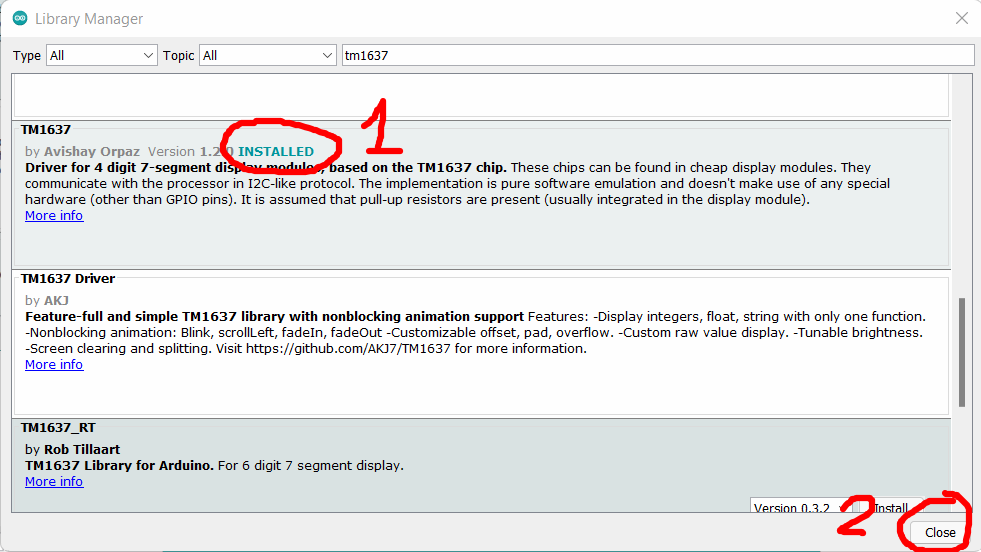
2.พิมพ์ tm1637 ในช่องค้นหา และหาไลบรารี่ TM1637 จากนั้นกดปุ่ม Install
- เมื่อติดตั้งเสร็จจะแสดงข้อความ Installed ให้กดปุ่ม close ได้เลย
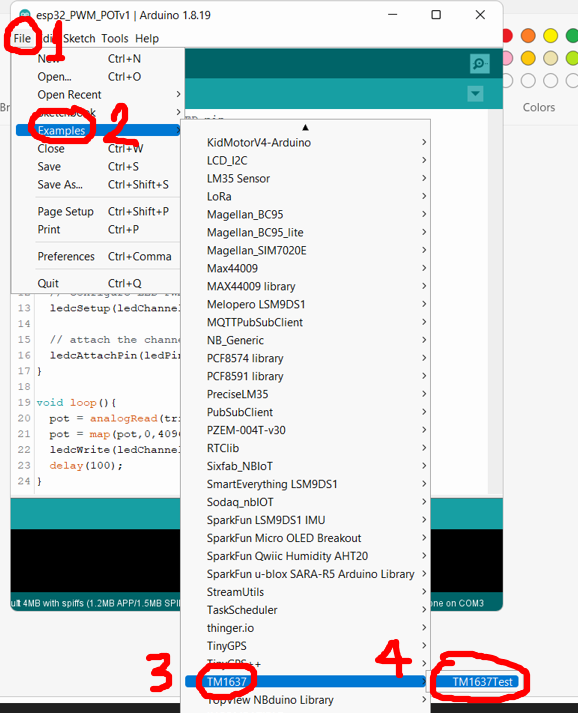
- ขั้นตอนเปิดไฟล์ตัวอย่าง เข้าเมนู File เลือก Example >TM1637 กดที่ TM1637Test
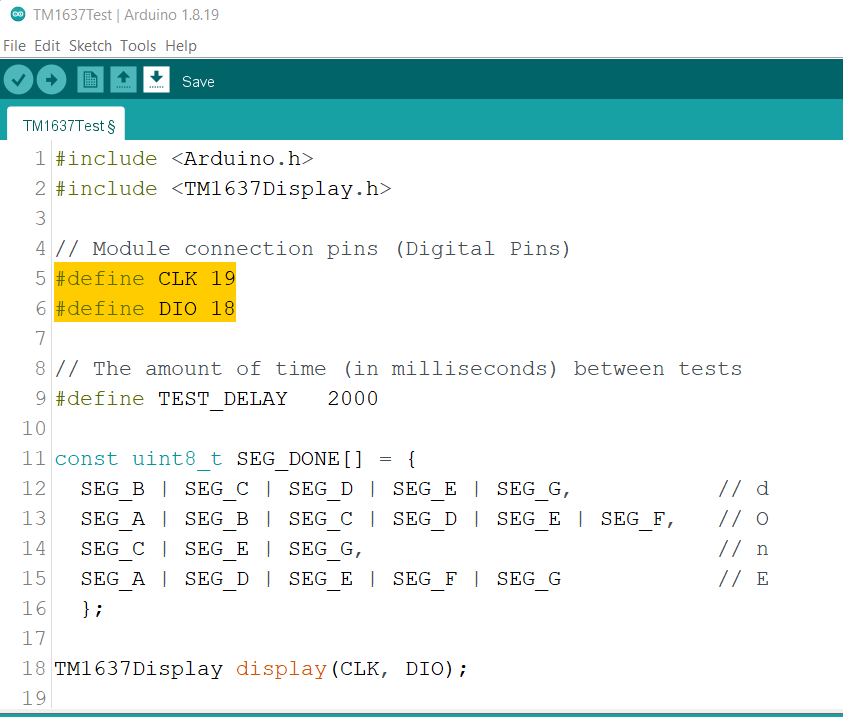
- กำหนดค่าตำแหน่งขา ขา CLK = 19 และ ขา DIO = 18
- จากนั้นให้ UPLOAD โค้ดได้เลยครับ
[embed]บทที่ 19 ESP32 การแสดงผล 7-Segment Edit descriptionyoutube.com
- ต่อไปทดสอบแสดงตัวเลข 0–9 บนจอ 7-Segment
/*******************************************************************
* Mr.Narin Damnuy (KruRin)
* Technology Computer
* Phatthalung Technical College
* fb.com/damnuy : LineID:damnuy27
* Free License
*******************************************************************/
#include <Arduino.h>
#include <TM1637Display.h>
#define CLK 19
#define DIO 18
TM1637Display display(CLK, DIO);
void setup() {
  display.setBrightness(0x0f);      //ปรับความสว่าง
}
void loop() {
  for(int i = 0 ; i <= 9 ; i++){    //คำสั่ง for วนลูป 10 รอบ
    display.showNumberDec(i, false);  //คำสั่งแสดงตัวเลขบนจอ 7-Segment
    delay(500);
  }
}- จากนั้นให้ UPLOAD โค้ดได้เลยครับ
[embed]
- ต่อไปทำการต่อสวิตช์จำนวน 3 ตัว เพื่อทดสอบการกดนับขึ้น และ นับลง
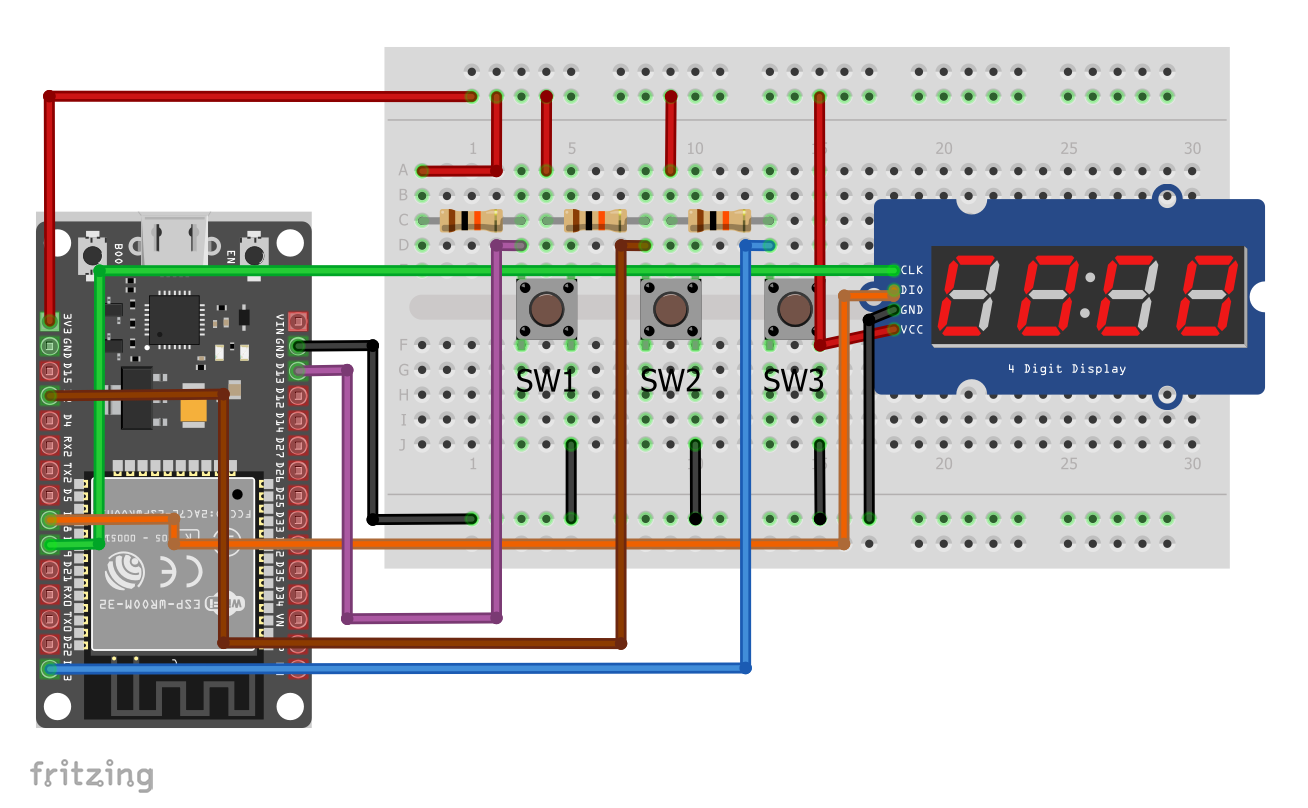
- ใช้คำสั่งต่อไปนี้ เมื่อกด SW1 ตัวเลขจะนับขึ้น และ กด SW2 ตัวเลขจะนับลง
/*******************************************************************
* Mr.Narin Damnuy (KruRin)
* Technology Computer
* Phatthalung Technical College
* fb.com/damnuy : LineID:damnuy27
* Free License
*******************************************************************/
#include <Arduino.h>
#include <TM1637Display.h>
#define CLK 19
#define DIO 18
#define SW1 13
#define SW2 5
#define SW3 23
int num = 0;
TM1637Display display(CLK, DIO);
void setup() {
  display.setBrightness(0x0f);
  pinMode(SW1,INPUT);
  pinMode(SW2,INPUT);
  pinMode(SW3,INPUT);
  display.showNumberDec(num, false);
}
void loop() {
  if(!digitalRead(SW1)){
    num++;
    while(!digitalRead(SW1)){delay(10);}
  }
  if(!digitalRead(SW2)){
    num--;
    while(!digitalRead(SW2)){delay(10);}
  }
  display.showNumberDec(num, false);
}- จากนั้นให้ UPLOAD โค้ดได้เลยครับ
[embed]
ขอบคุณที่รับชมครับผม

สนันสนุน KruRin ในการเขียนบทความ เลี้ยงกาแฟซักแก้วครับ กดที่นี่

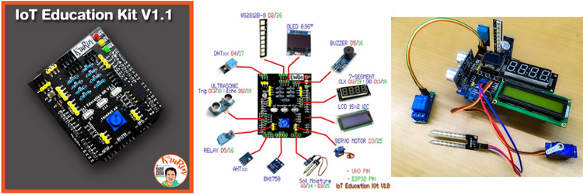
สนใจบอร์ด IoT Education Kit V1.1
สั่งซื้อใน Shopee ที่ลิ้งค์ด้านล่างได้เลยครับผม
https://shopee.co.th/narindamnuy
หรือ กด ที่นี่
บทต่อไป กดลิ้งค์ด้านล่างเลยครับ
메타데이터
- post_id
- ebcd8fcde00a
- slug
- บทที่-19-esp32-การแสดงผล-7-segment-4-digit-tm1637-ebcd8fcde00a
- url
- https://medium.com/@KruRin/%E0%B8%9A%E0%B8%97%E0%B8%97%E0%B8%B5%E0%B9%88-19-esp32-%E0%B8%81%E0%B8%B2%E0%B8%A3%E0%B9%81%E0%B8%AA%E0%B8%94%E0%B8%87%E0%B8%9C%E0%B8%A5-7-segment-4-digit-tm1637-ebcd8fcde00a
- canonical_url
- https://medium.com/@KruRin/%E0%B8%9A%E0%B8%97%E0%B8%97%E0%B8%B5%E0%B9%88-19-esp32-%E0%B8%81%E0%B8%B2%E0%B8%A3%E0%B9%81%E0%B8%AA%E0%B8%94%E0%B8%87%E0%B8%9C%E0%B8%A5-7-segment-4-digit-tm1637-ebcd8fcde00a
- author_url
- https://medium.com/@KruRin
- status
- ok
- fetched_at
- 2026-07-26 23:38:14