Building a Production-Grade AI Coding Agent in the Terminal: A Deep Dive into RobCode
How I architected a multi-model, streaming, billing-ready AI coding assistant that lives in your terminal — powered by Bun, React, OpenTUI…
Building a Production-Grade AI Coding Agent in the Terminal: A Deep Dive into RobCode
How I architected a multi-model, streaming, billing-ready AI coding assistant that lives in your terminal — powered by Bun, React, OpenTUI, Hono, Clerk, Polar, and the Vercel AI SDK.

AI coding agents have exploded in popularity. From GitHub Copilot to Cursor to Claude Code, developers now expect AI assistance deeply integrated into their workflow. But most of these tools are either SaaS products you subscribe to or IDE plugins with limited customization. What if you wanted to build your own — one that you fully control, runs in the terminal, supports multiple AI providers, has real billing, and persists sessions? That’s exactly what RobCode is.
In this post, I’ll walk through the architecture, design decisions, and implementation details of RobCode — a terminal-based AI coding agent I built from the ground up. Whether you’re curious about building AI tooling or want to understand how production coding agents work under the hood, this deep dive is for you.
Table of Contents
- High-Level Architecture
- The Terminal UI: React in Your Terminal
- Plan vs Build: The Dual-Mode System
- Tool System: How the Agent Interacts with Your Codebase
- Streaming AI Responses
- Authentication: Clerk OAuth with PKCE
- Billing: Credits-Based Metering with Polar
- Multi-Model Support
- Session Persistence
- The Command Palette
- Key Technical Decisions and Trade-offs
- Conclusion
High-Level Architecture
RobCode is a monorepo organized as four packages under Bun workspaces. At a 10,000-foot view, the system is split into interconnected domains:
- The Terminal (CLI): Runs the OpenTUI React interface, handles all local tool execution (like file reads, writes, and shell commands), and manages local authentication state (~/.robcode/auth.json).
- The Server (Hono): A centralized API running on port 3000 that processes requests from the CLI. It relies on middleware for authentication and credit balances, handles AI streaming routes, manages session CRUD operations, and coordinates billing logic.
- External Services: The server orchestrates API calls to Clerk for OAuth, Polar for billing, and Anthropic or OpenAI for LLM generation.
- The Database: A PostgreSQL database (hosted on Neon) accessed via Prisma to persist user sessions and conversation histories.
The architecture follows a client-heavy pattern: the server handles authentication, AI model orchestration, and billing, while the CLI handles all local codebase interaction directly on the user’s machine. The CLI authenticates with the Server using a Bearer JWT. This design keeps sensitive code on the user’s device and reduces server-side complexity.
Package Breakdown
PackageRoleKey Technologies@robcode/cliTerminal UI, local tool execution, authOpenTUI, React, AI SDK@robcode/serverAPI, AI streaming, billing ingestionHono, AI SDK, Clerk SDK, Polar SDK@robcode/databaseSchema, Prisma clientPrisma, PostgreSQL@robcode/sharedShared types, schemas, tool contractsZod, AI SDK
The Terminal UI: React in Your Terminal
One of the most striking aspects of RobCode is that its entire UI is built with React — but rendered in the terminal, not a browser. This is possible thanks to OpenTUI, a library that provides a React reconciler for terminal rendering.
// packages/cli/src/index.tsx
import { createCliRenderer } from "@opentui/core";
import { createRoot } from "@opentui/react";
import { createMemoryRouter, RouterProvider } from "react-router";

const router = createMemoryRouter([
  {
    path: "/",
    element: <RootLayout />,
    children: [
      { index: true, element: <Home /> },
      { path: "sessions/new", element: <NewSession /> },
      { path: "sessions/:id", element: <Session /> },
    ]
  }
]);
const renderer = await createCliRenderer({ targetFps: 60, exitOnCtrlC: false });
createRoot(renderer).render(<RouterProvider router={router} />);
This means you get all the benefits of React’s component model — providers, hooks, context, routing — in a terminal application. The component tree looks remarkably like a web app:
// packages/cli/src/layouts/root-layout.tsx
export function RootLayout() {
  return (
    <ThemeProvider>
      <ToastProvider>
        <KeyboardLayerProvider>
          <DialogProvider>
            <PromptConfigProvider>
              <ThemedRoot>
                <Outlet />
              </ThemedRoot>
            </PromptConfigProvider>
          </DialogProvider>
        </KeyboardLayerProvider>
      </ToastProvider>
    </ThemeProvider>
  );
}
Provider Stack Explained
- ThemeProvider — Manages color themes with a context-based API
- ToastProvider — Shows transient notifications (login success, errors)
- KeyboardLayerProvider — Handles layered keyboard shortcuts (base layer vs dialog layer)
- DialogProvider — Manages modal dialogs for agent selection, model picking, session browsing
- PromptConfigProvider — Tracks current mode (PLAN/BUILD) and selected model
The Input Bar: More Than Just Text
The input-bar.tsx component is a sophisticated piece of terminal UI engineering. It supports:
- @mention file autocompletion — Type @ followed by a path fragment, and it scans the current project directory to suggest files and folders
- /command palette — Type / to access commands like /new, /agents, /models, /login, /upgrade
- Multi-line input — The textarea grows as you type longer prompts
The mention system walks the filesystem in real-time, filtering entries that match your query while respecting .gitignore-like exclusions (node_modules):
// Simplified mention candidate resolution
async function getMentionCandidates(query: string): Promise<MentionCandidate[]> {
  const normalizedQuery = query.startsWith("./") ? query.slice(2) : query;
  // ... walks directory, filters hidden files and node_modules
  // Returns sorted { path, kind: "file" | "directory" } entries
}
Plan vs Build: The Dual-Mode System
RobCode operates in two distinct modes, allowing users to toggle seamlessly between different permission states. This design prevents the AI from accidentally modifying files when you just want analysis.
- PLAN Mode: The agent is locked down. It is restricted to read-only operations, allowing it to read files, list directory contents, and run searches (glob/grep) to formulate a strategy.
- BUILD Mode: The agent is fully armed. It retains all PLAN mode capabilities but gains the ability to write files, edit strings, and execute bash scripts.
The mode is defined in the shared package and enforced on both client and server:
// packages/shared/src/schemas.ts
export const Mode = {
  BUILD: "BUILD",
  PLAN: "PLAN",
} as const;

export const readOnlyToolContracts = {
  readFile: tool({ /* ... */ }),
  listDirectory: tool({ /* ... */ }),
  glob: tool({ /* ... */ }),
  grep: tool({ /* ... */ }),
};
export const buildToolContracts = {
  ...readOnlyToolContracts,
  writeFile: tool({ /* ... */ }),
  editFile: tool({ /* ... */ }),
  bash: tool({ /* ... */ }),
};
On the client side, local-tools.ts enforces mode restrictions:
export async function executeLocalTool(toolName: string, input: unknown, mode: ModeType) {
  if (mode === Mode.PLAN && !["readFile", "listDirectory", "glob", "grep"].includes(toolName)) {
    throw new Error(`Tool ${toolName} is not available in PLAN mode`);
  }
  // ... execute tool
}
The system prompt also adapts per mode. In PLAN mode, the AI is instructed to analyze and propose — never modify. In BUILD mode, it’s told to implement changes directly and verify its work.
Critical Safety Design: Path Sandboxing
Every tool that interacts with the filesystem goes through resolveInsideCwd:
function resolveInsideCwd(path: string) {
  const cwd = process.cwd();
  const resolved = resolve(cwd, path);
  const rel = relative(cwd, resolved);

if (rel.startsWith("..") || isAbsolute(rel)) {
    throw new Error("Path is outside the project directory");
  }
  return { cwd, resolved };
}
This ensures the AI can never escape the project directory — no reading /etc/passwd, no writing to ~/.ssh. The editFile tool goes further by requiring the oldString to be unique in the file, preventing ambiguous edits:
const occurrences = content.split(oldString).length - 1;
if (occurrences === 0) throw new Error("oldString not found in file");
if (occurrences > 1) throw new Error(`oldString is ambiguous; found ${occurrences} matches`);
Tool Execution Flow
The key insight of RobCode is that tools execute on the client, not the server. This coordination requires a specific step-by-step flow:
- User Prompt: The user types a message into the CLI.
- API Request: The CLI sends the conversation messages, selected mode, and model to the Server via POST /chat.
- AI Generation Begins: The Server combines the system prompt, user messages, and available tools, and calls the AI Model using streamText.
- Tool Intent: The AI decides a tool call is needed and streams that intent back to the Server, which instantly passes it down to the CLI.
- Local Execution: The CLI detects the tool call (onToolCall), securely executes the requested action (like reading a file or running bash) locally on the user’s File System, and captures the result.
- Result Submission: The CLI sends the captured tool output back to the Server via the addToolOutput hook.
- AI Resumes: The Server passes the real-world tool result back to the AI model so it can process the information.
- Final Response: The AI streams its final, compiled response back to the user, after which the Server saves the session and charges the relevant billing credits.
This means file contents never leave your machine except to be sent to the AI provider, shell commands run in your actual terminal environment, and the server remains entirely stateless regarding file access.
Streaming AI Responses
RobCode uses the Vercel AI SDK’s streamText for real-time streaming:
const result = streamText({
  model: resolvedModel.model,
  system: buildSystemPrompt({ mode }),
  messages: modelMessages,
  tools,
  providerOptions: resolvedModel.providerOptions,
  onFinish(event) {
    completedUsage = event.totalUsage;
  },
});

return result.toUIMessageStreamResponse({
  originalMessages: nextMessages,
  messageMetadata({ part }) {
    if (part.type === "start") return { mode, model };
    if (part.type !== "finish") return undefined;
    return {
      mode, model,
      durationMs: Date.now() - startTime,
      ...(completedUsage ? { usage: completedUsage } : {}),
    };
  },
  async onFinish(event) {
    // Persist full conversation to database
    // Ingest billing usage
  },
});
Message Merging Strategy
One subtle but important detail is how RobCode handles message updates. When the client sends messages, the server merges them with previously persisted messages:
// packages/server/src/routes/chat.ts:94-112
const previousMessages = Array.isArray(session.messages)
  ? (session.messages as unknown as robcodeUIMessage[])
  : [];
const mergedMessages = [...previousMessages];

for (const message of messages) {
  const existingMessageIndex = mergedMessages.findIndex((m) => m.id === message.id);
  if (existingMessageIndex === -1) {
    mergedMessages.push(message);
  } else {
    mergedMessages[existingMessageIndex] = message; // Update in place
  }
}
This deduplication ensures that tool call results and streaming updates replace their previous partial states without creating duplicate messages.
Tool Call Auto-Continuation
When the AI returns a message with pending tool calls, RobCode automatically sends the tool results back. This is handled by the AI SDK’s sendAutomaticallyWhen hook:
const chat = useAiChat({
  transport,
  onToolCall({ toolCall }) {
    void executeLocalTool(toolCall.toolName, toolCall.input, mode)
      .then((output) => chat.addToolOutput({ tool: toolCall.toolName, toolCallId: toolCall.toolCallId, output }))
      .catch((error) => chat.addToolOutput({ tool: toolCall.toolName, toolCallId: toolCall.toolCallId, state: "output-error", errorText: error.message }));
  },
  sendAutomaticallyWhen: lastAssistantMessageIsCompleteWithToolCalls,
});
The server also checks for pending tool calls before finalizing a session update. If the last message still has unresolved tool calls (state is not output-available or output-error), it skips persistence and billing — the message is still in flight.
Authentication: Clerk OAuth with PKCE
Authenticating a CLI application is notoriously tricky. You can’t use traditional web OAuth redirects because there’s no browser context. RobCode solves this with a clever Authorization Code with PKCE flow:
- Preparation: The CLI generates a PKCE code_verifier, a code_challenge, and a random nonce to prevent Cross-Site Request Forgery (CSRF).
- Local Server: The CLI spins up a temporary local Bun server on a random, available port.
- Browser Redirect: The CLI automatically opens the user’s default web browser to the Clerk authorize URL. Crucially, it passes a state parameter containing the local callback port and nonce.
- User Authenticates: The user logs in through Clerk’s secure UI in their browser.
- Server Callback: Upon success, Clerk redirects the browser to the Hono Server’s /auth/callback route, attaching the authorization code and the untouched state parameter.
- Local Handoff: The Server decodes the state parameter, extracts the CLI’s local port, and redirects the browser one final time to http://localhost:{port}/callback.
- Token Exchange: The CLI receives the code on its local server, immediately shuts the server down, and posts the code alongside the code_verifier back to Clerk in exchange for a valid access token.
- Persistence: The token is safely saved locally, and the browser displays a success message letting the user know they can close the tab.
The state parameter is the key innovation. It’s a base64url-encoded JSON payload containing:
// packages/cli/src/lib/oauth.ts
type OAuthState = {
  nonce: string;  // Prevents CSRF
  port: number;   // Where the CLI's callback server is listening
};
The Hono server at /auth/callback simply decodes the state, extracts the port, and redirects the browser to the CLI’s local callback server:
const [encoded] = state.split(".");
const payload = JSON.parse(Buffer.from(encoded, "base64url").toString());
const port = payload.port;
const redirectUrl = `http://localhost:${port}/callback?code=${encodeURIComponent(code)}&state=${encodeURIComponent(state)}`;
return c.redirect(redirectUrl);
The token is persisted to ~/.robcode/auth.json with restrictive permissions (0o600 for the file, 0o700 for the directory) so other users on the same machine can’t read it.
On every API request, the CLI’s api-client.ts reads the token and attaches it as a Bearer header. If a 401 is received, it automatically clears the stored token.
On the server side, the requireAuth middleware uses Clerk’s authenticateRequest to validate OAuth tokens:
export const requireAuth = createMiddleware(async (c, next) => {
  const auth = await authenticateOAuthRequest(c.req.raw);
  if (!auth) return c.json({ error: "Unauthorized" }, 401);
  c.set("userId", auth.userId);
  await next();
});
Billing: Credits-Based Metering with Polar
RobCode implements a production-ready billing system using Polar. The model is credit-based metering:
The Credits Model
1 credit = $0.01 USD. This peg makes credits intuitive (like cents) while remaining granular enough for small AI usage:
// packages/server/src/lib/credits.ts
const USD_PER_CREDIT = 0.01;

function convertUsdToCredits(estimatedCostUsd: number) {
  if (estimatedCostUsd <= 0) return 0;
  return Math.max(1, Math.ceil(estimatedCostUsd / USD_PER_CREDIT));
}
Each model has its own pricing in the shared registry:
// packages/shared/src/models.ts
export const SUPPORTED_CHAT_MODELS = [
  { id: "claude-opus-4-6", provider: "anthropic",
    pricing: { inputUsdPerMillionTokens: 5, outputUsdPerMillionTokens: 25 } },
  { id: "gpt-5.4", provider: "openai",
    pricing: { inputUsdPerMillionTokens: 2.5, outputUsdPerMillionTokens: 15 } },
  // ... more models
];
After each AI response completes, the usage is calculated and ingested:
// packages/server/src/routes/chat.ts (onFinish handler)
const billableUsage = calculateCreditsForUsage({
  provider: resolvedModel.provider,
  model: resolvedModel.modelId,
  usage: completedUsage,
});

await ingestAiUsage({
  externalCustomerId: userId,
  eventId: `chat-message:${event.responseMessage.id}`,
  credits: billableUsage.credits,
});
Credit Gating
Before creating a session or sending a chat message, the requireCreditsBalance middleware checks if the user has any credits left:
const creditsBalance = await getAvailableCreditsBalance(userId);
if (creditsBalance <= 0) {
  return c.json({ error: "No credits remaining. Run /upgrade to buy more credits." }, 402);
}
This is a simple launch-time gate — it checks that credits exist before starting work but doesn’t reserve the full eventual cost. For low-volume apps, this is pragmatic and sufficient.
Checkout and Customer Portal
The billing routes provide two endpoints:
- POST /billing/checkout — Creates a Polar checkout session for purchasing credits
- POST /billing/portal — Opens the Polar customer portal for managing subscriptions
Both are triggered from the CLI’s command menu via /upgrade and /billing commands.
Multi-Model Support
RobCode supports six models across two providers with provider-specific configurations:
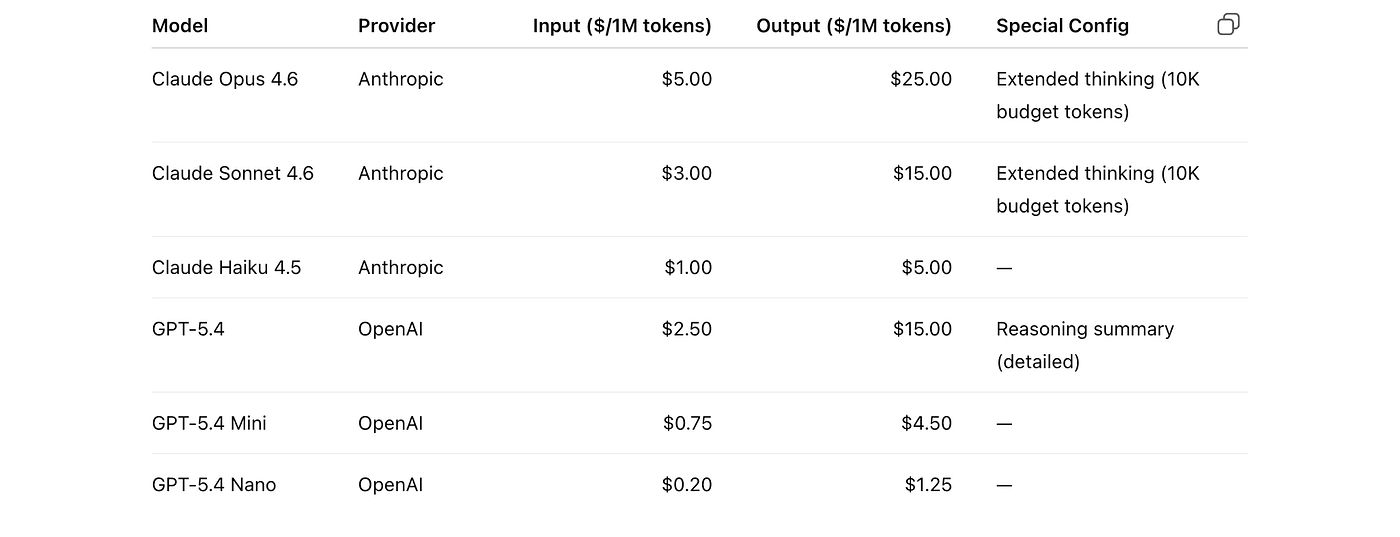
The model resolution system in models.ts maps model IDs to provider-specific SDK instances with optional configurations:
const ANTHROPIC_PROVIDER_OPTIONS = {
  "claude-opus-4-6": {
    anthropic: { thinking: { type: "enabled", budgetTokens: 10000 } }
  },
};

const OPENAI_PROVIDER_OPTIONS = {
  "gpt-5.4": {
    openai: { thinking: { reasoningSummary: "detailed" } }
  },
};
The UI lets users switch models dynamically via the /models command, which opens a dialog listing all available models. The default is Claude Opus 4.6.
Session Persistence
All conversations are persisted to PostgreSQL via Prisma. The schema is intentionally simple:
prisma

// packages/database/prisma/schema.prisma
model Session {
  id        String   @id @default(cuid())
  userId    String
  title     String
  createdAt DateTime @default(now())
  updatedAt DateTime @updatedAt
  messages  Json     @default("[]")
@@index([userId])
}
The entire conversation history is stored as a JSON column — an array of AI SDK UIMessage objects. This design trades some relational queryability for flexibility; since messages are always loaded and saved as a complete array, there’s no need for a separate Message table.
Sessions are scoped to users via a userId index, and all queries include a userId filter to prevent cross-user access.
The Command Palette
The command menu is activated by typing / in the input bar. It provides quick access to common operations:
CommandDescription/newStart a new conversation/agentsSwitch between PLAN and BUILD mode/modelsSelect AI model/sessionsBrowse and resume past sessions/themeChange color theme/loginSign in via browser OAuth/logoutClear stored credentials/upgradePurchase more credits/billingOpen billing portal
The command system is built on a typed interface:
type Command = {
  name: string;
  description: string;
  value: string;
  action: (ctx: CommandContext) => void | Promise<void>;
};
Filtering is done client-side with fuzzy matching, and the UI renders a scrollable list with keyboard navigation (arrow keys + enter) and mouse support.
Key Technical Decisions and Trade-offs
1. Client-Side Tool Execution
Decision: Tools execute on the CLI, not the server.
Trade-off: This keeps file contents local and reduces server complexity, but means the CLI must be running for tool execution to work. It also means tool execution speed depends on the user’s machine, which is usually a benefit, not a drawback.
2. JSON Message Storage
Decision: Store entire conversation as a JSON array in a single column.
Trade-off: Simpler schema, no joins needed. But you lose the ability to query individual messages, and the JSON column can grow large for long conversations. For a terminal-based tool with typically focused sessions, this is a reasonable trade-off.
3. Launch-Time Credit Gating
Decision: Check credit balance before starting work, don’t reserve estimated costs.
Trade-off: Simple implementation but allows edge-case overspend. For a low-volume, single-developer tool, this is pragmatic. A high-volume SaaS would need a reservation system.
4. Bun as Runtime
Decision: Use Bun throughout — for the CLI binary, the server runtime, and the package manager.
Trade-off: Bun provides excellent performance, native TypeScript support, and built-in tools (Glob, spawn, serve). The trade-off is a smaller ecosystem compared to Node.js, but for this use case, everything needed was available.
5. React in the Terminal
Decision: Use OpenTUI to render React components in the terminal.
Trade-off: The developer experience is fantastic — you write React like you would for a web app. But terminal rendering has constraints (fixed character grid, limited color support) that require different thinking about layout and interaction patterns.
Conclusion
RobCode demonstrates that building a production-grade AI coding agent is achievable with modern tools and thoughtful architecture. The combination of Bun, React (via OpenTUI), Hono, the Vercel AI SDK, Clerk, and Polar creates a stack that’s both powerful and developer-friendly.
Key takeaways from building RobCode:
- The AI SDK does the heavy lifting — Streaming, tool calling, message validation are all handled by streamText, validateUIMessages, and convertToModelMessages. You focus on your tools and business logic.
- Client-side tools are simpler and more secure — Running tools on the CLI avoids building a sandboxed server-side execution environment and keeps user code on their machine.
- Dual-mode is essential — Separating PLAN (read-only) from BUILD (read-write) prevents accidents and gives users confidence when they just want analysis.
- PKCE + local callback server is a clean CLI auth pattern — The state-parameter-as-port-carrier trick elegantly solves the CLI OAuth redirect problem without requiring a separate desktop app.
- Credits-based metering with Polar is surprisingly straightforward — Once the meter is configured, billing becomes a matter of calculating usage and calling polar.events.ingest().
메타데이터
- post_id
- 2e76d0621b37
- slug
- building-a-production-grade-ai-coding-agent-in-the-terminal-a-deep-dive-into-robcode-2e76d0621b37
- url
- https://medium.com/@robin5002234/building-a-production-grade-ai-coding-agent-in-the-terminal-a-deep-dive-into-robcode-2e76d0621b37
- canonical_url
- https://medium.com/@robin5002234/building-a-production-grade-ai-coding-agent-in-the-terminal-a-deep-dive-into-robcode-2e76d0621b37
- author_url
- https://medium.com/@robin5002234
- status
- ok
- fetched_at
- 2026-06-09 15:37:30




