Part1: Understanding Linux Network Namespaces and Virtual Ethernet (veth): Building Container…
Introduction
Part1: Understanding Linux Network Namespaces and Virtual Ethernet (veth): Building Container Networking from Scratch
Introduction
It is 2:00 AM, and a critical production application running on Kubernetes suddenly stops communicating with its database. The application Pods are running, the database Pod is healthy, and no obvious errors appear in the cluster. However, users are unable to log in, transactions are failing, and the business is losing revenue every minute the issue remains unresolved.
As a DevOps Engineer, one of the first questions you need to answer is simple: how does traffic actually travel between containers and Pods?
Most engineers know how to deploy applications using Docker and Kubernetes, but far fewer understand what happens underneath when a container receives an IP address, communicates with another container, or accesses the internet. In production environments, troubleshooting network issues often requires going beyond Kubernetes objects and understanding the Linux networking primitives that power them.
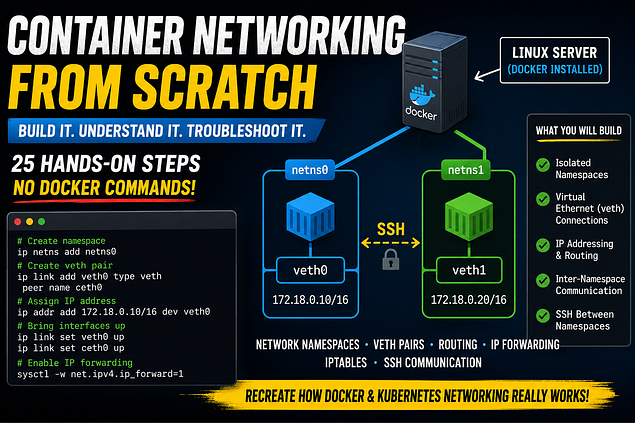
Modern container platforms such as Docker, Kubernetes, Containerd, CRI-O, Calico, Flannel, and Cilium all rely on the same core Linux networking concepts:
Press enter or click to view image in full size
- Network Namespaces
- Virtual Ethernet (veth) Pairs
- IP Addressing
- Routing Tables
- IP Forwarding
- Firewall Rules (iptables)
Whenever a Pod is created, Linux builds an isolated networking environment, attaches virtual network interfaces, assigns IP addresses, configures routes, and enables communication with other workloads. These operations happen automatically, which is why many engineers never get the opportunity to see how container networking actually works.
In this hands-on lab, we will build a miniature container networking environment from scratch using native Linux commands. Instead of relying on Docker or Kubernetes abstractions, we will manually create network namespaces, connect them using virtual Ethernet devices, assign IP addresses, configure routing, and establish communication between isolated environments. We will eventually create multiple namespaces and even establish SSH communication between them to simulate real application traffic.
By the end of this exercise, you will understand the exact networking building blocks used underneath containers and Kubernetes Pods, making it significantly easier to troubleshoot real-world networking issues in cloud-native environments.
Your starting point is simply:
Linux Server
+
Docker Installed
But for this experiment, Docker is not actually required.
We‘re using Linux networking commands directly:
ip netns
ip link
ip addr
ip route
iptables
nsenter
The reason Docker is relevant is that you’re manually recreating networking concepts that Docker normally creates automatically.
Real-world mapping:
our Lab                     Docker
-------                     -------
netns0                ->    Container 1
netns1                ->    Container 2
veth0/ceth0           ->    Container veth pair
IP addresses          ->    Container IPs
Host routing          ->    Docker bridge routing
SSH traffic           ->    Application traffic
iptables              ->    Docker NAT/FORWARD rules
A good real-world introduction could start like this:
Assume you have a Linux server running Docker. Every day, developers launch containers and applications communicate successfully without much thought about what happens behind the scenes. Containers receive IP addresses, communicate with each other, and access external services automatically. But what networking components does Docker create to make this possible? In this lab, we will ignore Docker’s abstractions and manually build the same networking foundations using native Linux commands. By recreating namespaces, virtual Ethernet devices, routing, and inter-container communication from scratch, we will gain a deeper understanding of how container networking works underneath modern container platforms.
The journey throughout this lab follows the same logical sequence used by container runtimes such as Docker and Kubernetes:
Host Network Analysis
- Create a network information script.
- Examine the host network configuration.
- Create a custom iptables chain.
- Observe firewall changes using the network information script.
Building the First Container Network
- Create the first network namespace (netns0).
- Enter and explore the namespace.
- Create a virtual Ethernet (veth) pair.
- Move one side of the veth pair into the namespace.
- Configure the host-side interface.
- Configure the namespace-side interface.
- Assign IP addresses.
- Verify host-to-namespace connectivity.
- Examine routing behavior and network isolation.
- Attempt external communication and analyze why it fails.
Building a Multi-Container Environment
- Create a second network namespace (netns1).
- Create a second virtual Ethernet pair.
- Connect the second namespace to the host.
- Configure networking inside netns1.
- Verify connectivity between netns1 and the host.
Enabling Inter-Container Communication
- Enable IP forwarding on the host.
- Configure routing in netns0.
- Configure routing in netns1.
- Verify namespace-to-namespace communication using ICMP.
Application-Level Communication
- Deploy an OpenSSH server inside netns1.
- Establish an SSH connection from netns0 to netns1 and analyze packet flow.
Step 1: Create a Network Information Script
Before creating isolated network environments, it is important to understand the current networking state of the host system. In production troubleshooting, engineers typically begin by examining network interfaces, routing tables, and firewall rules to establish a baseline before making changes.
To simplify this process, create a script that displays all critical networking information in a single command.
cat <<'EOF' > network_info.sh
#!/usr/bin/env bash
echo "# Network devices"
ip link list
echo -e "\n# Route table"
ip route list
echo -e "\n# iptables rules"
iptables --list-rules
EOF
chmod +x network_info.sh
What does this script do?
The script collects three important pieces of networking information:
Network Devices
ip link listDisplays all network interfaces available in the current network namespace.
Example:
1: lo
2: eth0
Routing Table
ip route listDisplays how Linux forwards packets.
Example:
default via 192.168.1.1 dev eth0
192.168.1.0/24 dev eth0
Firewall Rules
iptables --list-rulesDisplays packet filtering and forwarding rules.
Step 2: Examine the Host Network
Execute the script.
./network_info.shThis output represents the current state of the host network before we begin creating network namespaces and virtual Ethernet devices. Having this baseline makes it easier to observe how Linux networking changes throughout the remainder of the lab.
At this stage you are inspecting the host’s network stack.
The output contains:
- Physical interfaces
- Existing routes
- Current firewall rules
This serves as our baseline before creating any isolation.
root@ip-10-200-2-135:~# ip link list
1: lo: <LOOPBACK,UP,LOWER_UP> mtu 65536 qdisc noqueue state UNKNOWN mode DEFAULT group default qlen 1000
    link/loopback 00:00:00:00:00:00 brd 00:00:00:00:00:00
2: enX0: <BROADCAST,MULTICAST,UP,LOWER_UP> mtu 9001 qdisc mq state UP mode DEFAULT group default qlen 1000
    link/ether 0a:6c:3d:71:c8:ed brd ff:ff:ff:ff:ff:ff
    altname enx0a6c3d71c8ed
3: docker0: <NO-CARRIER,BROADCAST,MULTICAST,UP> mtu 1500 qdisc noqueue state DOWN mode DEFAULT group default
    link/ether 42:50:75:a1:87:53 brd ff:ff:ff:ff:ff:ff
root@ip-10-200-2-135:~# ip route list
default via 10.200.2.1 dev enX0 proto dhcp src 10.200.2.135 metric 100
10.200.0.2 via 10.200.2.1 dev enX0 proto dhcp src 10.200.2.135 metric 100
10.200.2.0/24 dev enX0 proto kernel scope link src 10.200.2.135 metric 100
10.200.2.1 dev enX0 proto dhcp scope link src 10.200.2.135 metric 100
172.17.0.0/16 dev docker0 proto kernel scope link src 172.17.0.1 linkdown
Step 3: Create a Custom iptables Chain
iptables --new-chain MY_CUSTOM_CHAINor
iptables -N MY_CUSTOM_CHAINPurpose
Creates a user-defined firewall chain.
Before:
INPUT
FORWARD
OUTPUT
After:
INPUT
FORWARD
OUTPUT
MY_CUSTOM_CHAIN
Run the script again:
./network_info.shYou should now see the newly created chain.
Although not directly related to namespaces, this demonstrates that networking also involves firewall and packet-filtering components.
Step 4: Create a Network Namespace
ip netns add netns0What is a Network Namespace?
A network namespace is an isolated networking environment.
It contains its own:
- Interfaces
- Routing table
- ARP cache
- Firewall rules
- Network statistics
Think of it as a miniature computer running inside the host.
Verify its existence:
ip netns listOutput:
netns0At this stage the namespace exists but has no connectivity.
Step 5: Enter the Namespace
nsenter --net=/run/netns/netns0 bashThis launches a shell that uses the network stack of netns0.
Run:
./network_info.shYou will notice:
loOnly the loopback interface exists.
No ethernet devices are available.
No routes exist.
No external communication is possible.
This is similar to creating a brand-new container before networking has been configured.
Step 6: Create a Virtual Ethernet Pair
Exit the namespace and execute:
ip link add veth0 type veth peer name ceth0What is a veth Pair?
A veth pair behaves like a virtual network cable.
Traffic entering one end immediately appears on the other end.
Visualization:
veth0 <-------> ceth0This pair is commonly used to connect containers to the host.
Verify:
ip link listOutput now contains:
veth0
ceth0
Step 7: Move One End into the Namespace
ip link set ceth0 netns netns0Purpose
Moves ceth0 from the host namespace into netns0.
Result:
Host
eth0
veth0
Namespace
lo
ceth0
Now the namespace has a network interface available.
Think of this as connecting a cable from the host into the container.
Step 8: Configure the Host Side
Bring up the interface:
ip link set veth0 upAssign an IP address:
ip addr add 172.18.0.11/16 dev veth0Host configuration:
Interface : veth0
IP Address: 172.18.0.11
The host side of the connection is now ready.
Step 9: Configure the Namespace Side
Enter the namespace again:
nsenter --net=/run/netns/netns0 bashView interfaces:
ip link listYou should see:
lo
ceth0
Bring up loopback:
ip link set lo upBring up ceth0:
ip link set ceth0 upAssign an IP:
ip addr add 172.18.0.10/16 dev ceth0Namespace configuration:
Interface : ceth0
IP Address: 172.18.0.10
The namespace is now connected to the host through the veth pair.
Step 10: Verify Connectivity
From the namespace:
ping -c 2 172.18.0.11Expected result:
2 packets transmitted
2 received
Packet flow:
Namespace
ceth0
   |
   |
veth0
Host
Now test in the opposite direction.
From the host:
ping -c 2 172.18.0.10Communication succeeds because both devices belong to:
172.18.0.0/16Step 11: Inspect the Host Interface
ip addr show dev eth0Example:
inet 172.16.0.2/24This is the host’s primary network interface.
Notice that it belongs to a different subnet than the veth pair.
Step 12: Attempt Internet Connectivity
Enter the namespace:
nsenter --net=/run/netns/netns0 bashTry:
ping 8.8.8.8Result:
ping: connect: Network is unreachableWhy Does It Fail?
Check routes:
ip route listOutput:
172.18.0.0/16 dev ceth0The namespace only knows how to reach:
172.18.x.xIt has no knowledge of the internet.
A typical Linux machine contains:
default via 172.16.0.1 dev eth0The default route tells Linux where to send packets when no specific route exists.
Since our namespace lacks a default route, packets destined for 8.8.8.8 are immediately discarded.
Step 13: Why Pinging 172.16.0.2 May Fail
ping 172.16.0.2The namespace does not know how to reach the host’s external network.
It only has:
172.18.0.0/16in its routing table.
No route exists for:
172.16.0.0/24Therefore Linux cannot determine where to send the packet.
Relationship to Containers
Everything performed manually in this exercise is similar to what Docker does automatically.
When you execute:
docker run nginxDocker typically performs operations similar to:
Create network namespace
Create veth pair
Move one end into namespace
Assign IP addresses
Configure routes
Configure NAT
Enable forwarding
Kubernetes follows the same principles through Container Network Interface (CNI) plugins.
Popular CNIs such as:
- Calico
- Flannel
- Cilium
- Weave
all rely on the same Linux networking primitives demonstrated in this lab.
Network Topology Built During the Lab
HOST NAMESPACE
eth0
 |
 | 172.16.0.2
veth0
 |
 | 172.18.0.11
 |
 +----------------------+
                        |
                        |
                 ceth0
                 172.18.0.10
NETWORK NAMESPACE
netns0
Key Concepts Learned
Network Namespace
Provides network isolation.
veth Pair
Acts as a virtual Ethernet cable.
IP Addressing
Allows devices to identify each other.
Routing
Determines how packets reach their destination.
Firewall Rules
Control traffic flow and security.
Container Networking
Built using namespaces, veth pairs, routing, and NAT.
Step 14: Create a Second Network Namespace
Create another namespace that will act as a second container.
ip netns add netns1Verify:
ip netns listOutput:
netns0
netns1
At this point we have two isolated network namespaces.
Host
 ├── netns0
 └── netns1
Both namespaces are completely disconnected from each other.
Step 15: Create Another veth Pair
Create a second virtual ethernet pair.
ip link add veth1 type veth peer name ceth1Result:
veth1 <-------> ceth1Move one side into netns1.
ip link set ceth1 netns netns1Current topology:
Host
 ├── veth0
 └── veth1
netns0
 └── ceth0
netns1
 └── ceth1
Step 16: Configure the Host Side Interface
Bring up the interface.
ip link set veth1 upAssign an IP address.
ip addr add 172.18.0.21/16 dev veth1Host configuration:
veth0 → 172.18.0.11
veth1 → 172.18.0.21
Step 17: Configure netns1
Enter netns1.
nsenter --net=/run/netns/netns1 bashBring up loopback.
ip link set lo upBring up ceth1.
ip link set ceth1 upAssign IP.
ip addr add 172.18.0.20/16 dev ceth1Verify:
ip addr show ceth1Output:
172.18.0.20/16Step 18: Verify Connectivity to the Host
From netns1:
ping -c 2 172.18.0.21Expected:
2 packets transmitted
2 received
The second namespace can now communicate with the host.
Step 19: Can netns0 Reach netns1?
Current topology:
netns0 ---- Host ---- netns1Addresses:
netns0 : 172.18.0.10
Host   : 172.18.0.11
netns1 : 172.18.0.20
Host : 172.18.0.21From netns0:
ping 172.18.0.20The ping may fail depending on routing and forwarding configuration because traffic must traverse the host.
The host now acts as a router between the namespaces.
Step 20: Enable Packet Forwarding on the Host
Exit both namespaces and execute on the host.
sysctl -w net.ipv4.ip_forward=1Verify:
cat /proc/sys/net/ipv4/ip_forwardOutput:
1This allows the host to forward packets between interfaces.
Step 21: Verify Network Configuration in netns0
Enter netns0.
nsenter --net=/run/netns/netns0 bashView the routing table.
ip route listOutput:
172.18.0.0/16 dev ceth0 proto kernel scope link src 172.18.0.10This route was automatically created when the IP address was assigned to ceth0. Since both namespaces belong to the same subnet (172.18.0.0/16), no additional static routes are required.
Step 22: Verify Network Configuration in netns1
Enter netns1.
nsenter --net=/run/netns/netns1 bashView the routing table.
ip route listOutput:
172.18.0.0/16 dev ceth1 proto kernel scope link src 172.18.0.20Similar to netns0, Linux automatically created a route for the connected network when the IP address was assigned to ceth1.
Step 23: Verify Namespace-to-Namespace Communication
From netns0:
ping -c 2 172.18.0.20From netns1:
ping -c 2 172.18.0.10Expected:
2 packets transmitted
2 received
Traffic flow:
netns0
172.18.0.10
     |
     |
172.18.0.11
Host
172.18.0.21
     |
     |
172.18.0.20
netns1
The two isolated namespaces can now communicate with each other through the networking infrastructure created on the host.
Step 24: Install OpenSSH Server in netns1
Inside netns1:
apt update
apt install openssh-server -y
Generate host keys if necessary.
ssh-keygen -AStart SSH daemon.
mkdir -p /run/sshd
/usr/sbin/sshd -D
Keep this terminal open.
Step 25: Connect from netns0 Using SSH
Open another terminal.
Enter netns0.
nsenter --net=/run/netns/netns0 bashInstall SSH client if required.
apt update
apt install openssh-client -y
Connect:
ssh root@172.18.0.20Or:
ssh <username>@172.18.0.20Example:
The authenticity of host '172.18.0.20' can't be established.
Are you sure you want to continue connecting?
Type:
yesEnter the password.
Successful login:
Welcome to UbuntuStep 26: Verify SSH Traffic Flow
Connection path:
SSH Client
(netns0)
172.18.0.10
      |
      |
172.18.0.11
HOST ROUTER
172.18.0.21
      |
      |
172.18.0.20
SSH Server
(netns1)
The SSH packets travel through the host routing layer exactly as packets would travel between two containers in a containerized environment.
What Have We Achieved?
We have manually built a miniature container networking environment:
Container 1 (netns0)
        |
        |
      Host
     Router
        |
        |
Container 2 (netns1)
We successfully:
- Created two isolated network namespaces.
- Connected them using veth pairs.
- Assigned IP addresses.
- Enabled routing on the host.
- Configured routes.
- Verified ICMP communication.
- Established an SSH connection between namespaces.
This closely resembles the networking concepts used by Docker containers, Kubernetes Pods, CNI plugins, and Linux container runtimes.
Conclusion
In this lab, we manually built the core networking components that power modern container platforms such as Docker, Kubernetes, Podman, and CRI-O. Starting from the host network namespace, we explored existing network interfaces, routing tables, and firewall rules before creating isolated network namespaces to simulate containers.
We created virtual Ethernet (veth) pairs to act as network cables between the host and the namespaces, assigned IP addresses, and verified connectivity using ICMP (ping). This demonstrated how isolated network environments can communicate with the host while maintaining separation from each other.
Next, we expanded the setup by creating a second namespace and configuring the host to act as a router. By enabling IP forwarding and adding appropriate routes, we established communication between the two namespaces. Finally, we deployed an OpenSSH server in one namespace and successfully connected to it from the other namespace, proving that full TCP-based application communication can occur between isolated environments.
Through this exercise, we learned that container networking is not a special technology but rather a combination of standard Linux networking primitives:
- Network Namespaces for isolation
- Virtual Ethernet (veth) pairs for connectivity
- IP Addressing for identification
- Routing Tables for packet forwarding
- IP Forwarding for inter-network communication
- iptables for traffic filtering and control
The complete topology evolved from a single isolated namespace to a multi-container environment where traffic flowed through the host acting as a router. This closely mirrors how container runtimes and Kubernetes CNI plugins connect Pods and Containers in real-world deployments.
Most importantly, this lab revealed what happens behind the scenes whenever a container is created. Operations that Docker or Kubernetes perform automatically — such as namespace creation, interface provisioning, route configuration, and packet forwarding — were executed manually, providing a deeper understanding of how Linux networking forms the foundation of containerized infrastructure.
By mastering these concepts, engineers gain the ability to troubleshoot container networking issues more effectively, understand Kubernetes networking architectures, and confidently work with advanced networking technologies used in modern cloud-native environments.
메타데이터
- post_id
- 748c79d0e256
- slug
- understanding-linux-network-namespaces-and-virtual-ethernet-veth-building-container-networking-748c79d0e256
- url
- https://medium.com/@tradingcontentdrive/understanding-linux-network-namespaces-and-virtual-ethernet-veth-building-container-networking-748c79d0e256
- canonical_url
- https://medium.com/@tradingcontentdrive/understanding-linux-network-namespaces-and-virtual-ethernet-veth-building-container-networking-748c79d0e256
- author_url
- https://medium.com/@tradingcontentdrive
- status
- ok
- fetched_at
- 2026-06-11 17:55:54