Data Science Series [1] — Attach Running Jupyter Notebook/Lab Kernel to VSCode
Jupyter Notebook and Jupyter Lab are essential tools for anyone in data science. However, the web browser interface may not suit everyone’s…
Data Science Series [1] — Attach Running Jupyter Notebook/Lab Kernel to VSCode
Jupyter Notebook and Jupyter Lab are nearly essential tools for anyone in data science. However, the web browser interface may not suit everyone’s preferences.

Generated by DALL·E 3
There are several benefits of using the web-based interface. Most importantly, it is the most responsive interface after directly using the IPython Kernel. Additionally, there are some visualization packages implemented with JavaScript that require the web-based interface to run. However, the available plugins are not sufficient. For example, you cannot use GitHub Copilot on the web interface.
Personally, I only use VSCode for Jupyter. For all other text editing tasks, I use NeoVim. I will write a follow-up article about my terminal settings for running a Jupyter-Notebook-like interface with NeoVim. Stay tuned!
Next, I will introduce my setup from scratch. Some steps are optional and make my life easier, but they are not necessary for everyone. These steps apply to both Jupyter Notebook and Jupyter Lab. I will refer to Jupyter Notebook for simplicity, but it can be swapped with Jupyter Lab.
Setup Virtual Environment
A best practice in data science is to manage virtual environments properly, as complicated package dependencies can be a nightmare. I use Miniconda, the minimal version of Conda, to manage my environments.
Check if you have Conda installed.
Open your terminal and type conda, if the message shows Command not found, go to miniconda to install conda based on your OS. After installation, create your working environment.
# reload your shell
source ~/.bashrc # use .zshrc for zsh or your prefered shell configuration

# create a conda environment
conda create -n your_environment_name

# activate conda environment
conda activate your_environment_name

# deactivate conda environment
conda deactivate

# feel free to check more options from conda documentation
In the next step, you can choose to start a Jupyter server in one environment and stay in that environment or connect to other environments.
Option 1: Start a Jupyter Server in One Environment and Stay in
Enter your working conda environment and install Jupyter Notebook or Jupyter Lab. Then enter,
jupyter notebook --no-browser --ip "0.0.0.0"Use 127.0.0.1 for localhost. You will need to do SSH tunneling if you are running it on a remote server. Use 0.0.0.0 for external access without port forwarding.
If the Jupyter Server starts running, you will see something like this:
  _   _          _      _
 | | | |_ __  __| |__ _| |_ ___
 | |_| | '_ \\/ _` / _` |  _/ -_)
 \\___/| .__/\\__,_\\__,_|\\__\\___|
       |_|

Read the migration plan to Notebook 7 to learn about the new features and the actions to take if you are using extensions.
<https://jupyter-notebook.readthedocs.io/en/latest/migrate_to_notebook7.html>
Please note that updating to Notebook 7 might break some of your extensions.
[I 2023-10-17 20:54:49.291 ServerApp] nbclassic | extension was successfully loaded.
[I 2023-10-17 20:54:49.292 ServerApp] Serving notebooks from local directory: /xxxxx/xxxxxxxxx
[I 2023-10-17 20:54:49.292 ServerApp] Jupyter Server 1.23.4 is running at:
[I 2023-10-17 20:54:49.292 ServerApp] <http://localhost:8888/lab?token=7386e7bcac2d0ff26aa7a1d6c214bf4c5563c3235af3cbdd>
[I 2023-10-17 20:54:49.292 ServerApp]  or <http://127.0.0.1:8888/lab?token=7386e7bcac2d0ff26aa7a1d6c214bf4c5563c3235af3cbdd>
[I 2023-10-17 20:54:49.292 ServerApp] Use Control-C to stop this server and shut down all kernels (twice to skip confirmation).
[C 2023-10-17 20:54:49.294 ServerApp]

    To access the server, open this file in a browser:
        file:///xxxxx/xxxxxxxxx
    Or copy and paste one of these URLs:
        <http://localhost:8888/lab?token=7386e7bcac2d0ff26aa7a1d6c214bf4c5563c3235af3cbdd>
     or <http://127.0.0.1:8888/lab?token=7386e7bcac2d0ff26aa7a1d6c214bf4c5563c3235af3cbdd>
Option 2: Connect to Other Environments (which I prefer)
To do this, start by creating an environment specifically for Jupyter Notebook and install Jupyter Notebook within that environment. Then, proceed to install nb_conda_kernels:
# create and activate your Jupyter Notebook environment
conda create -n jupyternotebook
conda activate jupyternotebook

# To access other conda environments, in the created environment install:
conda install nb_conda_kernels
Next, create your working environment, enter the environment, and install ipykernel:
# create and activate your working environment
conda create -n my_working_env
conda activate my_working_env

# For other conda environments you want to access, in that environment install:
conda install ipykernel
Now, start a Jupyter server from the Jupyter Notebook environment, and you will be able to access other environments. Any package installed with the selected kernel in the Notebook will be located in the selected working environment.
Accessing Web-Based Interface
With the URL, you can access the web-based interface by pasting it into any browser. If you choose option 1, you will only see one kernel option, as shown in the image below. If you choose option 2, you should be able to see all Conda environments with ipykernel installed.

Kernel options with option 1 (in JupyterLab web-based interface)
Attaching to a Running Jupyter Kernel in VSCode
To attach to a running Jupyter kernel in VSCode, follow these steps:
- Install VSCode and the Jupyter extensions in it.
- Open VSCode and press
Ctrl+Shift+Pon Linux and Windows, orCommand+Shift+Pon macOS. - Type “New Jupyter Notebook” to create an empty file.
- You can now start running the notebook without attaching it to the Jupyter server you created.
However, keep in mind that if you turn off the file, the kernel will be killed, and all cached values will be cleared. If you want to keep the kernel running even when the server is killed, you need to attach it to a running Jupyter server.
Connecting Kernels from Your Local Machine
To connect to a Jupyter server from your local machine, follow these steps:
First, start a Jupyter server from your working environment or the Jupyter Notebook environment mentioned in option 2 above, and copy the URL generated by the server. Then,

Click the kernel on the top-right corner

Select “Select Another Kernel…”

Select “Existing Jupyter Server…”

Paste the copied URL
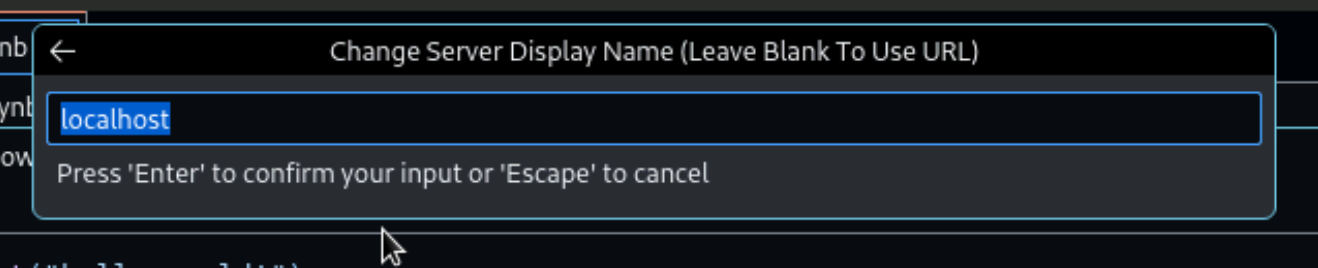
Put a preferred name for this kernel
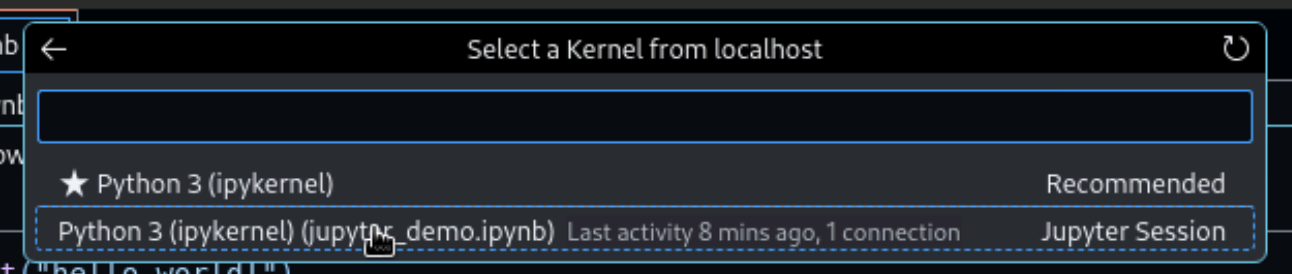
And now you have access to all kernels and running sessions
Great Use Case: Connect to a Remote Server
If you want to run your Jupyter server on a remote server, follow these steps:
- Install Remote-SSH extension in VSCode.
- SSH to the remote server and edit or open files on it.
- Keep the Jupyter server running on the remote server, so you don’t have to worry about any interruptions to your work.
- To ensure that the Jupyter server keeps running, you can use tools like Screen or Tmux. If you choose to use Tmux, type
tmuxin your terminal and then start the Jupyter server. - Copy the URL, keep it safe, and detach the Tmux session by pressing
ctrl+bthen pressingd. You can reattach the session by typingtmux a -t 0in the terminal. Please follow these commands for now, as I will provide more information about setting up Tmux in another article.
Note the following considerations for connecting to a remote server:
- If the remote server limits the port for external access, make sure to set the
--portoption when starting your Jupyter server. - If you started your Jupyter server with
localhostor127.0.0.1, you will need to install the Remote-SSH extension on VSCode and use SSH tunneling to connect to your remote server. You can do this with the commandssh -L [some specified local port]:localhost:[some specified remote port] userid@host_address. For example,-L 8888:localhost:8888. Then, use the URL withlocalhostin it. - If you started your Jupyter server with
0.0.0.0and your remote server does not limit external port access, you can directly copy and paste the URL with your hostname. Avoid using the URL starting with127.0.0.1orlocalhostin this case.
Finally, Attach Running Jupyter Notebook/Lab Kernel to VSCode
If you are running a kernel on the web-based interface, you can also access this running kernel from VSCode. Follow the steps mentioned in the previous section and select the kernel with your filename. Additionally, check the last connection time and the number of connections to ensure that you are connecting to the correct kernel.
Please feel free to leave questions and comments. I will update this article accordingly. Happy coding!
메타데이터
- post_id
- a2297a820ed3
- slug
- data-science-series-1-attach-running-jupyter-notebook-lab-kernel-to-vscode-a2297a820ed3
- url
- https://medium.com/@CompXBio/data-science-series-1-attach-running-jupyter-notebook-lab-kernel-to-vscode-a2297a820ed3
- canonical_url
- https://medium.com/@CompXBio/data-science-series-1-attach-running-jupyter-notebook-lab-kernel-to-vscode-a2297a820ed3
- author_url
- https://medium.com/@CompXBio
- status
- ok
- fetched_at
- 2026-06-17 19:05:49