Recreating Rain World’s 2D Procedural Animation — Part 2
Control character’s procedural animation using C# code in Unity
Recreating Rain World’s 2D Procedural Animation — Part 2
Hi, I am Merxon22, an indie game developer from China and a freshman student at Minerva University.
This devlog series aims to recreate RainWorld’s art style in Unity: procedural rigged animation for 2D pixelated character.

Procedural animation for pixelated 2D character in “Rain World”.
In my last devlog, I wrote about how I created a rig for a 2D sprite and applied pixelation shader to it. You can read it **here**.
In this devlog, I am going to code a walking procedural animation for the character and give it different walking styles.

Here we go.
Step 0: Preparation
This project uses:
- Unity 2021.3.16f1
If you want to follow along with this devlog and practice it by yourself, it is best that you have knowledge of:
- The basics of Unity Editor and C# language
Step 1: Setting up the hierarchy
In the last part, we successfully setup our character’s IK constraint. Given the character’s body position and feet position, this constraint calculates where to put the legs.

By default, when creating an IK constraint, Unity automatically places the IK target as a child object of the IK Solver. But here, we want to make the left foot target and right foot target have no parent object (i.e., on the outer-most layer in the hierarchy).

Make sure the IK Targets are in the outter layer of the hierarchy.
This is because when the character moves, we want its foot to stick on the ground despite of the body movement. Setting the target as the child of the character will cause the target to move with the body, resulting in no animation in the foot.
Step 2: Detecting balance
There are multiple methods for coding procedural walking animation. One common way is to calculate the distance between the foot’s landing position and the character’s hip position. If this distance is too far, the foot will make one step forward. This article from Mina Pêcheux introduces this type of movement in Unity.
However, in this devlog, I am trying another type of approach, which is calculating the character’s center of mass by real time. By observing how human beings walk, we can see that we tend to slightly lean forward and shift our center of mass forward when walking. This, as a result, will make our body fall to the front and gain a forward momentum. And, to avoid us from falling, we will make a step with either of our left or right foot to support us. Whenever our character’s center of mass falls out of the feet’s landing position, make one step forward.

Gait pattern generation for a power-assist device of paraplegic gait — Scientific Figure on ResearchGate.
I did this for two reasons:
- There are already many articles on the internet that introduces the first method. It will be fun to try something new ;)
- From my own aesthetic, I think the second approach looks better in my project (it can be purely subjective, though)
To calculate whether this 2D character is out of balance, I simply check whether its game object’s pivot point’s x position is between the two feet’s x position.
If the pivot point is between the two feet, then we’re all good. Our character is in balance, and no step needs to be made.
Otherwise, we will have to make a step forward to avoid falling.

Left: balanced state. Right: unbalanced state.
Create a C# script called “FootPositioner” and write the following code:
using UnityEngine;

public class FootPositioner : MonoBehaviour
{
    // reference to player character object
    public GameObject playerObj;

    // reference to IK target
    public Transform target;

    // reference to the other foot
    public FootPositioner otherFoot;

    public bool isBalanced;

    private void Update()
    {
        UpdateBalance();
    }

    private void UpdateBalance()
    {
        // get center of mass in world position
        float centerOfMass = playerObj.transform.position.x;
        // if center of mass is between two feet, the body is balanced
        isBalanced = IsFloatInRange(centerOfMass, target.position.x, otherFoot.target.position.x);
    }

    /// <summary>
    /// returns true if "value" is between "bound1" and "bound2"
    /// </summary>
    bool IsFloatInRange(float value, float bound1, float bound2)
    {
        float minValue = Mathf.Min(bound1, bound2);
        float maxValue = Mathf.Max(bound1, bound2);
        return value > minValue && value < maxValue;
    }

}
Add two of this components to our character, one for left foot, one for right foot.

Two “FootPositioner” class instances: one for left foot, one for right footr.
Then, when we hit “Play”, the character should be able to detect whether it is balanced or not.

Pay attention to the “Is Balanced” boolean filed in the inspector.
Step 3: Make a step forward
In this step, we are going to do one thing: when we know that our body loses balance, make one step forward.
In the same C# script, add the following fields:
// used to lerp the foot from its current position to target position
public float lerp;

// the start and end position of a step
private Vector3 startPos;
private Vector3 endPos;

// how far should we anticipate a step
public float overShootFactor = 0.8f;

// how fast the foot moves
public float stepSpeed = 3f;

// the foot's displacement from body center on the X axis
public float footDisplacementOnX = 0.25f;
The “overShootFactor” field exists here because when we human make a step forward, we usually position our feet slightly in front of our center of mass to anticipate the next step.
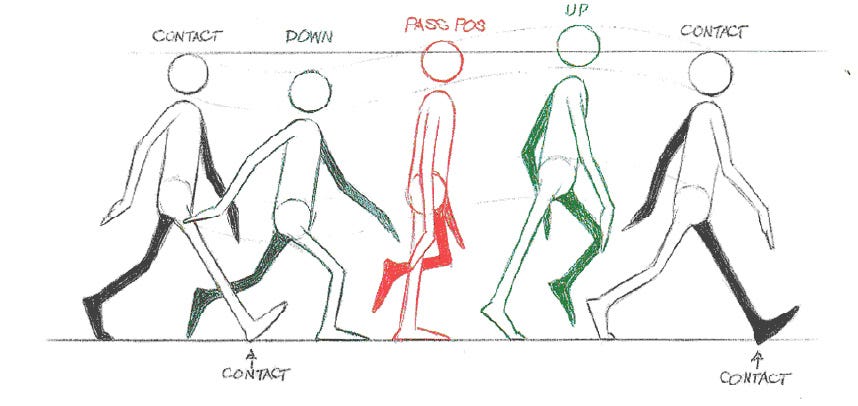
Obtained from: https://courses.cs.washington.edu/courses/cse459/16au/assignments/assignment_5/index.html
The “footDisplacementOnX” field exists here because we have a 2D character, and the “root” of its two legs have slight displacement from the character’s center. This field represents the distance of this slight displacement.

X displacement is shown as the green arrow in this image.
One foot’s X-displacement should be negative, and the other should be positive. In my case, the left foot’s is -0.25, and the right foot’s is +0.25. This value will depend on your sprite.
Then, add the following code to the C# script:
private void Start()
{
    startPos = endPos = target.position;
}

private void Update()
{
    // ...previous code

    // if the body is not balanced AND this foot has finished its previous step (we don't want to calculate new steps in the process of moving a foot)
    if (!isBalanced && lerp > 1)
    {
        CalculateNewStep();
    }

    // using ease in/ease out value will make the animation look more natural
    float easedLerp = EaseInOutCubic(lerp);

    target.position = Vector3.Lerp(startPos, endPos, easedLerp);
    lerp += Time.deltaTime * stepSpeed;
}

/// <summary>
/// Smoothly ease in and ease out the input using sigmoid function
/// </summary>
private float EaseInOutCubic(float x)
{
    return 1f / (1 + Mathf.Exp(-10 * (x - 0.5f)));
}

/// <summary>
/// Calculate where the new step should be made
/// </summary>
private void CalculateNewStep()
{
    // set starting position
    startPos = target.position;

    // this will make the foot start moving to its target position starting from next frame
    lerp = 0;

    // find where the foot should land without considering overshoot
    RaycastHit2D ray = Physics2D.Raycast(playerObj.transform.position + new Vector3(footDisplacementOnX, 0, 0), Vector2.down, 10);

    // consider the overshoot factor
    Vector3 posDiff = ((Vector3)ray.point - target.position) * (1 + overShootFactor);

    // find end target position
    endPos = target.position + posDiff;
}

/// <summary>
/// This helps visualize the target position in run time
/// </summary>
private void OnDrawGizmos()
{
    Gizmos.color = Color.red;
    Gizmos.DrawSphere(targetPos, 0.1f);
}
Then, we should be able to see that when we move our character around, the feet follows.

But we don’t want the legs to move at the same time. In the next step, we will make them move alternately.
Step 4: Alternate feet movement
In the Update method where we calculate new steps, we want to add one more boolean condition called “thisFootCanMove”.
// this foot can only move when: (1) the other foot finishes moving, (2) the other foot made the last step
bool thisFootCanMove = otherFoot.lerp > 1 && lerp > otherFoot.lerp;

// if the body is not balanced AND this foot has finished its previous step (we don't want to calculate new steps in the process of moving a foot)
if (!isBalanced && lerp > 1 && thisFootCanMove)
{
    CalculateNewStep();
}
And in the inspector, we want to make the two feet’s “lerp” field slightly different. Choose one of the foot and set its initial lerp value to a very small value like 0.01. Now, two feet will alternate their walking.

But we may notice something: the character looks a bit crippled. This is because of the way we calculate balance for a 2D character:
When the character’s legs are not crossed, there is a longer distance between the left foot and the right foot, hence making this “balanced period” much longer.
When the character’s legs are crossed, the distance between the feet is much shorter, making this “balanced period” much shorter. Therefore, the legs will make more rapid steps when in this type of position.

Uncrossed (left) VS crossed legs (right). When the legs are crossed, the “balancing space” is much smaller.
To solve this, we add a little offset to the feet’s position when calculating balance. We can make modification to the “UpdateBalance” method. Here, when calculating balance, we will also offset our calculation by a slightly value to cancel out the above-mentioned problem.
private void UpdateBalance()
{
    // get center of mass in world position
    float centerOfMass = playerObj.transform.position.x;

    // if center of mass is between two feet, the body is balanced
    isBalanced = IsFloatInRange(centerOfMass, target.position.x - footDisplacementOnX, otherFoot.target.position.x - otherFoot.footDisplacementOnX);
}
Now, the animation looks better:

Step 5: Lifting the Feet
There is one more thing: when human walk, their feet do not stick on the ground. We first lift our foot and then drop them.
To simulate this process, we will add in another field called “midPos”. This is a Vector3 that presents the highest point where we lift our feet.

① startPos, ② midPos, ③ endPos
Make following changes to the code:
private Vector3 midPos;

// ...

private void Start()
{
    startPos = midPos = endPos = target.position;
}

// in the Update method, replace the original lerping code with the following:
private void Update()
{
    // ... other code

    // using ease in/ease out value will make the animation look more natural
    float easedLerp = EaseInOutCubic(lerp);

    // a lerping method that draws an arc using startPos, midPos, and endPos
    target.position = Vector3.Lerp(
        Vector3.Lerp(startPos, midPos, easedLerp),
        Vector3.Lerp(midPos, endPos, easedLerp),
        easedLerp
        );
    lerp += Time.deltaTime * stepSpeed;
}

private void CalculateNewStep()
{
    // ... other code

    // midPos is the mid point between startPos and endPos, but lifted up a bit depending on stepSize
    float stepSize = Vector3.Distance(startPos, endPos);
    midPos = startPos + posDiff / 2f + new Vector3(0, stepSize * 0.8f);

}
Now, our character’s feet will automatically lift up from ground when making steps!

The entire code can be found **here on GitHub**.
Conclusion
So this concludes this part of my pixelated-procedural animation devlog. This devlog shows a backbone method for procedural walk animation on 2D characters. Based on your game’s style, you may want to tweak the values and even add in more parameters to give the animation different characteristics.
For example, making the body bounce up and down while walking:

Chasing:
Crawling:

And even crazier: finding its balance after tripping over!

All using the same script, just different parameter values. That is the beauty of procedural animation.
I just began writing my devlogs on Medium. So, please leave a comment and let me know any of your questions or thoughts! Any feedback regarding how to improve my devlogs or game will be very welcomed!
Thank you for reading! Let’s all make our character start walking.

메타데이터
- post_id
- f5faef82aa50
- slug
- recreating-rain-worlds-2d-procedural-animation-part-2-f5faef82aa50
- url
- https://medium.com/@merxon22/recreating-rain-worlds-2d-procedural-animation-part-2-f5faef82aa50
- canonical_url
- https://medium.com/@merxon22/recreating-rain-worlds-2d-procedural-animation-part-2-f5faef82aa50
- author_url
- https://medium.com/@merxon22
- status
- ok
- fetched_at
- 2026-08-25 20:11:46