Are Ipswich Town bad at defending set pieces?
At the beginning of last season Ipswich Town brought in Mark Hudson in a newly defined role as set piece coach with Kieran McKenna having…
Are Ipswich Town bad at defending set pieces?
At the beginning of last season Ipswich Town brought in Mark Hudson in a newly defined role as set piece coach with Kieran McKenna having overseen them himself in the Championship promotion season. It was widely suggested on social media that the appointment has not gone well with Town conceding 13 goals from non penalty set pieces last season (the joint fourth highest in the Premier League). In this piece I’m going to try and break it down a bit more and look at a few themes around that to see if there are any glaring issues in Town’s set piece set up or if it was just bad luck.
The Goalkeeper
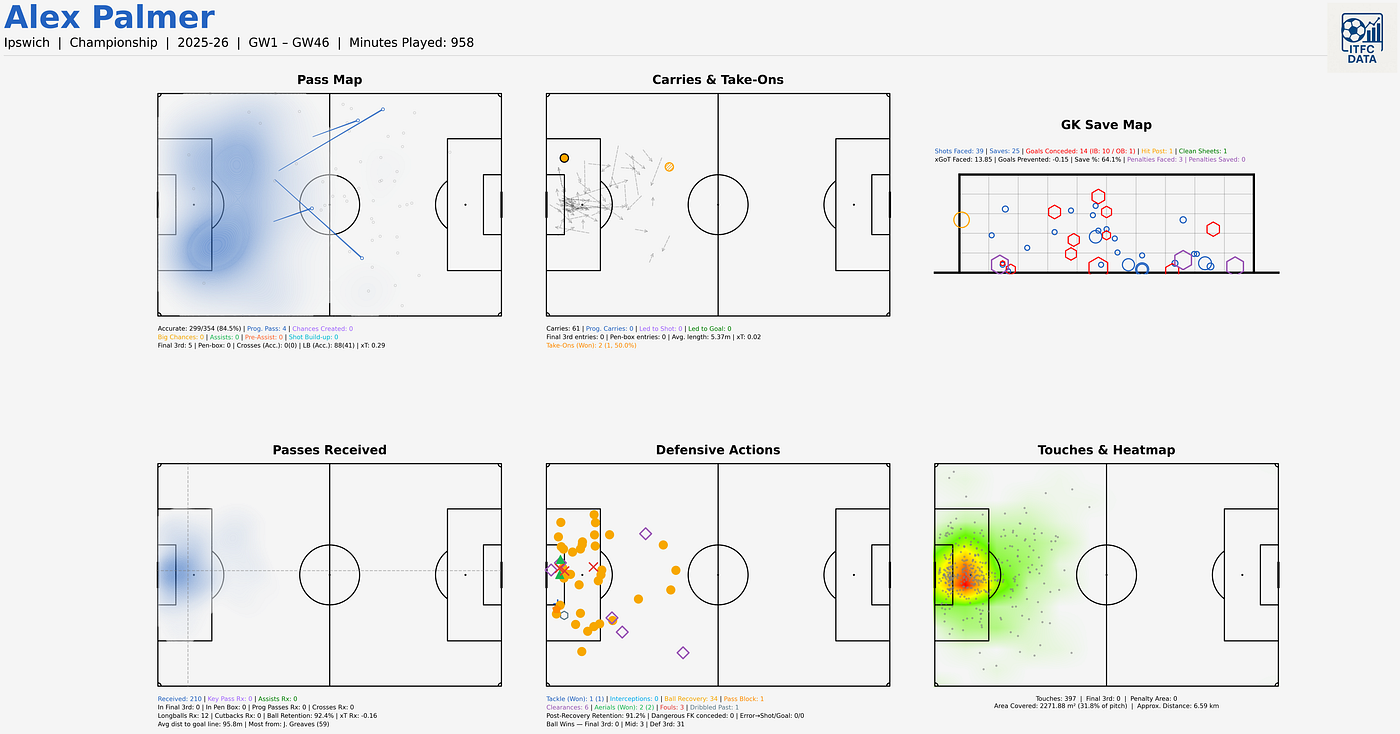
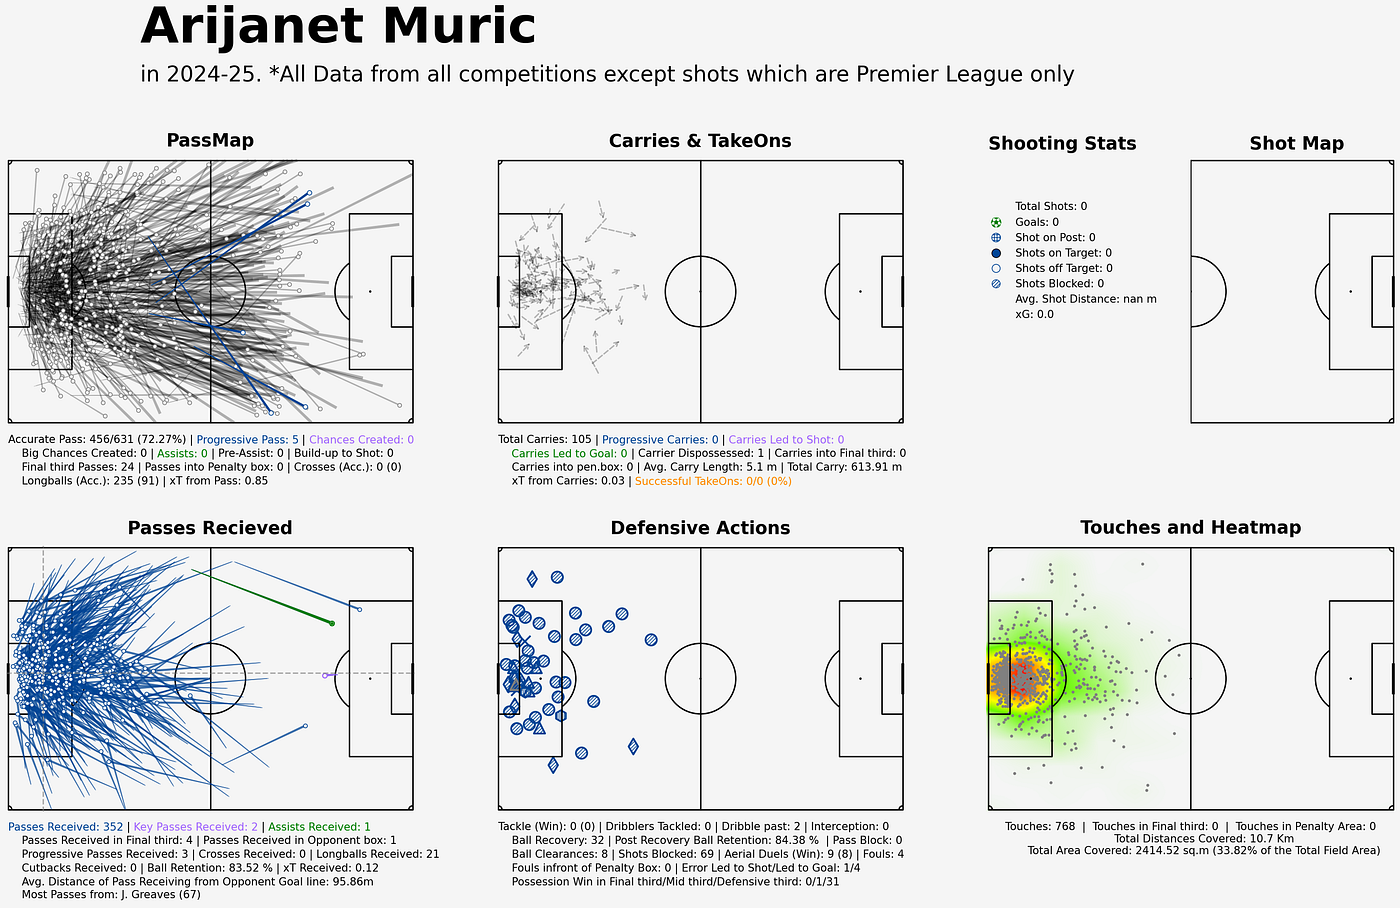
Town used three goalkeepers over the Premier League season with Aro Muric starting 18 games, Alex Palmer starting 13 and Christian Walton starting 7. The most glaringly obvious stat that comes from looking at the data is that 10 of the 13 goals conceded from set pieces were in games where Palmer was starting.
Muric was much maligned for his costly errors but an area he did excel in was stopping crosses. He claimed 15.7% of crosses into his penalty area whilst Palmer only stopped 8%. Although it meant that Muric claimed more corners I don’t think that’s an underlying reason for the amount of goals conceded under Palmer and is very much correlation rather than causation.
Types of Set Piece
When you look into those 13 goals conceded in more detail however only four of them were headers directly from corners (Bentancur — Spurs(A), Maguire — Man U (A), Osula — Newcastle (A) and Schade — Brentford (H))
Four more came from short corners (Sancho — Chelsea(A), Trossard — Arsenal (H), Nwanieri — Arsenal (H), Burn — Newcastle (A)) whilst three came from the second phase of a corner and two came from wide free-kicks
7 of the 13 also came in just three matches against Manchester United, Arsenal and Newcastle, two of which Town were down to ten men in which is understandably going to make things harder.
Who the opposition were
Here are the clubs that Town conceded set pieces to and where the rank for set pieces scored in the Premier League
Everton (9th)
Tottenham (12th)
Brighton (5th)
Nottingham Forest (1st)
Manchester United (13th)
Arsenal (4th)
Chelsea (7th)
Newcastle (8th)
Brentford (6th)
Town conceded to 9 separate sides and only two of those Manchester United and Tottenham were outside the top 10 for scoring from Set Pieces. This shows that the goals they conceded were to sides who were successful all round from set pieces.
How do Town set up to defend corners?
I’m going to start by looking at some of the games where Town faced the most corners split across goalkeepers. Brighton at home (Walton in goal), Tottenham Away (Muric in goal) and Villa away (Palmer in goal).
Tottenham (Away)
We’ll start with the first Tottenham corner which was on the tenth minute.
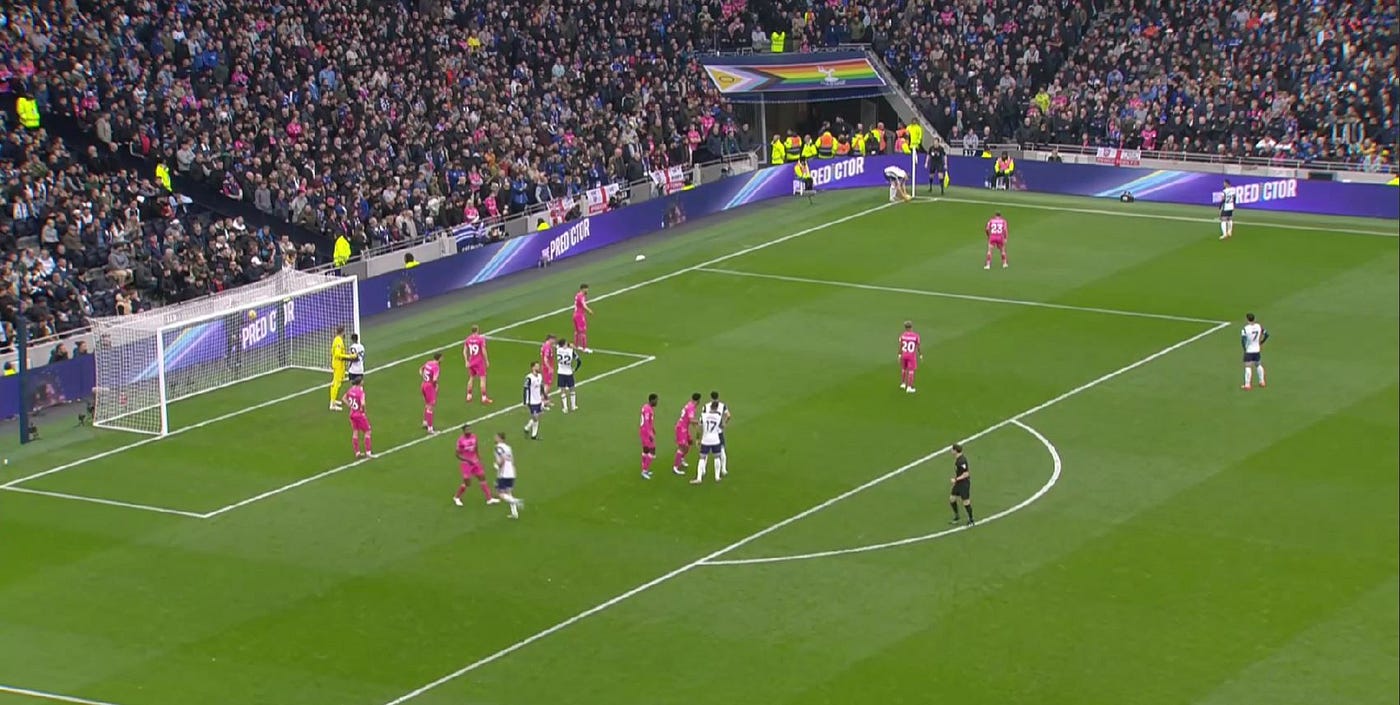
This is quite a common Town set up. Your three best headers of the ball cover the 6 yard box zones. In this case Delap has the near post, Burgess the middle of the box and O’Shea the far post.
The two biggest counter attacking threats, Szmodics and Hutchinson cover the short option and the edge of the box with everyone else going man to man apart from Morsy who is also in that front zone. What’s important to note here is that Muric is trusted to deal with his marker on his own.
It’s an in-swinging delivery to the centre of the box which Burgess comes out and deals with.
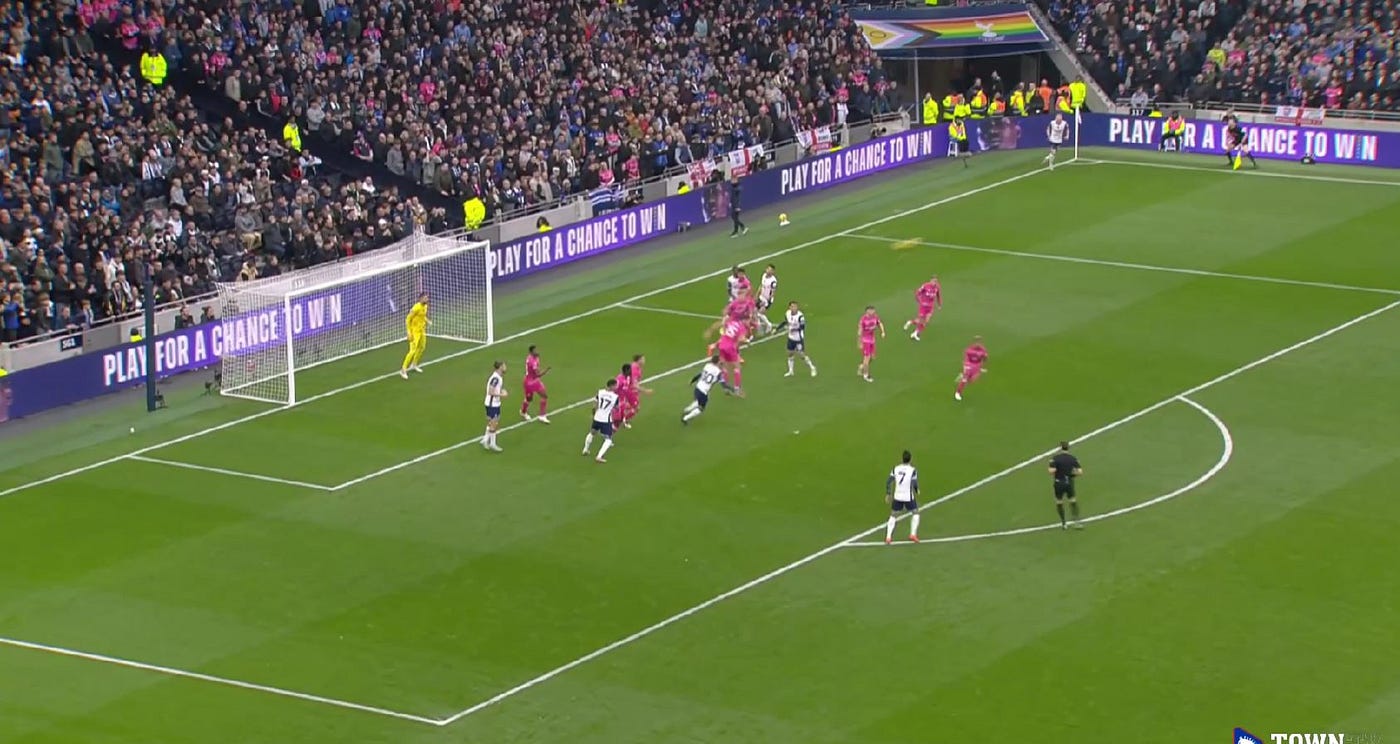
I want to look at the second phase of this corner too as I think dealing with second phases was a big problem Town had.
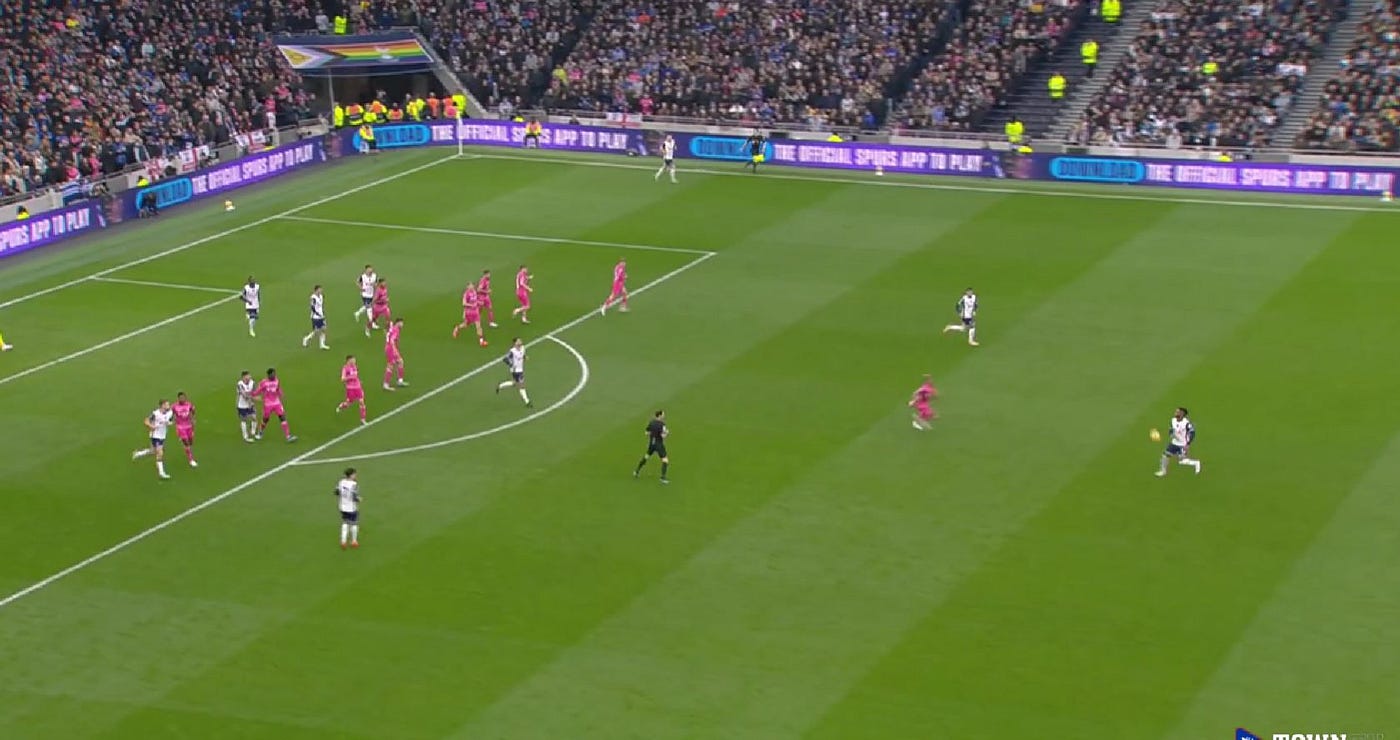
As the ball comes out of the box Town end up in almost a line of 9 with just Hutchinson going and pressing the ball as they look to try and get back into shape. During this disorganised spell it is easy for Tottenham to play it into Son who gets a shot off which Muric saves. I’d like to see a couple more players jumping out to press the ball as that straight line then creates confusion around who should press who.
Second corner was exactly the same set up with O’Shea heading away.
For the Third Tottenham opted to go short. Now you can see the same set up. Szmodics comes out to press but Morsy who is then there to close down the second man is slow to close down and ends up in no mans land as the cross comes in.
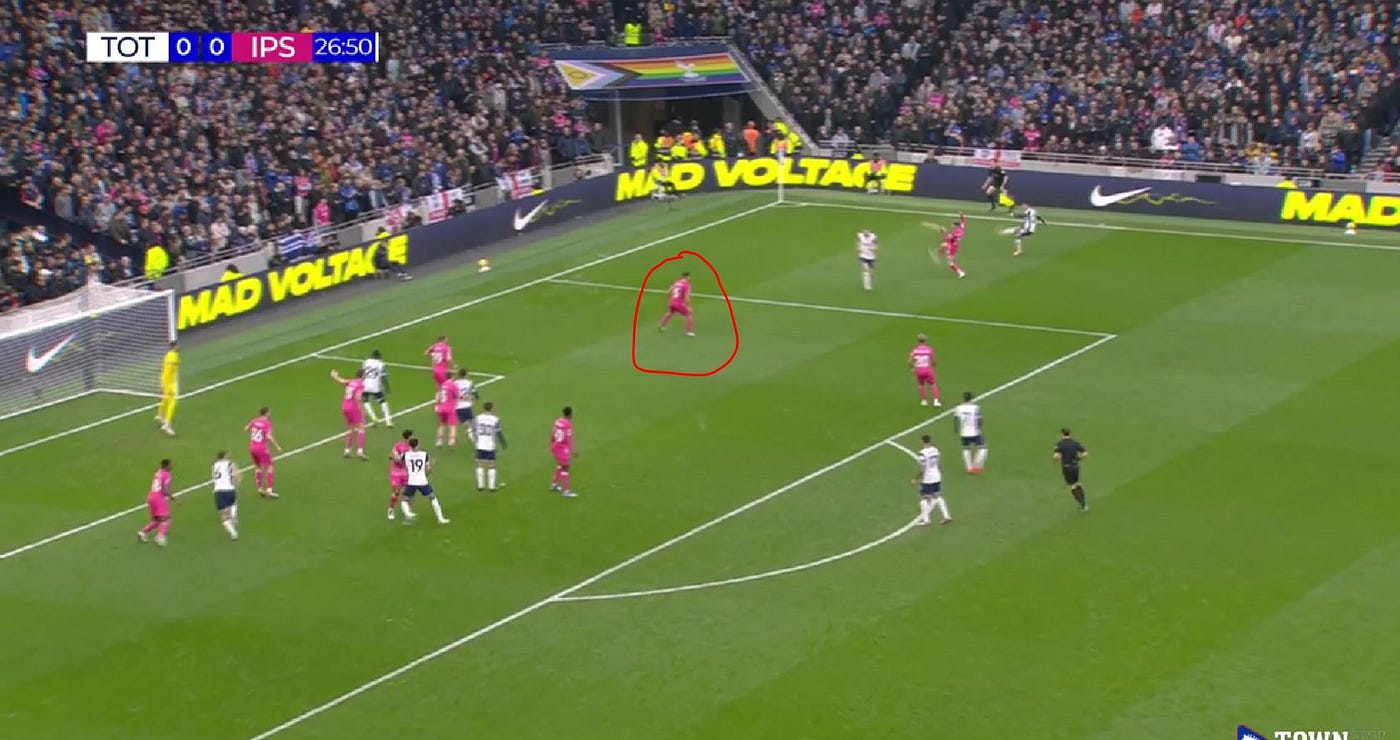
Fortunately Muric was there to claim that one but when we look at some of the goals conceded you’ll see why this is an issue.
Corner four was another short one with Morsy again out slowly allowing Kulusevski to chip into the box. The was flicked back in and Town were just about able to scramble away.
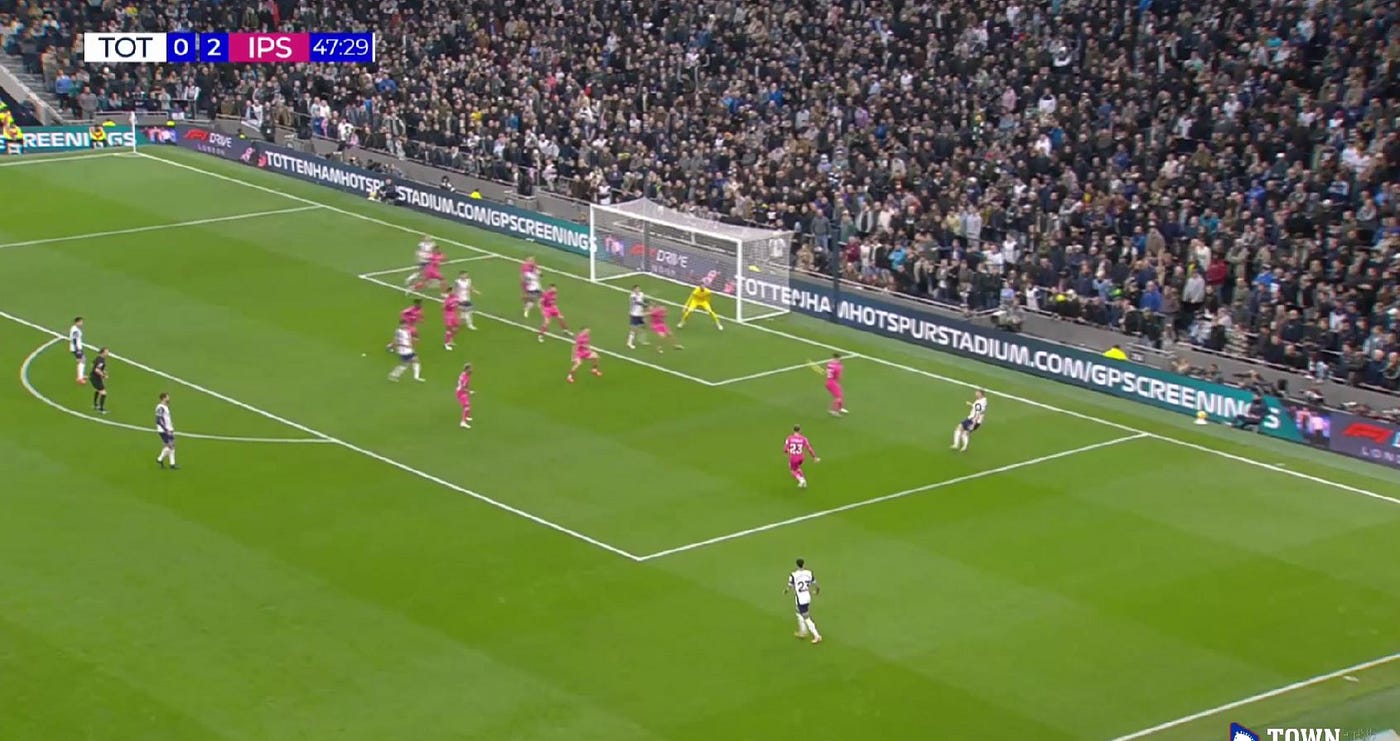
Corner five was short again with Szmodics able to make the tackle albeit at the expense of another corner.
Corner six led to the Dominic Solanke disallowed goal as Bentancur was allowed first contact and the Solanke bundled home off his arm. The important thing to note here which is relevant for later is that Tottenham always had an overload in the man marking areas and Bentancur was more often than not the man left free.
Corner seven is another Muric claim
For Corner eight we can see that Tottenham have not got anyone on the edge fo the box and instead have used the space to double up on Tuanzebe as they switch to an outswinging corner.
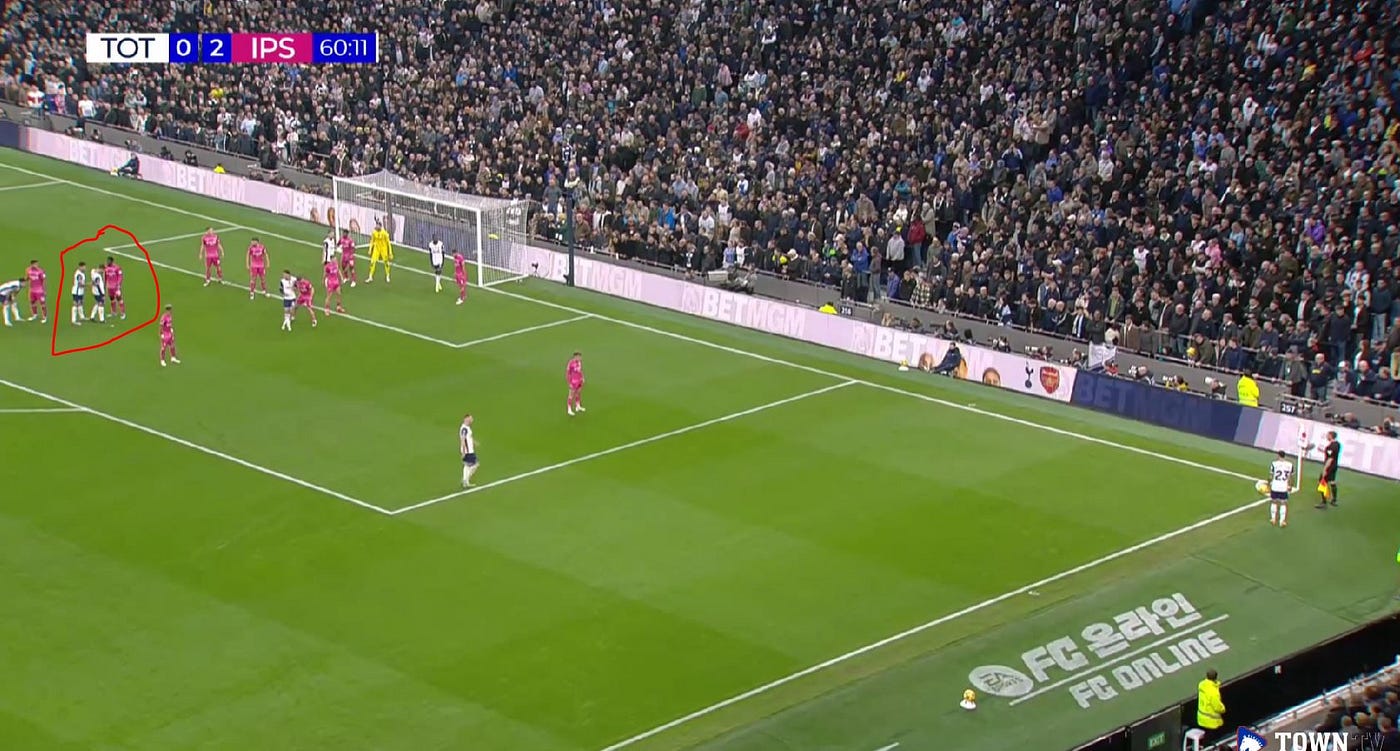
Instead they go short to Kulusevski but Hutchinson and Szmodics do their closing down work and Son ends up firing over the bar.
The goal comes from a similar situation albeit Tuanzebe has dropped a bit deeper rather than doing tight in his man to man marking
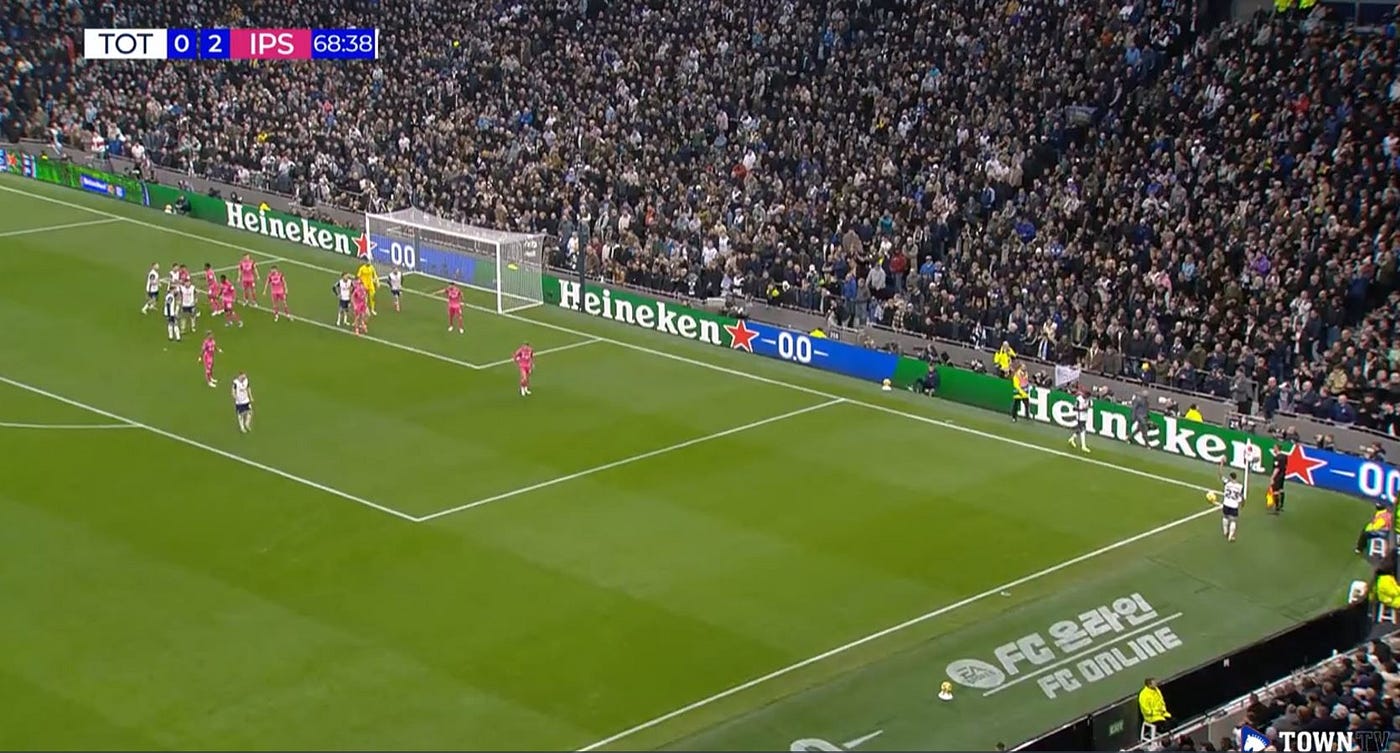
Tottenham run a screen to draw bodies away to the back post and Bentacur gets a run on the ball and is able to head home with a free header.
Corner ten they go short again and this time it is Jack Clarke who is on as a sub who closes Son down as he fires over.
Corner eleven is half claimed by Muric and then cleared away by O’Shea but Town players went a bit more zonal to cover off the run the Bentancur made for the previous goal.
The last corner of the game is once again claimed by Muric.
So what are the key takeaways from that game:
- Muric is dominant in the air from corners with four claims in this game
- The opponent often gets the ball into the box from short corners because Morsy is slow to close down
- Our second phase structure is good for dealing with a second cross but is very easy to pass through
- Man marking in the second zone makes it hard to stop near post run headers
- Having your two best counter attacking players cover the short balls allows for quick breaks.
Brighton (Home)
Now the Town camera angle doesn’t give the best view of the set up for corners but in this game for corner one Brighton looks to pin Christian Walton a lot. With a back five playing in this one the zonal marker honours were left to Luke Woolfenden, Dara O’Shea and Jacob Greaves whilst ahead the man markers ran a screen to defend against a train of attackers. Jens Cajuste was technically man marking but ended up in with the zonal marking given his attackers position whilst Kalvin Phillips was performing the Morsy role at the near post.
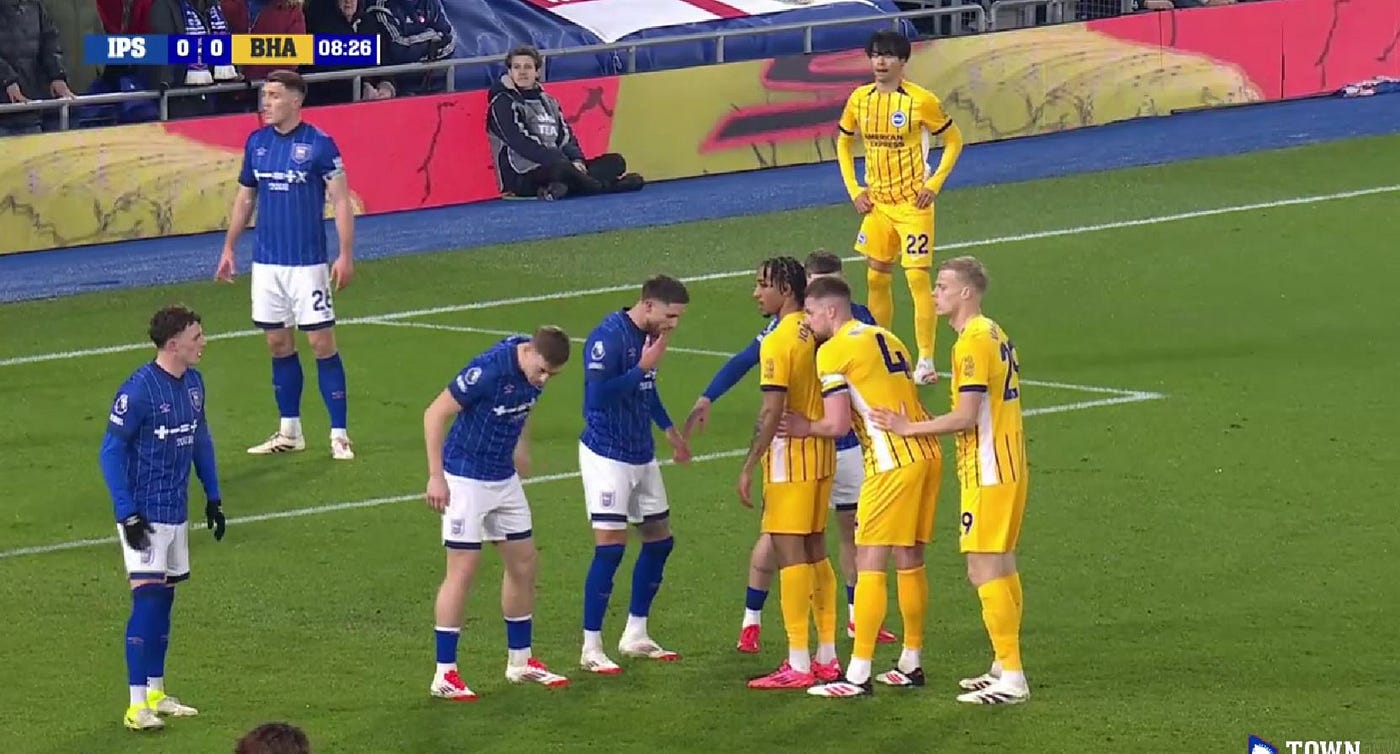
Brighton delivered this corner deep and Greaves headed away.
The second corner came immediately after and shows the set up a bit more. Interestingly Woolfenden goes to the near post, Greaves assumes the Burgess role in the middle and O’Shea covers the far post once again.
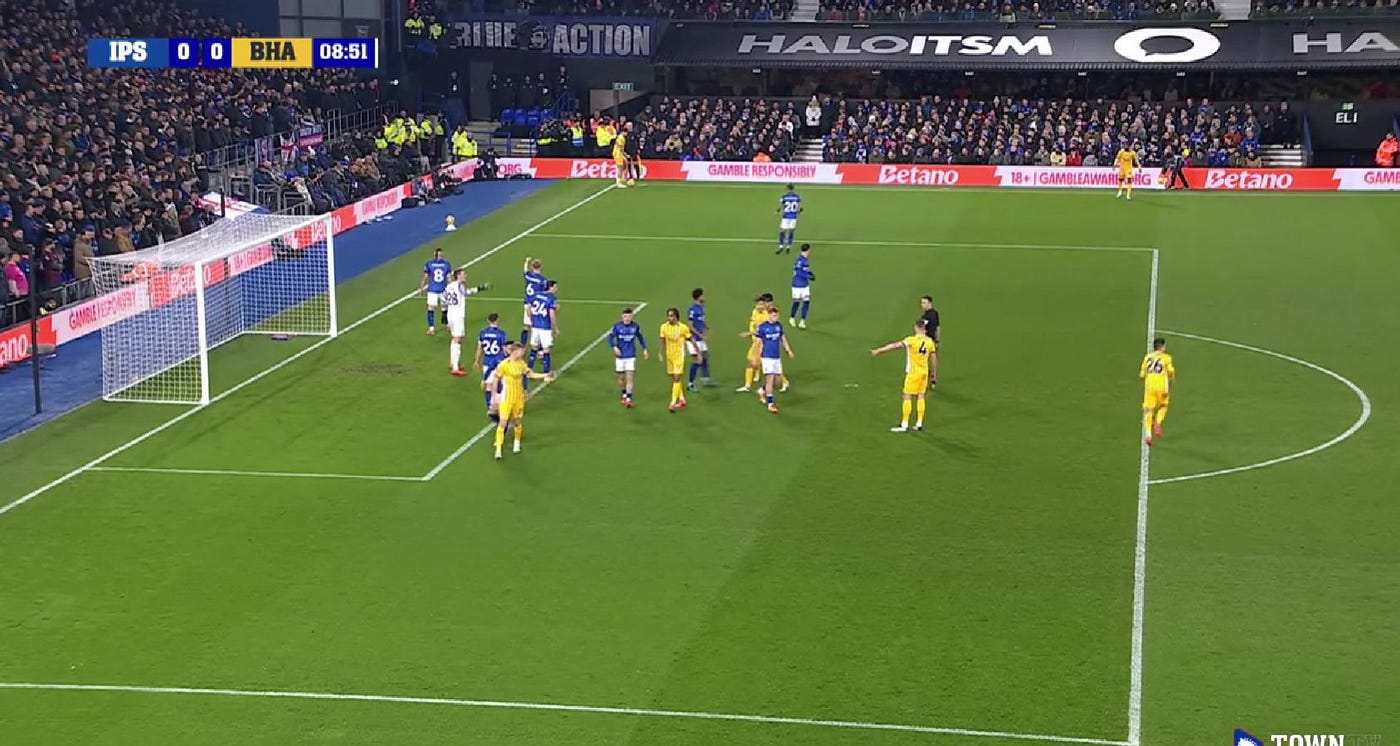
Brighton crowd the back post for this one and run towards to front but the ball is delivered too deep and goes out of play.
Corner three Brighton once again targeted the back post with bodies and run central
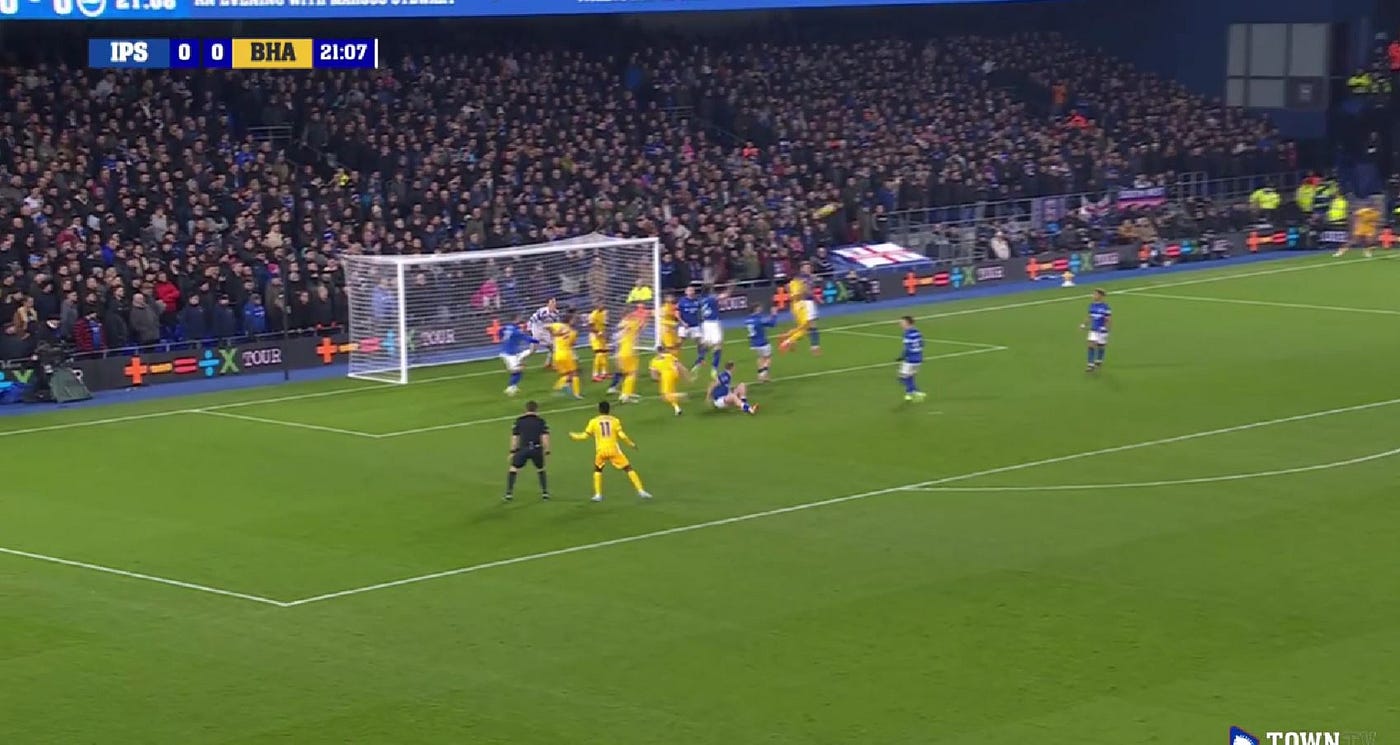
By having the zonal three it allows Greaves to come out and attack this but he misjudges the flight of the ball but does enough to put off the Brighton players header.
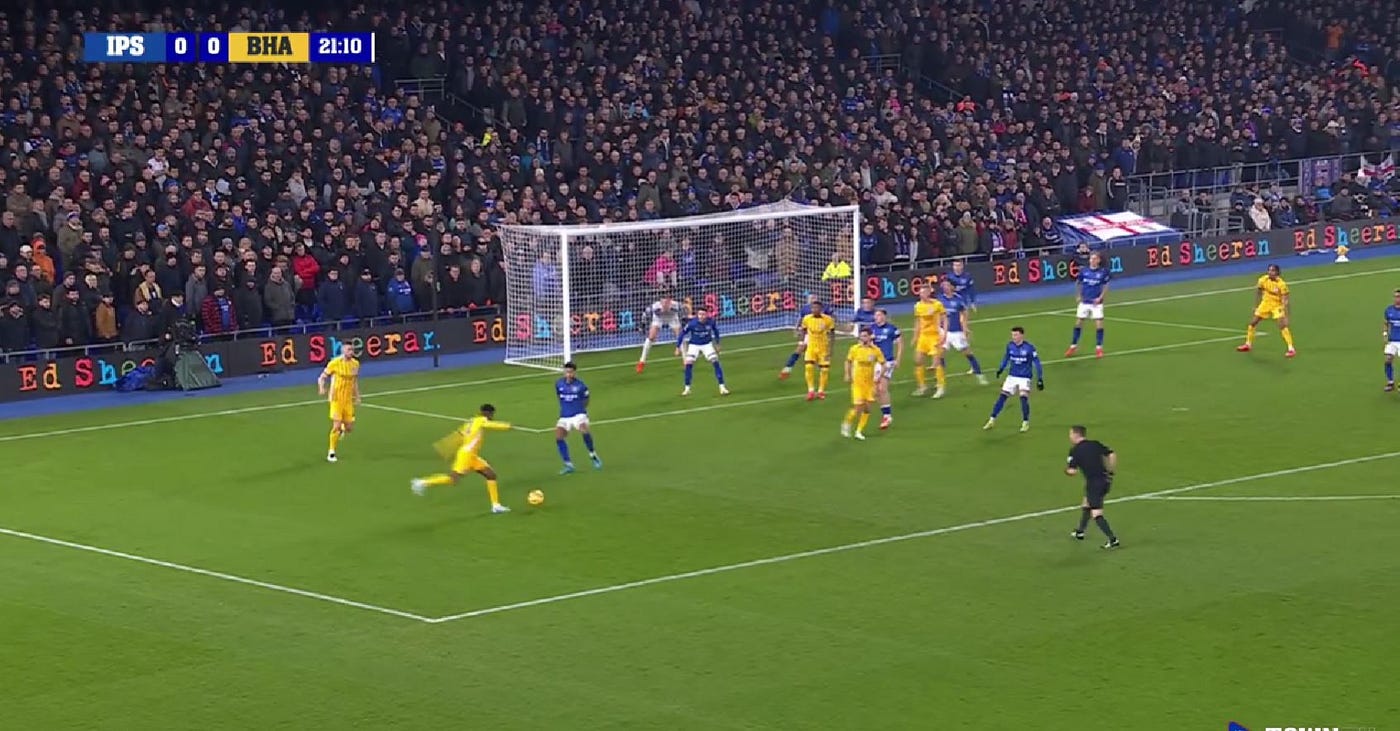
The second phase is dealt with fairly well. Cajuste comes out to cover the Adingra shot but he chips it to the far post where Joao Pedro gets a header away having given the covering Woolfenden a little shove.
It’s the same defensive set up for corner four which flys all the way through the box with Brighton again trying to pin Walton in.
Corner five Walton comes to punch but misses without incident as there as so many other bodies in there is can be cleared away.
Corner six its the screen vs the train again and Delap absolutely flattens Joao Pedro before it’s taken and it’s Delap who covers his man and flicks away at the front post.
Corner seven is also deep and over everyone.
Eight Walton gets right under once again but O’Shea is behind him to head away
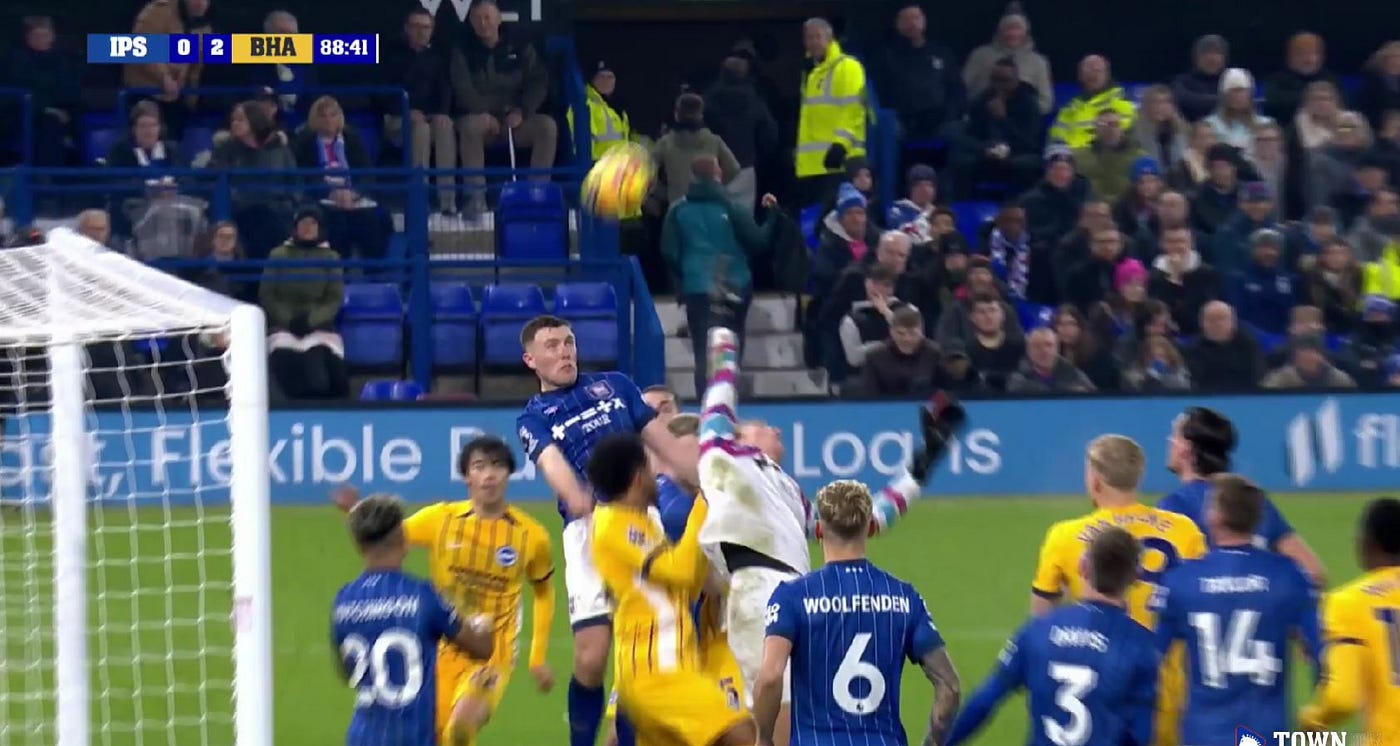
The last one of the game is a poor delivery, low to the front post and Morsy is able to boot clear.
So what are the key takeaways from this one
- Walton has a similar aerial presence to Muric but isn’t as confident claiming the ball and prefers to punch.
- Town largely keep their structure and positioning the same even where the personnel differ
- The man to man marking in front of the zone allows defending of different types of corners
Villa (Away)
From Villa’s first corner we can see the zonal three again. The two covering the edge of the box in Omari Hutchinson and Jack Clarke and everyone else going man to man.
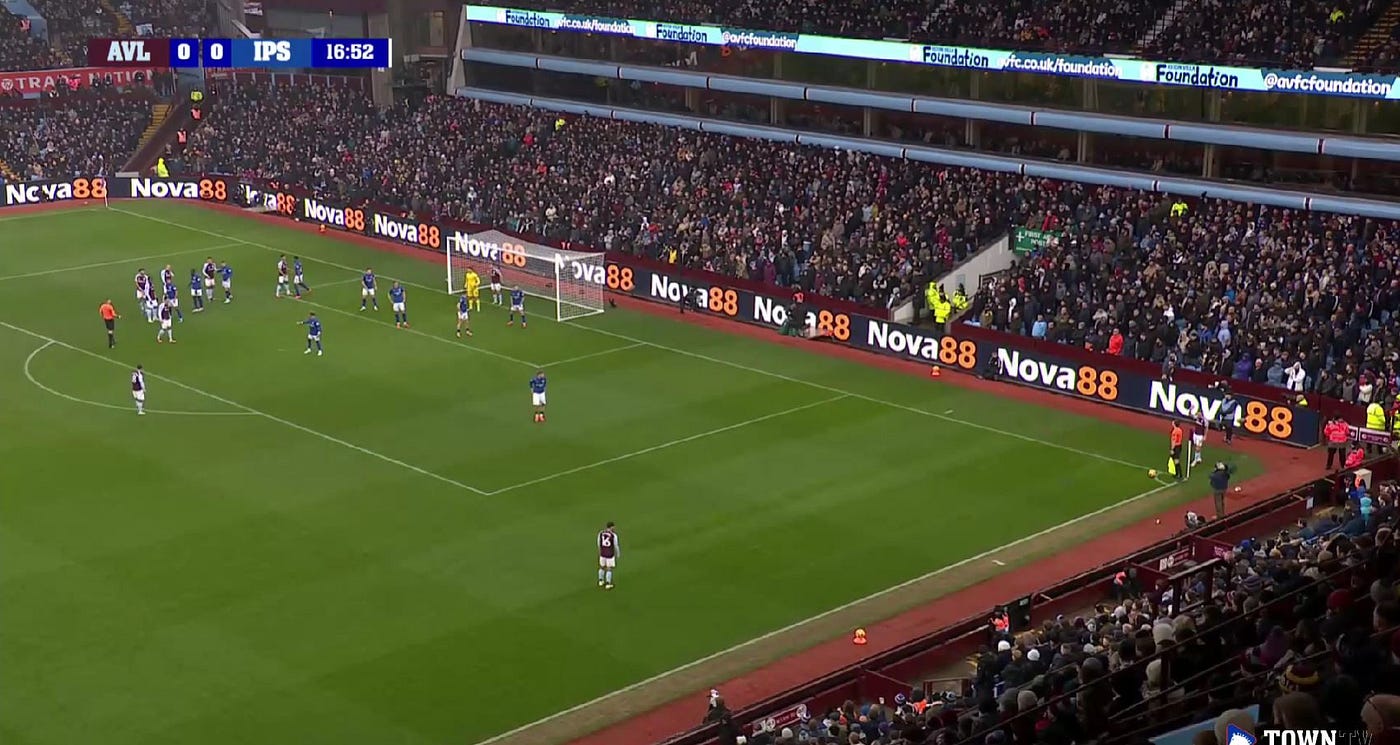
Villa go short with this one but the difference we see here compared to previous corners is that Kalvin Phillips is straight out to close down doubling up with Jack Clarke as Town eventually press the ball out for a throw in
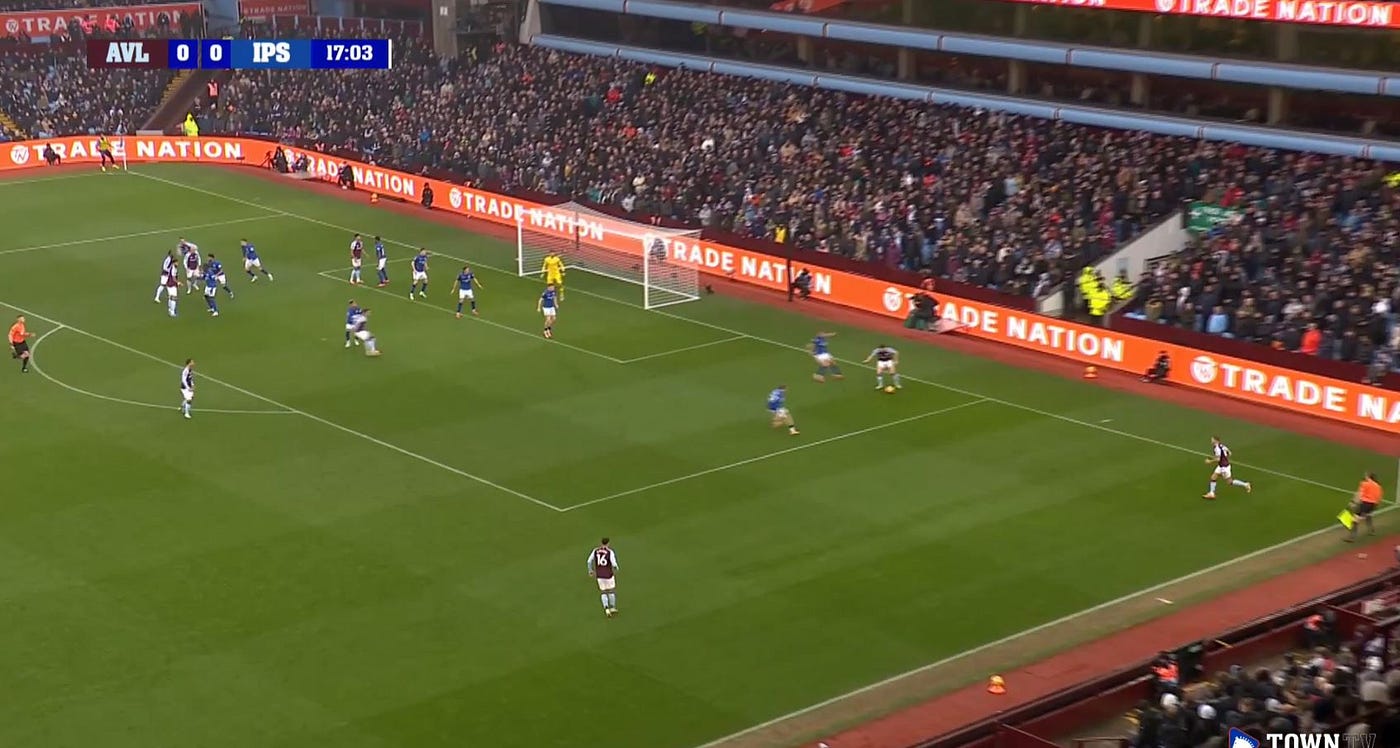
The next corner doesn’t come until the 42nd minute and the thing that’s worth noting in this one is that it’s after Town have gone down to 10-men with Axel Tuanzebe being sent off for a second yellow card. This means Town are now defending their box with one less player.
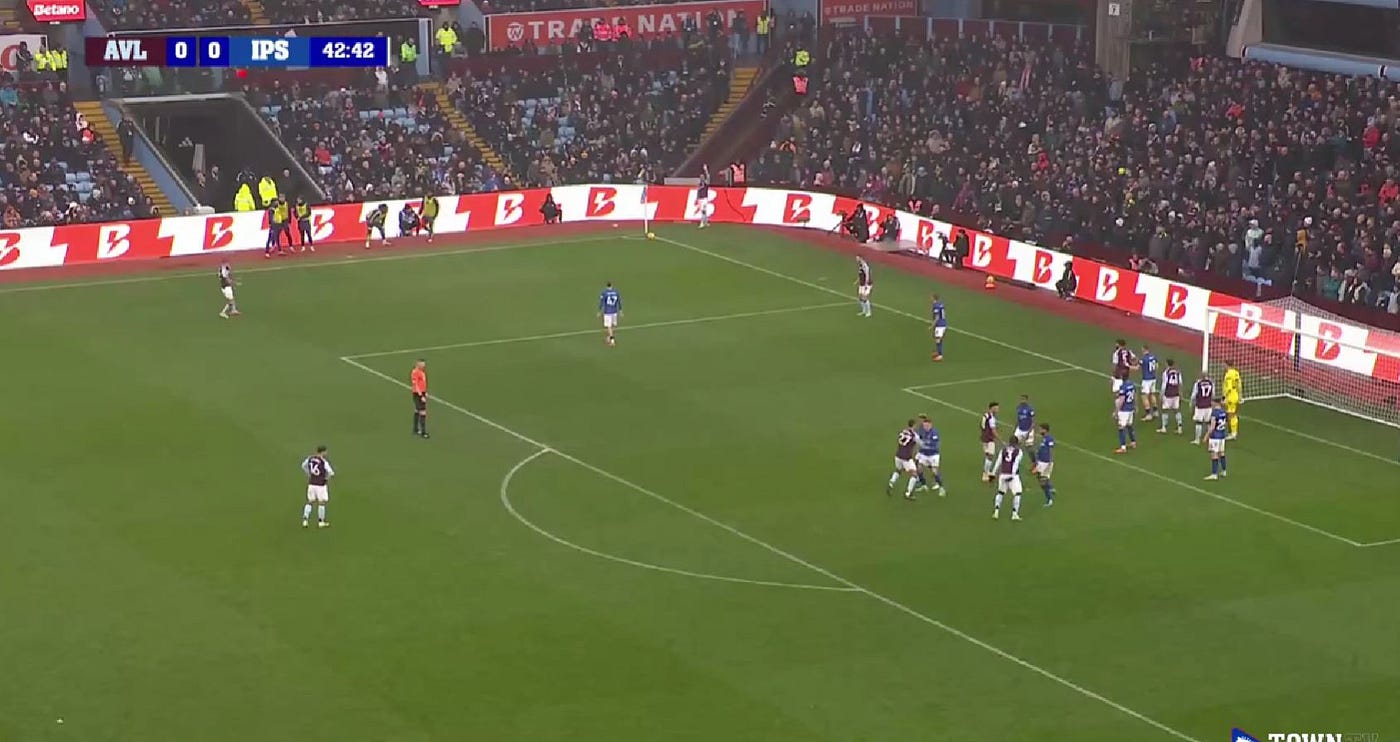
Now as you can see the role sacrificed is the one on the edge of the box with Omari Hutchinson dropping in to now defend man to man. Villa have televised the short option so Phillips has moved in close to cover that off.
Villa win the first ball at the near post because of that gap they’ve created but O’Shea reads it and heads away.
Villa went short with the next one but once again Phillips was out to close down and force a wayward cross to no one in particular.
Corner four was deep to the back post but O’Shea once again won it and headed away.
Corner five is headed away by Phillips at the front post. Town press the second phase well and force a wayward cross but Palmer weakly punches the below delivery instead of claiming to lead to a half chance to Aston Villa
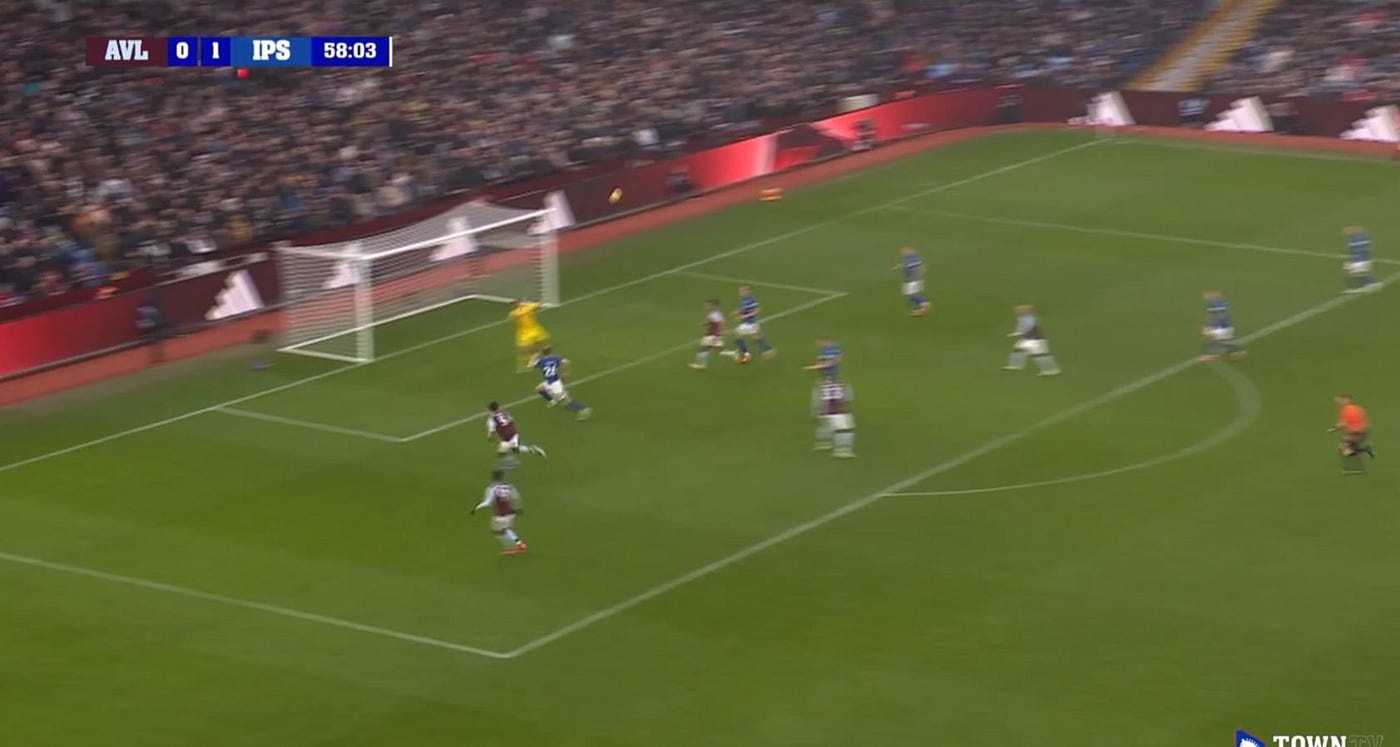
A short corner follows this one with Hutchinson pressing well and forcing another corner and he charges down the next one as well before Rogers gets a free header from the second phase. This is largely down to lack of bodies to close down the cross after an unfortunate ricochet following Omari’s challenge.
The third corner also goes short as Villa look to take advantage of Town’s man disadvantage by working it out to the edge of the box where Town have a player missing but Omari again does excellent defensive work to force Asensio to shoot over.
On 77 minutes, another Rashford corner, another header away by Phillips at the near post.
On 80 there’s another short corner routine which bypasses Hutchinson with a chipped ball but there are too many Town bodies in the way to block the resultant shot. Woolfenden cleared that one. It was the same again for the next as O’Shea blocked away and once more with Phillips blocking that one.
When Villa do finally put one directly into the box roles have shifted slightly. Woolfenden has replaced O’Shea in the deep zone and O’Shea has gone to be a man to man defender. The ball does make it’s way through. Palmer comes for it and just about manages to punch it away.
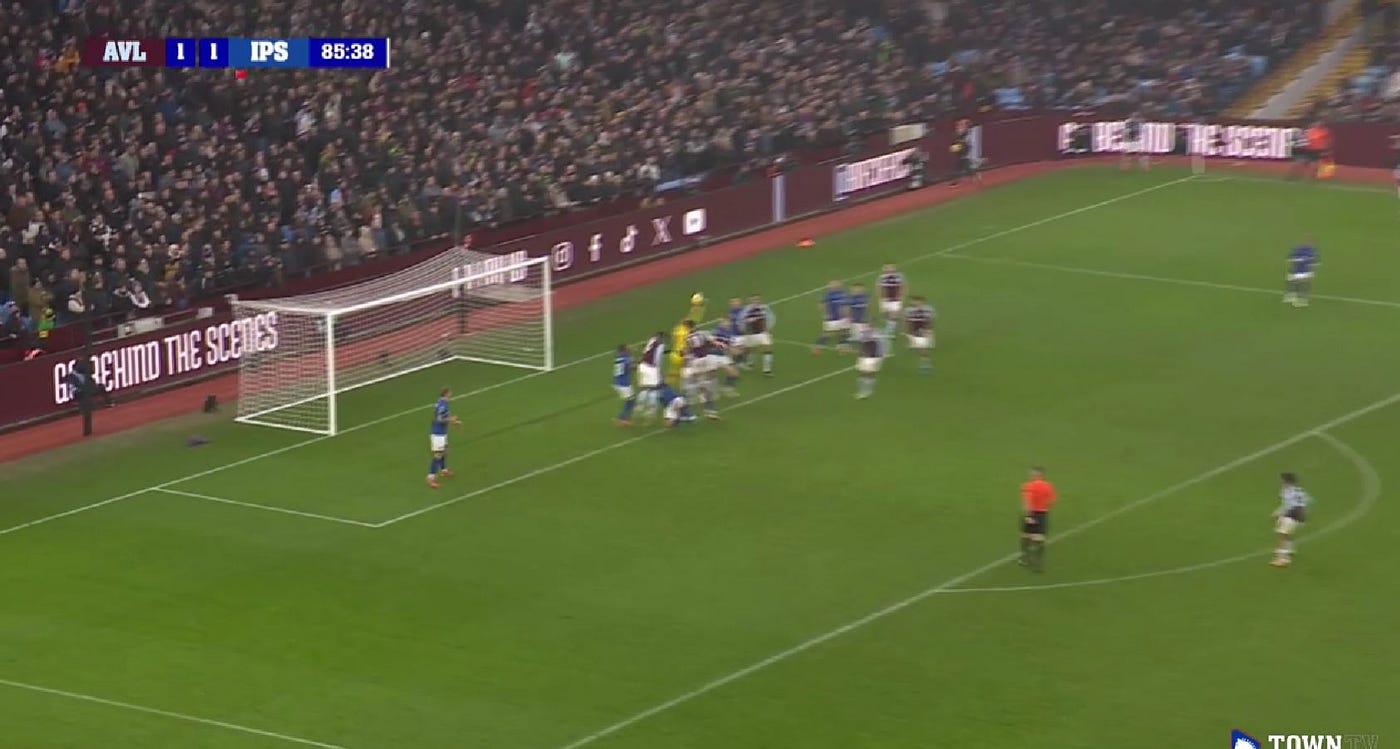
Villa then try going direct again but Greaves heads away. Then Rashford overhits one before Phillips once again heads away at the near post.
So what can we take away from this game:
- Palmer isn’t as tall as the other two keepers which results in more punches which doesn’t alleviate pressure
- Kalvin Phillips is a massive upgrade on Sam Morsy as that near post pressing defender with both his quick closing down and ability to head the ball away
- Despite being down to 10 Town still looked comfortable defending corners, largely thanks to the work of Omari Hutchinson covering two roles in one.
That is the general overview of how Town set up to defend corners where I’ve highlighted a lot of strengths and a few areas of weakness that could cause problems.
Next I want to take a look at the types of corners conceded in a bit more depth.
Direct headers
We’ve already looked at Bentancur’s direct header in the Tottenham game so I’m going to pick out Maguire, Osula and Schade’s goals in addition to look at.
Harry Maguire (Manchester United — Away)
The first thing to note about Maguire’s goal is how he has a free run as Cajuste and Tuanzebe are both covering De Ligt who had scored earlier. One of them should be touch tight on Maguire.
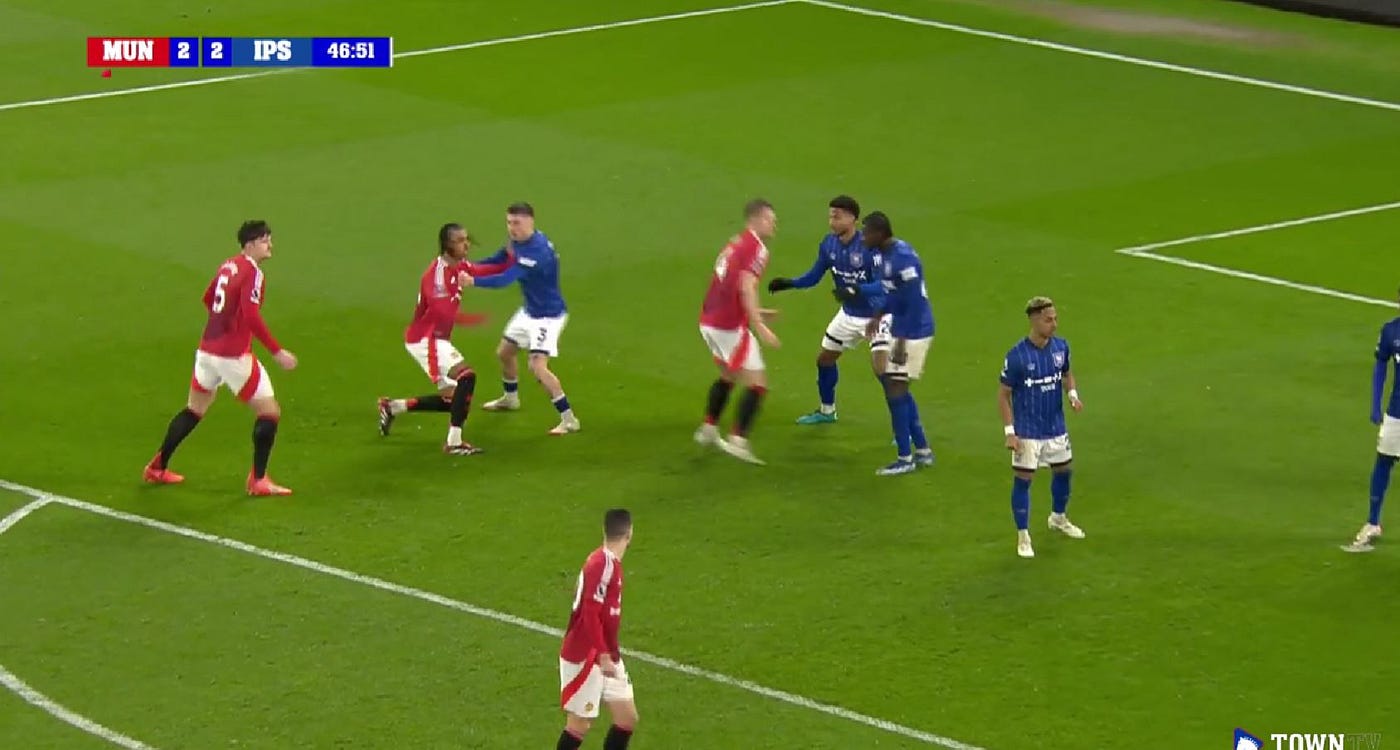
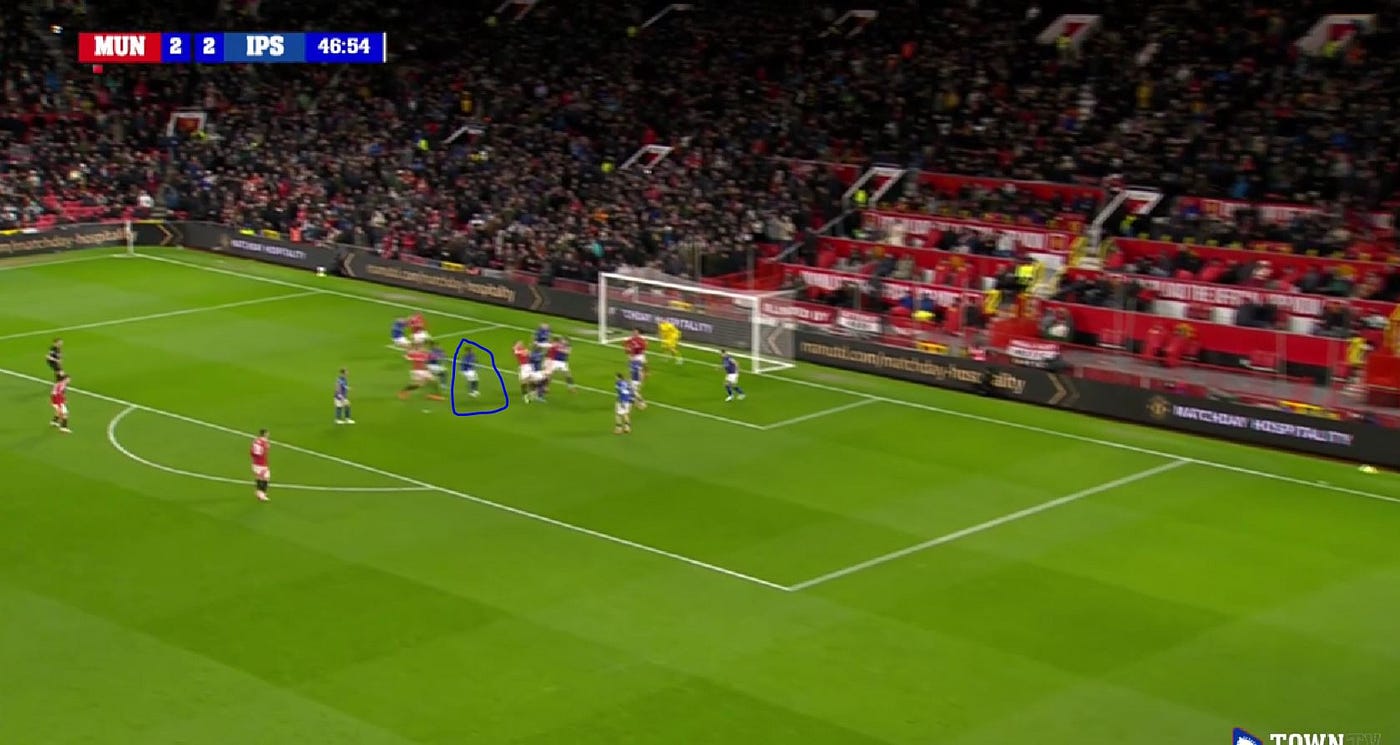
As the ball comes in Tuanzebe follows De Ligt leaving Cajuste with Maguire which first of all is a mismatch but again because they weren’t fully man to man allows Maguire a free run and jump
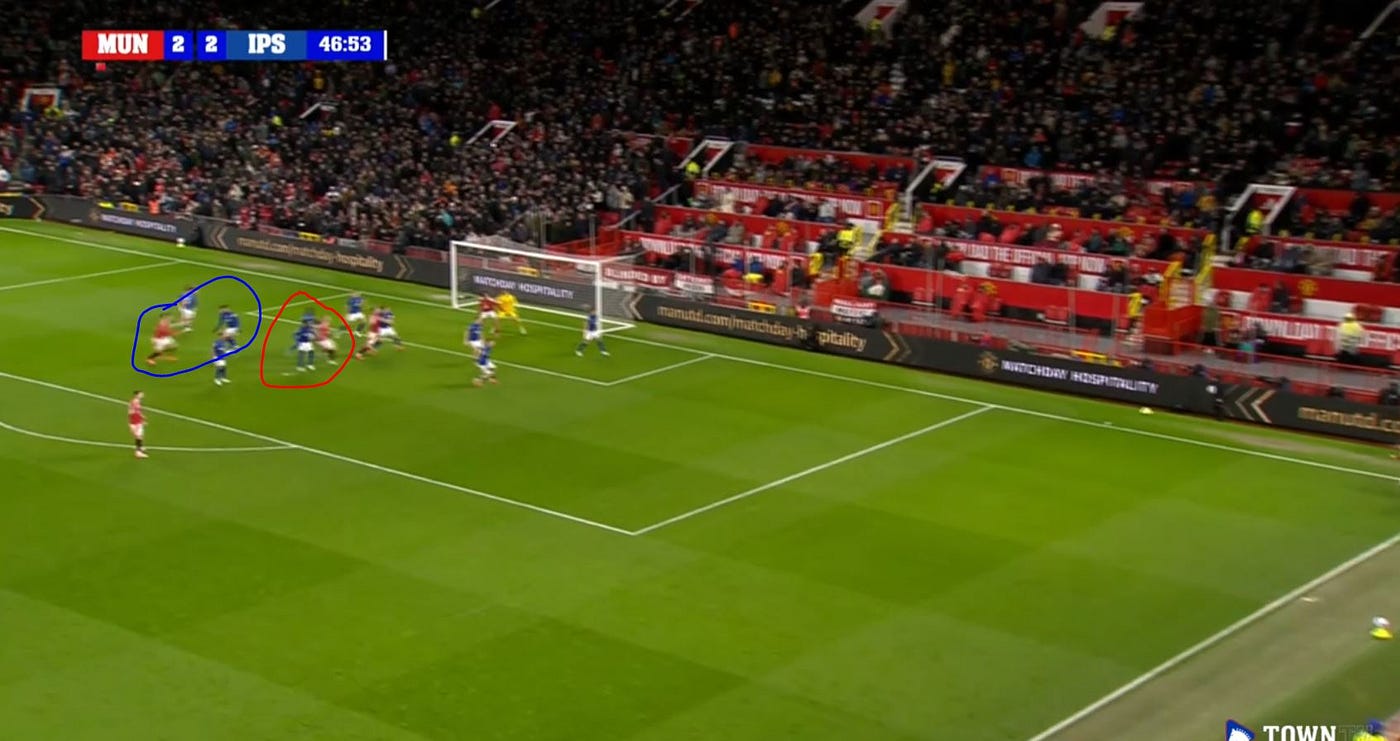
The last point on this on is that Manchester United are down to 10 men which means Philogene is the extra man in the box. He’s in an excellent position to go and head this away as it clears the group of bodies jumping for it but is too static, opting to try and kick it as Maguire nips in ahead of him.
Will Osula (Newcastle United — Away)
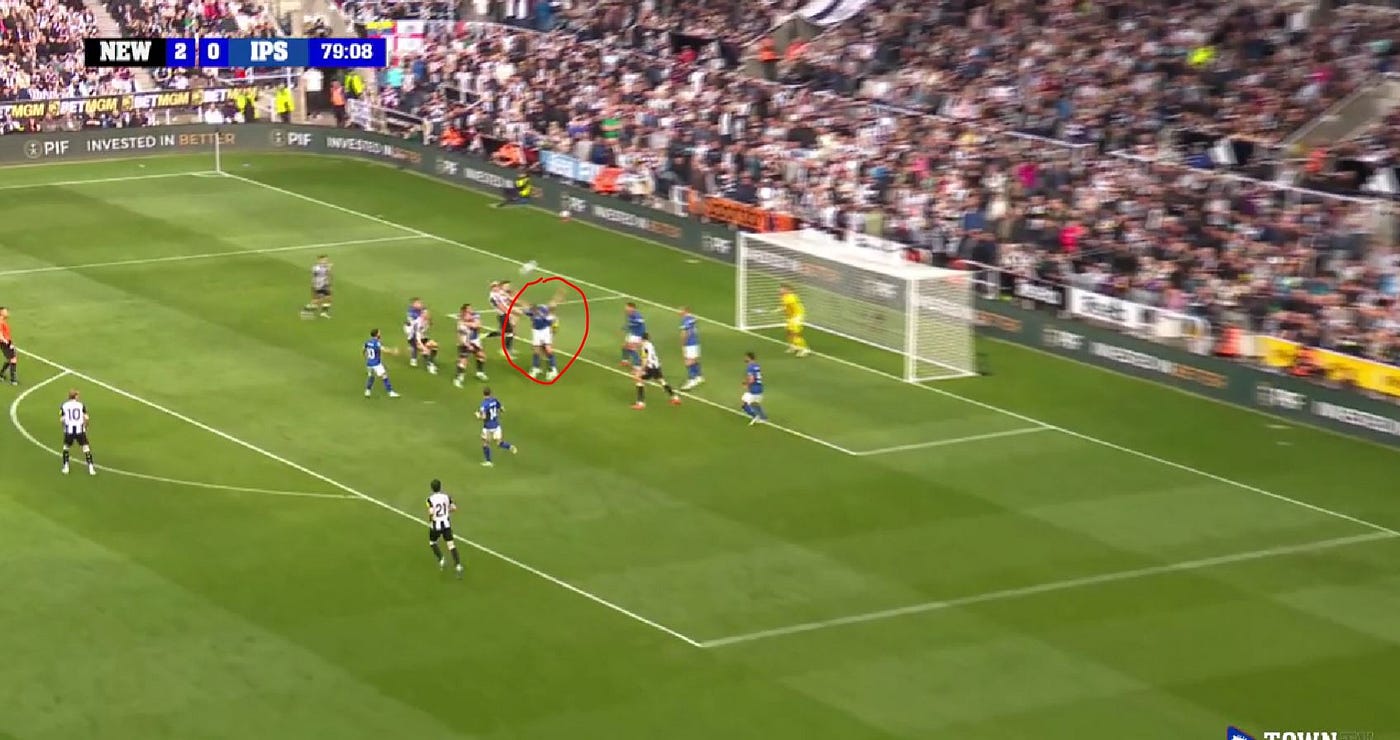
This is another corner where Town are down to 10 men following Ben Johnson’s dismissal.
Town have plenty of time to set up. Unlike Villa who went short a lot, Newcastle have loaded bodies into the box for this one. I don’t think Town did anything wrong with this one. Their defensive set up was good and Burgess would have got this one away if he wasn’t fouled here.
Kevin Schade (Brentford — Home)
This one comes after two ‘corners’ that were both stopped for grappling in the box as the corner was taken. It’s our standard set up. Delap front post, Burgess middle, O’Shea deep with Enciso and Chaplin covering the outside the box options and everyone else going man to man. From this point we look pretty well covered. Interestingly Schade is standing on Palmer before the corner is taken.
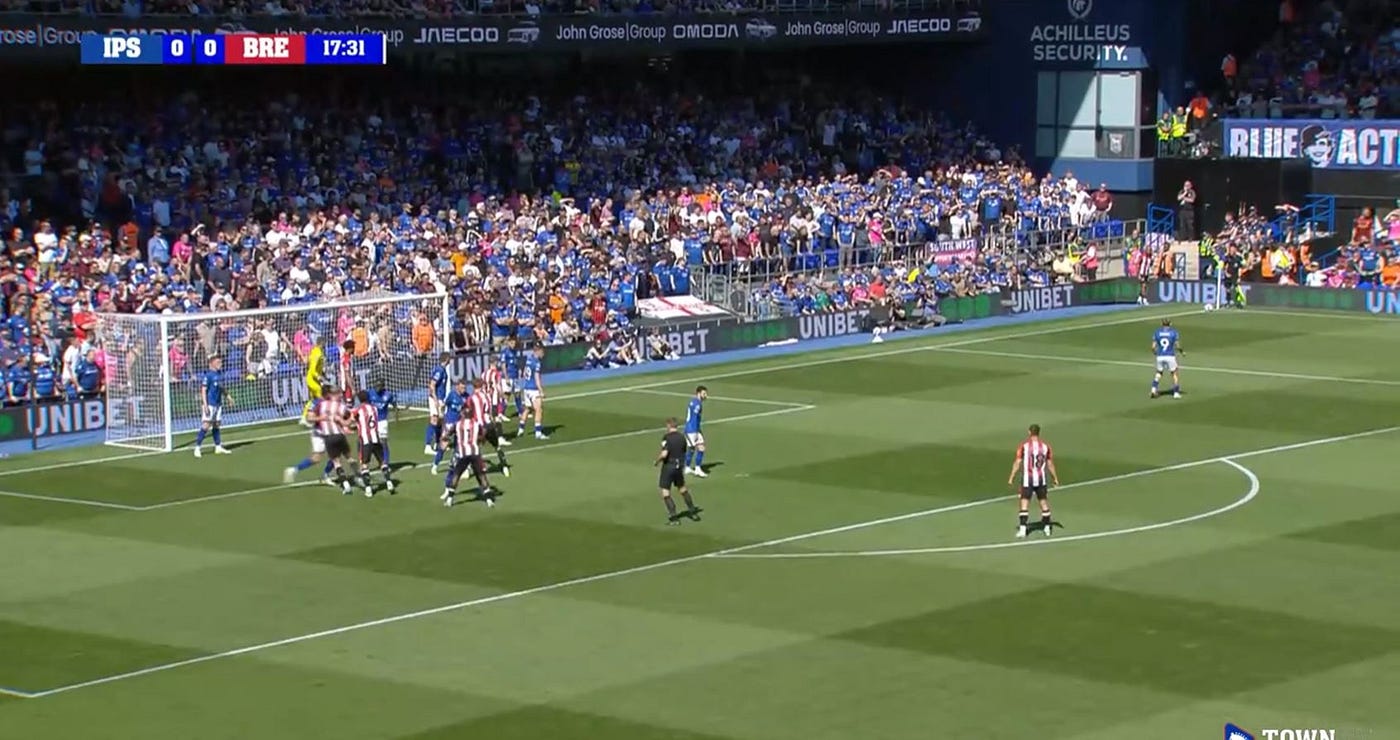
This positioning allows him to just drift out to the front post unmarked and get to the ball first
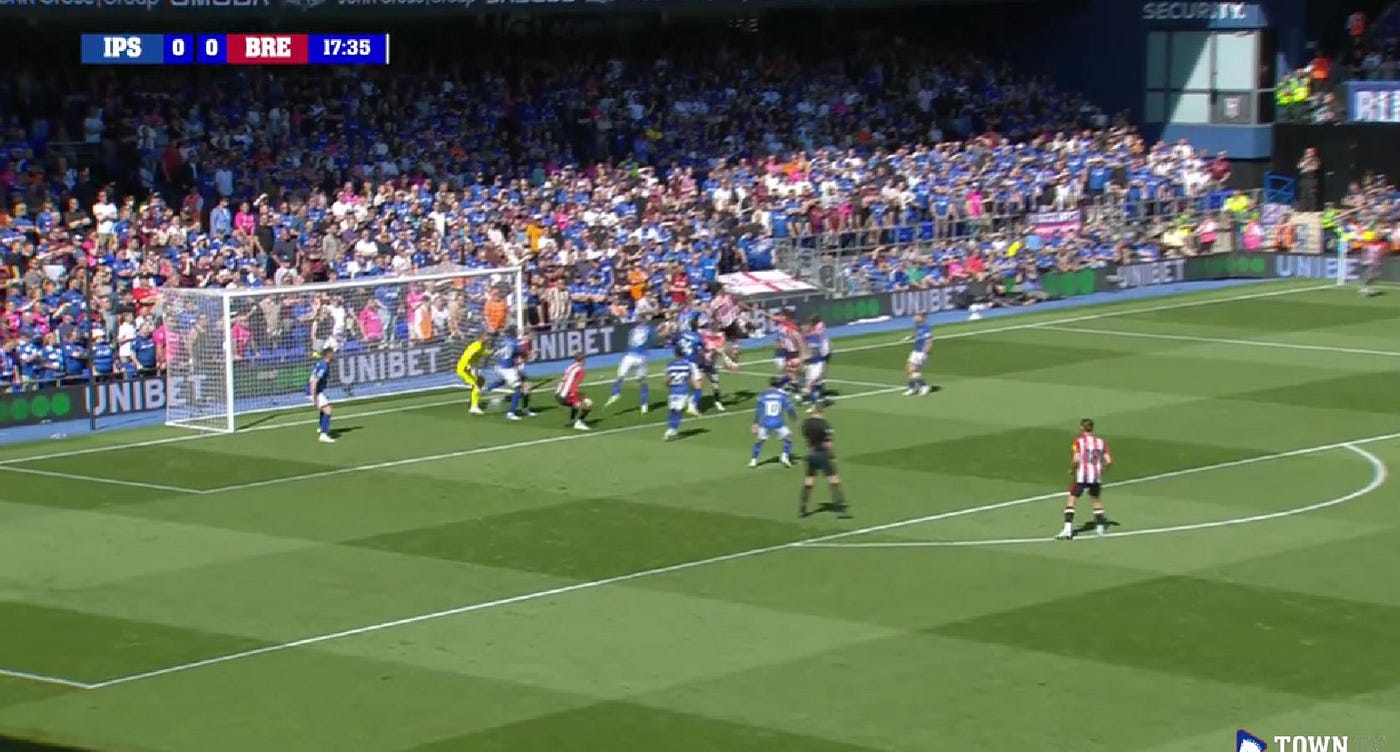
When you look at where he scores from as well it takes a very high class header to get it in from there. The first thing to say about this one is it’s a clever set piece from Brentford. You don’t often see the striker drift out from standing on the Goalkeeper. My one issue with this one is having Delap at the front post. Yes he’s tall and he’s strong and he can head the ball but maybe someone with better defensive instincts would have got their quicker.
Short Corners
This is where I think Town’s biggest corner weakness came from last season. I’m going to look at Trossard, Nwaneri and Burn goals here.
Leandro Trossard (Arsenal — Home)
Again it’s worth pointing out that Town were down to 10 here. Once again you’re looking at a very similar set up. The issue here is that Arsenal have four men outside the box with just Jack Taylor covering them. Something that he is pointing out as the previous corner is taken. That one resulted in a blocked Martinelli shot but it’s the same again when Trossard does eventually score
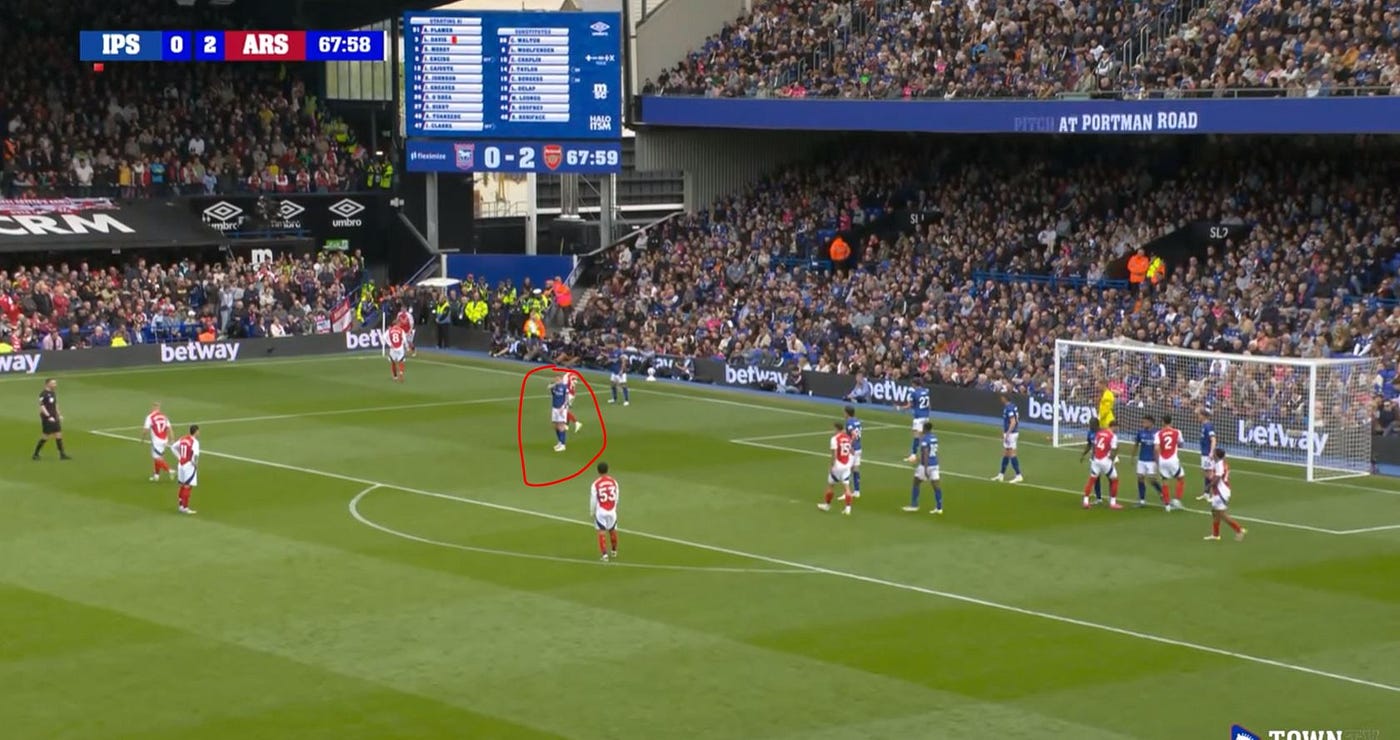
The ball goes short to Odegaard, Morsy does the most half hearted press I’ve ever seen but look at the options that are available below. Taylor is torn between pressing and staying.
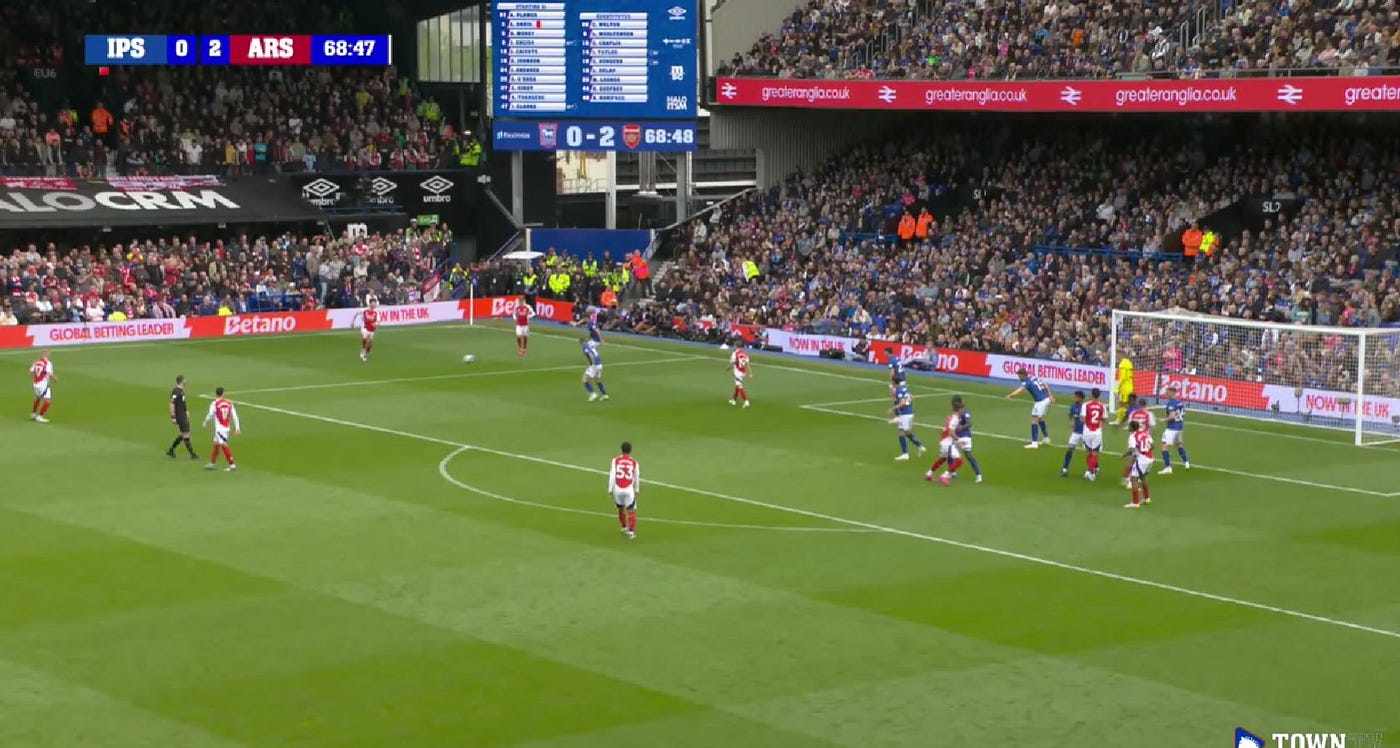
He does neither and Trossard who as just peeled off isn’t followed by Hirst who’s job is to head balls away at the near post in this set up remember.
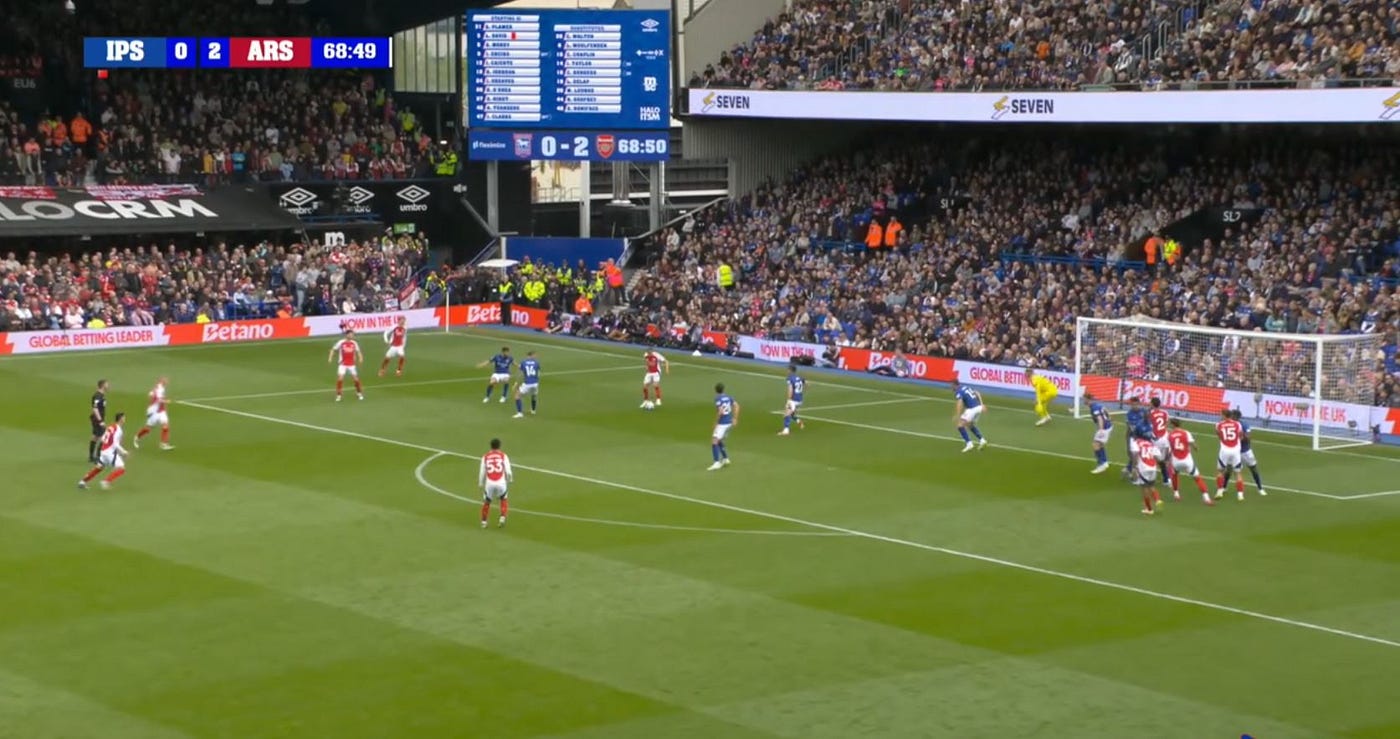
Trossard ends up receiving the ball, in space, in the box and has a relatively easy finish.
Nwanieri (Arsenal — Home)
This goal is almost a carbon copy but from the other side.
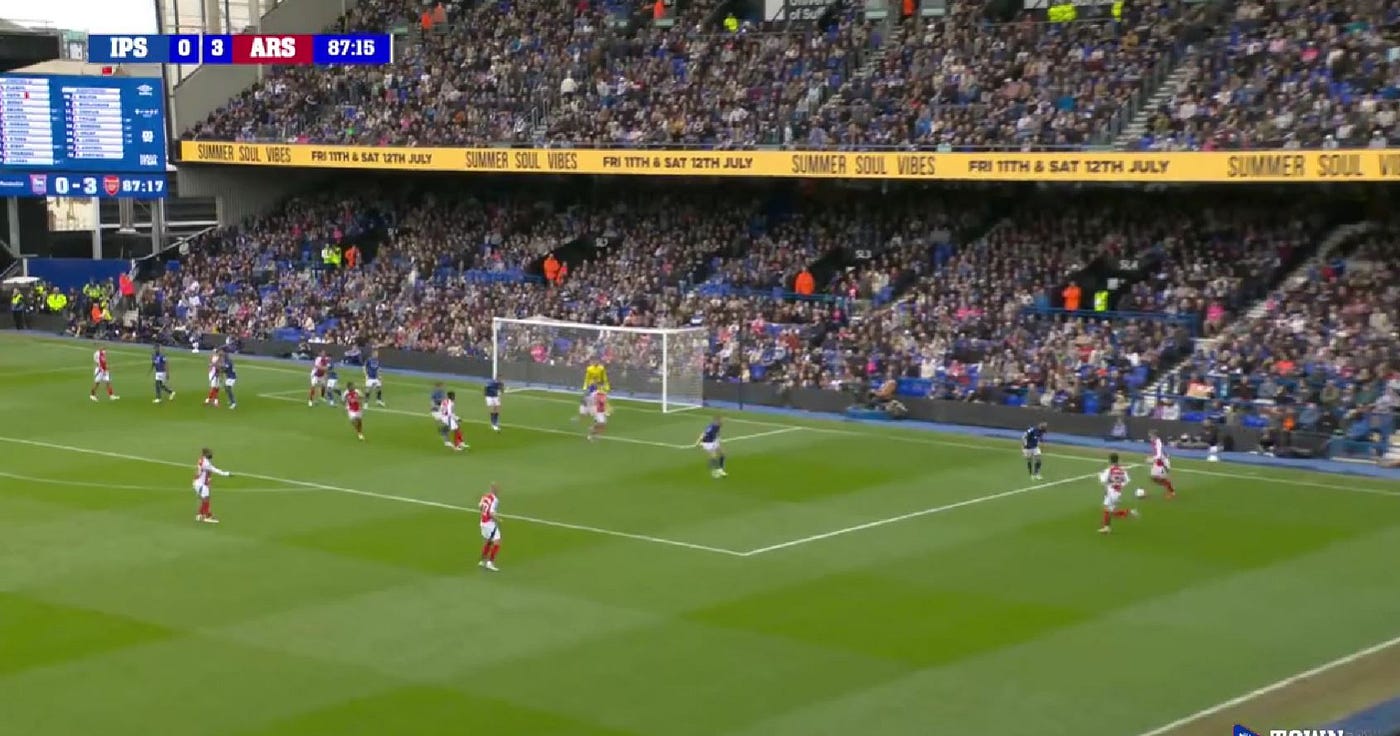
Again there’s a bunch of players left outside the box. Again Morsy is slow to close down and again Taylor gets caught in no mans land. Sterling receives the pass, lays it back to Zinchenko who has the easiest ball into Nwanieri, who cuts inside and finishes with a deflected effort
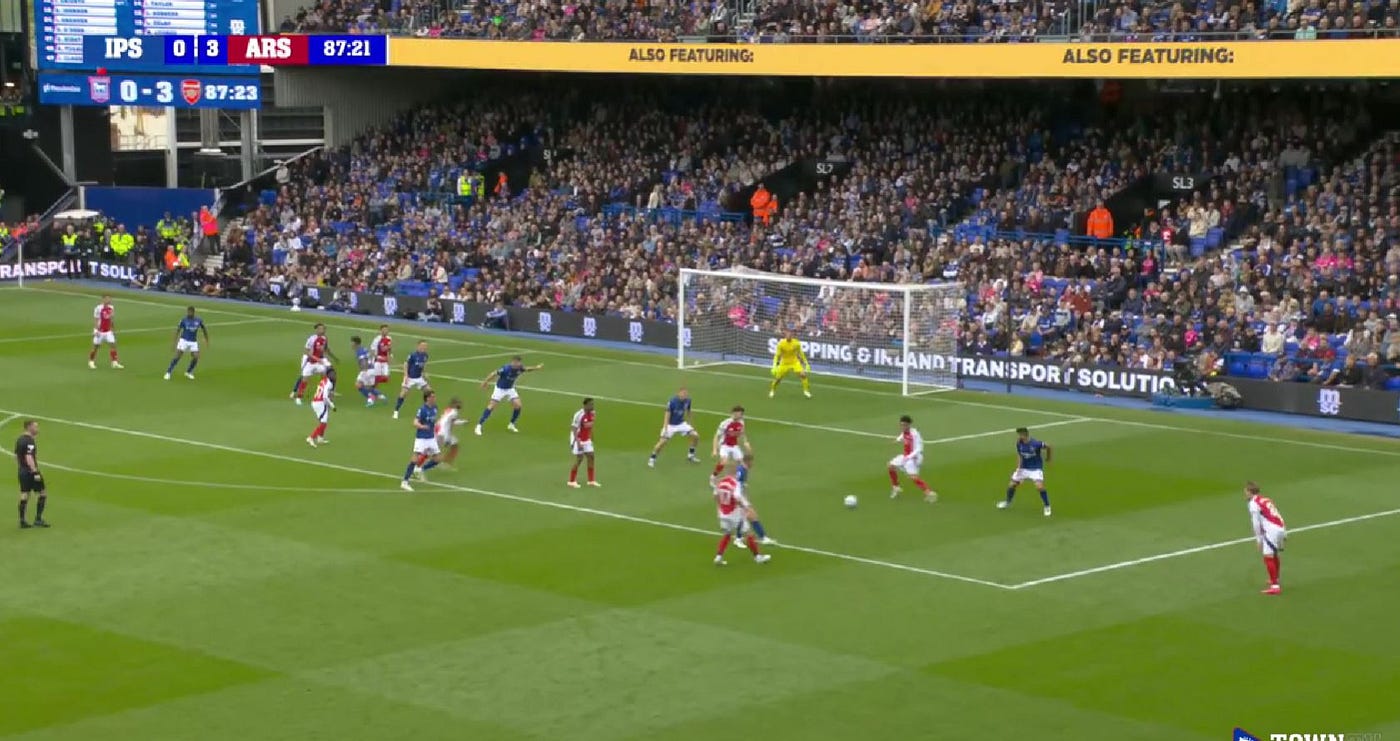
The other point with this one is when the striker is covering the front post header for short corners it often means he is then the one covering that inside ball as Delap is here and as Hirst was for the Trossard goal.
Dan Burn (Newcastle — Away)
This one comes because Town aren’t set, the first example this has happened.
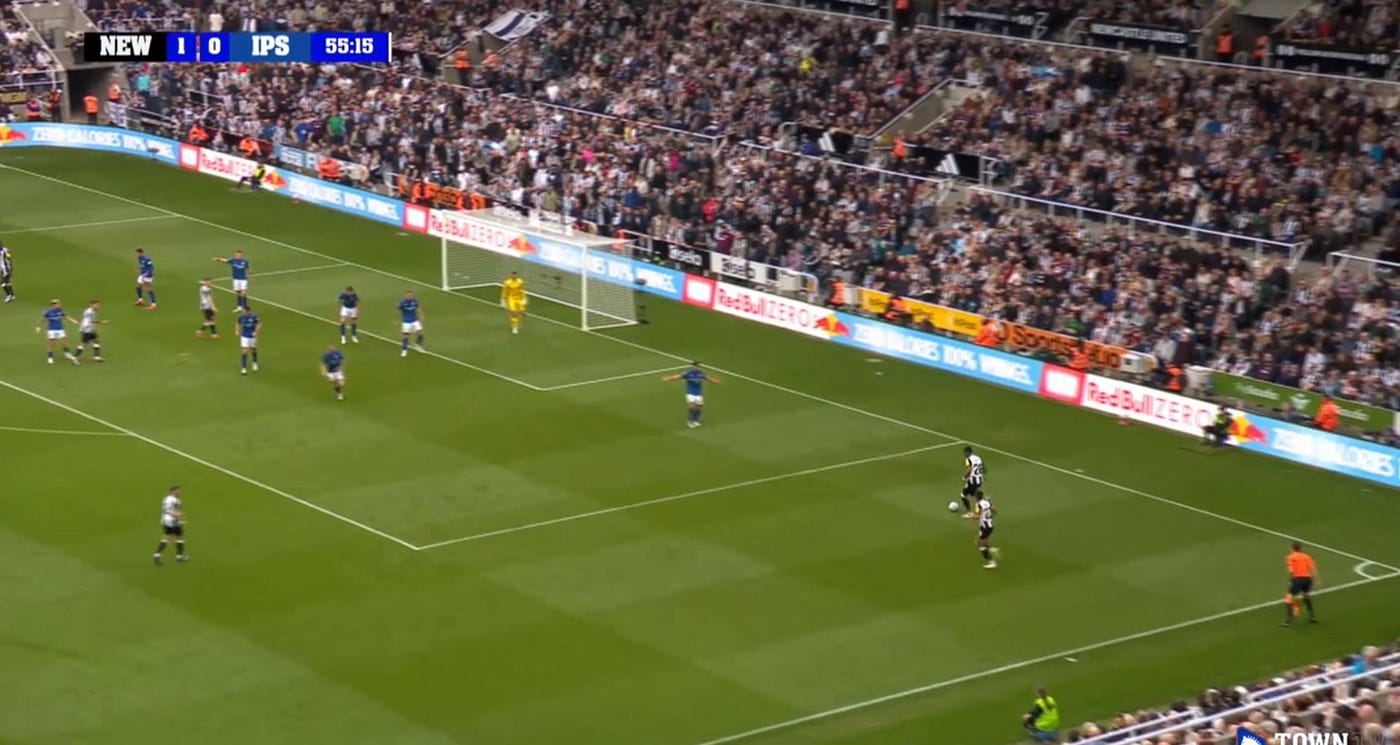
Newcastle are allowed to advance towards the box with Morsy not ready to press.
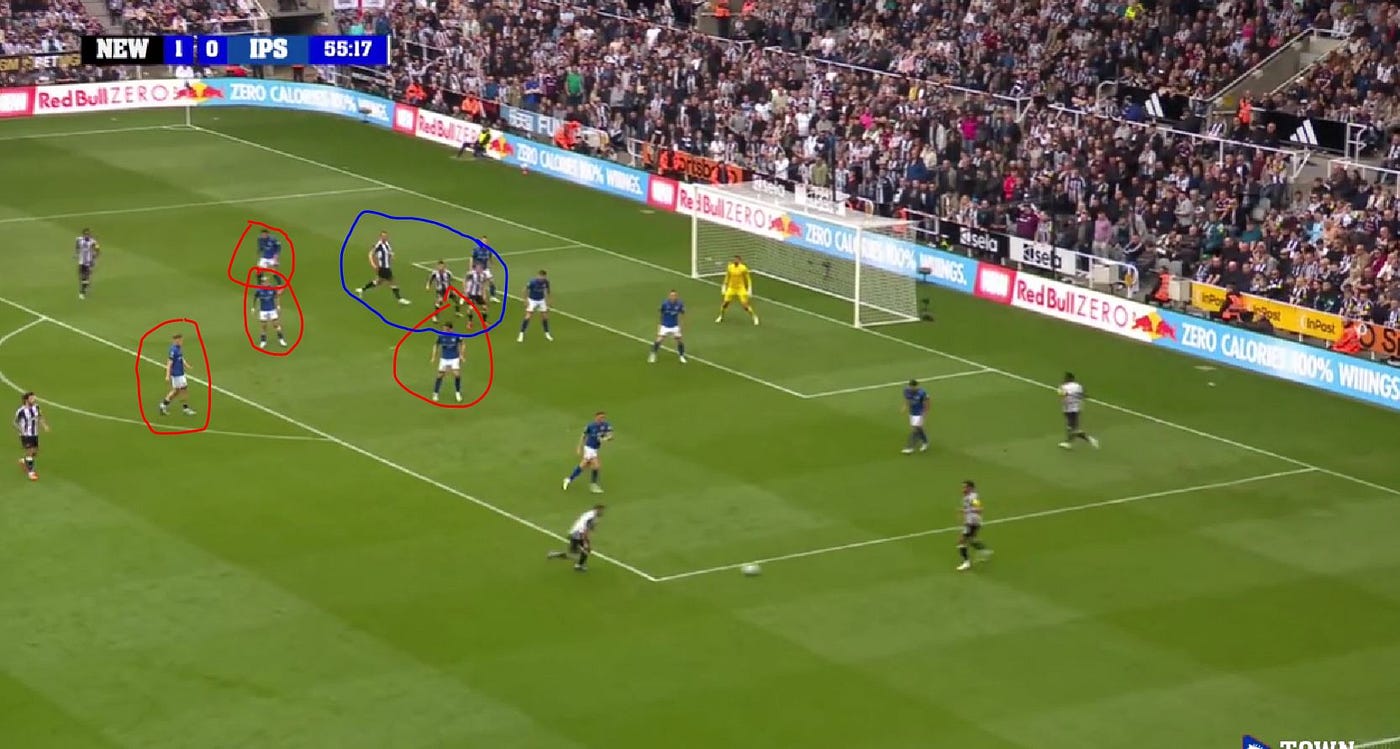
Taylor has to fly out to press but you end up with four Town players marking thin air and a 3 v 2 overload at the back post which gets punished as Burn bundles in from close range.
Second Phase Corners
Most of the short corner and direct corner goals were conceded when Town were down to 10 men however all second phase goals conceded were when Town had a full compliment on the pitch and hence could also pose a point of concern.
In this part I will look at goals from Keane, Milenkovic and De Ligt
Michael Keane (Everton — Home)
Town were set up well for this one. The initial corner went short. Jack Clarke came out to press followed by Morsy but McNeill lofted the ball in. Tarkowski headed back across goal but Burgess covered his central zone well and headed away.
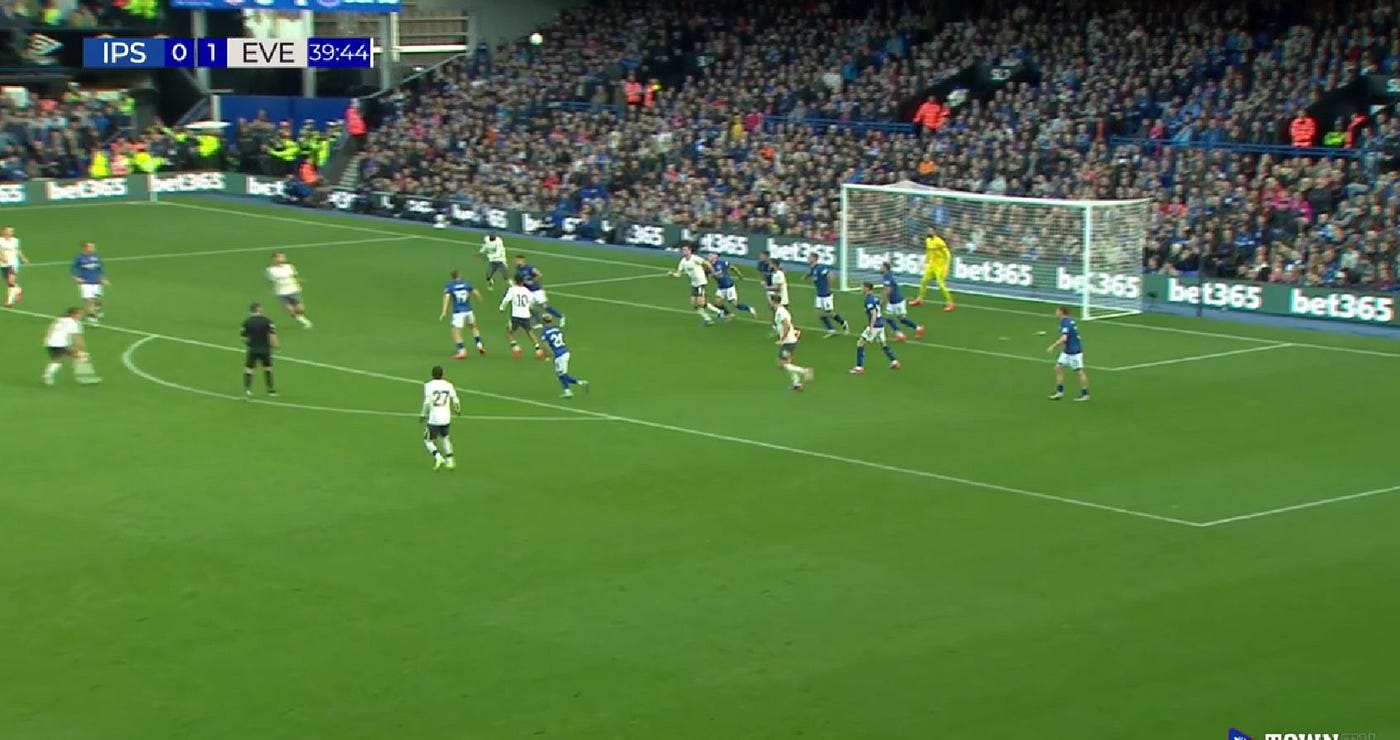
Now that position doesn’t look that dangerous and Delap could jump and head this away again but instead he looks to try and bring it down to launch a counter attack. This is very much a risk v reward situation and at 1–0 down it’s hard to say that’s the wrong decision.
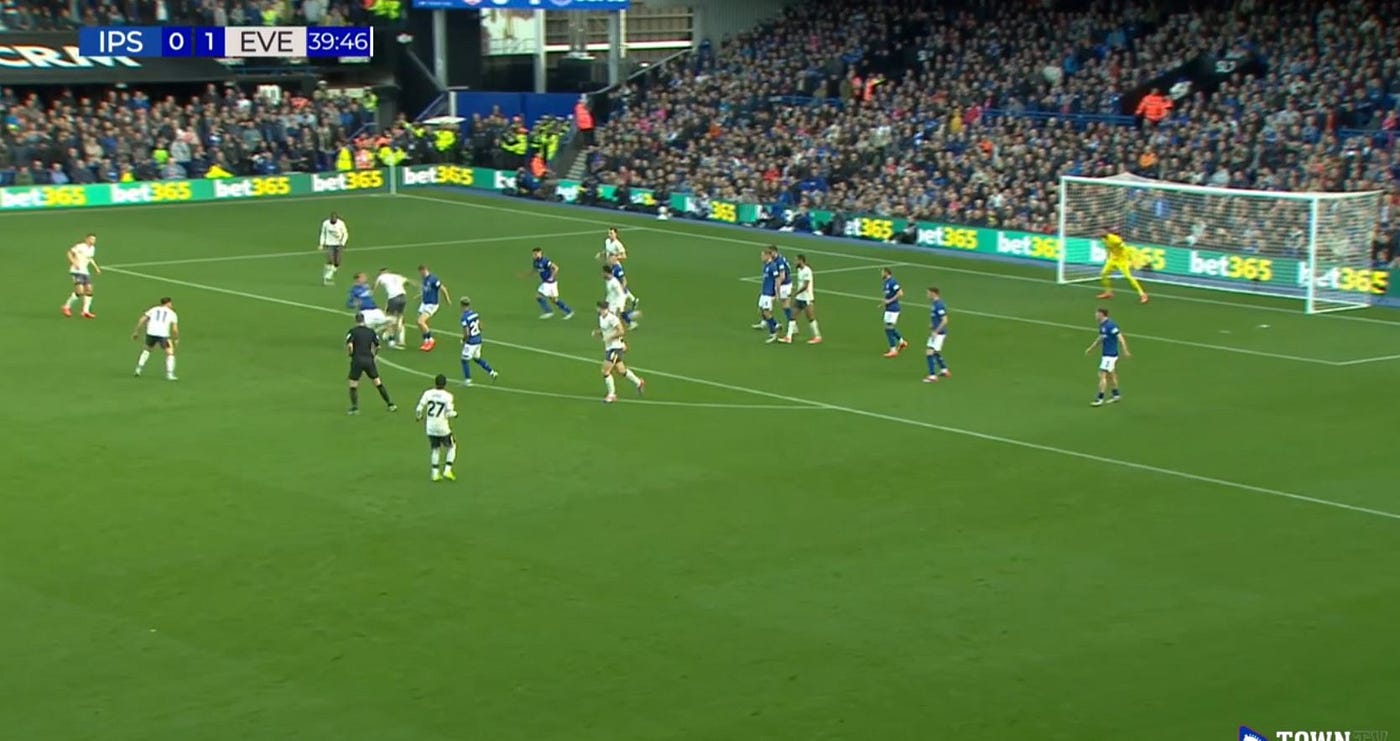
This next frame (above) is where things go wrong. Kalvin Phillips who was marking Keane has been drawn to the ball and neither Delap or Jack Clarke are strong enough in the tackle which is a danger of having forward players in that role on the edge of the box.
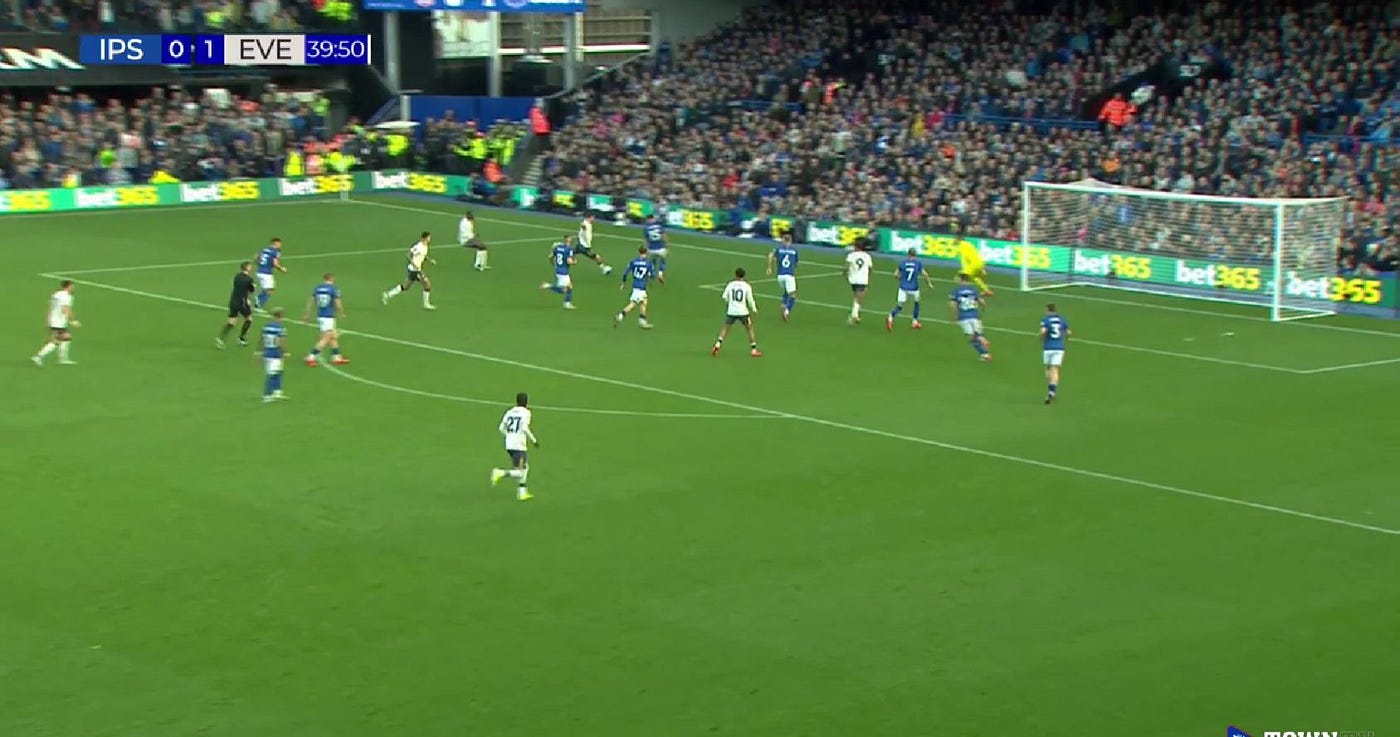
McNeil wriggles free and finds Keane but even then Burgess has done well to really narrow the angle. It takes a phenomenal left foot strike to beat both him and Muric from there.
Matthijs De Ligt (Manchester United — Away)
It’s another slightly different variation this time and Manchester United try to put as many bodies as possible in on Palmer. The two attacking from deep are Maguire and Hojlund with De Ligt initially in the scrum by the keeper
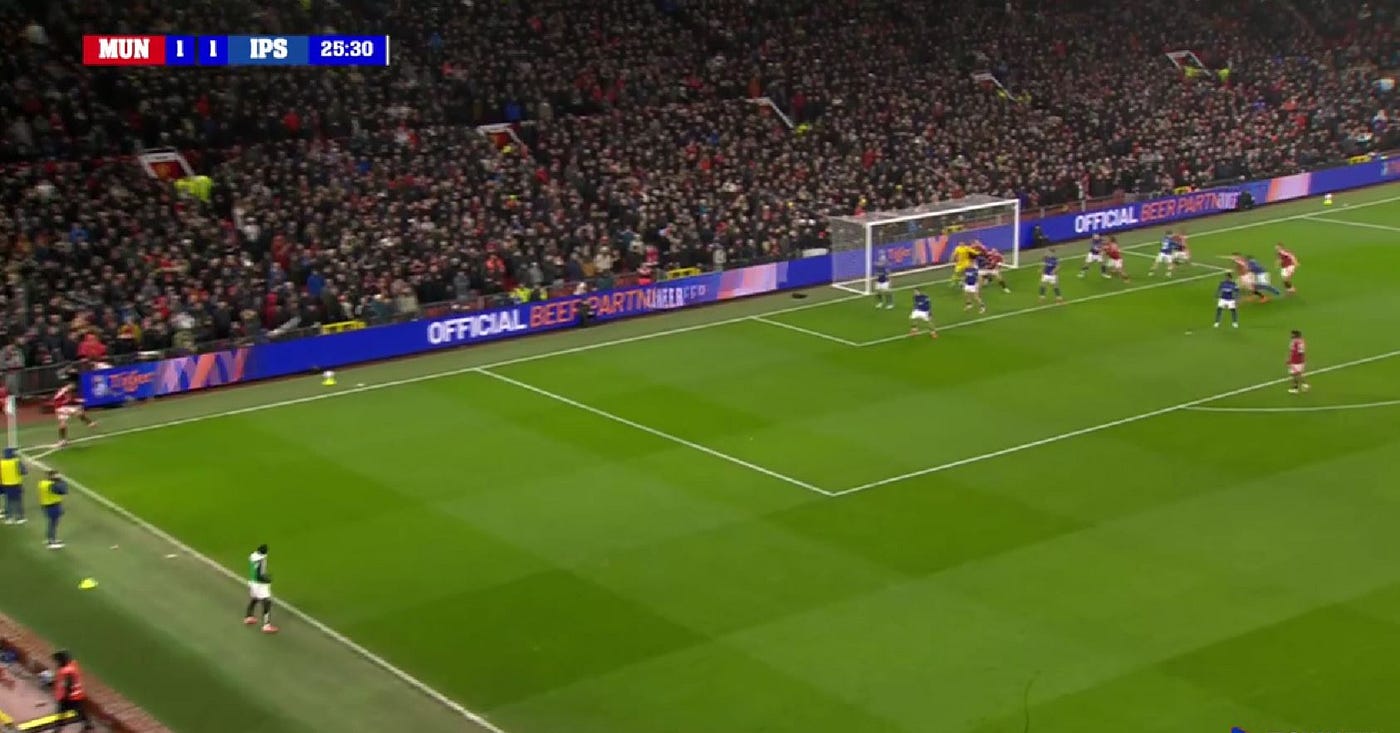
Like in the Maguire example Tuanzebe has been left with the job of dealing with both of them and it’s Hojland who wins the inital header forcing Palmer into a good save.
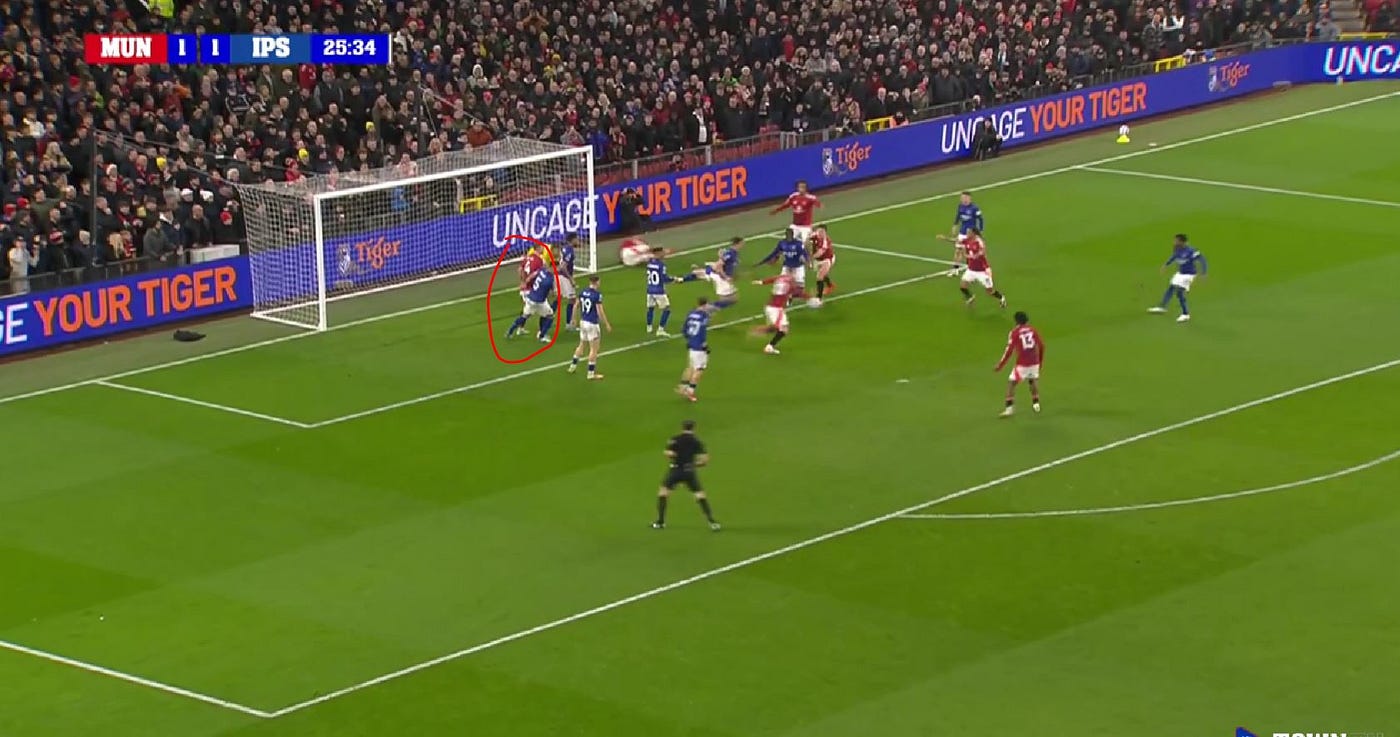
From that save it looks like Town are still in a good position with plent of men between the ball and the goal. Morsy is close to De Ligt. But Dalot does well to get a shot away and force another save from Palmer.
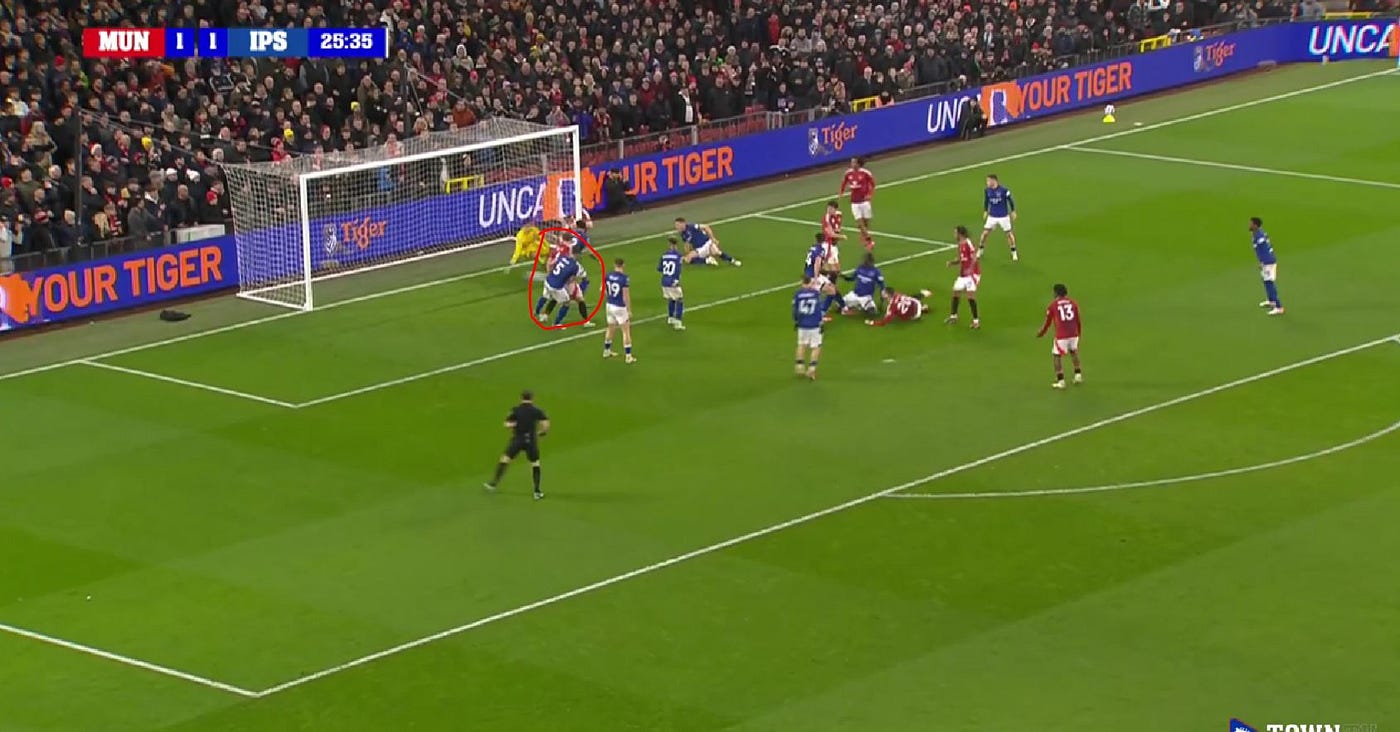
Even at this point with Palmer making that second save Town look in decent shape. Morsy is still tight to De Ligt and there are no other players threatening Town’s box.
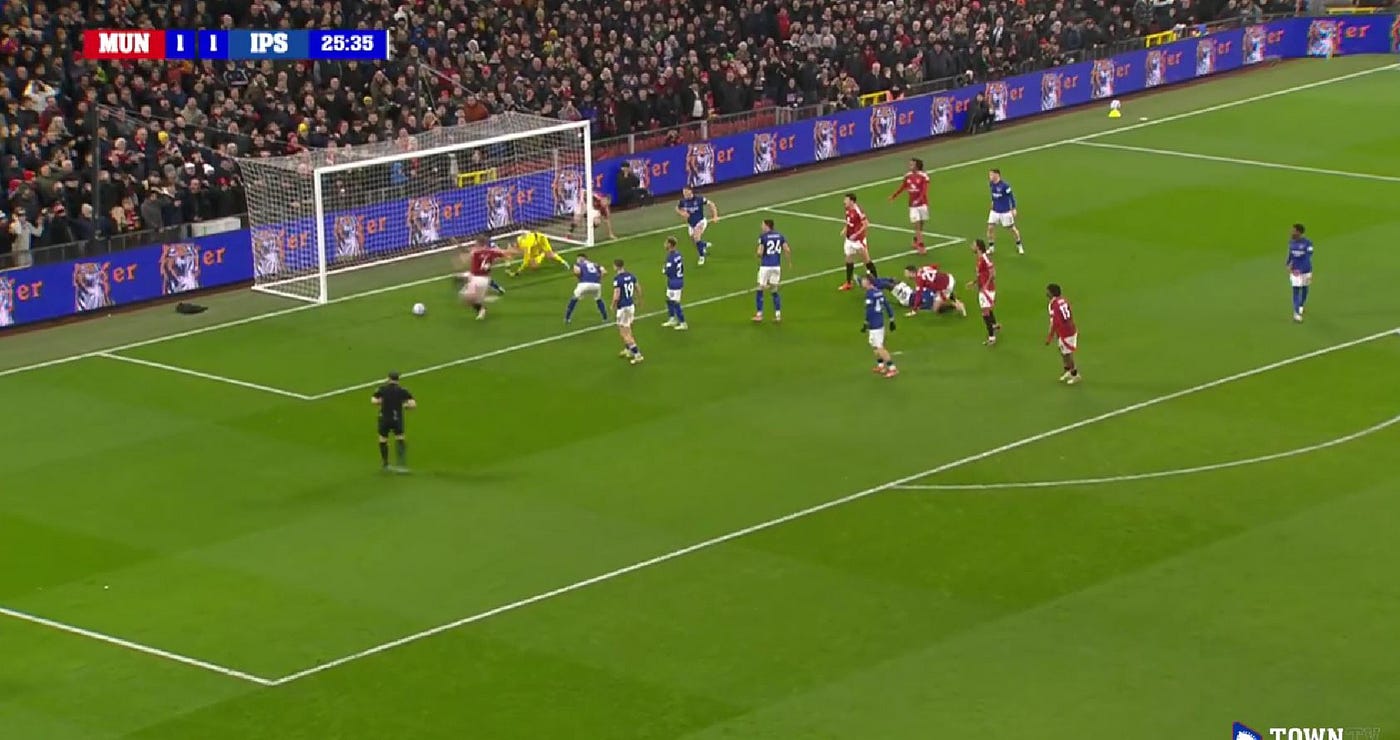
However, De Ligt rolls him, possibly with an elbow in the stomach looking at Morsy’s reaction and is able to poke in.
Nikola Milenkovic (Nottingham Forest — Home)
What’s interesting for this goal is that like in the Arsenal examples, Forest have three men outside the box as the corner is taken.
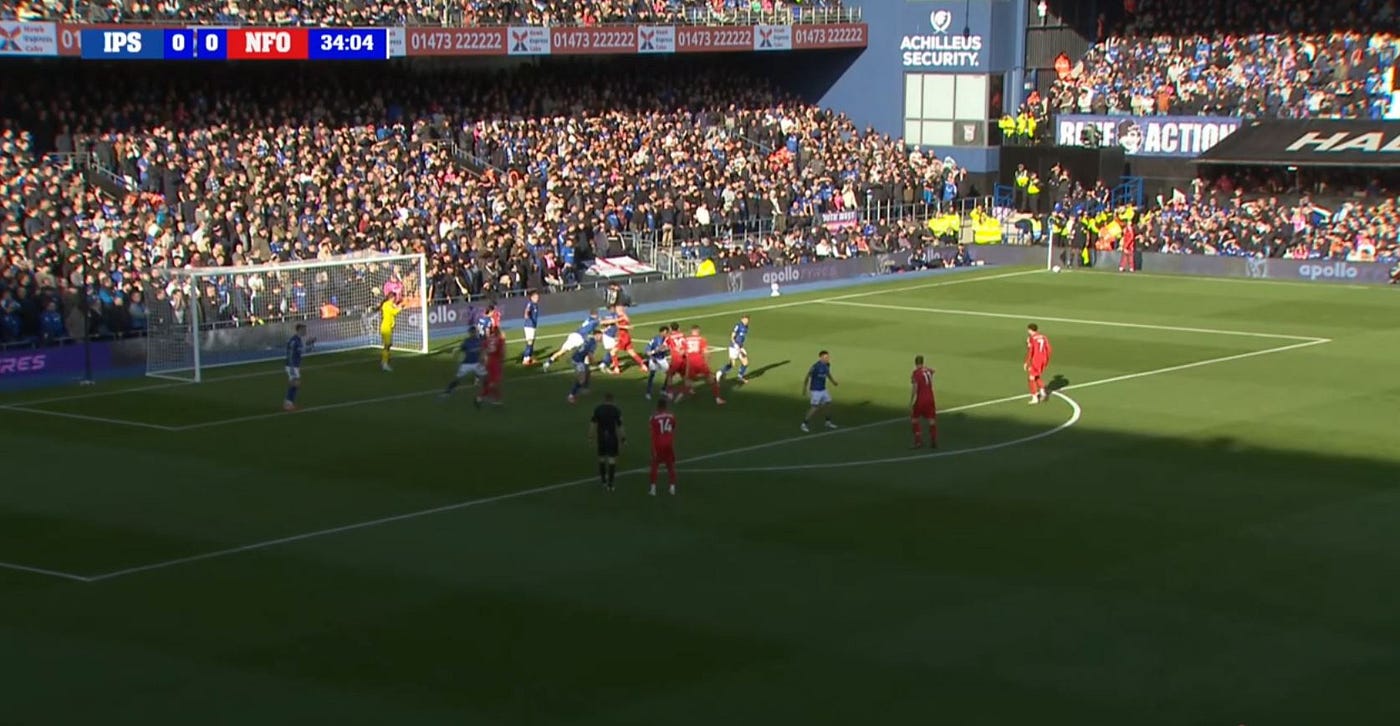
The first ball is headed away but because Forest have those three outside they are immediately in control for the second phase
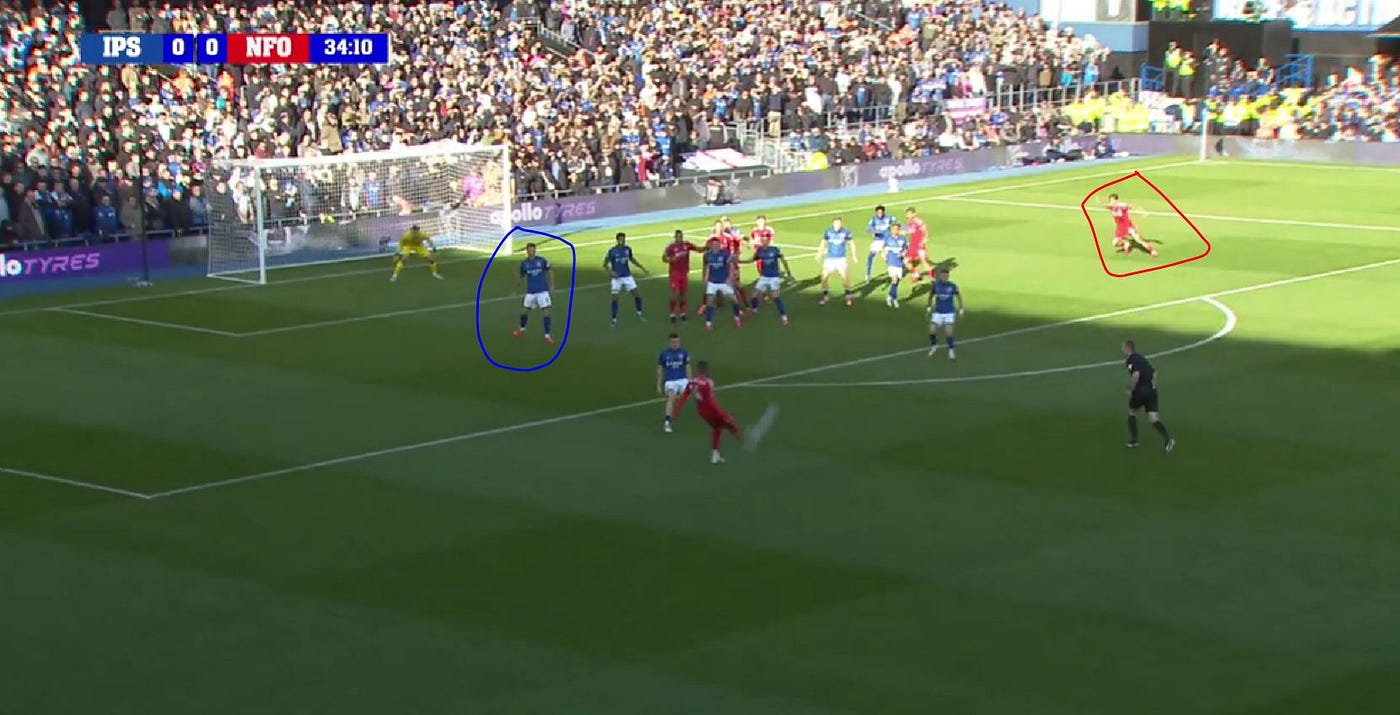
This means they are out of position when Hudson-Odoi chips in back in with all the players being one man too far to the right and Forest huddle to the right hand side.
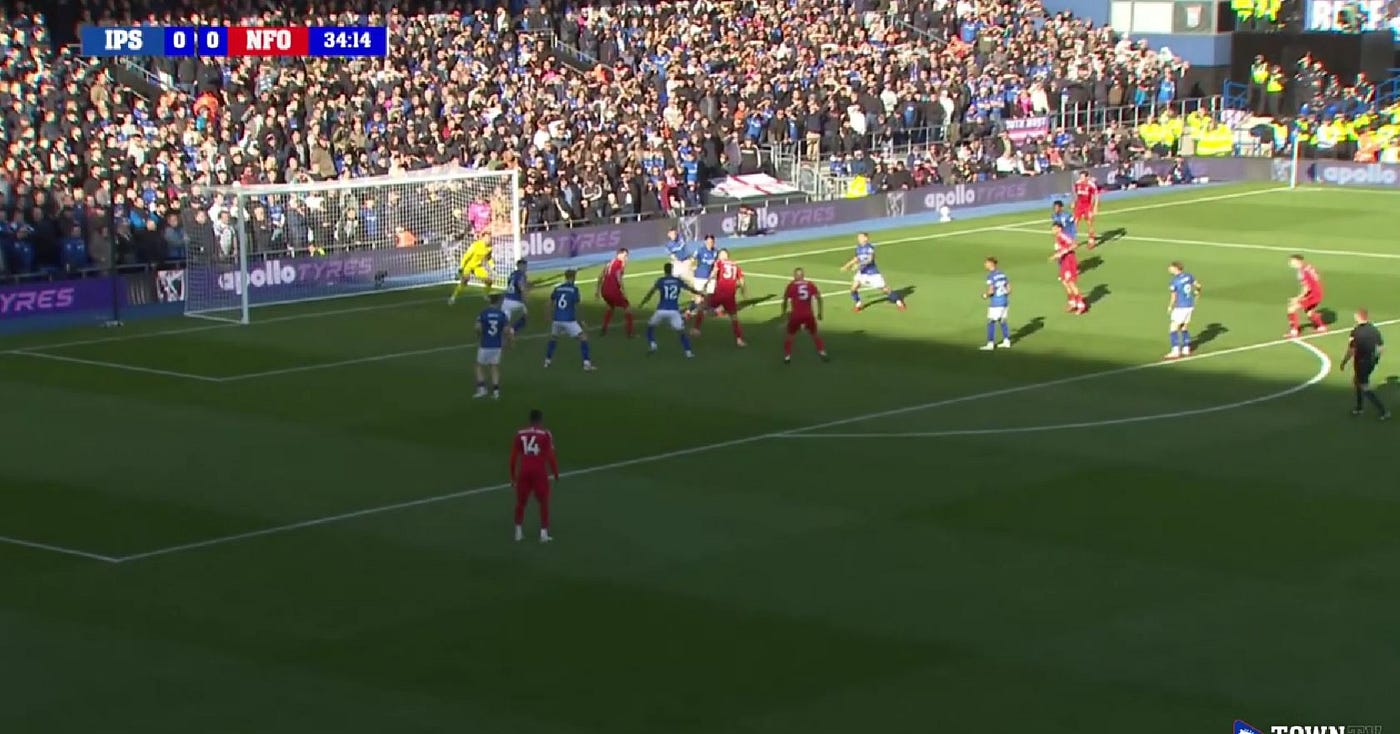
That leaves an easy header back across goal which Liam Delap gets under and Milenkovic is able to poke home.
For me this goal is preventable if you have more coverage on the edge of the box.
Conclusion
I could look at free kick goals conceded too but this has already taken a lot of time and research and turned into quite a long read so I’ll save those for another time.
So were Town actually dreadful at defending Set Pieces like the numbers suggest? No.
Did the goalkeeping play any part in the goals conceded? Not really. You could argue that Muric claiming more corners takes the pressure off but all three keepers largely dealt with balls into their box well enough.
So why did Town concede so many set pieces?
- They faced a lot in total, having to deal with the fourth most corners in the league
- A lot of goals were conceded when they were down to 10 men
- The opposition got away with a couple of fouls
However, going into next season there are still areas to improve
- If Morsy is going to be our front post presser he needs to get out to the ball way quicker or that role needs to be changed
- We need to change our set up when the opposition has multiple players outside the box otherwise that leaves us vulnerable to short corners and second phase moves
- Delap has left for Chelsea now but I also don’t like our front post defender in charge of heading the ball away being a striker but with Tuanzebe also gone I think it might have to be
So there you have it. Data is great but it never tells the whole story. Don’t hand Mark Hudson his P45 just yet.
메타데이터
- post_id
- 00a2b185994a
- slug
- are-ipswich-town-bad-at-defending-set-pieces-00a2b185994a
- url
- https://medium.com/@ad.wilkin/are-ipswich-town-bad-at-defending-set-pieces-00a2b185994a
- canonical_url
- https://medium.com/@ad.wilkin/are-ipswich-town-bad-at-defending-set-pieces-00a2b185994a
- author_url
- https://medium.com/@ad.wilkin
- status
- ok
- fetched_at
- 2026-07-19 01:01:37