Getting started with a BME280 environment sensor connected to an ESP32-C3 Supermini device and…
The BME280 sensor was designed by Bosch and measures the indoor temperature, humidity and barometric air pressure. The tiny sensor is…
Getting started with a BME280 environment sensor connected to an ESP32-C3 Supermini device and ST7735 TFT display
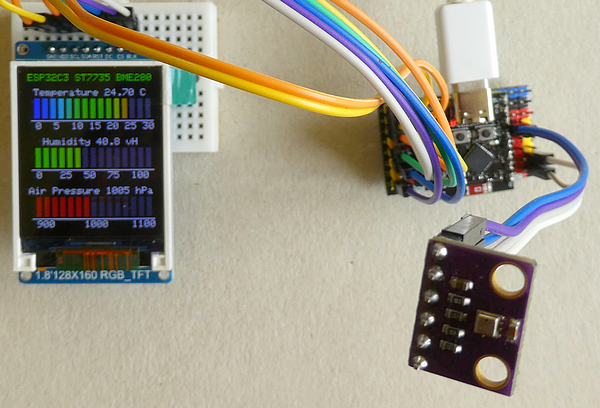
The BME280 sensor was designed by Bosch and measures the indoor temperature, humidity and barometric air pressure. The tiny sensor is connected to the ESP32-C3 Supermini device by the I2C interface (2 data cables plus 3.3 volts and GND).
The measured values are displayed on a TFT display (driver ST7735), but I’m not describing here how to prepare the TFT_eSPI library for the ESP32-C3 processor — please read the article “**Getting Started with an ESP32-C3 Supermini device connected to an ST7735 TFT display**” first.
BME280 Sensor Hardware
You can buy the sensor e.g. on AliExpress for around 3 Euros, but please verify that your device is using the I2C interface.
I2C Interface
The I2C interface is using “just” 2 data cables (“SDA” and “SCL”) plus 3.3 volts and GND power supply. In some pinouts I saw that you should use the GPIO pins 8 and 9 for the I2C interface, but unfortunately GPIO 8 is internally connected to the onboard RGB LED, so I’m using GPIOs 0 and 1 for the wiring:
Wiring of the BME280 sensor with an ESP32-C3 Supermini
TFT   ESP32-C3
GND   GND
VDD   3.3V
SCL   1
SDA   0
ESP32-C3 Supermini Hardware
I bought the ESP32-C3 Supermini together with an Expansion board as this makes it a lot easier to wire the 8 cables, but you can place the device on a breadboard as well.

There is a variant available that has an identical pinout but two additional features: an RGB LED (instead of the blue LED) and an IPEX antenna connector for a better Wi-Fi performance. They do not cost more, but it is up to you which one you want to buy. The solder pads on the back (“18” and “19”) are connected to the USB D+ and D- connector.
TFT Display with ST7735 driver 1.8 inch 128 x 160 pixels
The display is connected by the SPI interface to the ESP32-C3 device and is operated by the **TFT_eSPI library written by Bodmer. Please note that the library needs to get modified, as the library wasn’t updated to run the newest ESP32-boards. I strongly recommend reading the basis article “[Getting Started with an ESP32-C3 Supermini device connected to an ST7735 TFT display](https://medium.com/@androidcrypto/getting-started-with-an-esp32-c3-supermini-device-connected-to-an-st7735-tft-display-6ba1a1027a88)**” first.
Tutorial sketch
Below is the sketch I used to display the sample data, and you can find the sketch together with the changed TFT_eSPI files in my GitHub repository (see the link at the end).
/*
  This sketch shows how to work with the ESP32-C3 Supermini development board.
  Attached is an 1.8 inch TFT display that runs a ST7735 driver.
  The display has a size of 128x160 pixels.
  The library for the display is TFT_eSPI in a modified version, because the original
  version (2.5.4) can't run on ESP32 SDK 3.x so far and this SDK version is needed to
  select ESP32-C3 boards.

  Purpose of the sketch:
  - read the temperature, humidity and barometric air pressure from an attached BME280 sensor
  - display the temperature, humdity andair pressure on the TFT display with a Linear Analog Meter

  This is tested with ESP32 Board version 3.2.0 with SDK 5.4.1 on Arduino IDE 2.3.6
  TFT_eSPI version: 2.5.43
  Adafruit_BME280_Library version:  2.2.45
*/

/*
Version Management
26.04.2025 V01 Initial programming
*/

/*
TFT 128 x 160 pixels 1.8 inch ST7735 display wiring to an ESP32-C3 Supermini
Terminals on display's pcb from left to right

TFT   ESP32-C3
GND   GND
VDD   3.3V
SCL   6
SDA   7 (= "MOSI")
RST   9
DC    10
CS    21
BLK   5 *1)

Note *1) If you don't need a dimming you can connect BLK with 3.3V
Note *2) The display does not have a MISO ("output") terminal, so it is not wired
*/

// -------------------------------------------------------------------------------
// Sketch and Board information
const char *PROGRAM_VERSION = "ESP32-C3 Supermini ST7735 BME280 V01";
const char *PROGRAM_VERSION_SHORT = "ESP32C3 ST7735 BME280";
const char *DIVIDER = "--------------------";

// -------------------------------------------------------------------------------
// TFT Display

#include <TFT_eSPI.h>     // Hardware-specific library
#include <TFT_eWidget.h>  // Widget library https://github.com/Bodmer/TFT_eWidget/tree/main
#include <SPI.h>

#define RED2RED 0
#define GREEN2GREEN 1
#define BLUE2BLUE 2
#define BLUE2RED 3
#define GREEN2RED 4
#define RED2GREEN 5
#define TFT_GREY 0x2104  // Dark grey 16 bit colour

TFT_eSPI tft = TFT_eSPI();  // Invoke custom library with default width and height

#define TFT_BL_PIN 5               // backlight brightness control, needs to be a PWM pin
#define TFT_BRIGHTNESS_PERCENT 90  // avoids overheating of the device

const uint8_t linearMeterHeight = 50;
const uint8_t linearMeterStart = 15;

#define LOOP_PERIOD 35  // Display updates every 35 ms

// -------------------------------------------------------------------------------
// BME280 sensor

#define BME280_I2C_SDA_PIN 0
#define BME280_I2C_SCL_PIN 1
#define BME280_I2C_ADDRESS 0x76

#include <Wire.h>
#include <Adafruit_Sensor.h>  // https://github.com/adafruit/Adafruit_Sensor
#include <Adafruit_BME280.h>  // https://github.com/adafruit/Adafruit_BME280_Library
#define SEALEVELPRESSURE_HPA (1013.25)
Adafruit_BME280 bme;  // I2C

float temperature = -99;
float humidity = -99;
float pressure = -99;
float altitude = -99;

int interval = 2000;

void getBme280Values() {
  bme.takeForcedMeasurement();
  temperature = bme.readTemperature();
  humidity = bme.readHumidity();
  pressure = bme.readPressure() / 100.0F;
  altitude = bme.readAltitude(SEALEVELPRESSURE_HPA);
}

void printBme280Values() {
  Serial.print(F("Temperature: "));
  Serial.print(temperature, 1);
  Serial.print(F("c, Humidity: "));
  Serial.print(humidity);
  Serial.print(F("%, Pressure: "));
  Serial.print(pressure, 0);
  Serial.print(F("hPa, Altitude: "));
  Serial.print(altitude, 1);
  Serial.println(F("m"));
  Serial.flush();
}

void setup(void) {
  Serial.begin(115200);
  delay(1000);
  Serial.println(PROGRAM_VERSION);

  tft.begin();

  // set the brightness to 90% to avoid heating of the device
  pinMode(TFT_BL_PIN, OUTPUT);
  analogWrite(TFT_BL_PIN, 255 * TFT_BRIGHTNESS_PERCENT / 100);
  delay(10);

  tft.setRotation(0);
  tft.fillScreen(TFT_BLACK);
  tft.setTextColor(TFT_GREEN);
  tft.drawCentreString(PROGRAM_VERSION_SHORT, 64, 0, 1);

  bool wireStatus = Wire.begin(BME280_I2C_SDA_PIN, BME280_I2C_SCL_PIN);
  if (!wireStatus) {
    Serial.println(F("Wire begin failed"));
    while (1)
      ;
  } else {
    Serial.println(F("Wire begin running"));
  }

  delay(1000);

  bool bme_status = bme.begin(BME280_I2C_ADDRESS); // address either 0x76 or 0x77
  if (!bme_status) {

    Serial.println(F("No valid BME280 found"));
    while (1)
      ;
  } else {
    Serial.println(F("BME280 found"));
  }
  // the preferred way to get correct indoor temperatures
  bme.setSampling(Adafruit_BME280::MODE_FORCED,
                  Adafruit_BME280::SAMPLING_X16,  // temperature
                  Adafruit_BME280::SAMPLING_X1,   // pressure
                  Adafruit_BME280::SAMPLING_X1,   // humidity
                  Adafruit_BME280::FILTER_X16,
                  Adafruit_BME280::STANDBY_MS_0_5);

}

void loop() {

  if ((millis() - interval) > 1000) {
    // Serial.println("Read BME280");
    getBme280Values();
    printBme280Values();

    float tempMap;
    tempMap = mapValue(temperature, (float)0.0, (float)30.0, (float)0.0, (float)15.0);

    float humMap;
    humMap = mapValue(humidity, (float)0.0, (float)100.0, (float)0.0, (float)15.0);

    float presMap;
    presMap = mapValue(pressure, (float)900.0, (float)1100.0, (float)0.0, (float)15.0);

    char buffer[80];
    tft.setTextColor(TFT_WHITE,TFT_BLACK);
    sprintf(buffer, "Temperature %.2f C", temperature);
    tft.drawCentreString(buffer, 64, linearMeterStart, 1);
    linearMeterHelper(tempMap, 0, linearMeterStart + 10, BLUE2RED, " 0  5  10 15 20 25 30");
    // the complete element is 50 pixels high, so next element should start + 50 in y coordinate

     tft.setTextColor(TFT_WHITE,TFT_BLACK);
    sprintf(buffer, "Humidity %.1f vH", humidity);
    tft.drawCentreString(buffer, 64, linearMeterStart + linearMeterHeight, 1);
    linearMeterHelper(humMap, 0, linearMeterStart + linearMeterHeight + 10, GREEN2RED, " 0   25  50  75  100");

    tft.setTextColor(TFT_WHITE,TFT_BLACK);
    sprintf(buffer, "Air Pressure %.0f hPa", pressure);
    tft.drawCentreString(buffer, 64, linearMeterStart + 2 * linearMeterHeight, 1);
    linearMeterHelper(presMap, 0, linearMeterStart + 2 * linearMeterHeight + 10, RED2RED, " 900     1000    1100");

    interval = millis();
  }
}

float mapValue(float ip, float ipmin, float ipmax, float tomin, float tomax) {
  return tomin + (((tomax - tomin) * (ip - ipmin)) / (ipmax - ipmin));
}

void linearMeterHelper(int val, int x, int y, byte colourScheme, char* scalaString) {
  linearMeter(val, x, y, 5, 20, 3, 15, colourScheme);
  //tft.drawLine(4, 102, 127, 102, TFT_WHITE);
  tft.drawLine(x + 4, y + 20 + 2, 127, y + 20 + 2, TFT_WHITE);
  tft.setTextColor(TFT_WHITE,TFT_BLACK);
  tft.drawString(scalaString, x + 3, y + 20 + 4);
}

// #########################################################################
// Return a 16 bit rainbow colour
// #########################################################################
unsigned int rainbow(byte value) {
  // Value is expected to be in range 0-127
  // The value is converted to a spectrum colour from 0 = blue through to 127 = red

  byte red = 0;    // Red is the top 5 bits of a 16 bit colour value
  byte green = 0;  // Green is the middle 6 bits
  byte blue = 0;   // Blue is the bottom 5 bits

  byte quadrant = value / 32;

  if (quadrant == 0) {
    blue = 31;
    green = 2 * (value % 32);
    red = 0;
  }
  if (quadrant == 1) {
    blue = 31 - (value % 32);
    green = 63;
    red = 0;
  }
  if (quadrant == 2) {
    blue = 0;
    green = 63;
    red = value % 32;
  }
  if (quadrant == 3) {
    blue = 0;
    green = 63 - 2 * (value % 32);
    red = 31;
  }
  return (red << 11) + (green << 5) + blue;
}

// #########################################################################
// Return a value in range -1 to +1 for a given phase angle in degrees
// #########################################################################
float sineWave(int phase) {
  return sin(phase * 0.0174532925);
}

// Linear Analog Meters

// #########################################################################
//  Draw the linear meter
// #########################################################################
// val =  reading to show (range is 0 to n)
// x, y = position of top left corner
// w, h = width and height of a single bar
// g    = pixel gap to next bar (can be 0)
// n    = number of segments
// s    = colour scheme
void linearMeter(int val, int x, int y, int w, int h, int g, int n, byte s) {
  // Variable to save "value" text colour from scheme and set default
  int colour = TFT_BLUE;
  // Draw n colour blocks
  for (int b = 1; b <= n; b++) {
    if (val > 0 && b <= val) {  // Fill in coloured blocks
      switch (s) {
        case 0: colour = TFT_RED; break;                             // Fixed colour
        case 1: colour = TFT_GREEN; break;                           // Fixed colour
        case 2: colour = TFT_BLUE; break;                            // Fixed colour
        case 3: colour = rainbowColor(map(b, 0, n, 127, 0)); break;  // Blue to red
        case 4: colour = rainbowColor(map(b, 0, n, 63, 0)); break;   // Green to red
        case 5: colour = rainbowColor(map(b, 0, n, 0, 63)); break;   // Red to green
        case 6: colour = rainbowColor(map(b, 0, n, 0, 159)); break;  // Rainbow (red to violet)
      }
      tft.fillRect(x + b * (w + g), y, w, h, colour);
    } else  // Fill in blank segments
    {
      tft.fillRect(x + b * (w + g), y, w, h, TFT_DARKGREY);
    }
  }
}

/***************************************************************************************
** Function name:           rainbowColor
** Description:             Return a 16 bit rainbow colour
***************************************************************************************/
// If 'spectrum' is in the range 0-159 it is converted to a spectrum colour
// from 0 = red through to 127 = blue to 159 = violet
// Extending the range to 0-191 adds a further violet to red band

uint16_t rainbowColor(uint8_t spectrum) {
  spectrum = spectrum % 192;

  uint8_t red = 0;    // Red is the top 5 bits of a 16 bit colour spectrum
  uint8_t green = 0;  // Green is the middle 6 bits, but only top 5 bits used here
  uint8_t blue = 0;   // Blue is the bottom 5 bits

  uint8_t sector = spectrum >> 5;
  uint8_t amplit = spectrum & 0x1F;

  switch (sector) {
    case 0:
      red = 0x1F;
      green = amplit;  // Green ramps up
      blue = 0;
      break;
    case 1:
      red = 0x1F - amplit;  // Red ramps down
      green = 0x1F;
      blue = 0;
      break;
    case 2:
      red = 0;
      green = 0x1F;
      blue = amplit;  // Blue ramps up
      break;
    case 3:
      red = 0;
      green = 0x1F - amplit;  // Green ramps down
      blue = 0x1F;
      break;
    case 4:
      red = amplit;  // Red ramps up
      green = 0;
      blue = 0x1F;
      break;
    case 5:
      red = 0x1F;
      green = 0;
      blue = 0x1F - amplit;  // Blue ramps down
      break;
  }

  return red << 11 | green << 6 | blue;
}
These are the topics in the sketch:
The sketch initializes the TFT display and the BME280 sensor, reads the temperature, humidity and barometric air pressure and displays them on the display. The temperature, humidity and Air Pressure values are visualized on a “Linear Analog Meter”.

As the sketch does not use a “Supermini” or “Supermini Plus” feature, there is no defining for the variant.
The sketch was tested with this environment:
- ESP32 Board version 3.2.0 with SDK 5.4.1 on Arduino IDE 2.3.6
- TFT_eSPI version 2.5.43 (modified)
- Adafruit BME280 Library version 2.2.4
CPU Frequency change
When using battery operated devices, it is important to uses modes with low power settings. Beneath using light or deep sleep modes, the easiest way to save power is to set the CPU frequency to a lower level. Usually the ESP32-C3 processor operates with 160 MHz that is the maximum. In the Arduino — Tools there is a setting for the CPU frequency, and you can use these CPU frequencies: 10 / 20 / 40 / 80 / 120 and 160 MHz:
If you are using Wi-Fi within your sketch, you should stay in the range 80 to 160 MHz.
I tested the display with the library, and it worked with the lowest CPU frequency (10 MHz).
Summary
The tiny ESP32-C3 Supermini can easily be operated with a BME280 environment sensor and a TFT display that uses the ST7735 driver chip.
Source code of the app
You find the complete code of the app, the modified TFT_eSPI library and the device-display settings file in my GitHub repositories.
Happy coding !
메타데이터
- post_id
- 0485f5f2a2e3
- slug
- getting-started-with-a-bme280-environment-sensor-connected-to-an-esp32-c3-supermini-device-and-0485f5f2a2e3
- url
- https://medium.com/@androidcrypto/getting-started-with-a-bme280-environment-sensor-connected-to-an-esp32-c3-supermini-device-and-0485f5f2a2e3
- canonical_url
- https://medium.com/@androidcrypto/getting-started-with-a-bme280-environment-sensor-connected-to-an-esp32-c3-supermini-device-and-0485f5f2a2e3
- author_url
- https://medium.com/@androidcrypto
- status
- ok
- fetched_at
- 2026-07-20 01:04:06