End-to-End GCP Data Engineering Pipeline | Pub/Sub, Dataflow, BigQuery & dbt
If you think a data pipeline is “just code,” Google Cloud will correct you very quickly.
End-to-End GCP Data Engineering Pipeline | Pub/Sub, Dataflow, BigQuery & dbt
If you think a data pipeline is “just code,” Google Cloud will correct you very quickly.
This write-up exists because pipelines don’t fail only due to Python bugs — they fail because one command was run too early, too late, or in the wrong region.
This project starts with polling an air-quality API and ends with a fully orchestrated streaming pipeline on Google Cloud — Cloud Functions → Pub/Sub → Dataflow → BigQuery → dbt — with Cloud Scheduler pretending the API is a real-time stream.
GitHub stores the logic. This article stores the execution order. Because knowing what the code does is easy — knowing when to run which CLI command is what actually keeps the pipeline alive.
Github repo: https://github.com/sri-krishna-kireeti/GCP_End_to_End_Pipeline.git
HIGH LEVEL ARCHITECTURE
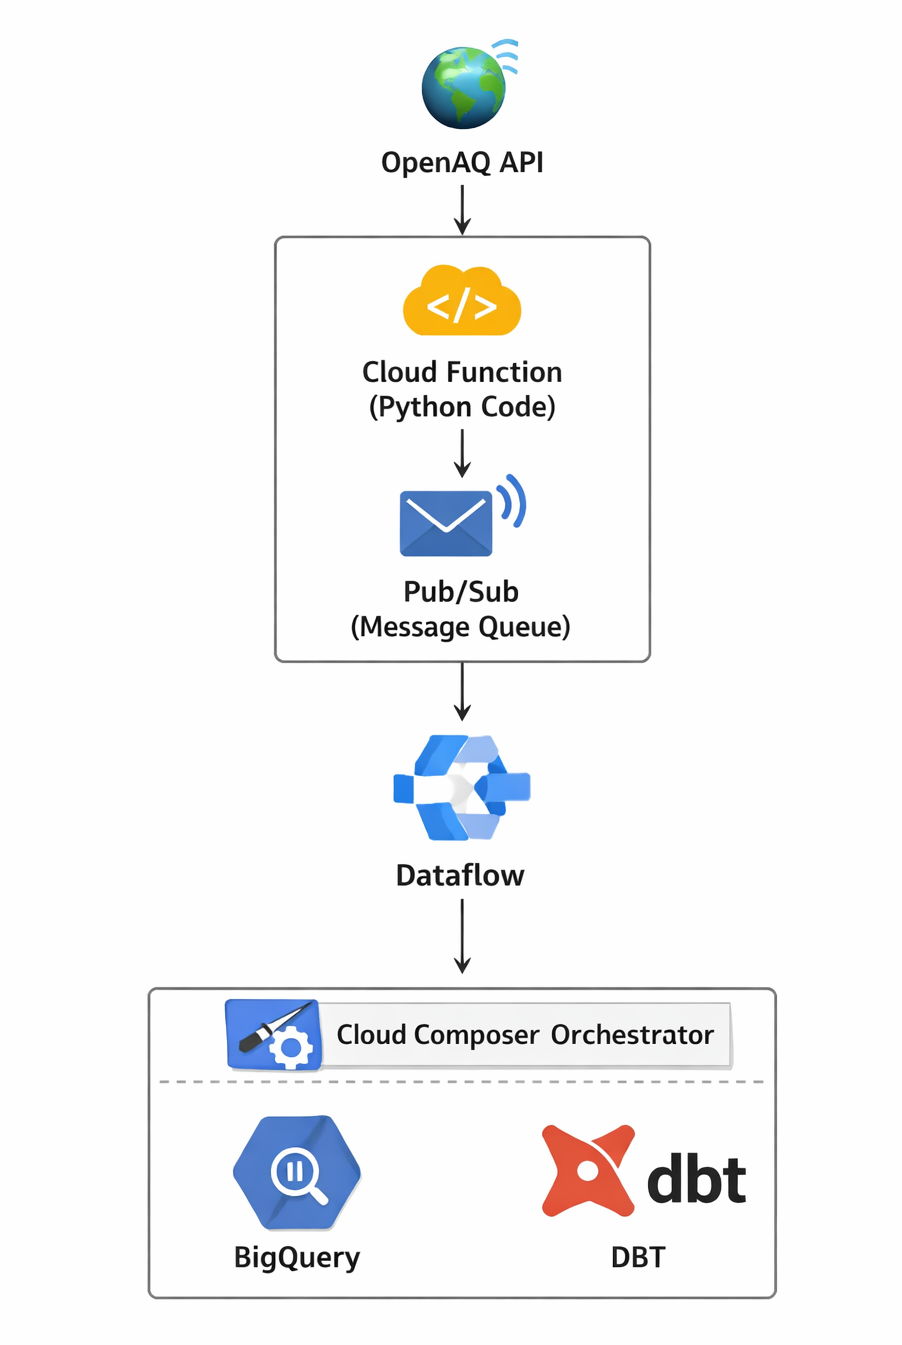
Why should architecture diagram always be horizontal😜
Here’s the entire pipeline, explained like a story — not a tool manual:
- Every hour, fresh air-quality data is fetched from a live public API. No files, no fake generators — just real data arriving continuously.
- That data is immediately pushed into a message queue, so ingestion and processing don’t depend on each other. If something downstream is slow, data doesn’t panic — it just waits patiently.
- Messages are then processed as a stream — cleaned, structured, and validated. Late arrivals are handled properly, because data doesn’t always arrive on time (just like us 😅).
- The processed data is stored in an analytics-ready warehouse, designed to scale without manual tuning.
- On top of that, clean transformations convert raw data into analysis-friendly tables — modular, testable, and version-controlled.
- Everything runs automatically on a schedule, with clear boundaries between ingestion, processing, and transformation — each independently scalable and failure-isolated.
That’s it. End-to-end. No magic.
What’s Not Connected (Yet 😅)
You might be wondering:
- *“Where’s Power BI?”
- “Where’s Tableau?”
- “Where’s Looker?”*
They’re not connected — yet.
Not because they can’t be, but because:
- They deserve **their own series
- They demand bigger datasets
- **And honestly… they love attention 😅
Once the data volume grows and analytics use-cases expand, connecting BI tools will make much more sense — and that’s a story for another time.
Tools We’re Using (And Why You’ll Love Them)
[embed]
STEP 0 (A): LOCAL SETUP
Before we let GCP do the heavy lifting, we need to make sure your local machine is not the weakest link in this pipeline. This is the part where most bugs are born — not in the cloud, but on your laptop 😅.
Let’s fix that.
1. Installing python with suitable version
Download Python version ≥ 3.9 and ≤ 3.11. — Python 3.9 / 3.10 / 3.11 → Safe zone ✅ — Python 3.12+ → You are playing with fire 🔥
Personal experience: I tried running this pipeline with Python 3.13 because “latest is best”, right? Wrong. Many GCP libraries, Apache Beam, and even some Google SDK components are not fully ready for the newest Python versions yet. Result? Random errors, broken dependencies, and a lot of unnecessary suffering 😅.
👉 Moral of the story: Stability > novelty.
2. Install Google Cloud SDK (Your Passport to GCP)
The Google Cloud SDK lets your laptop talk to GCP without shouting.
Install it from: Quickstart: Install the Google Cloud CLI | Google Cloud SDK | Google Cloud Documentation
Once installed, authenticate:
gcloud auth loginThis opens a browser window and asks you to log in.
3. Final (and Very Important) Step: Application Default Credentials (a.k.a. The Silent Pipeline Killer)
Everything might look perfect — APIs enabled, code written, libraries installed — and yet… nothing works. No errors. No logs. Just silence. Nine times out of ten, this is because your local credentials and quota project are not aligned 😅.
Fixing Application Default Credentials (CRITICAL)
Run the following commands in order:
# Login to GCP (user authentication)
gcloud auth login

# Set up Application Default Credentials
gcloud auth application-default login

# Make sure we're using the correct project
gcloud config set project [project_id]

# VERY IMPORTANT: Set quota project for ADC
gcloud auth application-default set-quota-project [project_id]
What this does: — Ensures your local code, Cloud SDK, and GCP billing/quota all point to the same project — Prevents silent failures that can waste hours of debugging
Why This Matters:
When you run code locally, GCP libraries use Application Default Credentials (ADC) to decide: — Who you are — Which project you’re using — Where billing/quota should be applied
If these don’t point to the same project, you’ll see weird errors like: — Permission denied — Quota exceeded (even when you have quota) — Or worse… no error at all.
STEP 0 (B): GCP setup
1. GCP Subscription
If you don’t already have a Google Cloud subscription, you can start with the free trial. It gives you: — $300 credit to spend over 90 days — Access to almost all GCP services — Enough resources to build a full end-to-end data pipeline without paying a dime
Sign up here: https://cloud.google.com/cloud-console
2. Create a New Project
Once your account is ready:
- Navigate to the Google Cloud Console → Manage Resources → Create Project
- Fill in the details (the names I used):
Project Name:
End to End DE PipelineProject ID:end-to-end-de-pipeline(must be globally unique — usually generated automatically) - Click Create. GCP will set up the project environment for you.
Tip: Project ID cannot be changed later, so pick wisely. I went with
end-to-end-de-pipelinebecause… well, it just sounds straight to the point😎.
3. Required APIs
Our pipeline will use several GCP services. Each one needs to be enabled for our project.
Cloud Functions: Runs Python code to fetch API data and push messages to Pub/Sub.
Cloud Build: Cloud Build: Builds and packages Cloud Functions (mandatory, even if you never touch it directly)
Pub/Sub: Messaging backbone between ingestion and processing.
Dataflow: Runs Apache Beam pipelines for stream/batch processing.
BigQuery: Datawarehouse (Stores raw and transformed data).
Cloud Scheduler: Triggers Cloud Functions periodically, simulating streaming.
Cloud Storage
The required APIs can be enabled directly from the GCP Console UI by navigating to Google Cloud Console → APIs & Services → Library, selecting your project, and enabling the services one by one. Alternatively, they can also be enabled using a single
gcloudcommand.
Instead of enabling each service one-by-one from the GCP UI (and questioning your life choices), here’s a single command to enable all the required APIs at once:
# Enable all required APIs
gcloud services enable \
  cloudfunctions.googleapis.com \
  cloudbuild.googleapis.com \
  pubsub.googleapis.com \
  dataflow.googleapis.com \
  bigquery.googleapis.com \
  cloudscheduler.googleapis.com \
  storage.googleapis.com
To run this command in power-shell (from your local setup), replace “\” with reverse-tick ( ` ).
Now the Fun part Begins!!!
STEP 1 — FETCHING DATA AND PLACING IT IN PUB/SUB
STEP 1 (A): Create Pub/Sub Topic & Subscription
Basic theory:
In most real-world systems, the biggest mistake is tight coupling: one service waits on another, failures cascade, and scaling becomes painful. Pub/Sub exists to break this dependency.
At its core, Pub/Sub is about fire-and-forget communication. A service produces an event and moves on. It doesn’t care who consumes it, when they consume it, or how many consumers exist.
A topic is just a named stream of events. Producers publish messages to a topic, nothing more. A topic doesn’t process data, doesn’t apply logic, and doesn’t know who is listening. Its only job is to accept messages and make them available.
A subscription is where responsibility begins. It represents a consumer’s view of the topic. Each subscription gets its own copy of messages and tracks whether they’ve been processed. If one consumer is slow or broken, others are not affected — and that’s the real power.
Why does this matter? Because in production systems: Producers should never wait for consumers Failures should be isolated, not contagious Adding a new consumer should not require code changes upstream
Pub/Sub forces this discipline. It nudges systems toward event-driven thinking, where services communicate through facts (“something happened”) instead of commands (“do this now”). Once teams adopt this mindset, scaling and reliability stop being afterthoughts — they become defaults.
We now create:
— A topic (where data is published) — A subscription (to consume and verify messages)
Create Topic & Subscription
gcloud pubsub topics create [topic_name]
gcloud pubsub subscriptions create [subscription_name] --topic=[topic_name_to_refer]
In my code: Topic_name = air-quality-topic Subscription_name = air-quality-sub
Verify
gcloud pubsub topics list
gcloud pubsub subscriptions list
At this point: — Pub/Sub is ready — Nothing is publishing yet — that’s next
STEP 1 (B): Connecting to a Real API (WAQI / OpenAQ)
I’m using the Air Quality Open Data Platform (WAQI). Link: World’s Air Pollution: Real-time Air Quality Index
It provides real, city-level air-quality data — exactly what we need.
You’ll need:
- An API token (free, because who doesn’t love free stuff?) Link: Air Quality Open Data Platform: API Token Request Form
- A city name (I’m rolling with Hyderabad, because obviously, I’m a HyderaBaddiee… 😜)
STEP 1 (C): Python Code — API → Pub/Sub
This Cloud Function does one job only:
- Fetch data from the API
- Wrap it with metadata
- Publish it to Pub/Sub
import json
import os
import requests
from datetime import datetime, timezone
from google.cloud import pubsub_v1

PROJECT_ID = os.environ.get("PROJECT_ID")
TOPIC_ID = os.environ.get("TOPIC_ID")
WAQI_TOKEN = os.environ.get("WAQI_TOKEN")
CITY = os.environ.get("CITY", "hyderabad")
publisher = pubsub_v1.PublisherClient()
topic_path = publisher.topic_path(PROJECT_ID, TOPIC_ID)
def fetch_waqi(request):
    url = f"https://api.waqi.info/feed/{CITY}/?token={WAQI_TOKEN}"
    response = requests.get(url, timeout=20)
    response.raise_for_status()
    payload = response.json()
    message = {
        "source": "waqi",
        "city": CITY,
        "ingestion_time": datetime.now(timezone.utc).isoformat(),
        "event_time": payload["data"]["time"]["iso"],
        "raw_payload": payload
    }
    publisher.publish(
        topic_path,
        json.dumps(message).encode("utf-8")
    )
    return "Published", 200
Show your skills, do small edits in the code to run this in local, and check if this is working😜.
Step 1 (D): Deploy as a Cloud Function (Gen 2)
Now we deploy the function:
gcloud functions deploy fetch_waqi \
  --gen2 \
  --runtime python311 \
  --region asia-south1 \
  --entry-point fetch_waqi \
  --trigger-http \
  --allow-unauthenticated \
  --set-env-vars "PROJECT_ID=[gcp_project_id],TOPIC_ID=[topic_id],WAQI_TOKEN=[YOUR_TOKEN],CITY=hyderabad"
Important Notes:
deploy fetch_waqi→ cloud function name.--entry-point fetch_waqi→ Python function to execute (entry point in python code)- Environment variables hold sensitive data for now
- Note the generated uri. This is needed for scheduling.
⚠️ In production, tokens must live in Secret Manager, not env vars. We’ll fix that later.
Testing Manually:
Run the below command in cloud shell to check if the cloud function is working fine.
curl -X GET https://asia-south1-end-to-end-de-pipeline.cloudfunctions.net/fetch_waqiSTEP 1 (E): Scheduling the Function (Simulating Streaming)
Polling APIs aren’t streaming — Scheduler makes them feel like it.
gcloud scheduler jobs create http waqi-hourly-job \
  --location asia-south1 \
  --schedule "10 * * * *" \
  --uri "https://fetch-waqi-xxxx.a.run.app" \
  --http-method GET \
  --time-zone "Asia/Kolkata"
You can find the uri in previous step. If missed, you can find this in the UI in your cloud function.
Some useful commands:
Check scheduler jobs
gcloud scheduler jobs list --location asia-south1Update schedule
gcloud scheduler jobs update http waqi-hourly-job --location asia-south1 --schedule "10 12 * * *"STEP 1 (F): Verifying data in pub/sub (subscriber code)
Before moving forward, we must verify data is actually arriving.
import os

# 🔴 CRITICAL: disable opentelemetry BEFORE importing pubsub - needed for python3.13
os.environ["OTEL_SDK_DISABLED"] = "true"
os.environ["OTEL_TRACES_EXPORTER"] = "none"
os.environ["OTEL_METRICS_EXPORTER"] = "none"
os.environ["OTEL_LOGS_EXPORTER"] = "none"

import json
from google.cloud import pubsub_v1

PROJECT_ID = "[project_id]"
SUBSCRIPTION_ID = "[subscription_id]"

subscriber = pubsub_v1.SubscriberClient()
subscription_path = subscriber.subscription_path(
    PROJECT_ID, SUBSCRIPTION_ID
)

def callback(message):
    try:
        payload = json.loads(message.data.decode("utf-8"))
        print("\n===== MESSAGE =====")
        print(json.dumps(payload, indent=2))
        message.ack()
    except Exception as e:
        print("❌ Error:", e)

subscriber.subscribe(subscription_path, callback=callback)
print("Listening... Ctrl+C to stop")

try:
    while True:
        pass
except KeyboardInterrupt:
    print("\nStopped")
If you see JSON printed — congratulations 🎉 Your ingestion layer works.
So far, we’ve done something important but deceptively simple:
We pulled real data from an API and pushed it safely into Pub/Sub. Our data: Arriving continuously Sitting in a message queue Untouched, unvalidated, and unstructured
STEP 2 — Pub/Sub to BigQuery — Streaming with Dataflow, Apache Beam & Flex Templates
Note: I am using asia-south2 region (dataflow services are not available in asia-south1).
Why We Need a Processing Layer (Quick Reality Check)
Let’s address an uncomfortable truth:
You cannot directly connect Pub/Sub to BigQuery and call yourself a data engineer 😅
Why? — APIs return messy, nested JSON — Fields change — Events arrive late — Schemas drift — Failures happen mid-stream
We need a brain in the pipeline — not just pipes. That brain is Apache Beam, and in GCP, it runs on Dataflow.
Basic theory:
Apache Beam and Dataflow — The Simple Truth
Apache Beam is not a data processing engine. It’s a way of thinking about data processing. Beam lets you write one pipeline that describes what should happen to data, not where or how it runs. Whether the data is batch or streaming, the code stays the same — and that’s the whole point.
Google Cloud Dataflow is where Beam actually gets things done. It’s Google’s fully managed service that executes Beam pipelines at scale. You write Beam code, hand it to Dataflow, and Google worries about workers, scaling, retries, and failures.
Why this combo matters in real life: You stop rewriting logic for batch vs streaming You stop managing clusters and babysitting jobs You focus on transformations, not infrastructure
In short: Beam defines the pipeline, Dataflow runs it, and you stay sane.
High-Level Flow
Before touching code, here’s the process view:
- Dataflow continuously pulls messages from Pub/Sub
- Each message is parsed and validated
- Timestamps are extracted for event-time correctness
- Invalid records are separated (and logged)
- Clean records are written into BigQuery
- Checkpoints ensure the pipeline survives restarts
If the job crashes? → It resumes. If data arrives late? → It’s handled. If load increases? → It scales.
This is real streaming.
Step 2 (A): Create GCS Buckets (Mandatory for Dataflow)
Dataflow will not run without GCS buckets. We need a bucket to store the data/checkpoints etc.
Command to create a bucket:
gsutil mb gs://source_data_dataflowNo buckets = no job. Period.
Step 2 (B): Create BigQuery Dataset & Table
I could have:
- Written a schema JSON
- Used
bq mk - Debugged schema mismatches
- Questioned my life choices
But I didn’t make my life harder than it needed to be.
😌 I opened BigQuery UI, created the dataset, and ran a simple CREATE TABLE SQL.
Because:
Data engineering is hard enough already — no need to role-play suffering.
Final Bronze Table Schema
This table represents cleaned, structured air quality measurements, extracted from the raw event payload:
event_date            DATE
city                  STRING
station_name          STRING
lat                   FLOAT
lon                   FLOAT
aqi                   INTEGER
dominant_pollutant    STRING
pm25                  FLOAT
pm10                  FLOAT
co                    FLOAT
no2                   FLOAT
so2                   FLOAT
temperature           FLOAT
humidity              FLOAT
wind                  FLOAT
event_time            TIMESTAMP
bq_load_time          TIMESTAMP
This schema is: — Flat — suitable based on incoming data. — Analytics-friendly — Perfect for Bronze → Silver → Gold modeling
Step 2 (C): Apache Beam: Extracting Structure from Chaos
This is where Apache Beam actually earns its salary. Instead of passing data through blindly, the pipeline:
- Reads messages from Pub/Sub
- Parses JSON
- Extracts only required fields
- Writes clean rows to BigQuery.
Apache Beam Pipeline (Actual Logic)
import json
from datetime import datetime
import apache_beam as beam
from apache_beam.options.pipeline_options import (
    PipelineOptions,
    StandardOptions,
    SetupOptions
)

PROJECT_ID = "end-to-end-de-pipeline"
REGION = "asia-south2"
SUBSCRIPTION = "projects/end-to-end-de-pipeline/subscriptions/air-quality-sub"
BQ_TABLE = "end-to-end-de-pipeline:air_quality.waqi_hyd_bronze"

class ParseWAQI(beam.DoFn):
    def process(self, message):
        msg = json.loads(message.decode("utf-8"))

        data = msg["raw_payload"]["data"]
        iaqi = data.get("iaqi", {})
        city_info = data.get("city", {})

        event_time = datetime.fromisoformat(msg["event_time"])

        yield {
            "event_date": event_time.date().isoformat(),
            "city": msg["city"],
            "station_name": city_info.get("name"),
            "lat": city_info.get("geo", [None, None])[0],
            "lon": city_info.get("geo", [None, None])[1],
            "aqi": data.get("aqi"),
            "dominant_pollutant": data.get("dominentpol"),
            "pm25": iaqi.get("pm25", {}).get("v"),
            "pm10": iaqi.get("pm10", {}).get("v"),
            "co": iaqi.get("co", {}).get("v"),
            "no2": iaqi.get("no2", {}).get("v"),
            "so2": iaqi.get("so2", {}).get("v"),
            "temperature": iaqi.get("t", {}).get("v"),
            "humidity": iaqi.get("h", {}).get("v"),
            "wind": iaqi.get("w", {}).get("v"),
            "event_time": event_time.isoformat(),
            "bq_load_time": datetime.utcnow().isoformat()
        }

def run():
    options = PipelineOptions()
    options.view_as(StandardOptions).streaming = True
    options.view_as(SetupOptions).save_main_session = True

    with beam.Pipeline(options=options) as p:
        (
            p
            | "Read from PubSub" >> beam.io.ReadFromPubSub(subscription=SUBSCRIPTION)
            | "Parse WAQI Payload" >> beam.ParDo(ParseWAQI())
            | "Write to BigQuery" >> beam.io.WriteToBigQuery(
                table=BQ_TABLE,
                write_disposition=beam.io.BigQueryDisposition.WRITE_APPEND
            )
        )

if __name__ == "__main__":
    run()
Requirements.txt
apache-beam[gcp]==2.70.0
google-cloud-storage==2.19.0
Step 2 (D): Deploying the Pipeline the Right Way: Dataflow Flex Templates
At this point, our Apache Beam pipeline works. It reads from Pub/Sub. It writes clean data into BigQuery. Life is good.
But there’s one uncomfortable truth we still haven’t addressed:
👉 The pipeline currently depends on a human.
And production systems should never emotionally depend on humans.
This is where Dataflow Flex Templates enter the story.
What Is a Dataflow Flex Template? (One-Line Definition)
A Flex Template is a containerized Apache Beam pipeline that can be launched multiple times with different parameters, without rebuilding the code.
At a high level: — A Docker image with your Beam pipeline — A metadata file describing how to run it — A reusable definition stored in GCS
Once deployed, the pipeline becomes:
A system, not a script.
Think of it as:
“Here is everything needed to run this pipeline — don’t ask me later.”
Deployment Step 1: Metadata File (Mandatory, No Negotiation)
Every Flex Template needs a metadata.json.
This file tells Dataflow: — What the template is — What it does — What parameters it expects (if any)
In our case, the pipeline is simple and parameter-free. No parameters for now — we’re keeping life peaceful.
{
  "name": "WAQI PubSub to BigQuery (Flex)",
  "description": "Streaming WAQI pipeline from Pub/Sub to BigQuery bronze table",
  "parameters": []
}
Think of this as:
The README that Dataflow reads before running your pipeline.
Deployment Step 2: Docker Image (Automatic vs Controlled Chaos)
Dataflow allows you to: — Auto-generate a Docker image or — Write your own Dockerfile
When auto-generation is enough
— Pure Python — Standard Beam dependencies — No OS-level packages
When you should write your own Dockerfile
— Non-Python dependencies — Custom system libraries — Tight control over runtime environment
For this pipeline, auto-generation is sufficient, but the important thing is:
You can take full control when needed — and production teams love that option.
Deployment Step 3: Build the Flex Template
This step does three critical things:
- Builds a Docker image
- Pushes it to Artifact Registry
- Registers a reusable template in Cloud Storage
Command (Run this from your dataflow folder):
gcloud dataflow flex-template build \
  gs://source_data_dataflow/templates/waqi_flex.json \
  --sdk-language PYTHON \
  --flex-template-base-image PYTHON3 \
  --py-path "." \
  --image-gcr-path [region]-docker.pkg.dev/[project_id]/dataflow-docker-repo/waqi:latest \
  --metadata-file metadata.json \
  --env FLEX_TEMPLATE_PYTHON_PY_FILE=main.py \
  --env FLEX_TEMPLATE_PYTHON_REQUIREMENTS_FILE=requirements.txt
What’s Actually Happening Here
— Docker image is built with:
— main.py (Beam pipeline)
— requirements.txt — Image is pushed to Artifact Registry
—Template definition is written to GCS as “waqi_flex.json” file.
— Dataflow now knows how to run this pipeline — forever
Step 4: Running the Job from the Template
Once the template exists, starting the pipeline becomes boring — which is exactly what we want.
Run the Streaming Job
gcloud dataflow flex-template run waqi-dataflow-run \
  --template-file-gcs-location gs://source_data_dataflow/templates/waqi_flex.json \
  --region asia-south2
No code. No Docker. No Python setup. No developer laptop.
Just:
“Start the pipeline.”
And Dataflow handles:
- Worker provisioning
- Scaling
- Retries
- Logging
- Stability
We finally make the data useful phase!!!
Moving into DBT: Turning Data into Something Humans Can Query
Up to this point, our pipeline has done a great job at one thing:
👉 Moving data safely from an API into BigQuery.
But let’s be honest — data at this stage is still: — Raw-ish — Duplicate-prone — Not designed for analytics — Definitely not something a BI tool should touch directly
So now comes DBT.
DBT doesn’t ingest data. DBT assumes data already exists — and then applies structure, rules, and intent on top of it.
In other words:
Dataflow brings the data in. DBT makes it make sense.
Where DBT Fits in the Overall Process
At a process level, here’s what’s happening now:
- Bronze layer — Raw, structured data from Dataflow (one row per event, minimal logic)
- Silver layer — Deduplicated — Cleaned data — Type-corrected — Consistent grain
- Gold layer — Daily metrics — Business-ready aggregates — Dimension joins — Analytics-friendly models
This follows the Medallion Architecture, which is popular not because it’s fancy — but because it scales mentally as the project grows.
Initial DBT Setup (The Boring but Necessary Part)
Install DBT for BigQuery
pip install dbt-bigqueryVerify installation:
dbt --versionCreate a DBT Project
dbt init waqi_dbtDuring setup: — Choose BigQuery — Complete OAuth — Make sure the location matches your BigQuery dataset (this matters more than it should)
Profiles Configuration (Very Important, Very Easy to Ignore)
DBT uses a file called profiles.yml to know:
— Which project to connect to
— Which dataset to use
— How to authenticate
Usually located at:
C:\Users\<your_username>\.dbt\profiles.ymlDouble-check:
project:→end-to-end-de-pipelinedataset:→ DBT will create schemas based on model configuration, so the dataset here acts as a default fallback. For safety keep it empty (“”).location:→ same as BigQuery dataset location
Then validate:
dbt debugIf dbt debug fails — do not proceed.
Fix it first. DBT assumes a perfect connection from here on.
Bronze Layer: The Starting Point
Our bronze table (waqi_hyd_bronze) already exists in BigQuery.
Important design choice:
Bronze is not “dirty” — it’s just unopinionated.
It has: — All events — No logic — source data is dumped as it is. — No deduplication guarantees
That’s intentional.
Silver Layer: Cleaning and Deduplicating
The first real transformation happens here.
Goal of Silver Layer
— Remove duplicates
— 1nf transformation -Ensure one row per (city, station, event_time) — Keep the latest record if duplicates exist
— Prepare stable keys for downstream models
Code:
{{
    config(
        materialized = "incremental",
        unique_key = "event_hash"
    )
}}

with source as (
    select
        event_date,
        event_time,
        city,
        station_name,
        lat,
        lon,
        cast(aqi as int64) as aqi,
        dominant_pollutant,
        pm25, pm10, co, no2, so2,
        temperature, humidity, wind,
        bq_load_time,

        -- business hash
        to_hex(md5(concat(city, station_name, cast(event_time as string)))) as event_hash,

        row_number() over (
            partition by city, station_name, event_time
            order by bq_load_time desc
        ) as rn

    from {{ source('air_quality', 'waqi_hyd_bronze') }}
)

select * except(rn) from source where rn = 1

{% if is_incremental() %}
  and bq_load_time > (select max(bq_load_time) from {{ this }})
{% endif %}
What This Achieves
- Deduplication using
row_number - Stable business key via
event_hash - Incremental loading (no full table scans every run)
This is the first place where data quality is enforced.
Gold Layer: Business Metrics
Now we finally ask business questions.
Example: Daily Air Quality Metrics
{{ config(materialized='table') }}
select
    date(s.event_time) as date,
    d.station_sk,
    avg(s.aqi) as avg_aqi,
    max(s.aqi) as max_aqi,
    avg(s.pm25) as avg_pm25,
    avg(s.pm10) as avg_pm10
from {{ ref('air_quality_silver') }} s
join {{ ref('dim_station') }} d
  on s.city = d.city
 and s.station_name = d.station_name
 and s.event_time between d.valid_from
                         and coalesce(d.valid_to, timestamp('9999-12-31'))
group by 1, 2
This is what BI tools actually want.
Dimension Table: SCD Type 2 (Because Stations Change)
Stations can:
- Change coordinates
- Get renamed
- Move
- Be reclassified
So we model them as an SCD Type 2 dimension.
Station Dimension Model
{{ config(materialized='incremental', unique_key='station_sk') }}

with base as (
    select city, station_name, lat, lon, event_time
    from {{ ref('air_quality_silver') }}
),

dedup as (
    select *,
           row_number() over (
               partition by city, station_name
               order by event_time
           ) as rn
    from base
)

select
    {{ dbt_utils.generate_surrogate_key(
        ['city', 'station_name', 'event_time']
    ) }} as station_sk,

    city,
    station_name,
    lat,
    lon,
    event_time as valid_from,

    lead(event_time) over (
        partition by city, station_name
        order by event_time
    ) as valid_to,

    case
        when lead(event_time) over (
            partition by city, station_name
            order by event_time
        ) is null then true
        else false
    end as is_current

from dedup
where rn = 1
This gives us:
- Full station history
- Valid time ranges
- A clean join surface for fact tables
Fun fact: I did this part only to showcase I can implement SCD2😜
Packages (Because We Used dbt_utils)
packages.yml
packages:
  - package: dbt-labs/dbt_utils
    version: 1.1.1
Install dependencies:
dbt depsSchema & Tests (Where Trust Is Earned)
schema.yml
version: 2sources:
- name: air_quality
database: end-to-end-de-pipeline
schema: air_quality
description: "Bronze layer containing raw hourly WAQI air quality data"
tables:
- name: waqi_hyd_bronze
description: "Raw hourly air quality data for Hyderabad ingested from WAQI API"models:
- name: air_quality_silver
description: "Cleaned hourly air quality data"
columns:
- name: event_hash
tests:
- not_null
- unique - name: dim_station
description: "SCD2 station dimension"
columns:
- name: station_sk
tests:
- not_null
- uniqueTests are how DBT moves from SQL scripts to data contracts.
Running & Validating
Validate Setup
dbt debugCompile SQL (No Execution)
dbt compileRun Models
dbt runFull Refresh (When Needed)
dbt run --full-refreshAt this point, I’m officially bored of deployment.
The fun parts are done, the data is flowing, and what remains is the classic “enterprise DLC” — scheduling and permissions.
I’ll leave the final step to you: deploying dbt to run at regular intervals.
Hint: Cloud Composer will enter the scene, along with service accounts, IAM roles, and a sudden appreciation for why people complain about orchestration.
🚧 What’s Next (No Escaping This Time)
I know, I know — I bailed out a bit early on the deployment side this time. Boredom won. It happens.
But in the next iteration of this project, I’m doing it properly:
- All code will live in Git (no more “local-only heroics”).
- Git-based triggers will be added so changes actually mean something when pushed.
- Deployments will reflect real CI/CD behavior, not manual commands typed at 2 AM.
- And yes — every single component will be deployed, even if boredom shows up again uninvited.
No shortcuts, no “left as an exercise for the reader” excuses. This pipeline deserves a proper ending — and I’ll make sure it gets one. 😅🚀.
If you have suggestions, improvements, or if you just want to scold me for leaving deployment incomplete, feel free to drop an email. Constructive criticism is welcome. Brutal honesty too. I clearly deserve some of it. 😄
Until then — happy building, happy breaking, and may your pipelines fail loudly before production.
Love You 3000❤️
About Me
I have around 2 years of experience working with ETL pipelines — mostly the kind that work, but don’t always help you grow at the pace you’d like. If you’ve spent time in large organizations (hello, TCS 👋), you already know how easy it is to get comfortable… and how hard it is to stay sharp.
So instead of waiting for “the perfect project,” I decided to build one myself.
This series is me:
- Re-learning concepts properly
- Filling the gaps I didn’t even realize I had
- And documenting everything so others don’t have to hit the same walls I did 😜
If you’re early in your data engineering journey, stuck with legacy ETL, or just tired of CSV-based tutorials — this series is for you. And if nothing else, it’s proof that frustration can be a pretty good teacher.
0420 — signing off🙃
메타데이터
- post_id
- 04b5e78ecbf6
- slug
- building-a-real-end-to-end-data-pipeline-on-gcp-yes-from-scratch-04b5e78ecbf6
- url
- https://medium.com/@ganeshnasrikrishna/building-a-real-end-to-end-data-pipeline-on-gcp-yes-from-scratch-04b5e78ecbf6
- canonical_url
- https://medium.com/@ganeshnasrikrishna/building-a-real-end-to-end-data-pipeline-on-gcp-yes-from-scratch-04b5e78ecbf6
- author_url
- https://medium.com/@ganeshnasrikrishna
- status
- ok
- fetched_at
- 2026-06-09 15:37:30



