The Complete Guide to git clone: From Your First Download to Advanced Repository Mirroring
Everything you need to know about the command that copies a repository onto your machine, explained in plain English with real-world…
The Complete Guide to git clone: From Your First Download to Advanced Repository Mirroring
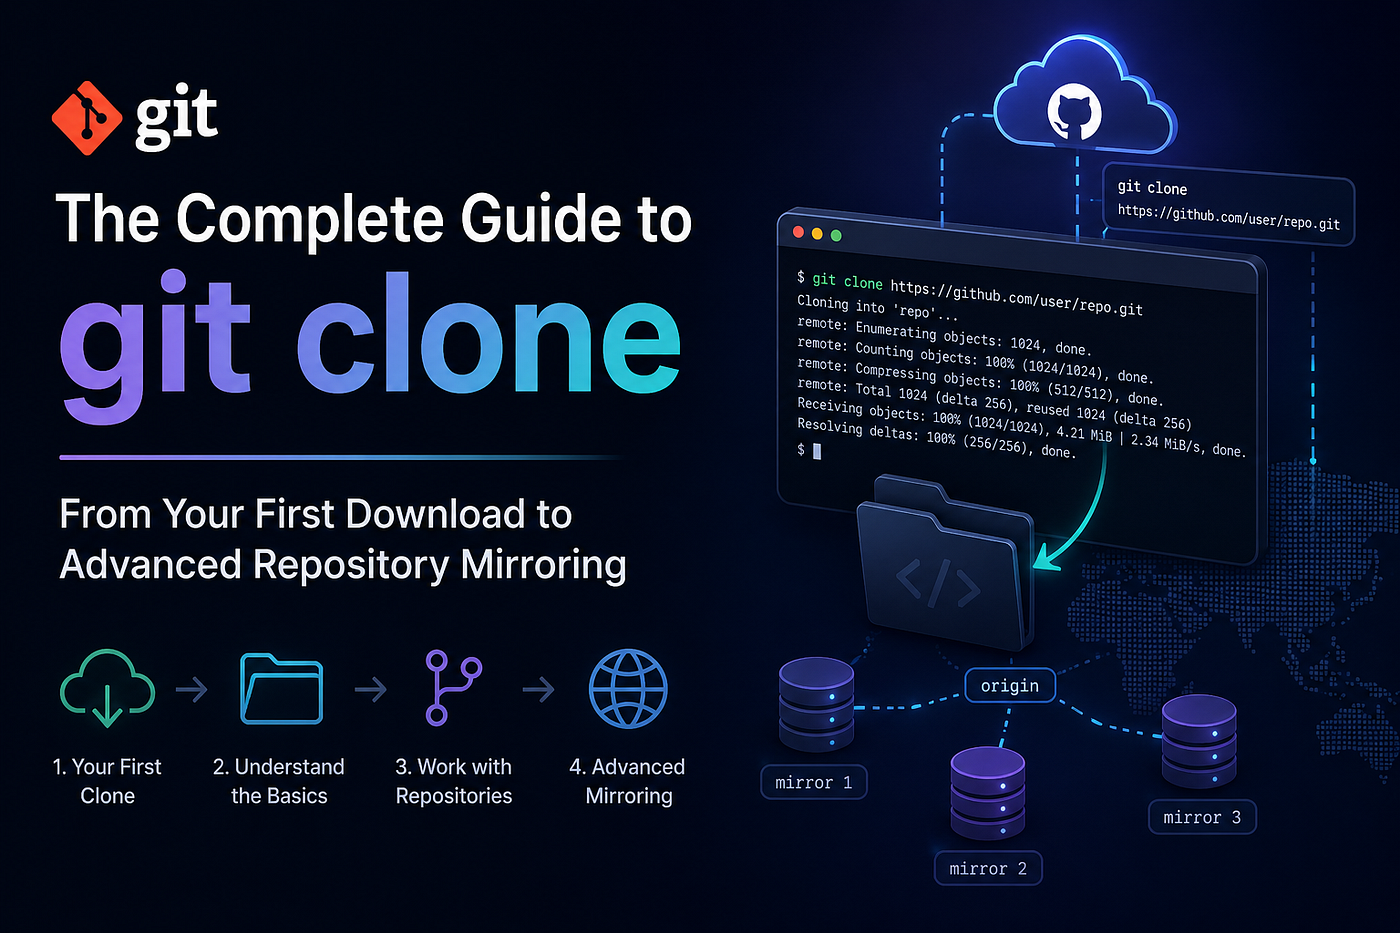
Everything you need to know about the command that copies a repository onto your machine, explained in plain English with real-world scenarios, visual diagrams, and honest talk about the mistakes everyone makes.
A deep-dive tutorial covering Beginner, Intermediate, and Advanced usage, all options from the official Git manual
**inter-git.com** is an interactive Git tutorial where each command is shown visually so you can see exactly how it works in real time. It runs entirely in your browser, so there is nothing to install.
Table of Contents
- Introduction: Why git clone Matters More Than You Think
- Level 1: Beginner 2.1 What is git clone and what problem does it solve? 2.2 The mental model: what actually happens when you clone 2.3 Your first git clone 2.4 Anatomy of a freshly cloned repository 2.5 Understanding “origin”: what is a remote? 2.6 Remote-tracking branches explained simply 2.7 Cloning into a specific folder name 2.8 Your first workflow after cloning 2.9 Beginner pitfalls
- Level 2: Intermediate 3.1 — branch: clone a specific branch 3.2 — depth: shallow clones 3.3 — no-checkout: history without files 3.4 — single-branch: narrow history 3.5 — no-tags: skip tag downloads 3.6 — origin: rename the remote 3.7 — recurse-submodules 3.8 — config: bake in settings 3.9 — template 3.10 — quiet, — verbose, — progress 3.11 Intermediate pitfalls
- Level 3: Advanced 4.1 — filter: partial clones 4.2 — sparse: sparse checkout 4.3 — bare: bare repositories 4.4 — mirror: complete mirrors 4.5 — reference and — dissociate 4.6 — local, — no-hardlinks, — shared 4.7 Advanced submodule flags 4.8 — jobs: parallel fetching 4.9 — reject-shallow 4.10 — server-option 4.11 — upload-pack 4.12 — revision 4.13 git clone in CI/CD pipelines 4.14 Advanced pitfalls
- Quick Reference Card
- Conclusion
Introduction: Why git clone Matters More Than You Think
If you have ever clicked the green “Code” button on GitHub and copied a URL to your clipboard, you have taken the first step toward using git clone. It is probably the most-used Git command in the world, executed millions of times every day by developers downloading open-source libraries, joining team projects, setting up CI/CD pipelines, and archiving repositories.
And yet, most developers only ever use the most basic form of it. They type git clone followed by a URL, wait for the progress bar, and move on. That is like buying a Swiss Army knife and only ever using the main blade. The command has a remarkable set of options that, once you understand them, will fundamentally change how you work with Git at scale.
This guide covers every single option documented in the official git clone manual, explained the way a patient senior developer would explain them to a colleague: in plain English, with real examples, honest warnings about what can go wrong, and diagrams that make the abstract concrete.
Level 1 Beginner: Understanding git clone From the Ground Up
**inter-git.com** is an interactive Git tutorial where each command is shown visually so you can see exactly how it works in real time. It runs entirely in your browser, so there is nothing to install.
What Is git clone and What Problem Does It Solve?
To understand git clone, you first need to understand a simple reality about how developers work together. Code does not live in one place. Your teammate is writing features on their laptop in Amsterdam. You are reviewing their work on yours in Rotterdam. Your company's production server is running in Frankfurt. A third colleague is about to contribute from Berlin.
Everyone needs access to the same codebase. And everyone needs to be able to work on it independently, without blocking each other, and without accidentally overwriting each other’s work.
The way Git solves this is elegant: every person gets their own complete copy of the entire repository, including the entire history of every change ever made. That copy lives on their own machine. They can work on it offline, run experiments, break things, fix things, and then share their work back when they are ready.
The command that creates this local copy is git clone. It reaches out to a source repository, downloads everything, and sets up a complete, fully functional repository on your machine. This is fundamentally different from downloading a ZIP file of the code. A ZIP gives you current files. git clone gives you the files and the entire history: every commit, every branch, every tag.
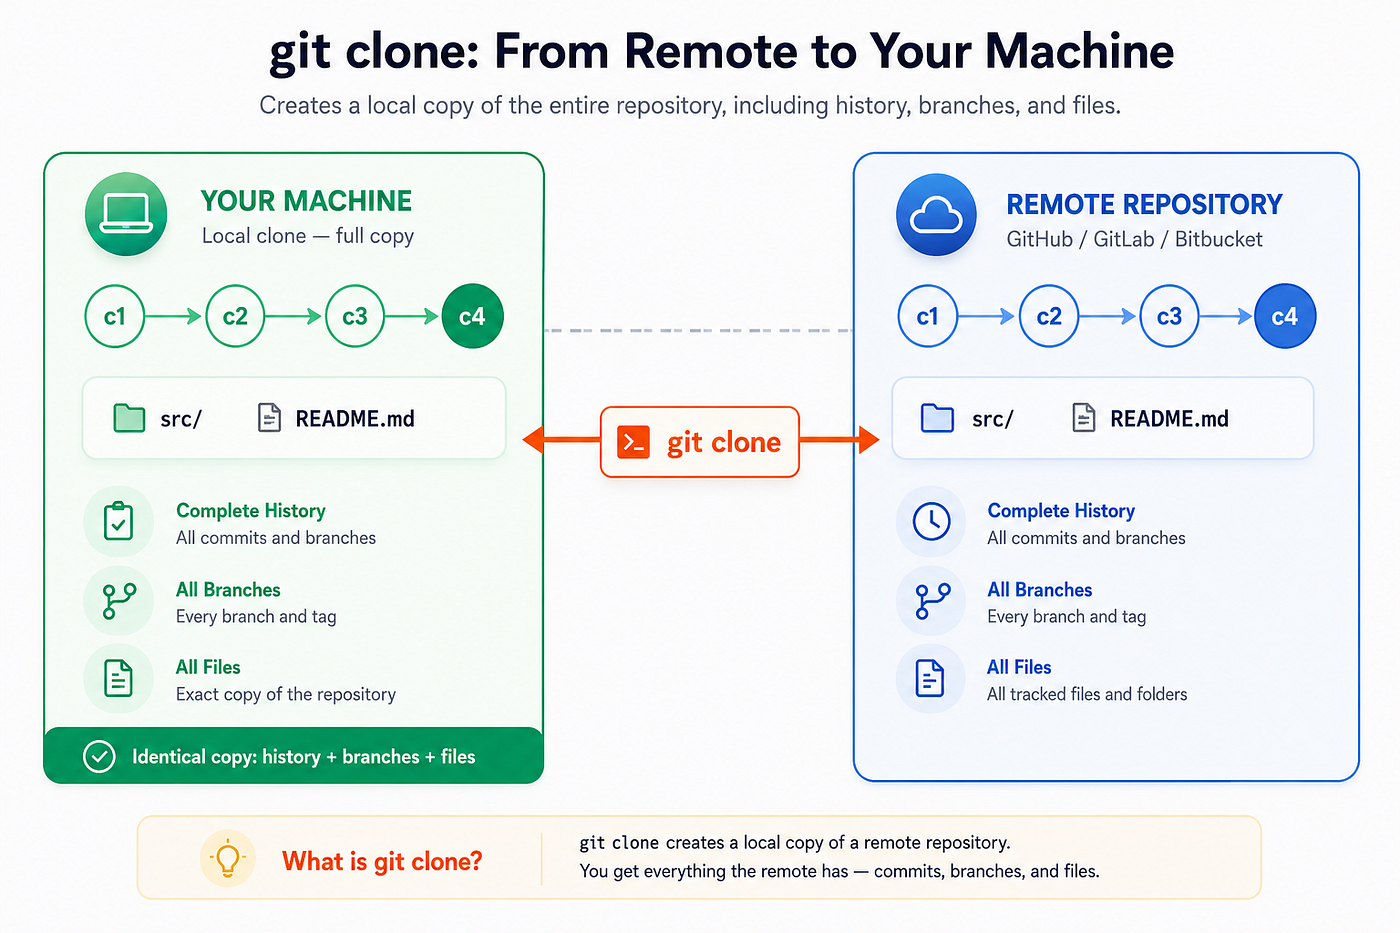
Figure 1: git clone copies the complete repository from a remote source to your local machine. You get every commit, every branch, and every file.
The Mental Model: What Actually Happens When You Clone
When you run git clone, Git does not just download a folder of files. It:
- Creates a new folder on your machine with the repository name
- Downloads the entire Git object database: every commit, every version of every file, the complete history
- Sets up a connection back to the source repository and names it origin
- Creates remote-tracking branches for every branch that exists on the remote
- Checks out the default branch (usually
mainormaster) so you have actual files to work with
The result is a fully self-contained repository. You can disconnect from the internet and still look at history, switch branches, make commits, and do almost everything Git can do. Only git fetch, git pull, and git push require network access.
Your First git clone
git clone <url>Downloads a complete copy of the repository at the given URL into a new folder in your current directory. The folder will be named after the repository (the last part of the URL, without the .git extension).
Clone a GitHub repository
git clone https://github.com/facebook/react.git

Clone via SSH (recommended for regular contributors)
git clone git@github.com:username/project.git

Clone from a local path
git clone /path/to/existing/repository
Note: The .git at the end of a GitHub URL is optional in most cases. GitHub and most hosting services handle both forms.
Anatomy of a Freshly Cloned Repository
After the clone finishes, inside the folder you will find:
my-app/
  ├── .git/           ← The hidden Git database (the "engine")
  │   ├── config      ← This repo's local configuration (including remote URL)
  │   ├── HEAD        ← Points to the current branch
  │   ├── refs/
  │   │   ├── heads/  ← Local branches
  │   │   └── remotes/
  │   │       └── origin/  ← Remote-tracking branches
  │   └── objects/    ← The actual object database (all your history)
  ├── src/            ← Your actual project files
  └── README.md
The .git/config file is the most important one to understand. It contains the remote URL and branch tracking configuration that Git uses for every fetch and push.
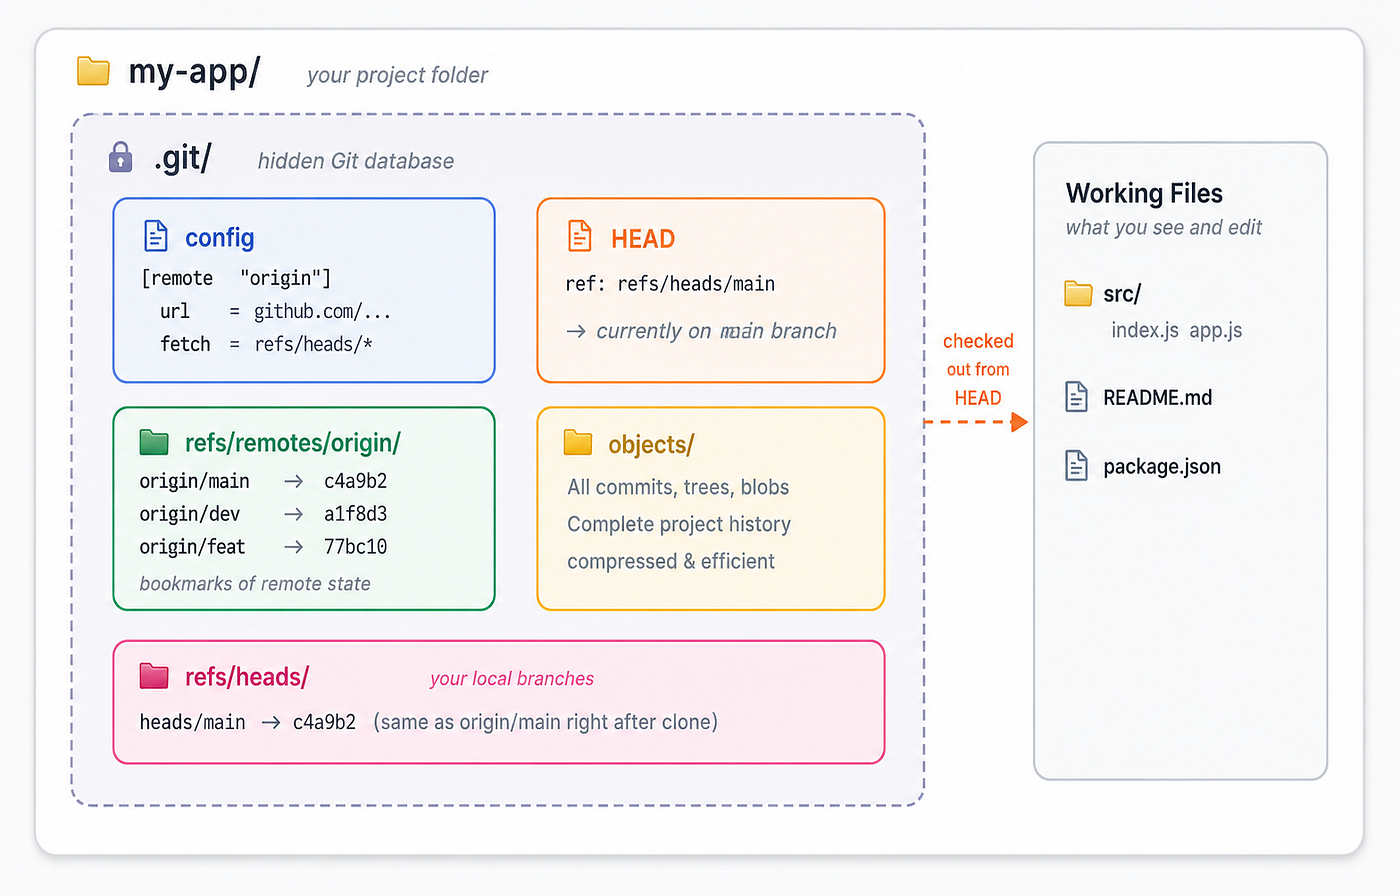
Figure 2: Inside a freshly cloned repository. The .git folder holds the entire history and all configuration. The working files are what Git has checked out for you to edit.
Understanding “origin”: What Is a Remote?
After you clone a repository, you will hear a lot about something called origin. A remote in Git is just a nickname for the URL of another repository. When you cloned from GitHub, Git automatically created a remote called origin that points back to the URL you cloned from. Think of it as a bookmark.
# List all configured remotes
git remote -v
# origin  https://github.com/username/my-app.git (fetch)
# origin  https://github.com/username/my-app.git (push)
The name origin is completely arbitrary. It is just the default name that git clone chooses. When you run git push without specifying where to push, Git pushes to origin. When you run git pull, Git pulls from origin.
Good to Know: You can have multiple remotes in a single local repository. In open-source contribution, a common pattern is to have origin pointing to your own fork and upstream pointing to the original project. You add the second remote with git remote add upstream <url> after cloning.
Remote-Tracking Branches Explained Simply
After cloning, running git branch -a shows:
* main
  remotes/origin/main
  remotes/origin/dev
  remotes/origin/feature/login
The first line, main, is your local branch. The lines starting with remotes/origin/ are remote-tracking branches: read-only snapshots of what the remote branches looked like the last time Git checked.
Think of remote-tracking branches like a photo of a friend’s room. The photo shows their room when the photo was taken. The room might have changed since then. The photo does not update automatically. You have to go take a new photo — which in Git means running git fetch.
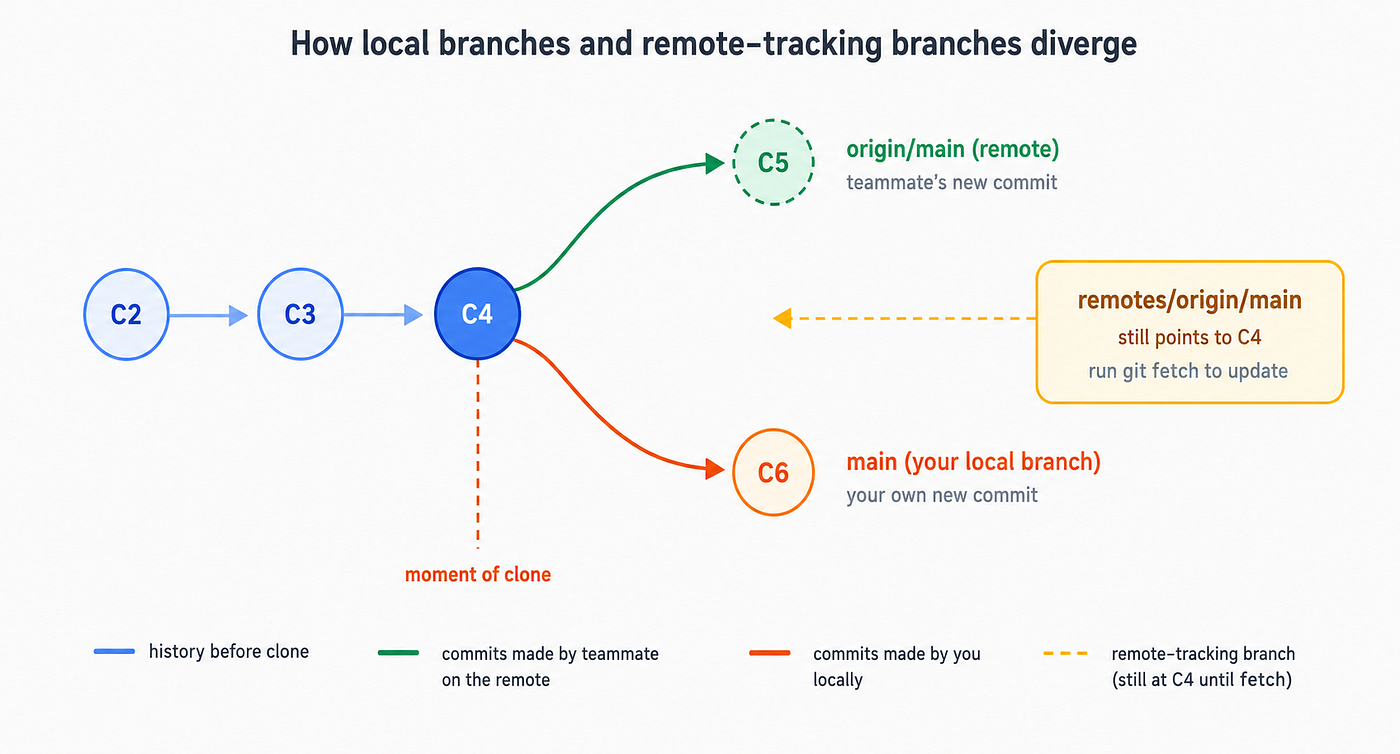
Figure 3: After cloning, your local branch and the remote-tracking branch start at the same commit. Over time they diverge. Run git fetch to bring your remote-tracking branches up to date.
Cloning Into a Specific Folder Name
git clone <url> <directory>Clones the repository into a folder with the name you specify, rather than using the repository’s default name. Use . to clone into the current (empty) directory.
# Clone into a folder called "backend"
git clone https://github.com/company/node-api-service.git backend

Clone into the current (empty) directory
git clone https://github.com/company/api.git .
Warning: If you clone into . and the current directory is not empty, Git will refuse and print an error. Make sure the target directory is empty before using this pattern.
Your First Workflow After Cloning
# Step 1: Clone the repository
git clone https://github.com/myteam/web-app.git
cd web-app

# Step 2: Check what branches exist
git branch -a

# Step 3: Create your own branch for your work
git checkout -b feature/my-new-feature

# Step 4: Make changes, commit, push
git add .
git commit -m "Add my new feature"
git push origin feature/my-new-feature

# Step 5: Later, pull in updates from the team
git checkout main
git pull origin main
Real-World Context
When you first join a company, you will typically clone their main repository and immediately run an install command like npm install or pip install -r requirements.txt. The git clone command is the first thing you run on a new machine, and you may run it dozens of times throughout your career as you pick up different projects.
Beginner Pitfalls
Pitfall 1: Cloning Inside Another Repository
If you navigate into a folder that is already a Git repository and then run git clone, you will create a repository inside a repository. Always check with git status or check if a .git folder exists before cloning.
Pitfall 2: Forgetting to cd Into the Cloned Folder
After running git clone, you are still in the directory you were in before. You must cd project-name before running any other Git commands.
Pitfall 3: Confusing Clone With Download
Downloading a ZIP file gives you the current files but no Git history. Always use git clone instead of downloading a ZIP when you intend to actually work on the project.
Pitfall 4: SSH Clone Failing Without SSH Keys If you try to clone using an SSH URL without having set up SSH keys, you will get a “Permission denied (publickey)” error. Use HTTPS with a personal access token to get started, and set up SSH keys later for convenience.
Pitfall 5: Assuming You Can Push to Any Repository You Clone Cloning gives you a local copy. It does not give you write permission to the remote. To contribute to a project you do not own, fork it first, clone your fork, and submit a pull request.
Level 2 Intermediate: Taking Control of How You Clone
Now that you have a solid understanding of what git clone does at its core, it is time to look at the flags that give you finer control. These are the options you will use regularly as you work on real projects.
Cloning a Specific Branch: --branch
git clone - branch <name> <url>After the clone, checks out the named branch instead of the remote’s default branch. This does not limit what history is downloaded: you still get the full repository with all branches. The short form is -b <name>. You can also pass a tag name to clone to a specific version.
# Clone and land on the "develop" branch
git clone --branch develop https://github.com/company/api.git
git clone -b develop https://github.com/company/api.git

# Clone and land on a specific release tag (detached HEAD)
git clone --branch v2.4.1 https://github.com/nginx/nginx.git
Note: Even when you use --branch, the clone still downloads all branches and their full history. To download only one branch's history, combine with --single-branch.
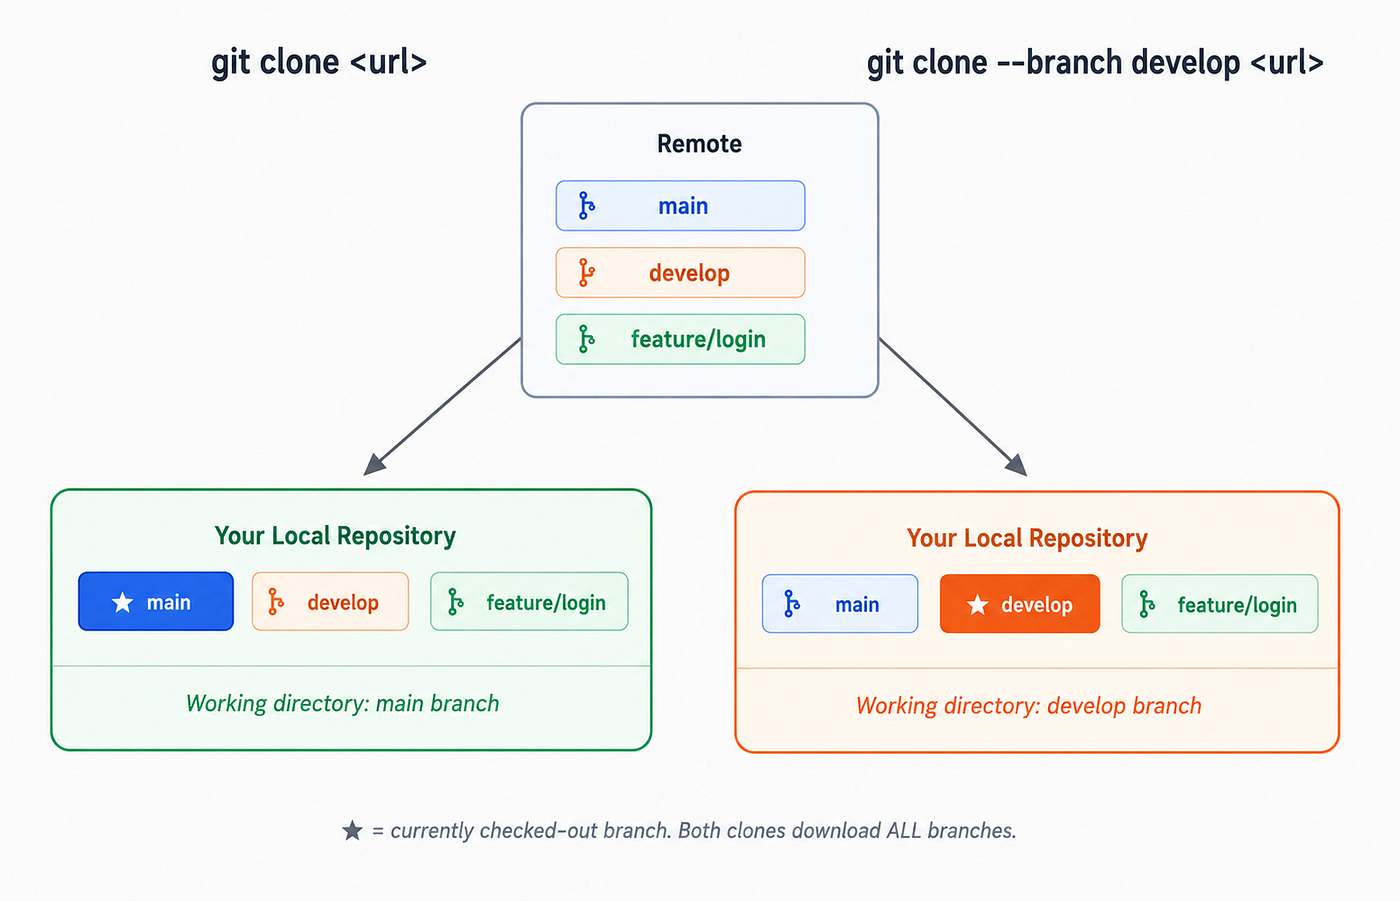
Figure 4: The — branch flag changes which branch your working directory lands on. Both clones still download all branches.
Shallow Clones: --depth
git clone - depth <number> <url>Creates a “shallow clone” that downloads only the most recent commits instead of the entire history. --depth 1 means only the most recent commit on each branch. Often ten to a hundred times faster than a full clone for large repositories.
# Shallow clone: only the latest snapshot, no deep history
git clone --depth 1 https://github.com/torvalds/linux.git

# Slightly deeper: last 10 commits
git clone --depth 10 https://github.com/company/api.git

# Convert a shallow clone to a full clone later
git fetch --unshallow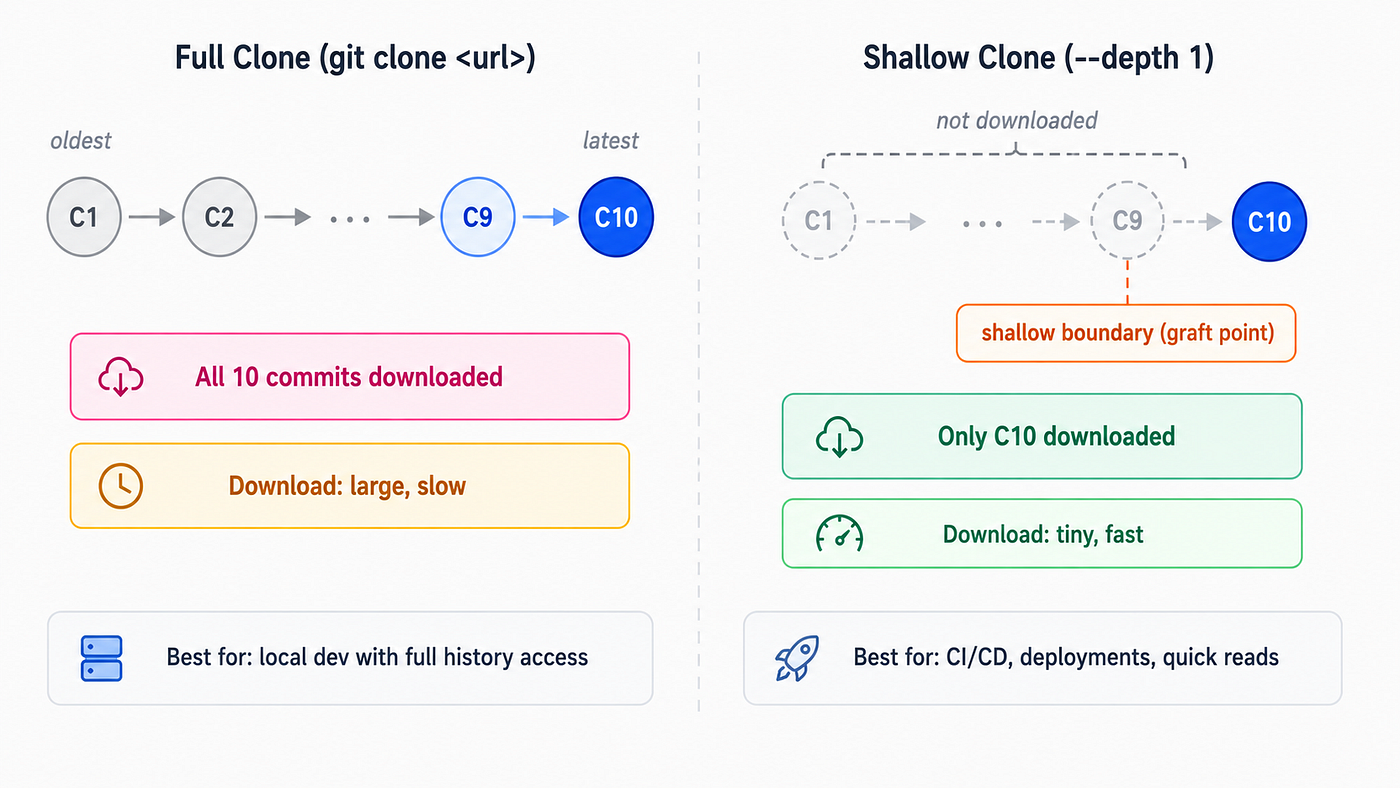
Figure 5: A full clone downloads the entire commit history. A shallow clone ( — depth 1) downloads only the most recent commit, making it dramatically faster.
Real-World Context: CI/CD Is Why You Need This
In virtually every CI system, the pipeline clones your repository fresh on every build. Switching to git clone --depth 1 in your GitHub Actions, Jenkins, or GitLab CI configuration can cut clone time from 60-90 seconds to 3-8 seconds for large repositories. At scale, across dozens of builds per day, this adds up to hours of saved machine time per week.
Getting a Repository Without Files: --no-checkout
git clone - no-checkout <url>Downloads the complete Git object database but does not check out the working files. The project folder will be empty (no source files) but the full history is in .git/. Useful for scripted workflows or when you want to do a sparse checkout. The short form is -n.
# Clone without checking out any files
git clone --no-checkout https://github.com/company/monorepo.git
cd monorepo

# Now manually check out what you need
git checkout main -- src/frontend/
Narrowing History: --single-branch
git clone - single-branch <url>Downloads only the history for the branch that gets checked out, instead of downloading history for all branches. When combined with --branch, downloads only the history for the specified branch. This is what makes CI/CD clones truly fast.
# The gold standard CI/CD clone pattern
git clone --depth 1 --single-branch --branch main https://github.com/company/app.git

# All history but just one branch
git clone --single-branch --branch develop https://github.com/company/app.git
If You Change Your Mind Later
If you did a --single-branch clone and later need other branches, run: git config remote.origin.fetch "+refs/heads/*:refs/remotes/origin/*" followed by git fetch.
Controlling Tag Downloads: --no-tags
git clone - no-tags <url>Prevents Git from downloading tags from the remote. By default, git clone downloads all tags. In repositories with hundreds of version tags, skipping them can shave time off the clone.
# The most aggressive minimal-download pattern
git clone --depth 1 --single-branch --no-tags --branch main https://github.com/company/api.git
Renaming the Remote: --origin
git clone - origin <name> <url>Instead of calling the remote origin, use the name you specify. The short form is -o <name>.
# Name it "upstream" when cloning to contribute to an open-source project
git clone --origin upstream https://github.com/opensource/project.git
Real-World Usage: The Fork Contribution Pattern
Clone the original project with --origin upstream, then add your fork as a second remote called origin. This way, git pull upstream main updates your copy from the original, and git push origin feature-branch pushes to your fork.
Handling Submodules: --recurse-submodules
git clone - recurse-submodules <url>After cloning, automatically initializes and clones all submodules referenced in the repository. Without this flag, submodule directories exist in your working tree but are empty after cloning.
# Without the flag: submodule directories are empty
git clone https://github.com/company/app-with-submodules.git
ls vendor/library/      # empty! nothing here

# With the flag: submodules are automatically populated
git clone --recurse-submodules https://github.com/company/app-with-submodules.git

# Fix a clone that was done without the flag
git submodule update --init --recursive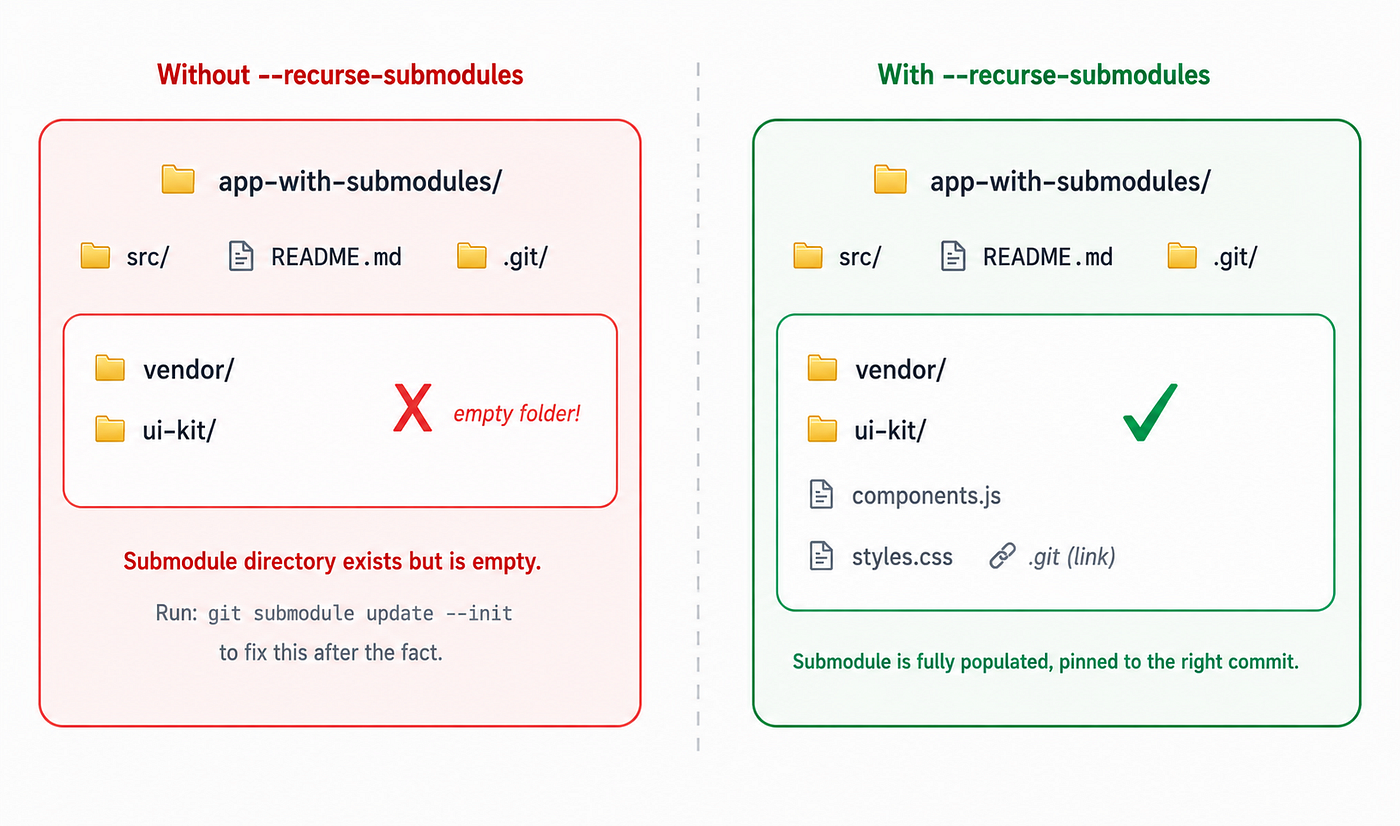
Figure 6: Without — recurse-submodules, submodule directories are created but left empty. With the flag, Git automatically clones each submodule into its directory.
The Most Common Submodule Pitfall
You clone a repository, everything looks fine, you try to build the code, and get errors about missing files or empty directories. Check .gitmodules in the root of the repository to see if it defines any submodules, and then run git submodule update --init --recursive to fix it.
Baking In Settings: --config
git clone - config <key>=<value> <url>Sets a Git configuration variable in the newly created repository immediately after initialization and before the remote history is fetched. You can use this flag multiple times. The short form is -c <key>=<value>.
# Set line ending behavior and disable garbage collection
git clone \
  --config core.autocrlf=false \
  --config gc.auto=0 \
  --config user.email=bot@company.com \
  https://github.com/company/app.git
Using Templates: --template
git clone - template=<directory> <url>Specifies a template directory whose contents are copied into the newly created .git directory after the clone. This is how teams enforce standard commit hooks across all developers: put the hooks in a template directory and clone with this flag.
# Clone with a custom template that includes team hooks
git clone --template=/path/to/team-template https://github.com/company/app.git
Progress Output: --quiet, --verbose, --progress
git clone - quiet <url>Suppresses all progress output. Git runs silently. Errors are still shown. Short form: -q.
git clone - verbose <url>Prints more detailed output than the default. Useful for debugging connection issues. Short form: -v.
git clone - progress <url>Forces progress reporting to be shown even when the output is not going to a terminal. Use this when redirecting output to a log file in a script.
# Silent clone for scripts
git clone --quiet https://github.com/company/app.git

# Force progress output even when piped to a log
git clone --progress https://github.com/company/app.git 2>&1 | tee clone.log
Intermediate Pitfalls
Pitfall 1: Shallow Clones and git log
When you do a shallow clone with --depth 1, running git log will show you only the single commit you downloaded. Commands like git blame and git bisect will be limited or broken. Shallow clones are great for CI, but use a full clone for local development where you need to investigate history.
Pitfall 2: Single-Branch Clone and Pushing
After a --single-branch clone, your remote configuration only knows about one branch. If you create a new local branch and try to push it, Git may complain. Specify the full push target: git push origin my-new-branch.
Pitfall 3: — depth and git rebase Do Not Mix Well
If you clone with --depth 1 and then try to do a git rebase, you may encounter errors because rebase needs commit ancestors that do not exist in a shallow clone. Deepen the clone first with git fetch --deepen=N or git fetch --unshallow.
Pitfall 4: Forgetting Submodules After Cloning
Always check the repository for a .gitmodules file. If it exists, either use --recurse-submodules or run git submodule update --init --recursive right after cloning.
Level 3 Advanced: Mastering Clone for Scale, Servers, and Automation
This section is for developers who need to work with Git at scale: large monorepos, server-side mirror setups, CI/CD optimization, and workflows involving tens or hundreds of gigabytes of repository data.
Partial Clones: --filter
git clone - filter=<filter-spec> <url>Uses the “partial clone” feature to download only a subset of the repository’s object database. Objects matching the filter are not downloaded until they are actually needed. Unlike a shallow clone, a partial clone has full commit history but defers the download of certain content types.
Git stores three types of objects: commits (records of when and what changed), trees (directory listings), and blobs (actual file contents). In a large repository with years of history, blobs are by far the largest part. The two most common filters are:
# Blobless clone: commits + tree structure, but not file contents (most popular)
git clone --filter=blob:none https://github.com/torvalds/linux.git

# Treeless clone: commits only (most aggressive)
git clone --filter=tree:0 https://github.com/torvalds/linux.git

# Limit blob size: skip files larger than 1 MB
git clone --filter=blob:limit=1m https://github.com/company/assets-repo.git
A blobless clone with --filter=blob:none downloads all commits and tree objects, but none of the actual file contents. Blobs are downloaded on-demand when you check out a file. The result is a clone that can be hundreds of times smaller than a full clone, yet supports all history operations like git log, git blame, and git bisect.
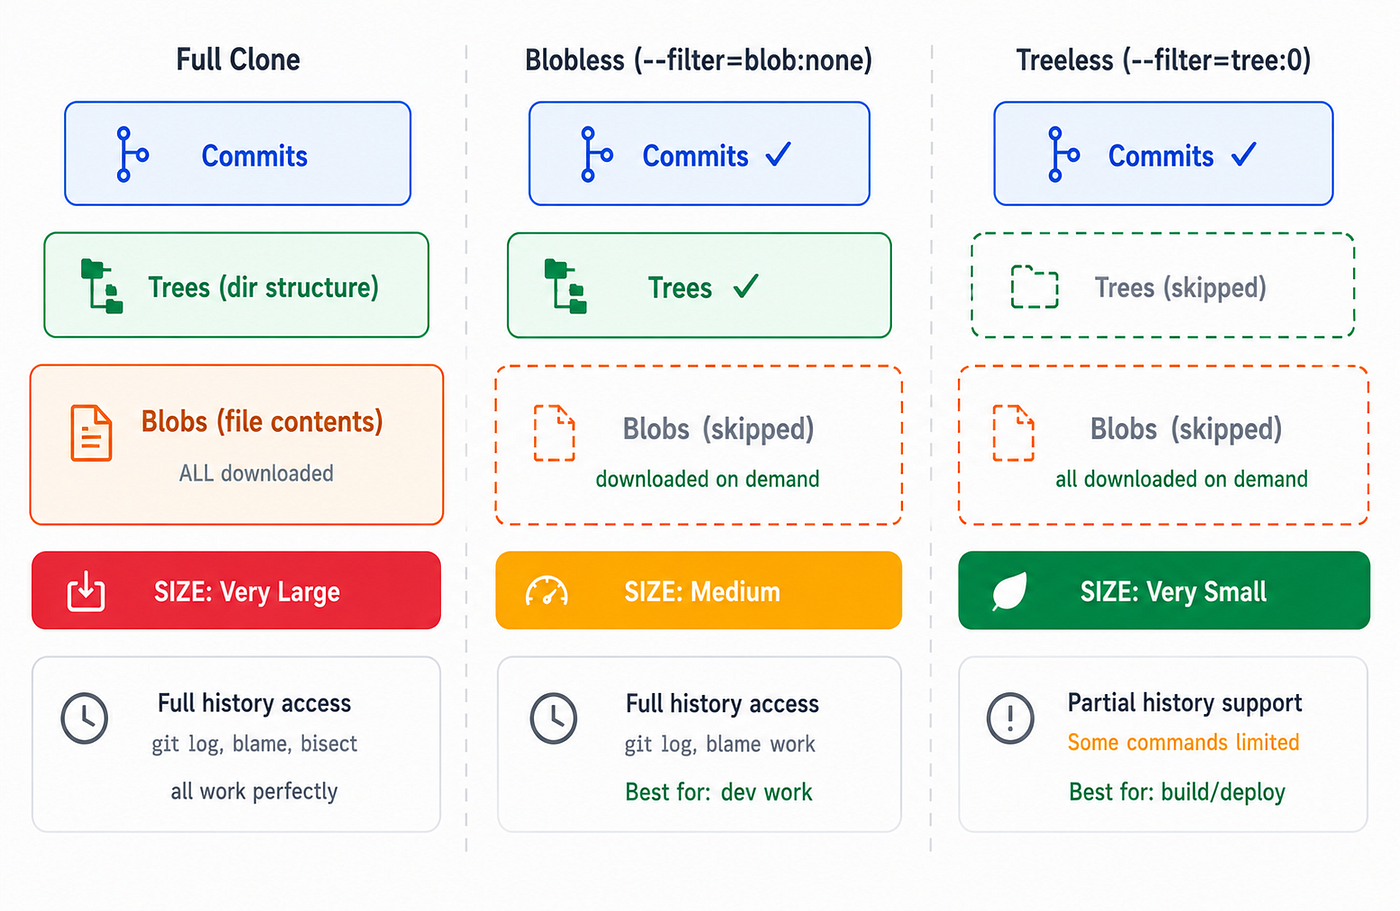
Figure 7: Comparison of full clone vs. blobless partial clone vs. treeless partial clone. Partial clones defer downloads of content until actually needed, dramatically reducing clone size while preserving history access.
Real-World Context: Google and Microsoft Use This Partial clones were developed specifically for massive repositories at companies like Google, Microsoft, and Meta. The Chromium repository, Android Open Source Project, and Windows source code are all examples of repositories so large that a full clone would be impractical on developer laptops. Partial clones let developers work with just the part of the codebase they need.
Sparse Checkout at Clone Time: --sparse
git clone - sparse <url>Initializes a sparse-checkout configuration after cloning. Instead of checking out all files, only the files in the root directory are materialized in your working tree. You then use git sparse-checkout add <path> to add specific subdirectories you need.
# Clone a monorepo with sparse checkout
git clone --sparse https://github.com/company/monorepo.git
cd monorepo

# Add only the directories you need
git sparse-checkout add services/auth-service
git sparse-checkout add shared/ui-components

# The ultimate monorepo pattern: sparse + partial clone
git clone --sparse --filter=blob:none https://github.com/company/monorepo.git
cd monorepo
git sparse-checkout add services/auth-service
Combining --sparse with --filter=blob:none is the gold standard for monorepo work. For a 100 GB monorepo, this combination can reduce your local footprint to a few hundred megabytes.
Bare Repository Clones: --bare
git clone - bare <url>Creates a bare repository instead of a normal one. A bare repository contains only the Git database objects (what would normally be in the .git folder) without any checked-out working files. Named repo-name.git by default.
If you have ever wondered how GitHub stores repositories on its servers, the answer is: as bare repositories. A bare repository is purely a storage mechanism, designed to be pushed to and fetched from, not worked in directly.
# Clone as a bare repository (for server hosting)
git clone --bare https://github.com/company/app.git

# Create a bare backup
git clone --bare https://github.com/company/critical-app.git /backups/critical-app.git

# Update the bare backup later
cd /backups/critical-app.git && git fetch
Complete Mirrors: --mirror
git clone — mirror <url>
Creates a bare repository that mirrors the source repository completely. Unlike a regular bare clone, a mirror copies not just branches but every ref: remote-tracking branches, notes, tags, pull request heads, and anything else stored under refs/. It also configures the repository so that git remote update will overwrite all refs from the source.
# Create a complete mirror
git clone --mirror https://github.com/company/app.git /backups/app-mirror.git

# Update the mirror daily
cd /backups/app-mirror.git && git remote update

# Push the mirror to a new hosting platform (repository migration)
git push --mirror https://gitlab.com/company/app.git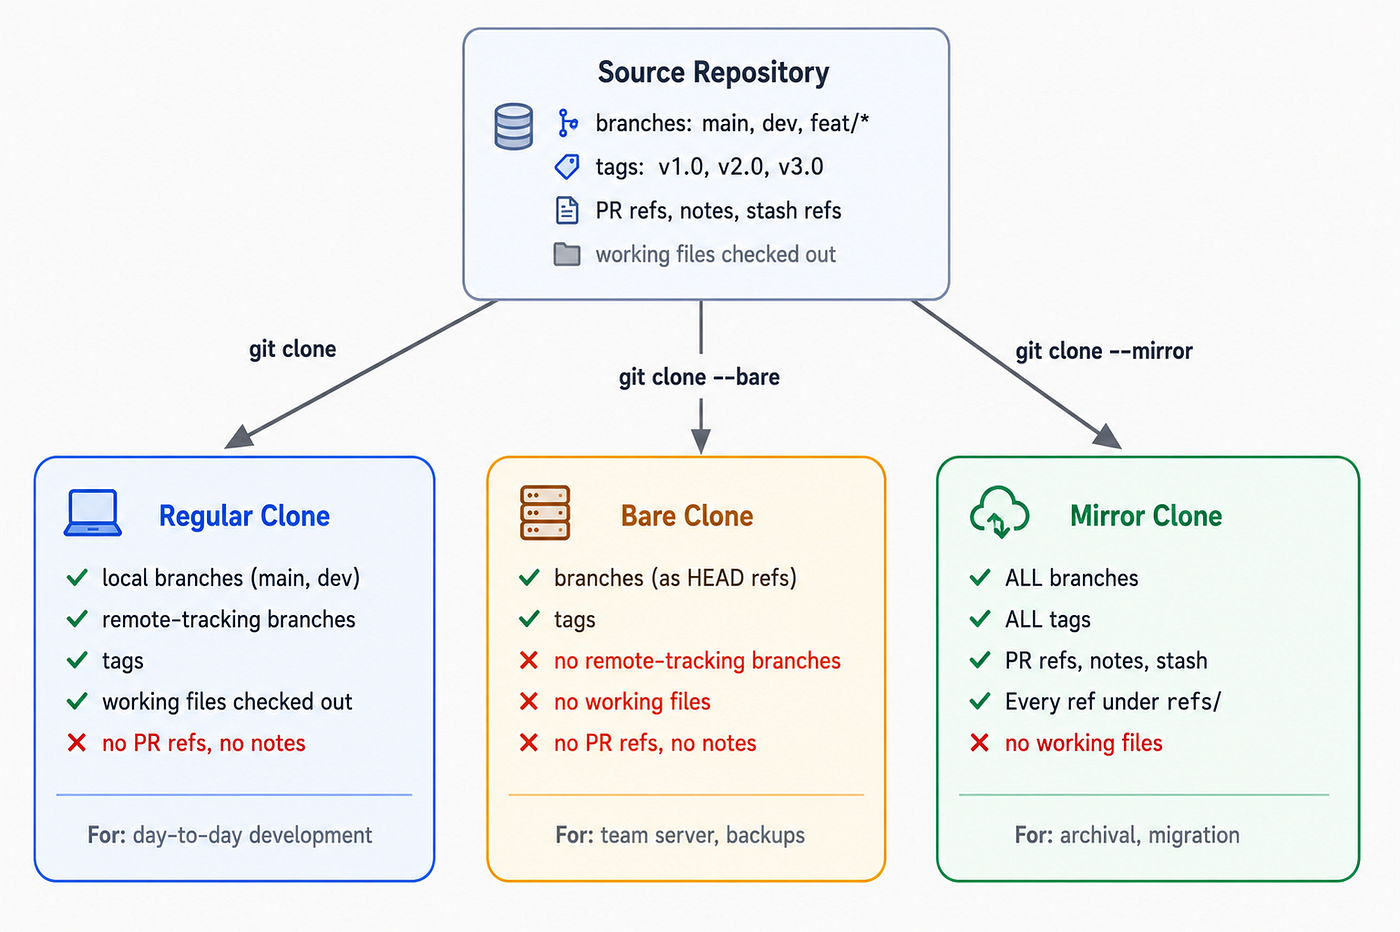
Figure 8: Comparing regular clone, bare clone, and mirror clone. Mirror is the most complete: it copies every reference in the source repository, making it ideal for archiving and migration.
Object Borrowing: --reference and --dissociate
git clone - reference <local-repository> <url>When cloning, instead of downloading objects that already exist in the specified local repository, Git borrows them. The new clone sets up an “alternates” reference to the local repository, avoiding redundant downloads. Useful when you need to clone the same large repository many times on the same machine.
git clone - reference-if-able <local-repository> <url>Same as --reference, but if the specified local repository does not exist, Git silently skips the borrowing instead of aborting. Safer for automated scripts.
git clone - reference … - dissociate <url>After using --reference to borrow objects, --dissociate makes local copies of all borrowed objects, ending the dependency on the reference repository. The clone becomes fully self-contained.
# Keep one full clone as the reference
git clone https://github.com/company/large-app.git /repos/reference

# Clone again, borrowing objects from the reference
git clone --reference /repos/reference \
  https://github.com/company/large-app.git /repos/feature-work-A

# Make a self-contained clone that no longer depends on reference
git clone --reference /repos/reference --dissociate \
  https://github.com/company/large-app.git /repos/standalone-copy
Important Warning About — reference
Do not delete or modify the reference repository while other clones are borrowing from it. If you delete the reference repo or objects are garbage collected, any clone borrowing those objects will become corrupted. Use --dissociate when creating clones to make them self-contained from the start.
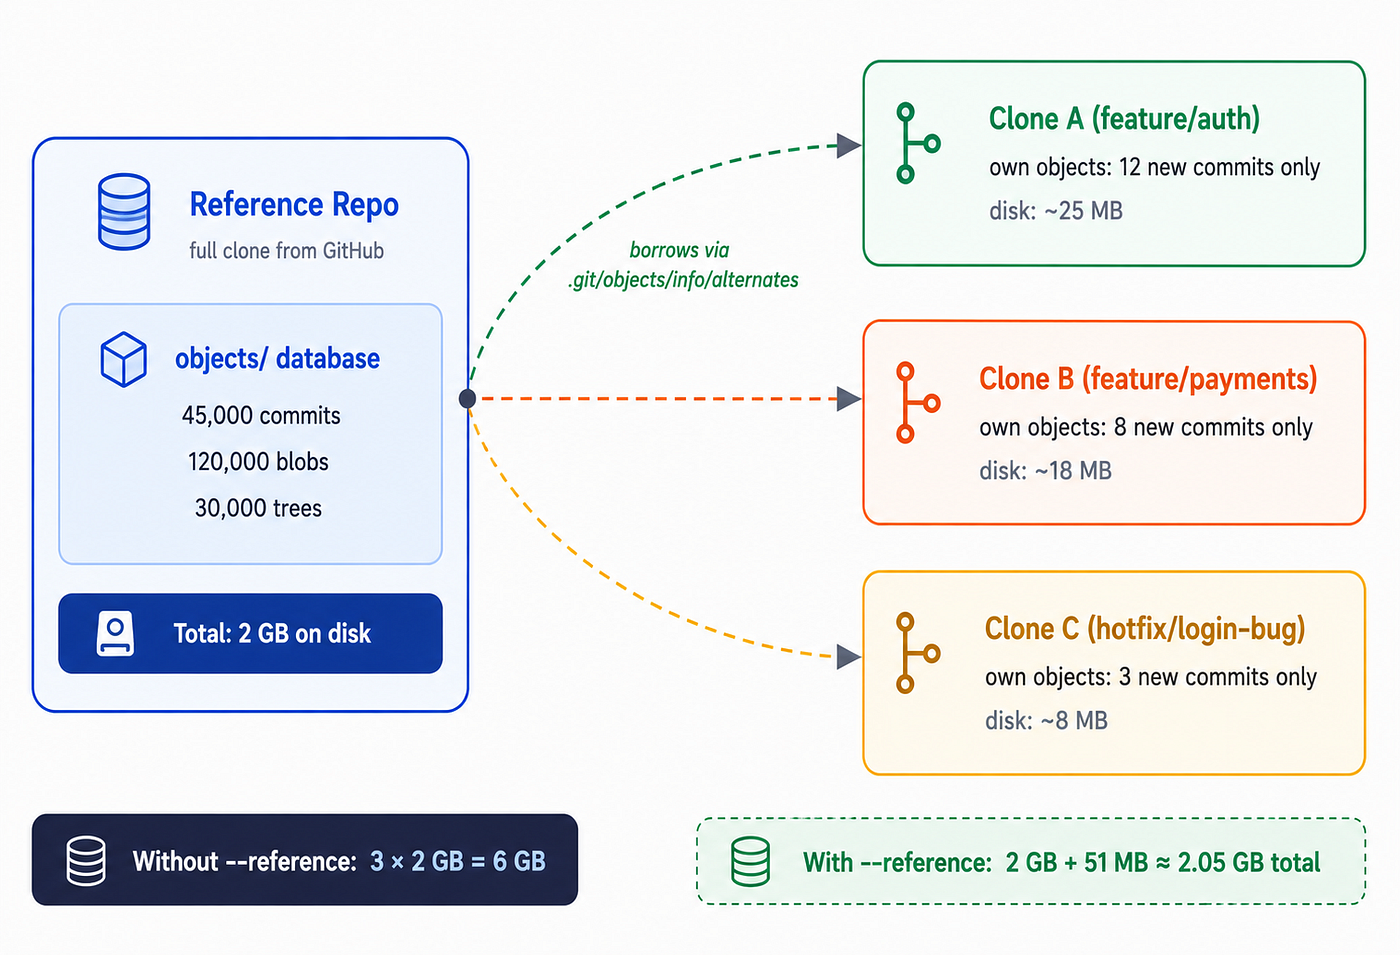
Figure 9: The — reference flag lets multiple clones borrow objects from one full clone, saving enormous amounts of disk space.
Local Copy Optimizations: --local, --no-hardlinks, --shared
git clone - local </path/to/repo>Explicitly uses the local optimization: creates hardlinks between source and clone objects instead of copying data. This is the default for local path clones. Short form: -l.
git clone - no-hardlinks </path/to/repo>Forces Git to actually copy the object files instead of creating hardlinks. The resulting clone is completely independent: use this when making a genuine backup copy.
git clone - shared </path/to/repo>Sets up .git/objects/info/alternates to point to the source repository's object database. The clone shares objects with the source. Short form: -s. Use with caution: if the source repository removes objects, the shared clone may become corrupted.
Advanced Submodule Flags
git clone - shallow-submodules <url>When combined with --recurse-submodules, clones each submodule with a depth of 1. This can drastically reduce download time when submodules have deep histories.
git clone - remote-submodules <url>When initializing submodules, uses the remote-tracking branch instead of the commit recorded in the superproject. Useful for CI scenarios where you want the latest submodule, but risks getting unpinned/unstable versions.
# The complete fast-CI submodule pattern
git clone \
  --depth 1 \
  --single-branch \
  --recurse-submodules \
  --shallow-submodules \
  --jobs 4 \
  --branch main \
  https://github.com/company/game-engine.git
Parallel Fetching: --jobs
git clone - jobs <n> <url>When cloning with submodules, fetch n submodules simultaneously instead of one at a time. Without submodules, this flag has no effect on the clone itself. Short form: -j <n>.
# Clone a project with many submodules, 8 at a time
git clone --recurse-submodules --jobs 8 https://github.com/company/platform.git
The --reject-shallow Flag
git clone --reject-shallow <url>Fails the clone if the source repository is itself a shallow repository. Use this to guarantee you are working with complete, untruncated history.
# Fail if the source is shallow (ensures full history)
git clone --reject-shallow https://internal-mirror.company.com/app.git

# Set this as a global default
git config --global clone.rejectShallow true
Talking to the Server: --server-option
git clone - server-option=<option> <url>When communicating using Git protocol version 2, sends the specified string to the server. The server interprets the option however it chooses. You can use this flag multiple times to send multiple options. Primarily relevant for teams building custom Git server infrastructure.
Custom SSH Path: --upload-pack
git clone - upload-pack=<path> <url>When cloning over SSH, specifies a non-default path for the git-upload-pack command to run on the remote server. Use when Git is installed in a non-standard location on the server. Short form: -u <path>.
# Specify a non-standard path to git-upload-pack
git clone --upload-pack=/opt/git/bin/git-upload-pack git@server.company.com:repo.git
Cloning to a Specific Commit: --revision
git clone - revision=<rev> <url>Fetches only the history leading to the specified revision (a ref name or commit hash), does not create remote-tracking branches or a local branch, and leaves HEAD in detached state. Incompatible with --branch and --mirror. Useful for reproducible builds.
# Clone to a specific tagged version
git clone --revision=refs/tags/v3.2.1 https://github.com/company/app.git

# Clone to an exact commit hash (completely precise)
git clone --revision=a3f8b2c1d4e5f6 https://github.com/company/app.git
git clone in CI/CD Pipelines
One of the most important real-world applications of advanced git clone knowledge is CI/CD pipeline optimization. Every time a developer pushes a commit, your pipeline clones the repository, builds the project, runs tests, and possibly deploys. If your clone takes 2 minutes in a pipeline that runs 50 times a day, that is over 1.5 hours of wasted time per day, every day, forever.
Pattern 1: The Minimal Build Pipeline Clone
# Absolute minimal clone for building — used by most major tech companies
git clone \
  --depth 1 \
  --single-branch \
  --no-tags \
  --branch "$CI_BRANCH" \
  "$REPO_URL" .
Clone times for a 2 GB repository drop from 60–90 seconds to 3–8 seconds with this pattern.
Pattern 2: The Security Scan or Code Analysis Clone
For security tools that need full history for accurate blame
git clone \
  --filter=blob:none \
  --branch main \
  "$REPO_URL" .
Pattern 3: The Deployment Clone
# For deploying to production servers
git clone \
  --depth 1 \
  --single-branch \
  --no-tags \
  --recurse-submodules \
  --shallow-submodules \
  --branch production \
  "$REPO_URL" /var/www/app
Pattern 4: The Repository Mirror/Backup Cron Job
# Initial mirror setup
git clone --mirror https://github.com/company/critical-app.git \
  /backups/critical-app.git

# Daily update job
cd /backups/critical-app.git && git remote update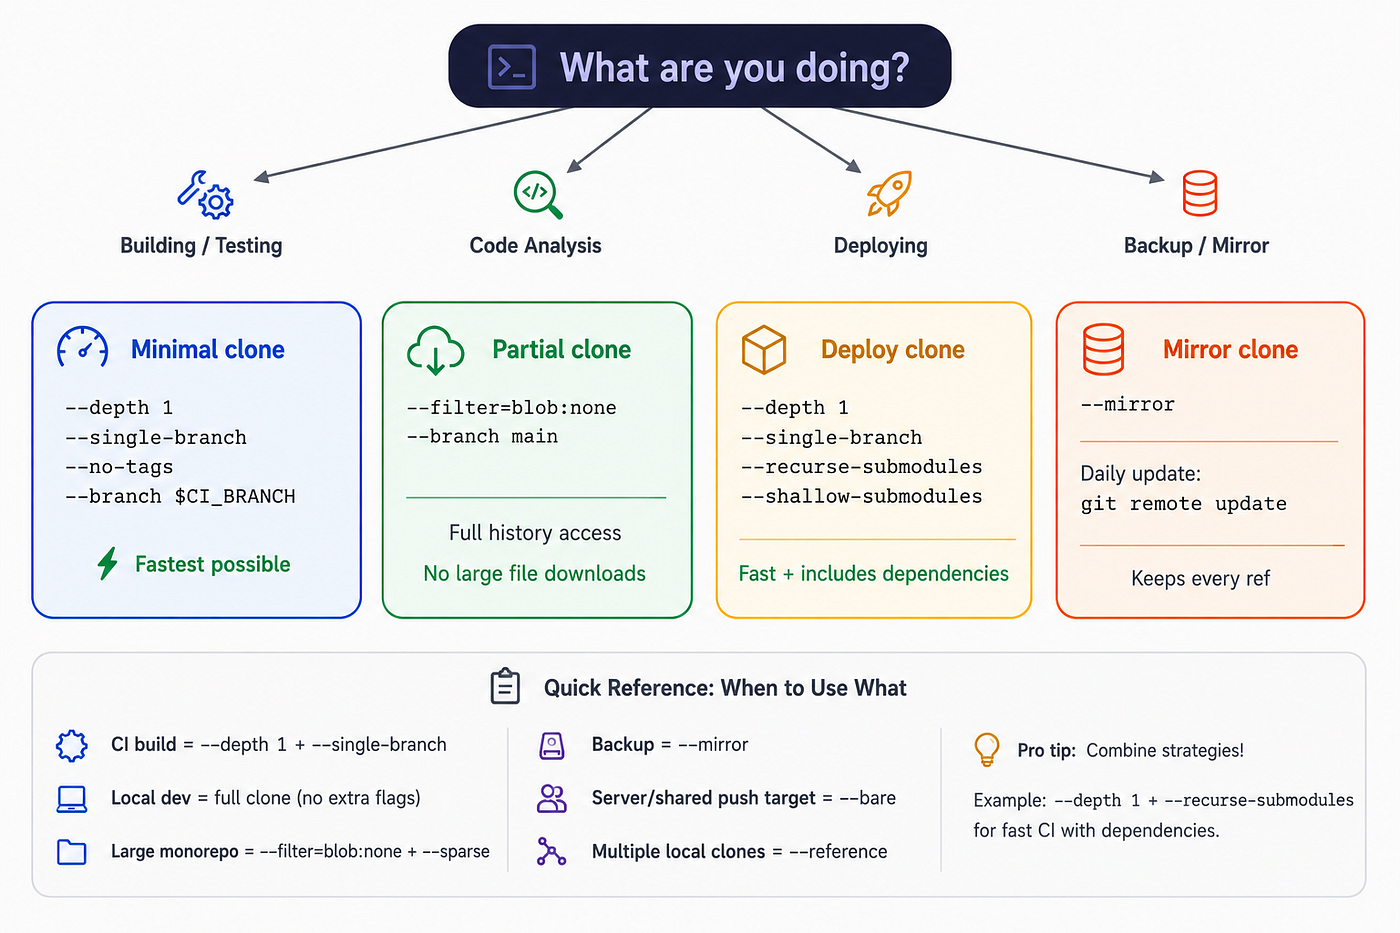
Figure 10: A decision guide for choosing the right git clone options for different CI/CD and infrastructure scenarios.
Advanced Pitfalls
Pitfall 1: Partial Clone and Missing Blobs Offline
When you use --filter=blob:none, blobs are downloaded on demand. If you go offline and try to access a blob you have not fetched yet, Git will fail with "unable to read sha1 file." Always make sure you have fetched everything you need before going offline with a partial clone.
Pitfall 2: git push — mirror Is Destructive
Creating a mirror clone and updating it with git push --mirror to another location is a common migration pattern. But git push --mirror will delete any refs on the destination that do not exist in the source. Always verify what exists on the destination before pushing with --mirror.
Pitfall 3: — reference Without — dissociate in Backups
If you create a backup clone with --reference pointing to your working clone, the backup depends on the working clone to be valid. If you delete your working clone, the backup becomes corrupted. For true backups, use --no-hardlinks, --dissociate, or --mirror.
Pitfall 4: The Source Being Bare Does Not Make the Clone Bare
If you clone a bare repository (one that lives on a server), by default git clone will clone it as a regular (non-bare) repository with working files. The source being bare does not make the clone bare.
Pitfall 5: CI Pipeline Caching and Shallow Clone Interaction
Many CI systems cache the cloned repository between runs. If your first run clones with --depth 1 and a later run needs a merge base beyond depth 1, Git may fail. Either always clone fresh, always unshallow after cloning (git fetch --unshallow), or avoid shallow clones in pipelines that do complex merge operations.
Quick Reference Card
A complete reference of all options covered in this tutorial, organized by category.
# Core Usage
git clone <url> # clone into folder named after repo
git clone <url> <directory> # clone into specific folder name
git clone <url> . # clone into current (empty) directory
git clone /path/to/repo # clone from local path
git clone git@github.com:user/repo.git # clone via SSH
# Branch and Checkout Control
git clone --branch <name> <url> # check out specific branch after clone
git clone -b <name> <url> # short form of --branch
git clone --branch v2.4.1 <url> # check out at a tag (detached HEAD)
git clone --no-checkout <url> # clone history only, no files checked out
git clone --single-branch <url> # only download one branch's history
git clone --revision=<rev> <url> # clone to a specific commit or ref# Size and Speed Optimization
git clone --depth 1 <url> # shallow clone: latest snapshot only
git clone --depth N <url> # shallow clone: last N commits
git clone --filter=blob:none <url> # partial clone: skip blobs until needed
git clone --filter=blob:limit=1m <url> # skip blobs larger than 1 MB
git clone --filter=tree:0 <url> # partial clone: commits only
git clone --no-tags <url> # skip all tags during clone
git clone --sparse <url> # sparse checkout: root files only# Submodules
git clone --recurse-submodules <url> # clone and initialize all submodules
git clone --recurse-submodules --shallow-submodules <url> # shallow submodules
git clone --recurse-submodules --remote-submodules <url> # use remote tracking for submodules
git clone --recurse-submodules --jobs 4 <url> # 4 parallel submodule clones
git clone -j 4 --recurse-submodules <url> # short form# Remote and Configuration
git clone --origin <name> <url> # rename remote from "origin" to <name>
git clone -o <name> <url> # short form
git clone --config core.autocrlf=false <url> # set config at clone time
git clone -c gc.auto=0 <url> # short form of --config
git clone --template=/path/to/tmpl <url> # apply template directory# Server and Mirror Operations
git clone --bare <url> # create bare repo (no working files)
git clone --mirror <url> # create complete mirror (all refs)
git clone --reference /path/repo <url> # borrow objects from local repo
git clone --reference-if-able /path <url> # borrow if available, skip if not
git clone --reference /path --dissociate <url> # borrow then make independent
git clone --reject-shallow <url> # fail if source is shallow
git clone --server-option=<opt> <url> # send option to Git server (protocol v2)
git clone --upload-pack=<path> <url> # custom path for git-upload-pack on SSH# Local Path Optimizations
git clone --local /path/to/repo # explicitly use hardlinks (default for local)
git clone --no-hardlinks /path/to/repo # copy files instead of hardlinks (true backup)
git clone --shared /path/to/repo # share object database via alternates (risky!)# Output and Progress
git clone --quiet <url> # suppress all output (silent)
git clone -q <url> # short form
git clone --verbose <url> # extra detailed output (for debugging)
git clone --progress <url> # force progress output even when pipedChoosing the Right Clone Command
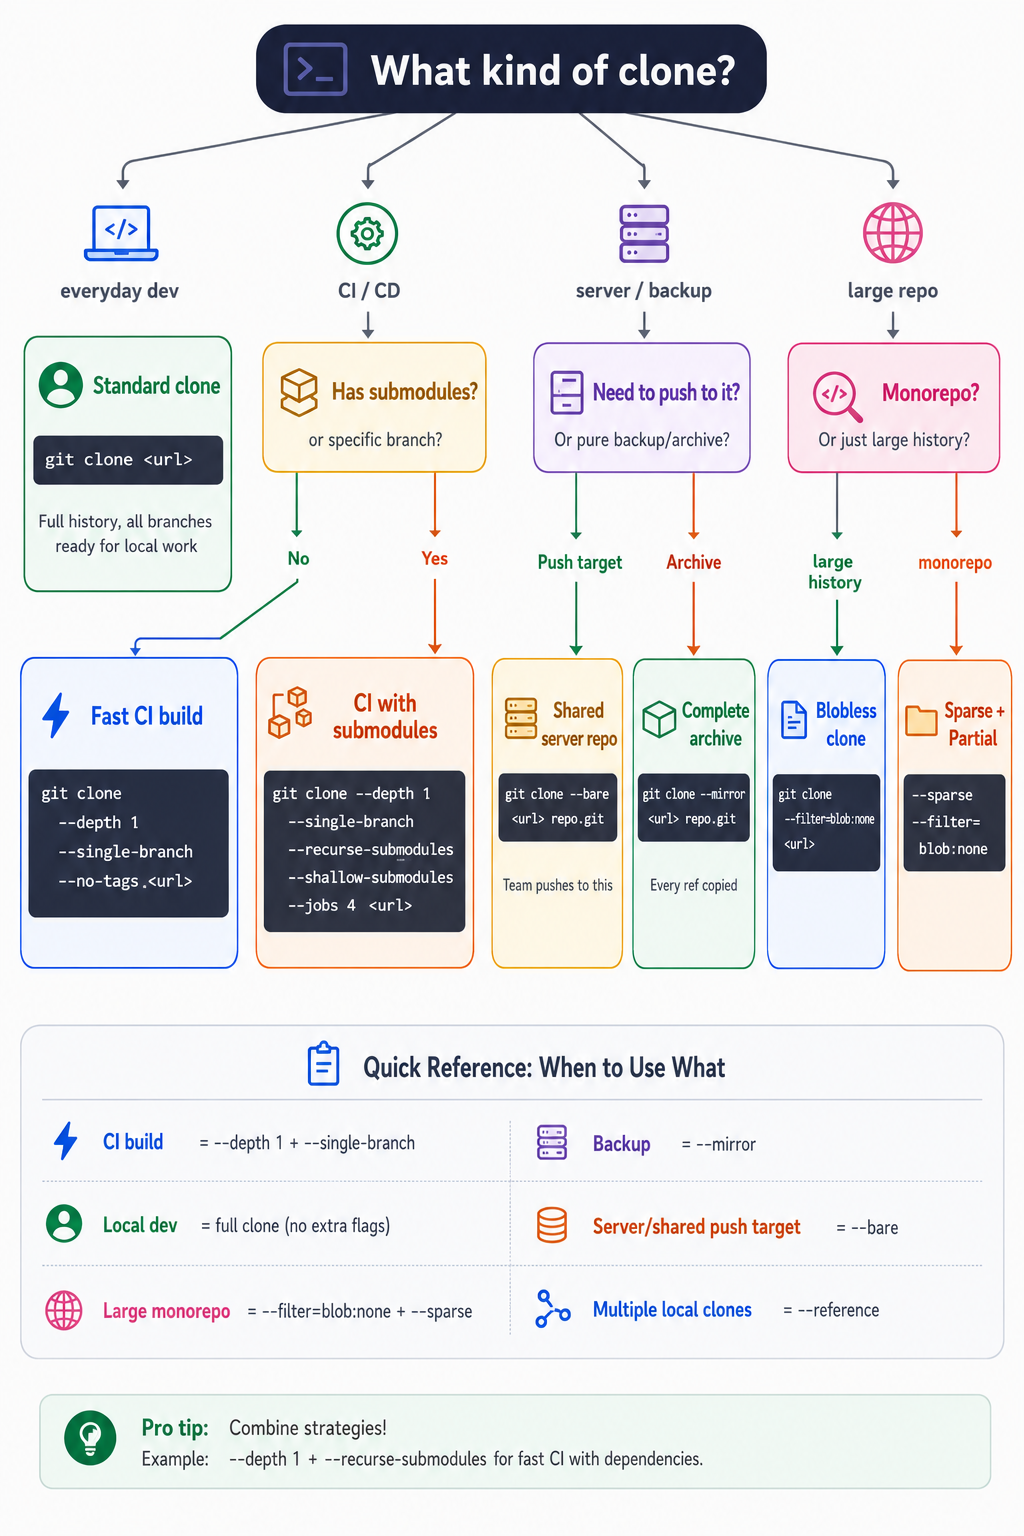
Figure 11: A decision tree for choosing the right git clone command. Start at the top and follow the branch that matches your situation.
Conclusion: The Command That Connects Every Developer
We have covered an enormous amount of ground. From the very first time you copy a URL from GitHub and paste it after git clone, to configuring production mirror setups, partial clone pipelines, and sparse checkout workflows for enormous monorepos, that one command carries remarkable depth.
At the beginner level, you built the mental model that matters most: cloning creates a complete, self-contained copy of an entire repository including every commit, every branch, and every byte of history. You learned what origin really means (just a nickname for a URL), what remote-tracking branches are (read-only snapshots of the remote's state), and walked through the first workflow most developers follow after cloning a project.
At the intermediate level, you gained real control. You learned to land on a specific branch with --branch, to get only the latest snapshot for speed with --depth, to narrow a clone to a single branch's history with --single-branch, to handle submodules with --recurse-submodules, and to bake in configuration at clone time with --config.
At the advanced level, you went deep into the options that matter at scale. Partial clones with --filter let you work in enormous repositories by deferring blob downloads. Sparse checkout with --sparse lets you materialize only the parts of a monorepo you actually need. Bare and mirror clones let you set up server infrastructure and archival systems. Reference repositories save disk space when you need multiple local clones.
The next time your pipeline is slow, your disk is filling up, or your team’s workflow involves a repository so large it is painful to work with, you have the tools to fix it. You know what the options mean, why they exist, and which combination to reach for.
Happy cloning, and may your repositories always be reachable.
This tutorial covers Git 2.28 and later. Some options like --filter, --sparse, and --revision require newer Git versions. Partial clone features work best with Git 2.36+ and require the remote server to support the partial clone protocol. Run git --version to check your installed version.
**inter-git.com** lets you work through Git commands in a visual, interactive environment directly in your browser.
메타데이터
- post_id
- 04bf8a6de04d
- slug
- the-complete-guide-to-git-clone-from-your-first-download-to-advanced-repository-mirroring-04bf8a6de04d
- url
- https://medium.com/@eloquentcoder/the-complete-guide-to-git-clone-from-your-first-download-to-advanced-repository-mirroring-04bf8a6de04d
- canonical_url
- https://medium.com/@eloquentcoder/the-complete-guide-to-git-clone-from-your-first-download-to-advanced-repository-mirroring-04bf8a6de04d
- author_url
- https://medium.com/@eloquentcoder
- status
- ok
- fetched_at
- 2026-06-09 15:37:30