Upgrade your ESP32-S3 Nixie-style clock with a Web BLE interface
If you followed my tutorial “How do I find the correct connection pins for an ESP32-S3 development board with an attached TFT display…
Upgrade your ESP32-S3 Nixie-style clock with a Web BLE interface
If you followed my tutorial “**How do I find the correct connection pins for an ESP32-S3 development board with an attached TFT display (ST7789)?”, you surely noticed the emulation of a Nixie-style clock. In the sketch presented there, the Wi-Fi credentials and the POSIX string (for controlling the local time zone) were hardcoded directly into the source code. In this tutorial, I will show you how to create a Web BLE-based configuration tool that allows you to transmit Wi-Fi credentials and the POSIX string** to the Nixie clock.
Topics of this tutorial
- A Brief Overview of Web BLE
- Initial Experiences with Web BLE Configuration
- Cause of the Memory Shortage
- Solution for the Out of Memory Problem
- How do you switch between the two programs?
- Required Hardware for the Nixie-Style Clock Project with Web BLE Configuration Interface
- Find the Right Partition Scheme
- Compiling and uploading the two sketch parts
- Using the Web BLE Interface
- Summary
A Brief Overview of Web BLE
In addition to a Wi-Fi interface, processors in the ESP32 family are equipped with Bluetooth Low Energy (BLE) radio modules. This allows us to establish a wireless interface between our smartphone and the ESP32 that operates independently of any Wi-Fi interface currently in use. The underlying Espressif libraries for BLE have now matured, and numerous examples exist demonstrating how to implement such a configuration interface.
To provide the user with a graphical user interface, we utilize an Edge- or Chrome-based browser on an Android smartphone or tablet, allowing us to control the device without the need to pre-install a specific app. The situation may differ on Apple devices, where a dedicated app — responsible for handling Web BLE control — must be installed once (though, lacking an iOS device, I was unable to test this myself, but found Bluefy, BLE Link and WebBLE in the AppStore).
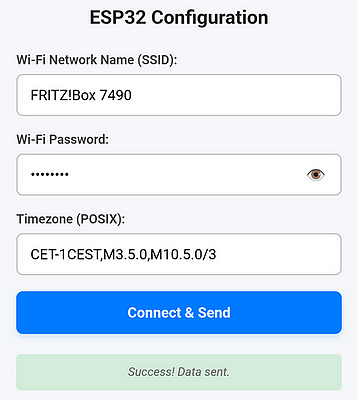
In this tutorial, I will not delve deeply into the underlying technology, but rather use it as a “ready-made” system.
Initial Experiences with Web BLE Configuration
I first tested the Web BLE interface using a minimal clock setup — that is, I used the transmitted configuration data solely to establish the Wi-Fi connection and calculate the local time — which worked without any issues.
However, once I had integrated the program code into the existing Nixie clock code, suddenly nothing worked at all. To make a long story short: multiple entries appeared in the debug log files pointing to “Out of memory” issues. At that point, I realized that “Low Energy” does not also mean “Low Memory” — but rather that the opposite is true.
Cause of the Memory Shortage
Since the BLE code had functioned flawlessly in a purely text-based environment, I was able to quickly narrow down the cause of the problem. To display the Nixie Clock, I utilize pre-made images depicting a typical Nixie tube with its filaments. For the 10 possible digits, I use 10 sprites, which I draw every second onto a screen-sized sprite before displaying the entire composite image on the actual display in a single operation.
While this prevents unpleasant flickering, it comes at the cost of internal processor memory — memory that is also used to manage the Bluetooth stack and cannot be expanded. As soon as this memory runs out, either Bluetooth, the display, Wi-Fi, or indeed all three components cease to function.
I tried a great many optimizations, but none yielded the desired results. Only a radical overhaul of the programming made it possible to implement the programming concept.
Solution for the Out of Memory Problem
Fortunately, the Web BLE interface is not required for the ongoing operation of the clock; rather, it is typically used just once — either to set up the clock on the home Wi-Fi network or when connecting it to a different Wi-Fi network. Furthermore, as long as I do not provide the ESP32 with new credentials, it cannot receive or display the current time. The same, of course, applies to the POSIX time zone string.
For this reason, I am now uploading two different programs to the ESP32-S3: first, the actual Nixie Clock sketch, and second, the Web BLE configuration interface. If the clock program fails to establish a connection to a Wi-Fi network — or if the Boot button is pressed — the ESP32 automatically restarts and then runs the configuration program. Once the new credentials have been entered, they are stored in Non-Volatile Storage (NVS); the ESP32 then restarts and resumes running the clock program.
This division ensures that only Wi-Fi and sprites are utilized in the Clock program, while in the Web BLE program, the TFT display displays only static pages without the use of sprites.
How do you switch between the two programs?
Switching between the two programs requires just a few lines of code. However, uploading both programs to the ESP32 can be a bit tricky, as the Arduino IDE always overwrites the last active program. Fortunately, there is a rather simple and convenient solution available through the website **ESPConnect**, which offers a facility for uploading two programs.
To avoid unnecessarily prolonging this tutorial, I have described the entire process — from program creation and compilation all the way to uploading — in a separate tutorial that you should definitely read: “**What is the second OTA partition on the ESP32 useful for, other than for an online update?”. Additionally, I recommend my tutorial “[Easily deploy and update your PlatformIO projects without an installed IDE](https://medium.com/@androidcrypto/easily-deploy-and-update-your-platformio-projects-without-an-installed-ide-6dd30162e162),” as I introduce the [ESPConnect](https://thelastoutpostworkshop.github.io/ESPConnect/)** web service used therein in much greater depth.
Required Hardware for the Nixie-Style Clock Project with Web BLE Configuration Interface
Even though the original project was programmed on an ESP32-S3 with 16 MB of flash memory and a built-in TFT display, you can use any processor from the ESP32 family — with the exception of the ESP32-H2 — provided it has at least 4 MB of memory.
A connected TFT display should have a width of at least 320 pixels and a height of at least 170 pixels in order to fully display all Nixie tube images.
Find the Right Partition Scheme
As previously described, we utilize the two available app partitions — “OTA_0” and “OTA_1” — for the entire project. Since these are primarily intended for “Over-the-Air” updates of existing firmware, both partitions must be of equal size. This means that, even though our two sub-programs differ in size, we must base our allocation on the larger of the two. When we compile our main clock program, a memory requirement of 1,216,384 bytes is reported, whereas our Web BLE configuration program requires 647,748 bytes. One possible scheme would be “Minimal SPIFFS (1.9 MB App with OTA / 128 KB SPIFFS),” which allows for 1.9 MB for the two apps and 128 KB for storage in SPIFFS.
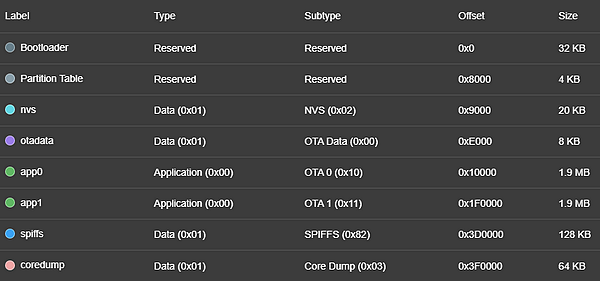
Compiling and uploading the two sketch parts
The standard method for compiling and uploading a program is to press the corresponding button on the Arduino GUI. This is exactly what we will do for the first part of our two sketches (“…ota_0”). We must handle the second part (“…ota_1”) in a completely different manner, as the Arduino always uploads a compiled program to the first program partition, thereby overwriting the existing initial program.
To avoid this, we compile the program using the Arduino menu option Sketch > Export Compiled Binary and then upload this binary file (“…bin”) to the second program partition using ESPConnect; for further details, I refer you to my tutorial titled “**What is the second OTA partition on the ESP32 useful for, other than for an online update?**”.
After the ESP32 restarts, the main program (“…ota 0”) launches first; finding no stored Wi-Fi credentials (yet), it then switches to the second program (“…ota_1”). Once you have entered the credentials via the Web BLE interface, the program saves this information and returns to the first program. This program utilizes the stored information to establish a Wi-Fi connection to your router, synchronize its time with an NTP server, calculate the local time, and display it on the Nixie-style clock.
Using the Web BLE Interface
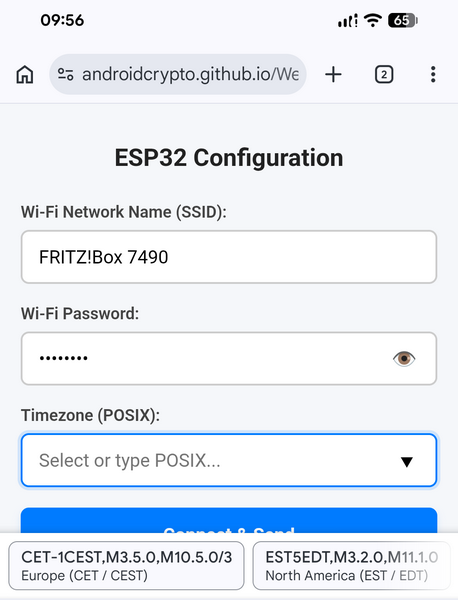
Once the ESP32-S3 has started the Web BLE interface, open this page in your Chrome, Edge, or Apple browser: https://androidcrypto.github.io/WebBle1/wifi_posix_04.html, enter your Wi-Fi credentials, and select your POSIX string (alternatively, you can copy it directly into the input field).
After tapping “Connect and Send,” your smartphone attempts to locate available BLE devices — here, tap “ESP32-Config-Portal” and then “Pair.”
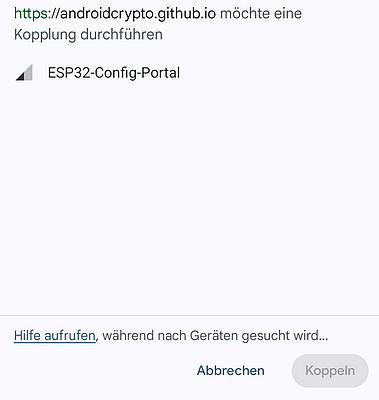
The data is then transmitted, and the ESP32-S3 restarts. It subsequently establishes a connection to the Wi-Fi router, synchronizes with the NTP server, and the sketch resumes its normal operation.
Summary
If special circumstances (e.g., memory constraints) compel you to use a second program, utilizing the Over-the-Air configuration — with its two separate memory areas — can offer a potential solution. Its implementation — specifically, switching between the two areas — can be accomplished with just a few lines of code.
Source code of the app
You find the complete code of the apps in the same GitHub repository as the regular clock, the modified TFT_eSPI library and the device-display settings file (*Setup810_S3_1_9_ST7789_170x320.h*) in my GitHub repositories. The necessary modification of the TFT_eSPI library is described in my article “**Getting Started with an ESP32-C6 Supermini device connected to an ST7789 TFT display**”.
Happy coding !
메타데이터
- post_id
- 06fde0070d9c
- slug
- upgrade-your-esp32-s3-nixie-style-clock-with-a-web-ble-interface-06fde0070d9c
- url
- https://medium.com/@androidcrypto/upgrade-your-esp32-s3-nixie-style-clock-with-a-web-ble-interface-06fde0070d9c
- canonical_url
- https://medium.com/@androidcrypto/upgrade-your-esp32-s3-nixie-style-clock-with-a-web-ble-interface-06fde0070d9c
- author_url
- https://medium.com/@androidcrypto
- status
- ok
- fetched_at
- 2026-06-12 18:14:10