Deploy Hoppscotch community edition in KinD cluster for development
This article shows how to deploy Hoppscotch community version in Docker KinD (Kubernetes in Docker) cluster to use for local development.
Deploy Hoppscotch community edition in KinD cluster for development
This article shows how to deploy Hoppscotch community version in Docker KinD (Kubernetes in Docker) cluster to use for local development.
The reason for this article is was working on REST API development and to test was exploring if there are any opensource tools similar to Postman and came accross the Hoppscotch.
Hoppscotch has an UI to accessing and test REST API endpoint, they offer both enterprise offering and free community version. In this article, have explained how to deployed the community version in KinD cluster with helm chart and access using self-singed certificate so we can access using https URL. Had used Apisix Ingress along with cert-manager components deployed to the KinD cluster.
With the Hoppscotch deployed to access locally deployed application with API endpoint, the Hoppscotch browser extension needs to be installed. To access the APIs hosted in the internet the extension is not required.
This article is inspired by the Hoppscotch Digital Ocean deployment documentation. In this article have used cert-manager and Apisix Ingress.
Pre-requisites: — Docker (Used Docker Daemon community version runnning in WSL2) — KinD CLI — Kubectl CLI — Helm CLI — Git CLI
Deploy the KinD Cluster
To create the KinD cluster we use below configuration which maps the host 80 and 443 to NodePort exposed by the Apisix Data plane. Note, below configuration will create 3 worker nodes
kind: Cluster
apiVersion: kind.x-k8s.io/v1alpha4
name: dev
nodes:
- role: control-plane
 extraPortMappings:
 — containerPort: 30080
 hostPort: 80
 protocol: TCP
 — containerPort: 30443
 hostPort: 443
 protocol: TCP
- role: worker
- role: worker
- role: worker
Save the above content to a file named kind_cluster.yaml and use KinD CLI to create the cluster. The command to create the cluster is as follows
kind create cluster — config kind_cluster.yamlThe output of the command will let us know if the cluster created successfully or not.
Deploy cert-manager
Certificate manager is deployed using helm chart. Below the helm command will install the cert-manager version 1.21.0 in cert-manager namespace
helm install \
 cert-manager oci://quay.io/jetstack/charts/cert-manager \
 — version v1.21.0 \
 — namespace cert-manager \
 — create-namespace \
 — set crds.enabled=true
To verify the deployment status use the command kubectl -n cert-manager get all to check the status of all resources.
Deploy the self-signed certificate for Apisix Ingress
With the cert manager we create self signed certificates which will be used by Apisix, so we can access the application from host machine browser in https url.
Create the apisix namespace, since the certificates will be issued at namespace level not at cluster level.
kubectl create ns apisixBelow configuration will create certificate and secrets which will be configured in the Apisix deployment.
---
apiVersion: cert-manager.io/v1
kind: Issuer
metadata:
 name: ss-apisix-ca-issuer
spec:
 selfSigned: {}
---
apiVersion: cert-manager.io/v1
kind: Certificate
metadata:
 name: ss-apisix-cert
spec:
 commonName: apisix.demo.com
 secretName: ss-apisix-cert-secret # cert will be created in this secret
 duration: 2160h
 renewBefore: 360h
 issuerRef:
 name: ss-apisix-ca-issuer # issuer resource name
 kind: Issuer
 dnsNames:
 - apisix.demo.com # dns name add this to hosts file for loopback address
---
Save above content to a file named apisix_cert.yaml. Then we can deploy the manifest using below command
kubectl -n apisix apply -f apisix_cert.yamlInstall Apisix Ingress (Control and Data plane)
Apisix installation can be done in different variation, we deploy control plane and data plane separately. Still the etcd is used from the Apisix chart itself.
Helm command used to deploy the control plane is shown below, note the secret name with the certificate should be updated correctly in the command, in this case ss-apisix-cert-secret. The secret would have been created by cert manager based on above deployment.
helm upgrade — install — create-namespace -n apisix apisix-cp apisix/apisix \
 — set apisix.deployment.mode=decoupled \
 — set apisix.deployment.role=control_plane \
 — set apisix.ssl.enabled=true \
 — set apisix.ssl.existingCASecret=ss-apisix-ca-issuer \
 — set apisix.ssl.certCAFilename=ca.crt \
 — set apisix.admin.allow.ipList[0]=0.0.0.0/0 \
 — set etcd.replicaCount=3 \
 — set etcd.enabled=true \
 — wait
The data plane installation helm command will look like below, this will work as-is. For production deployments, the adminKey.value shouldn’t be exposed like below instead use secrets (refer the Apisix documentation)
helm upgrade — install apisix-dp \
 — namespace apisix \
 — create-namespace \
 — set apisix.deployment.mode=decoupled \
 — set apisix.deployment.role=data_plane \
 — set apisix.nginx.logs.enableAccessLog=true \
 — set apisix.nginx.logs.errorLogLevel=warn \
 — set apisix.admin.enabled=false \
 — set apisix.ssl.enabled=true \
 — set apisix.ssl.existingCASecret=ss-apisix-cert-secret \
 — set apisix.ssl.certCAFilename=ca.crt \
 — set service.type=NodePort \
 — set service.http.enabled=true \
 — set service.http.servicePort=80 \
 — set service.http.containerPort=9080 \
 — set service.http.nodePort=30080 \
 — set service.tls.servicePort=443 \
 — set service.tls.nodePort=30443 \
 — set ingress-controller.enabled=true \
 — set ingress-controller.apisix.adminService.namespace=apisix-dp \
 — set ingress-controller.gatewayProxy.createDefault=true \
 — set ingress-controller.gatewayProxy.provider.controlPlane.service.name=apisix-cp-admin \
 — set externalEtcd.user=”” \
 — set externalEtcd.host[0]=http://apisix-cp-etcd.apisix.svc.cluster.local:2379 \
 — set etcd.enabled=false \
 — set ingress-controller.gatewayProxy.provider.controlPlane.auth.adminKey.value=edd1c9f034335f136f87ad84b625c8f1 \
 apisix/apisix \
 — wait
Install the ApisixTls and ApisixRoute to access Apisix Dashboard
Below are the configuration for ApisixTls and ApisixRoute. The ApisixRoute adds the adminKey in the incoming request which is also not production grade option. The ApisixTls uses the secret name generated by the cert manager with certificate info.
apiVersion: apisix.apache.org/v2
kind: ApisixTls
metadata:
 name: apisix-route-tls
spec:
 ingressClassName: apisix
 hosts:
 - apisix.demo.com
 secret:
 name: ss-apisix-cert-secret # certificate created by the cert-manager
 namespace: apisix
---
apiVersion: apisix.apache.org/v2
kind: ApisixRoute
metadata:
 name: dashboard-route
spec:
 ingressClassName: apisix
 http:
 - name: apisix-db
 match:
 hosts:
 - apisix.demo.com
 paths:
 - “/*”
 backends:
 - serviceName: apisix-cp-admin
 servicePort: 9180
 plugins:
 # for production implementation chcek Apisix doc
 - name: proxy-rewrite
 enable: true
 config:
 headers:
 set:
 X-Api-Key: “edd1c9f034335f136f87ad84b625c8f1”
Save the above content to a file named apisix_route.yaml. To deploy the manfiest use below command.
kubectl apply -f apisix-route.yaml -n apisixOnce the ApisixTls and ApisxRoute is deployed, we can access the Apisix Dashboard using [https://apisix.demo.com/ui](https://apisix.demo.com/ui`).
Information: When working behind the proxy in enterprise network, sometimes the apisix.demo.com might be routed to external internet in that case use the the DNS something like apisix.local or apisix.demo. This also depends on type of proxy being used.
Install the Hoppscotch Community Helm Chart
Clone the helm chart of Hoppscotch repo using below command.
git clone https://github.com/hoppscotch/helm-charts.gitWe need to override some properties in the configuration during deploying in the KinD cluster. To deploy in the specific namespace we need to specify the namespace in the global.namespace as well, since the default values.yaml includes default namespace. The default ingress is disabled. The config uses the custom domain like below.
global:
  namespace: hoppscotch

community:
  replicas: 1

  image:
    repository: hoppscotch/hoppscotch
    tag: latest
    pullPolicy: IfNotPresent

  config:
    urls:
      base: "http://frontend.hop.com"
      shortcode: "http://frontend.hop.com"
      admin: "http://admin.hop.com"
      backend:
        gql: "http://backend.hop.com/graphql"
        ws: "ws://backend.hop.com/graphql"
        api: "http://backend.hop.com/v1"
      redirect: "http://frontend.hop.com"
      whitelistedOrigins: "http://backend.hop.com,http://frontend.hop.com,http://admin.hop.com"

service:
    ingress:
      enabled: false
Save the content above to the file named overlay_values.yaml. Below is the command to deploy to the cluster. The command should be executed from the helm-chart path, and the overlay_values.yaml file also shoul be placed in teh same folder.
helm upgrade — install hoppscotch -n hoppscotch — create-namespace ./charts/shc — values overlay_values.yamlBelow is the route info to access the hoppscotch endpoint. We create three routes for admin, frontend and backend service. The domain name for admin, frontend and backend is defined as admin.hop.com, frontend.hop.com and backend.hop.com respectively. If we need the domain to be different the below route configuration should be updated.
apiVersion: cert-manager.io/v1
kind: Issuer
metadata:
  name: selfsigned-ca-hop-issuer
spec:
  selfSigned: {}
---
apiVersion: cert-manager.io/v1
kind: Certificate
metadata:
  name: selfsigned-hop-cert
spec:
  commonName: admin.hop.com
  secretName: selfsigned-ad-cert-secret # cert created in this secret
  duration: 2160h
  renewBefore: 360h
  issuerRef:
    name: selfsigned-ca-hop-issuer # issuer resource name
    kind: Issuer
  dnsNames:
    # dns name add this to hosts file for loopback address
    - admin.hop.com
---
apiVersion: apisix.apache.org/v2
kind: ApisixTls
metadata:
  name: admin-hop-tls
spec:
  ingressClassName: apisix
  hosts:
    - admin.hop.com
  secret:
    name: selfsigned-ad-cert-secret  # certificate created by the cert-manager
    namespace: hoppscotch
---
apiVersion: apisix.apache.org/v2
kind: ApisixRoute
metadata:
  name: hop-ad-route
spec:
  ingressClassName: apisix
  http:
    - name: hop-ad-http
      match:
        hosts:
          - admin.hop.com
        paths:
          - "/*"
      backends:
        - serviceName: hoppscotch-community
          servicePort: 3000
---
apiVersion: cert-manager.io/v1
kind: Certificate
metadata:
  name: selfsigned-fe-cert
spec:
  commonName: frontend.hop.com
  secretName: selfsigned-fe-cert-secret # cert created in this secret
  duration: 2160h
  renewBefore: 360h
  issuerRef:
    name: selfsigned-ca-hop-issuer # issuer resource name
    kind: Issuer
  dnsNames:
    # dns name add this to hosts file for loopback address
    - frontend.hop.com
---
apiVersion: apisix.apache.org/v2
kind: ApisixTls
metadata:
  name: hop-fe-tls
spec:
  ingressClassName: apisix
  hosts:
    - frontend.hop.com
  secret:
    name: selfsigned-fe-cert-secret  # certificate created by the cert-manager
    namespace: hoppscotch
---
apiVersion: apisix.apache.org/v2
kind: ApisixRoute
metadata:
  name: hop-fe-route
spec:
  ingressClassName: apisix
  http:
    - name: hop-fe-http
      match:
        hosts:
          - frontend.hop.com
        paths:
          - "/*"
      backends:
        - serviceName: hoppscotch-community
          servicePort: 3100
---
apiVersion: cert-manager.io/v1
kind: Certificate
metadata:
  name: selfsigned-be-cert
spec:
  commonName: backend.hop.com
  secretName: selfsigned-be-cert-secret # cert created in this secret
  duration: 2160h
  renewBefore: 360h
  issuerRef:
    name: selfsigned-ca-hop-issuer # issuer resource name
    kind: Issuer
  dnsNames:
    # dns name add this to hosts file for loopback address
    - backend.hop.com
---
apiVersion: apisix.apache.org/v2
kind: ApisixTls
metadata:
  name: hop-be-tls
spec:
  ingressClassName: apisix
  hosts:
    - backend.hop.com
  secret:
    name: selfsigned-be-cert-secret  # certificate created by the cert-manager
    namespace: hoppscotch
---
apiVersion: apisix.apache.org/v2
kind: ApisixRoute
metadata:
  name: hop-be-route
spec:
  ingressClassName: apisix
  http:
    - name: hop-be-http
      match:
        hosts:
          - backend.hop.com
        paths:
          - "/*"
      backends:
        - serviceName: hoppscotch-community
          servicePort: 3170
Save the above content to file named route.yaml on the helm-chart folder, then to deploy use below command
kubectl -n hoppscotch apply -f route.yamlAccessing the Hoppscotch UI
Set the hosts file with below mapping. In windows update the C:\Windows\System32\drivers\etc\hosts file
127.0.0.1 admin.hop.com frontend.hop.com backend.hs.comNow from browser to Hoppscotch UI use the URL ***https://admin.hop.com from browser. Install the Hoppscotch Chrome extension so we can test localhost endpoint API endpoint running in the host machine with [http://localhost](http://localhost):<port>*** url with endpoint path.
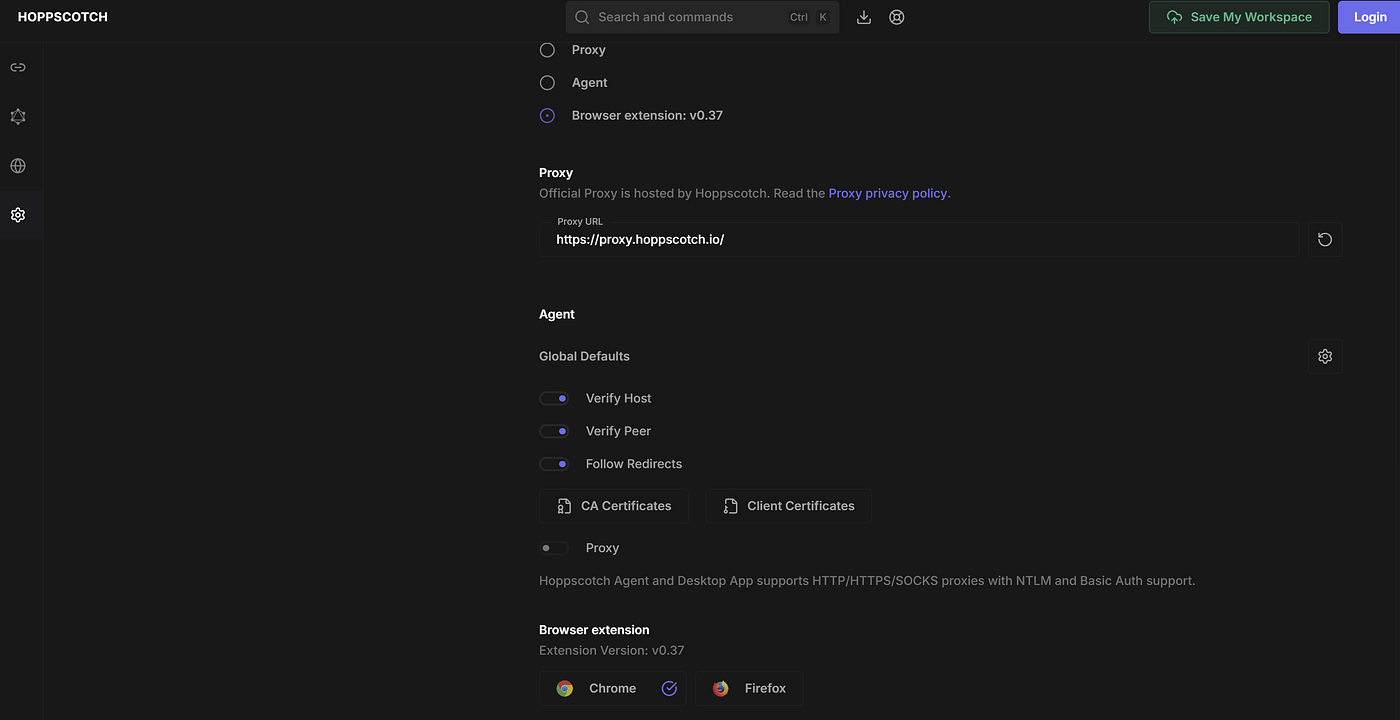
To configure the deployed Hoppscotch UI to use the Chrome extension, select the settings in the UI and update the interceptor section configuration. Refer the snapshot below.
Click Settings (gear icon) and scroll to the bottom, select the extensions in the interceptor. Once the the extensions is configured in the UI we should see the extensions version number.
Landing page of Hoppscotch

Accessing the API from internet the Hoppscotch endpoint and shows the output response

Configuring the Hoppscotch with Chrome Extension
Extension configuration looks like below, we can add any url to configure as origin

Now from the Hoppscotch UI we can access the local API. A simple JBang SpringBoot REST API is running locally and below snaphost we could see the GET repsonse from the application

Below is the code for JBang the Code is refered from this blog how-to-buuld-spring-boot-rest-api-with-jbang-in-single-java-file tweaked for latest version.
Below code is the single file code. The application uses the default port, refer the JBang Spring integration documentation to update for different port
//usr/bin/env jbang "$0" "$@" ; exit $?
//JAVA 25

//DEPS org.springframework.boot:spring-boot-dependencies:4.1.0@pom
//DEPS org.springframework.boot:spring-boot-starter-web

package app;

import org.springframework.boot.SpringApplication;
import org.springframework.boot.autoconfigure.SpringBootApplication;
import org.springframework.web.bind.annotation.GetMapping;
import org.springframework.web.bind.annotation.RestController;

import org.springframework.web.bind.annotation.RequestParam;

@SpringBootApplication
@RestController
public class SpringRestApi {

    public static void main(String[] args) {
        SpringApplication.run(SpringRestApi.class, args);
    }

    @GetMapping("/")
    public String sayHello(
        @RequestParam(value = "name", defaultValue = "World") String name) {
        return "Hello, " + name + "!";
    }
}
To run the above code from command prompt create a folder named app/ and create a file SpringRestApi.java with above code then execute below command using JBang CLI from the app/ folder.
jbang SpringRestApi.java메타데이터
- post_id
- 07b045f8f3d2
- slug
- hoppscotch-community-in-kind-cluster-07b045f8f3d2
- url
- https://medium.com/@thirumurthi.s/hoppscotch-community-in-kind-cluster-07b045f8f3d2
- canonical_url
- https://medium.com/@thirumurthi.s/hoppscotch-community-in-kind-cluster-07b045f8f3d2
- author_url
- https://medium.com/@thirumurthi.s
- status
- ok
- fetched_at
- 2026-08-10 11:51:09

