UniFi Protect Alarm → Home Assistant → HomeKit Integration Guide (aka Make UniFi Protect work like…
A complete guide to integrating UniFi Protect’s Alarm Manager with Home Assistant and HomeKit, including entry/exit delays, fob support…
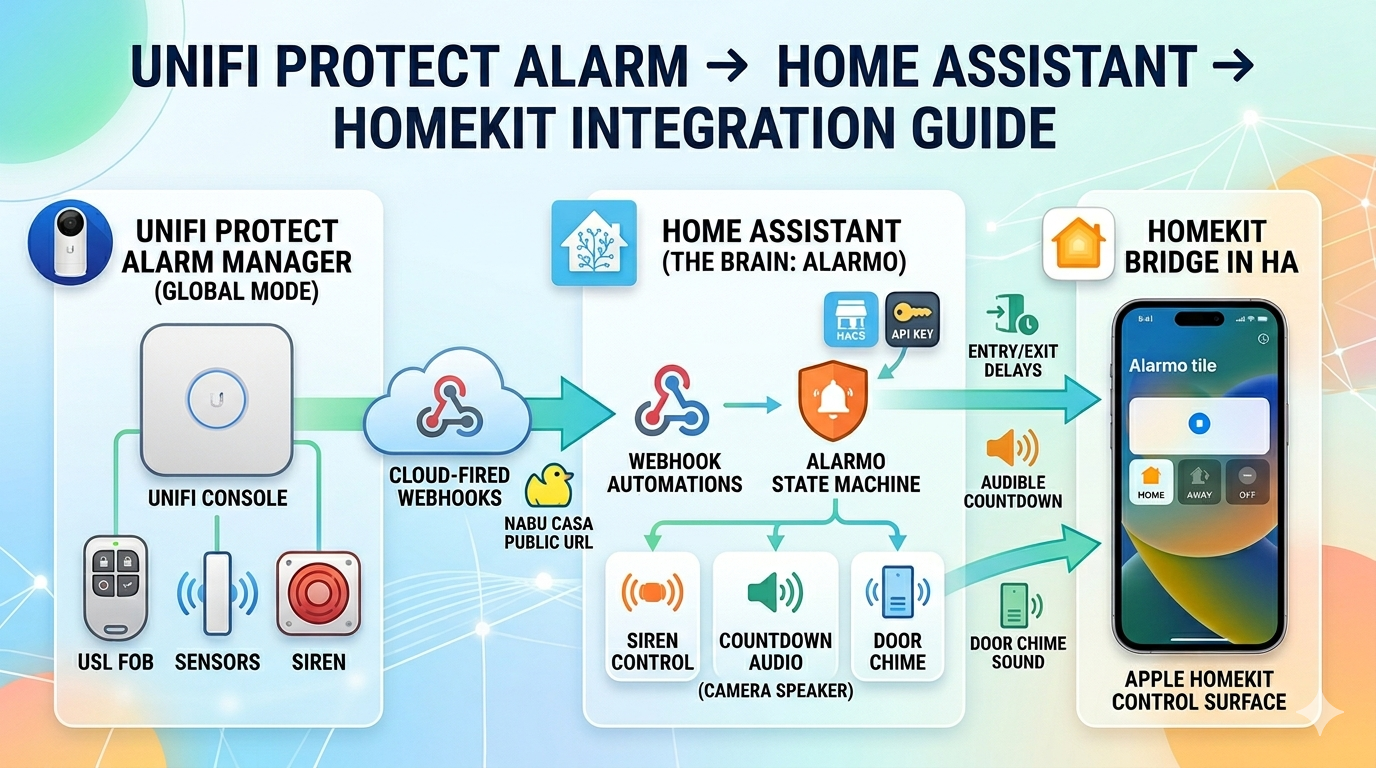
UniFi Protect Alarm → Home Assistant → HomeKit Integration Guide (aka Make UniFi Protect work like Ring)
A complete guide to integrating UniFi Protect’s Alarm Manager with Home Assistant and HomeKit, including entry/exit delays, fob support, and the workarounds required for Global mode.
This guide assumes (though it’s not necessary) that you have a USL Siren, a USL Fob, a SuperLink Gateway, and at least one USL Motion or USL Entry Sensor.
The Problem
UniFi Protect’s Alarm Manager has two configuration modes:
- Local mode — alarm logic runs on the NVR. Home Assistant’s UniFi Protect integration can read state and write commands. Everything works “natively” with Home Assistant.
- Global mode — alarm logic runs in Ubiquiti’s cloud (required if you use USL Fobs or multi-site management). The local NVR API is read-only and locked: HA can see some state but cannot arm or disarm Protect. Fob events are not visible to local API consumers.
If you can run in Local mode, do that and use HA’s native UniFi Protect alarm_control_panel entity directly. This guide is for everyone stuck in Global mode (because of fobs or other reasons) who still wants:
- HomeKit reflecting and controlling the alarm state
- Entry and exit delays
- Audible countdown during delays (optional, requires camera speakers or chime device)
- A door-chime sound on sensor open when disarmed (optional, same requirement)
The Architecture
Since Protect’s Alarm Manager is uncontrollable from HA in Global mode, we stop treating it as the brain. Alarmo (a HACS integration) becomes the brain, and Protect’s hardware (sensors, siren, fobs) becomes inputs and outputs.
[USL Fobs]                    [Apple Home / iPhone]
   │                                  ↕
   ▼                          [HomeKit Bridge in HA]
[Protect Alarm Manager Rules]         ↕
   │ (cloud-fired webhook)    [Alarmo state machine]  ← the brain
   ▼                                  │
[Nabu Casa public URL]                ├──→ siren on/off (via USL Siren entity)
   │                                  ├──→ countdown audio (via camera speaker)
   ▼                                  └──→ door chime (via camera speaker)
[HA webhook automations]              ▲
   │                                  │
   └──────────── arms/disarms ────────┘
[Protect sensors] ──────────► [Alarmo sensor triggers]Key consequences:
- HomeKit is the control surface. Tapping Home/Away/Off arms or disarms Alarmo.
- Fobs work via webhooks routed through Ubiquiti cloud → Nabu Casa → HA → Alarmo.
- Protect’s Alarm Manager is gutted of its own siren/notification actions so it doesn’t compete with Alarmo.
- Protect’s Alarm Manager state will appear out of sync with HomeKit in the UniFi app. This is cosmetic — Alarmo is the real source of truth.
Prerequisites
- UniFi Protect 7.1+ with webhook actions enabled in Alarm Manager
- Home Assistant 2026.5+ running locally (we tested on CasaOS via Docker)
- A local UniFi user (not the Ubiquiti SSO/cloud account) for HA’s Protect integration
- An API key generated in UniFi OS → Settings → Control Plane → Integrations
- HACS installed in HA (for the Alarmo integration)
- A Nabu Casa subscription ($6.50/month) for public HA URL — used for receiving Protect’s cloud-fired webhooks
The Nabu Casa requirement is the surprise gotcha. Protect’s webhook actions in Global mode are fired from Ubiquiti’s cloud, not your local NVR — so the webhook URL must be publicly reachable. Cloudflare Tunnel works as a free alternative.
Step 1 — Install and Configure Home Assistant Integrations
1a. UniFi Protect integration
Settings → Devices & Services → Add Integration → UniFi Protect. Use your local UniFi user. The integration will auto-create the API key on the next reconnect if it doesn’t already have one.
Confirm the following entities exist (names will vary based on your console name):
alarm_control_panel.YOUR_CONSOLE_alarm_manager(read-only state in Global mode)siren.YOUR_USL_SIRENbinary_sensor.*for each door/window/motion sensor in Protect
1b. HACS and Alarmo
Install HACS following its official instructions (get.hacs.xyz). Then in HACS, search for Alarmo by nielsfaber and install. Restart HA.
Settings → Devices & Services → Add Integration → Alarmo. After setup, an Alarmo icon appears in your sidebar.
Step 2 — Strip Protect’s Alarm Manager
Goal: keep the Alarm Profile active so fobs have something to interact with, but prevent Protect from independently firing the siren — Alarmo will own all alarm output.
In UniFi Protect → Alarm Manager:
- Open each Alarm Profile you have (e.g., “Arm”, “Away”)
- Remove or disable all Actions that fire the siren or send native push notifications about armed/triggered states
- Set both entry delay and exit delay on each profile to 0 (Alarmo will handle delays)
- Keep the profile itself enabled so fob buttons still flip Protect’s state — even though we can’t read that state from HA, leaving it on prevents fob errors
The profiles now exist as state flags only.
Step 3 — Configure Alarmo
Click Alarmo in the sidebar.
3a. General tab
- Disarm after trigger: enabled (auto-resets after siren timeout)
- Trigger time: 180 seconds (how long the siren sounds before auto-stopping)
3b. Modes tab — for each mode:
ModeExit delayEntry delayAway30s30sHome0s30s
The 0s exit delay on Home mode prevents a HomeKit tile display bug where the tile shows “Away” during any non-zero arming countdown.
3c. Sensors tab
For each Protect door sensor:
- Add it to Alarmo
- Enable for Away and Home modes
- Toggle “Use entry/exit delay” ON (this is what gives the door a grace period)
For any motion sensors (interior):
- Enable for Away mode only
- Leave entry delay OFF — motion shouldn’t get a grace period
3d. Codes tab
Leave off unless you want PIN protection. HomeKit handles its own access control.
3e. Actions tab
Skip entirely. We use standalone automations.
Test in Developer Tools → Actions:
alarm_control_panel.alarm_arm_awaywith targetalarm_control_panel.alarmo- State should go
disarmed→arming(30s) →armed_away - Trip a door sensor →
armed_away→pending(30s) →triggered alarm_control_panel.alarm_disarm→disarmed
Step 4 — Core Alarm Output Automations
Settings → Automations & Scenes → Create new → Edit in YAML.
4a. Trigger the siren when Alarmo triggers
alias: Alarmo triggered → siren on
description: Fires the USL Siren when Alarmo enters triggered state
triggers:
  - trigger: state
    entity_id: alarm_control_panel.alarmo
    to: triggered
actions:
  - action: siren.turn_on
    target:
      entity_id: siren.YOUR_USL_SIREN
mode: single
4b. Silence the siren when Alarmo disarms
alias: Alarmo disarmed → siren off
description: Stops the USL Siren when Alarmo is disarmed
triggers:
  - trigger: state
    entity_id: alarm_control_panel.alarmo
    to: disarmed
actions:
  - action: siren.turn_off
    target:
      entity_id: siren.YOUR_USL_SIREN
mode: single
Replace siren.YOUR_USL_SIREN with your actual entity ID.
Step 5 — Nabu Casa Public URL
Settings → Home Assistant Cloud → start your subscription/trial. After activation you get a permanent HTTPS URL like [https://xxxxxxxxxxxx.ui.nabu.casa.](https://xxxxxxxxxxxx.ui.nabu.casa.)
This URL is the base for all your webhook endpoints. You’ll use it in Step 6.
(Alternative: Cloudflare Tunnel via the CasaOS app store is free but takes more setup. Same end result — any publicly reachable URL pointing at HA will work.)
Step 6 — Fob Webhooks
This is the part that makes fobs work in Global mode.
6a. Inspect the webhook payload
Use a free tool like webhook.site first to see what Protect actually sends. In Protect → Alarm Manager, create a rule that fires on fob arm button press, set its webhook action to the webhook.site URL, press the fob, and inspect the payload. It looks like:
{
  "alarm": {
    "name": "USL Fob - Arm Alarm",
    "sources": [{"device": "[DEVICE_ID]", "type": "include"}],
    "conditions": [{"condition": {"type": "is", "source": "sensor_button_pressed", "value": "press"}}],
    "triggers": [{
      "key": "sensor_button_pressed",
      "value": "press",
      "device": "[DEVICE_ID]",
      "button": "arm",
      "eventId": "...",
      "timestamp": 1780273542884
    }]
  },
  "timestamp": 1780273545852,
  "alarm_id": "..."
}
The triggers[0].button field tells you which button. Possible values include arm, away, disarm, panic, etc. depending on your fob model.
6b. Create one HA webhook automation per fob button
Settings → Automations & Scenes → Create new → Edit in YAML. Replace RANDOM_ID_HERE with a non-guessable string (e.g., x7k2qp9z) — webhook IDs are public so make them unguessable.
Arm Home / Stay button:
alias: Fob Arm button → Alarmo Home
description: When Protect fires the arm-stay webhook, arm Alarmo in home mode
triggers:
  - trigger: webhook
    webhook_id: fob_arm_stay_RANDOM_ID_HERE
    allowed_methods:
      - POST
    local_only: false
actions:
  - action: alarm_control_panel.alarm_arm_home
    target:
      entity_id: alarm_control_panel.alarmo
mode: single
Arm Away button:
alias: Fob Away button → Alarmo Away
description: When Protect fires the arm-away webhook, arm Alarmo in away mode
triggers:
  - trigger: webhook
    webhook_id: fob_arm_away_RANDOM_ID_HERE
    allowed_methods:
      - POST
    local_only: false
actions:
  - action: alarm_control_panel.alarm_arm_away
    target:
      entity_id: alarm_control_panel.alarmo
mode: single
Disarm button:
alias: Fob Disarm button → Alarmo disarm
description: When Protect fires the disarm webhook, disarm Alarmo
triggers:
  - trigger: webhook
    webhook_id: fob_disarm_RANDOM_ID_HERE
    allowed_methods:
      - POST
    local_only: false
actions:
  - action: alarm_control_panel.alarm_disarm
    target:
      entity_id: alarm_control_panel.alarmo
mode: single
Critical: local_only: false is required because Nabu Casa relays appear as remote requests. The line must be present and set to false (or removed entirely). Leaving it true causes the webhook to be rejected with "Received remote request for local webhook" warnings in the logs.
6c. Configure Protect webhook rules
UniFi Protect → Alarm Manager → for each fob button:
- Create or open a rule with the trigger condition matching that button press (e.g.,
sensor_button_pressed = presswith button filterarm) - Add a Webhook action with the URL
[https://YOUR_NABU_CASA_URL.ui.nabu.casa/api/webhook/fob_arm_stay_RANDOM_ID_HERE](https://YOUR_NABU_CASA_URL.ui.nabu.casa/api/webhook/fob_arm_stay_RANDOM_ID_HERE) - Set the HTTP method to POST
- Save the rule
Repeat for each button you want to expose.
6d. Reload HA automations and test
Settings → Automations & Scenes → three-dot menu → Reload Automations.
Press a fob button. Verify in Settings → Logbook that the matching automation fired and Alarmo state changed appropriately.
Step 7 — HomeKit Bridge
Settings → Devices & Services → Add Integration → HomeKit Bridge.
In the setup wizard:
- Include domains: leave empty (do not select
alarm_control_panelas a domain — this would expose both Alarmo andthe Protect alarm panel, causing duplicate tiles in HomeKit) - Include entities: add
alarm_control_panel.alarmo. Optionally also add ascript.silence_usl_sirenif you create one (see Optional below)
After setup, HA displays a pairing notification with a QR code. Open Apple Home → + → Add Accessory → scan the QR or enter the 8-digit code → assign to a room.
The Alarmo tile now appears in HomeKit. Tapping Home/Away arms Alarmo in the matching mode; tapping Off disarms it. State changes from fobs (via the webhook chain) reflect in HomeKit within ~1 second.
Optional — Silence Script (Panic Button)
Useful for a one-tap “stop the noise” button in HomeKit, independent of the alarm flow.
Settings → Automations & Scenes → Scripts tab → Create new → Edit in YAML:
alias: Silence USL Siren
sequence:
  - action: siren.turn_off
    target:
      entity_id: siren.YOUR_USL_SIREN
mode: single
icon: mdi:bell-off
Add script.silence_usl_siren to your HomeKit Bridge filter (Step 7). It appears in HomeKit as a switch — tap it, it runs and auto-resets. Perfect for a fast-access widget on iPhone Control Center.
Optional — Audio Feedback (Camera Speaker or PoE Chime)
Skip this section if you don’t have a UniFi camera with a working speaker, or a UniFi PoE Smart Chime (UACC-Chime-PoE) integrated. Camera speaker audio via HA’s media_player is sometimes unreliable per multiple GitHub issues; test with a TTS call before committing.
Audio files
You need two MP3 files:
- A short repeating beep for countdowns
- A pleasant ding for door chimes
Place them in /config/www/ on your HA install — they become accessible as /local/beep.mp3 and /local/chime.mp3.
Exit countdown automation
alias: Alarmo arming → play exit countdown
description: Repeats a beep on the entry camera speaker during the exit delay
triggers:
  - trigger: state
    entity_id: alarm_control_panel.alarmo
    to: arming
actions:
  - repeat:
      until:
        - condition: not
          conditions:
            - condition: state
              entity_id: alarm_control_panel.alarmo
              state: arming
      sequence:
        - action: media_player.play_media
          target:
            entity_id: media_player.YOUR_ENTRY_CAMERA_SPEAKER
          data:
            media_content_id: /local/beep.mp3
            media_content_type: audio/mp3
        - delay: "00:00:01"
mode: single
Entry countdown automation
Same as above but change to: arming to to: pending and update the until-condition to check for state: pending.
Door chime when disarmed
alias: Front door chime when disarmed
description: Plays a chime when the front door opens, but only when disarmed
triggers:
  - trigger: state
    entity_id: binary_sensor.YOUR_FRONT_DOOR_SENSOR
    from: "off"
    to: "on"
conditions:
  - condition: state
    entity_id: alarm_control_panel.alarmo
    state: disarmed
actions:
  - action: media_player.play_media
    target:
      entity_id: media_player.YOUR_ENTRY_CAMERA_SPEAKER
    data:
      media_content_id: /local/chime.mp3
      media_content_type: audio/mp3
mode: single
Duplicate per door sensor you want chimed.
Testing Checklist
Walk through these to confirm a working setup:
- Arm via HomeKit — tile shows arming countdown (Away only) → armed state. Alarmo state in HA confirms.
- Trip door sensor while armed — state goes pending → after 30s → triggered. Siren fires.
- Disarm via HomeKit during pending — state goes back to disarmed. Siren never sounds.
- Disarm via HomeKit during triggered — state goes to disarmed. Siren stops.
- Press fob arm button — Logbook shows webhook automation firing. Alarmo state changes. HomeKit tile follows.
- Press fob disarm button — same flow in reverse. Siren stops if active.
Known Limitations
- Protect’s Alarm Manager state remains out of sync with HomeKit. Arming via HomeKit doesn’t change Protect’s display. Arming via fob changes Protect’s display but only reaches Alarmo via the webhook chain (which doesn’t write back to Protect). This is purely cosmetic; the actual alarm behavior is driven by Alarmo.
- Camera speaker audio in HA is flaky. Several long-standing GitHub issues report TTS/media playback failures on UniFi Protect cameras. The UniFi PoE Smart Chime is a more reliable alternative if your camera speaker doesn’t work.
- Nabu Casa is a recurring cost. Cloudflare Tunnel is the main free alternative.
- Webhook IDs are unauthenticated. Use non-guessable IDs and treat them as secrets. Anyone who knows your webhook URLs can fire your alarm actions.
- HA 2026.6+ may add native UniFi Protect alarm profile support including a select entity for profile choice. When that lands, the state-sync side of this guide may become unnecessary for Local mode users. The webhook approach for fobs in Global mode will likely remain the right path.
Troubleshooting
Webhook fires but Alarmo doesn’t change state Check local_only: false is set on the webhook trigger. Reload automations after any YAML change.
Webhook never reaches HA Test with webhook.site to confirm Protect is sending. If yes, the issue is the URL — verify Nabu Casa is active and the URL matches exactly.
HomeKit shows two alarm tiles HomeKit Bridge filter is including both Alarmo and the Protect alarm panel. Delete and re-add the bridge, leaving include domains empty and including only alarm_control_panel.alarmo as an entity.
HomeKit tile briefly shows “Away” when arming Home Known cosmetic bug in HA HomeKit Bridge state mapping. Set Home mode’s exit delay to 0 to avoid the arming state entirely.
Fob press doesn’t trigger any webhook Verify the Alarm Manager rule in Protect is firing — check via webhook.site or Protect’s notification system. If the rule isn’t firing, the trigger condition doesn’t match your fob’s button events. If the rule is firing but HA isn’t receiving, check the URL.
메타데이터
- post_id
- 08040b94d5d2
- slug
- unifi-protect-alarm-home-assistant-homekit-integration-guide-aka-make-unifi-protect-work-like-08040b94d5d2
- url
- https://medium.com/@culvercityit/unifi-protect-alarm-home-assistant-homekit-integration-guide-aka-make-unifi-protect-work-like-08040b94d5d2
- canonical_url
- https://medium.com/@culvercityit/unifi-protect-alarm-home-assistant-homekit-integration-guide-aka-make-unifi-protect-work-like-08040b94d5d2
- author_url
- https://medium.com/@culvercityit
- status
- ok
- fetched_at
- 2026-07-10 08:43:10