Let AI Build Your UI: Figma MCP x Copilot Integration Guide
Streamline your frontend workflow by connecting Figma design tokens with Copilot — auto-generate responsive, production-ready UI…
Let AI Build Your UI: Figma MCP x Copilot Integration Guide
Streamline your frontend workflow by connecting Figma design tokens with Copilot — auto-generate responsive, production-ready UI components with minimal manual coding.
How to Use Figma MCP with GitHub Copilot to Generate User Interfaces
This guide will help you set up and use Figma MCP for Code Generation alongside GitHub Copilot to transform Figma designs into user interface code for Web, Android (Jetpack Compose), or iOS (SwiftUI)…etc
I. Environment Setup & Visual Studio Code Configuration
For Visual Studio Code to detect and utilize MCP, you need to enable MCP discovery:
- Open Visual Studio Code.
- Go to Settings. You can quickly access it by pressing
Cmd + ,(macOS) orCtrl + ,(Windows/Linux). - Search for
chat.mcp.discovery.enabled. - Ensure this setting is set to
true. - (Optional) Your settings interface might look similar to the image below:
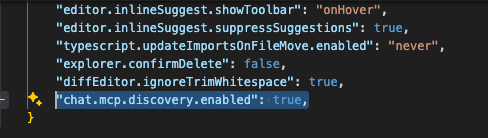
Setting Visual Code
II. Run Figma Developer MCP Server
You need to run the MCP server so it can interact with Figma and Copilot:
- Open Terminal or Command Prompt.
- Run the following command, replacing
figd_xxxx-xxxxx-xxxxxwith your actual Figma API key (note: this key is an example only):
npx figma-developer-mcp --figma-api-key=figd_xxxx-xxxxx-xxxxx- If the server starts successfully, you will see a message similar to the following image in your Terminal:
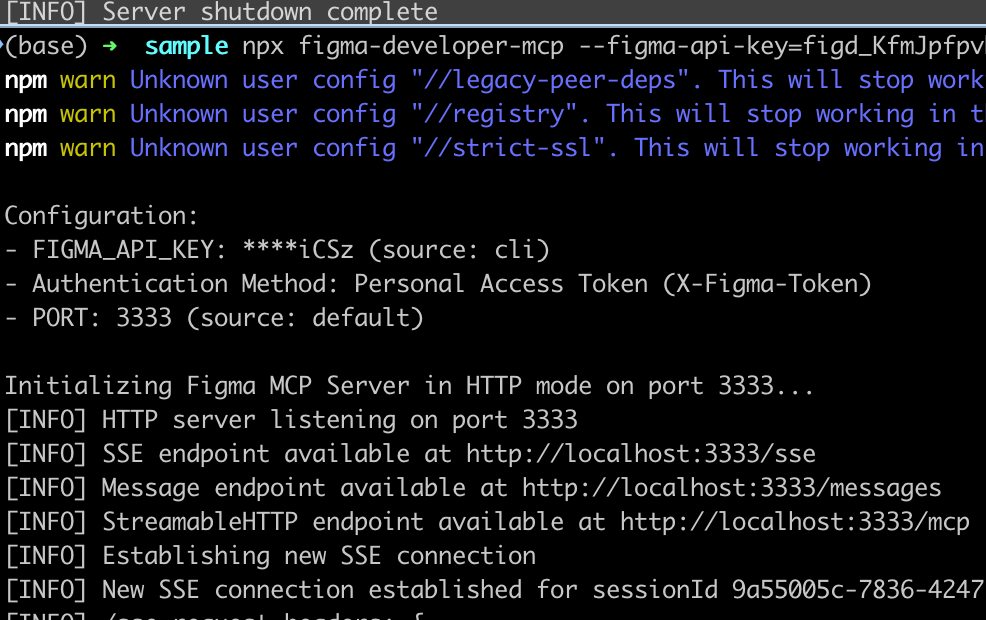
MCP Server is running
Notice: The command must be run from the sample location with the source code folder.
III. Set Up MCP Connection in Visual Studio Code
Connect Visual Studio Code to the running MCP server:
- In Visual Studio Code, press
Cmd + Shift + P(macOS) orCtrl + Shift + P(Windows/Linux) to open the Command Palette. - Type and select
MCP: Add Server
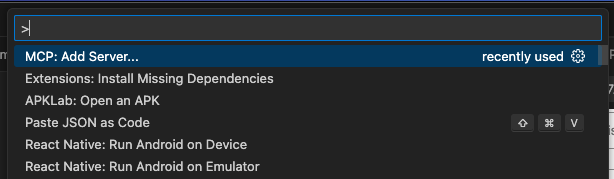
Add MCP Server
- Choose
HTTP (HTTP or Server-Sent Events)
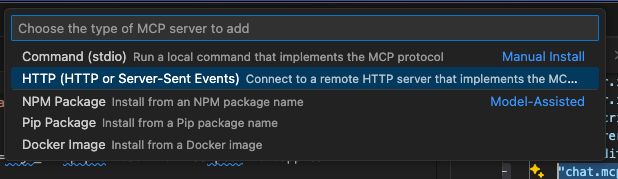
MCP Http
- When prompted for the URL, enter:
[http://localhost:3333/sse](http://localhost:3333/sse) - After setup, Visual Studio Code will automatically create an
mcp.jsonfile in your project directory (or workspace). Ensure this file has a structure similar to the following:
{
    "servers": {
        "my-mcp-server-xxxx": {
            "url": "http://localhost:3333/sse"
        }
    }
}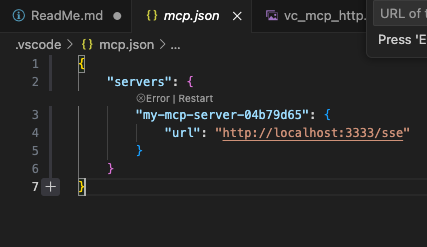
mcp.json
Notice: The server name, such as ‘my-mcp-server-xxxx’, is randomly generated.”
IV. Verify MCP Settings in Visual Studio Code
To check if MCP has been set up correctly:
- Open Visual Studio Code Settings via the gear icon or
Cmd + , (Mac OS)/Ctrl + ,(Window). - Search for “jobs” or “tasks” related to MCP.
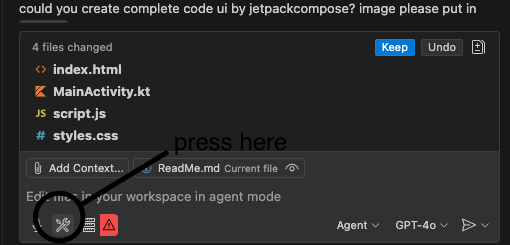
Check Job Figma MCP
- You will see two main tasks listed:
download_figma_imagesget_figma_data
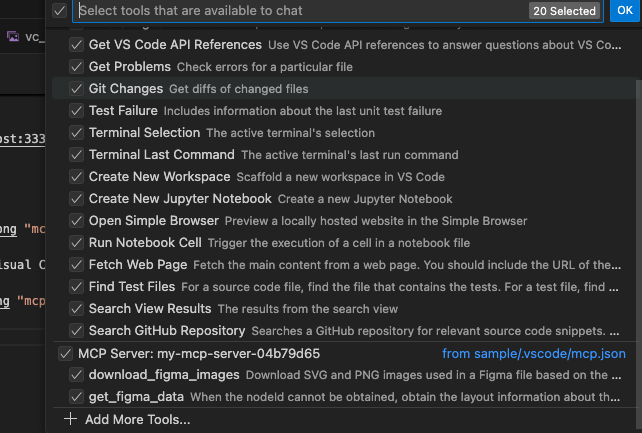
Figma MCP Job
You have completed the setup process!
V. Generate User Interfaces with Figma MCP and GitHub Copilot
After successful setup, you can start generating UI code from Figma designs.
1. Get Figma Design Link
- Open the Figma design file you want to convert into code.
- Select the specific frame(s) or UI element(s) for which you want to generate code.
- Right-click on the selection, then choose “Copy/Paste as” or “Copy Link” (depending on the Figma version and context). Make sure you obtain a direct link to the node ID of that UI element.

Copy Figma — Link Selection
- You will get a link similar to the following example:
https://www.figma.com/design/MmGWKoxYvUsgMIIC9aEnxP/MobileApp-Landing-Page-Template-for-Mobile-Apps-Showcase--Community-?node-id=0-132&t=iXnDxBH3Ipj0Nqtu-42. Request Code Generation using GitHub Copilot
- Open the GitHub Copilot Chat window in Visual Studio Code (usually the chat bubble icon in the sidebar).
- Send your prompt with the copied Figma link. Below are optimized prompt examples for each platform:
a. Prompt for Web (HTML, CSS, JavaScript):
I need a complete web interface based on this Figma design: `https://www.figma.com/design/MmGWKoxYvUsgMIIC9aEnxP/MobileApp-Landing-Page-Template-for-Mobile-Apps-Showcase--Community-?node-id=0-132&t=iXnDxBH3Ipj0Nqtu-4`.

Please generate the following files:
- index.html: Page structure with semantic HTML elements.
- style.css: Modern CSS styling, using CSS variables and Flexbox/Grid for responsive layout.
- script.js: JavaScript to handle basic interactions (e.g., responsive menu, animations if any).

Images should be placed in the `images/` directory.
Ensure the interface is optimized for both desktop and mobile, and adheres to Material Design principles if applicable to the Figma design.
b. Prompt for Android (Jetpack Compose):
I am an Android developer and I need to build a user interface for a mobile application using Jetpack Compose, based on this Figma design: `https://www.figma.com/design/MmGWKoxYvUsgMIIC9aEnxP/MobileApp-Landing-Page-Template-for-Mobile-Apps-Showcase--Community-?node-id=0-132&t=iXnDxBH3Ipj0Nqtu-4`.

Please generate one or more Composable functions in Kotlin to recreate the main landing page interface.
Ensure the following elements:
- Use standard Material Design 3 Composables.
- Accurately reproduce the layout structure, colors, fonts, and spacing as in Figma.
- Efficiently handle state for interactive components (e.g., buttons, input fields).
- Use ImageVector or drawable resources for icons and images.
- Ensure responsiveness across different Android screen sizes.
c. Prompt for iOS (SwiftUI):
I am an iOS developer and I need to build a user interface for a mobile application using SwiftUI, based on this Figma design: `https://www.figma.com/design/MmGWKoxYvUsgMIIC9aEnxP/MobileApp-Landing-Page-Template-for-Mobile-Apps-Showcase--Community-?node-id=0-132&t=iXnDxBH3Ipj0Nqtu-4`.

Please generate one or more `View` structs in Swift to recreate the main landing page interface.
Ensure the following elements:
- Effectively use SwiftUI's View modifiers and layout containers.
- Accurately reproduce the layout structure, colors, fonts, and padding as in Figma.
- Efficiently handle state (`@State`, `@Binding`, `@ObservedObject`) for interactive components.
- Use SF Symbols or assets for icons and images.
- Ensure responsiveness across different iPhone and iPad screen sizes (use `GeometryReader` if necessary).
3. Accept and Await Results
- After submitting the prompt, you will see two tasks (jobs) run by Copilot, corresponding to the jobs you verified in step IV. Verify MCP Setting:
download_figma_images & get_figma_data
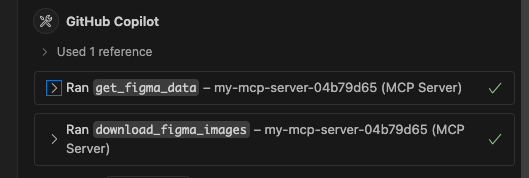
Accept Job
- Accept both of these tasks and wait for a moment. Copilot will begin generating code files based on your Figma design.
“Alright, you’re all set! Happy coding — but be careful to verify anything AI generates. You don’t want to lose weeks or months, debugging a depressive mess of code that nobody understands.”
메타데이터
- post_id
- 0fb9562de77a
- slug
- let-ai-build-your-ui-figma-mcp-x-copilot-integration-guide-0fb9562de77a
- url
- https://medium.com/@baka3k/let-ai-build-your-ui-figma-mcp-x-copilot-integration-guide-0fb9562de77a
- canonical_url
- https://medium.com/@baka3k/let-ai-build-your-ui-figma-mcp-x-copilot-integration-guide-0fb9562de77a
- author_url
- https://medium.com/@baka3k
- status
- ok
- fetched_at
- 2026-07-19 14:50:31