Siebel Data maps made simpler: A practical guide with real examples.
Siebel Data maps made simpler: A practical guide with real examples.
If you’ve worked with Siebel long enough, you’ve probably heard the term data maps thrown around like it’s obvious. But for many people especially when starting out it’s one of those things that sounds more complex than it actually is.
So let’s break it down in a way that actually makes sense.
What are Data Maps in Siebel?
At its core, a data map is simply a way of saying:
“When data comes from here, put it there.”
That’s it.
It defines how fields from one place (like an import file, integration, or external system) map to fields inside Siebel’s Business Components.
A Simple Real-Life Example
Imagine you’re importing customer data from an Excel sheet into Siebel.
Your Excel looks like this:
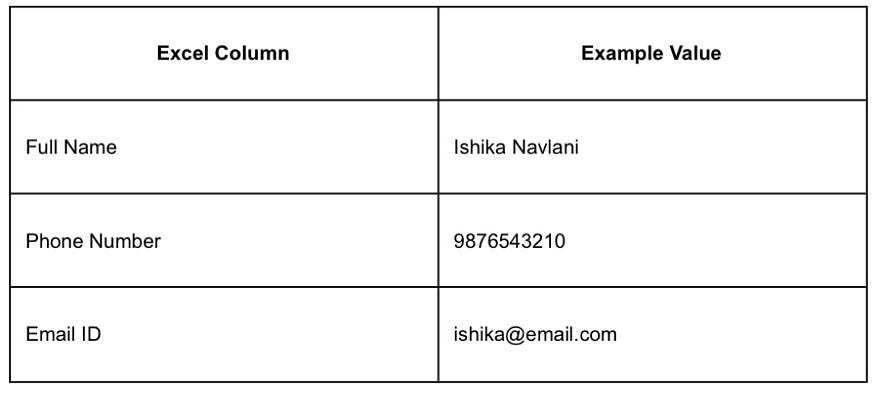
But in Siebel, the fields are:

Now Siebel doesn’t magically know:
- “Full Name” = First Name + Last Name
- “Phone Number” = Work Phone #
This is where data mapping comes in
You define:
- Full Name → First Name / Last Name (split logic)
- Phone Number → Work Phone #
- Email ID → Email Address
That mapping layer is your data map.
Where Do You Use Data Maps in Siebel?
You’ll encounter data mapping in multiple places:
- EIM (Enterprise Integration Manager)
Used for bulk imports/exports.
- Workflow Processes
When passing data between steps.
- Integration Objects & Web Services
Used in system-to-system communication.
- Data Transformation / Data Quality
Used to clean or standardize incoming data.
Why Data Mapping Matters
Bad mapping = silent chaos.
Good mapping:
✔ Keeps data clean
✔ Makes integrations reliable
✔ Prevents duplicate or broken records
A Slightly Advanced Example
Let’s say you’re integrating a loan system.
External system sends:

Mapping:
- ApplicantName → First Name + Last Name
- LoanAmt → Loan Amount
- StatusCode:
A → Approved
P → Pending
R → Rejected
⭐ How to Configure a Data Map in Siebel Tools
(Step-by-Step)
This is the part most people struggle with – so let’s make it simple and practical.
Step 1: Open Siebel Tools
Launch Siebel Tools and connect to your local or server repository.
Step 2: Identify Source & Target
Before touching anything, be clear on:
- Source → Where data is coming from (Integration Object, Workflow, EIM, etc.)
- Target → Which Business Component and fields in Siebel
👉 Example:
- Source: Integration Object (External System)
- Target: Contact Business Component
Step 3: Create / Open Integration Object (if applicable)
If you’re working with integrations:
- Go to Integration Object
- Create a new one or open an existing one
- Define structure (parent-child components)
This acts as your data container
Step 4: Configure Fields in Business Component
- Go to Business Component
- Ensure required fields exist
- Check:
- Data types
- Length
- Picklists (if applicable)
👉 If mapping fails, 80% of the time the issue is here.
Step 5: Create Mapping Logic
Now comes the real work.
Depending on use case:
Option A: Using Workflow Process
- Open Workflow Process Designer
- Add a Siebel Operation Step
- Choose:
- Operation: Insert / Update
- Business Component: e.g., Contact
Now map fields:
- Input Property → BC Field
Example:
- Input: PhoneNumber → Field: Work Phone #
Option B: Using Integration Mapping
- Go to Integration Component Field
- Map:
- External Field → Siebel Field
Add transformations if needed:
- Expressions
- Calculated fields
Step 6: Add Transformation Logic (If Required)
This is where things get interesting.
Examples:
- Split Full Name → First Name / Last Name
- Convert codes:
- “A” → “Approved”
You can use:
- Workflow expressions
- Business Services
- Calculated fields
Step 7: Validate the Mapping
Before deploying:
- Check all required fields are mapped
- Ensure no datatype mismatch
- Verify picklist values
👉 Small mistake here = big production issue later.
Step 8: Compile the Object
- Compile your changes in Siebel Tools
- Move to server repository if needed
Step 9: Test with Sample Data
Never skip this.
- Test with 1 – 2 records first
- Then test with edge cases:
- Missing values
- Incorrect formats
Step 10: Monitor & Debug
After deployment:
- Check logs
- Verify records in UI
- Fix mapping issues quickly
Common Challenges:
- Field name mismatch
- Data format issues
- Complex transformation logic
- Missing or dirty data
Practical Tips
- Always document mappings
- Keep logic simple initially
- Test in small batches
- Think like a human moving data manually
Final Thoughts
Data mapping in Oracle Siebel CRM isn’t about memorizing steps – it’s about understanding how data flows.
Once that clicks:
- Integrations feel easier
- Workflows make sense
- Debugging becomes logical
And suddenly, Siebel doesn’t feel so intimidating anymore.
메타데이터
- post_id
- 150ff62828e5
- slug
- siebel-data-maps-made-simpler-a-practical-guide-with-real-examples-150ff62828e5
- url
- https://medium.com/@ishikanavlani98/siebel-data-maps-made-simpler-a-practical-guide-with-real-examples-150ff62828e5
- canonical_url
- https://medium.com/@ishikanavlani98/siebel-data-maps-made-simpler-a-practical-guide-with-real-examples-150ff62828e5
- author_url
- https://medium.com/@ishikanavlani98
- status
- ok
- fetched_at
- 2026-07-14 03:32:34