How to Use Convex with Next.js: A Simple Guide for Beginners
Introduction
How to Use Convex with Next.js: A Simple Guide for Beginners
Introduction
You have an idea for an app. Maybe a todo list. Maybe a chat room. Maybe a small tool for your team.
To make it real, you usually need three things:
- A place to save stuff — like a notebook where you write down names, messages, or tasks. In apps, we call this a database.
- A helper that reads and writes that notebook — when someone clicks “Save,” something on the server has to actually save it. We call this a backend.
- The screen people see — buttons, forms, lists. We call this the frontend.
Here’s the annoying part: normally you build all three separately. You set up the database. You write API routes. You wire everything together. You fix bugs for days before your actual idea even works.
Convex skips most of that pain.
What is Convex?
Imagine your app is a lemonade stand.
- The stand is what people see (your website).
- The notebook is where orders get written (your data).
- The helper takes orders and updates the notebook (your backend).
Usually you hire three different people and teach them to talk to each other. That takes time.
Convex is one helper who does the notebook and takes orders. They live on the internet (in the cloud), not on your laptop. You just tell them the rules:
- “When someone adds a task, write it in the notebook.”
- “When someone asks for the list, read it out loud.”
- “When something changes, tell everyone looking at the screen.”
That’s it. Convex:
- Saves your data — users, messages, todos, whatever you need
- Follows your rules — add, delete, update, only show my stuff
- Updates screens live — change data in one tab, it shows up in another tab right away. No refresh button.
You write those rules in a folder called convex/ using TypeScript (JavaScript, but with fewer silly mistakes).
You don’t need to build a separate server. You don’t need to figure out how to connect five tools. Convex is the database and the backend in one box.
Why Convex is great for quick POCs and MVPs
Two words you’ll hear a lot:
- POC (Proof of Concept) — a tiny version to answer: “Does this idea even work?”
- MVP (Minimum Viable Product) — the smallest real version you can put in front of real users
For both, speed beats perfection. You are not building the final product yet. You are trying to learn fast.
Convex helps because you spend time on your idea, not on setup.
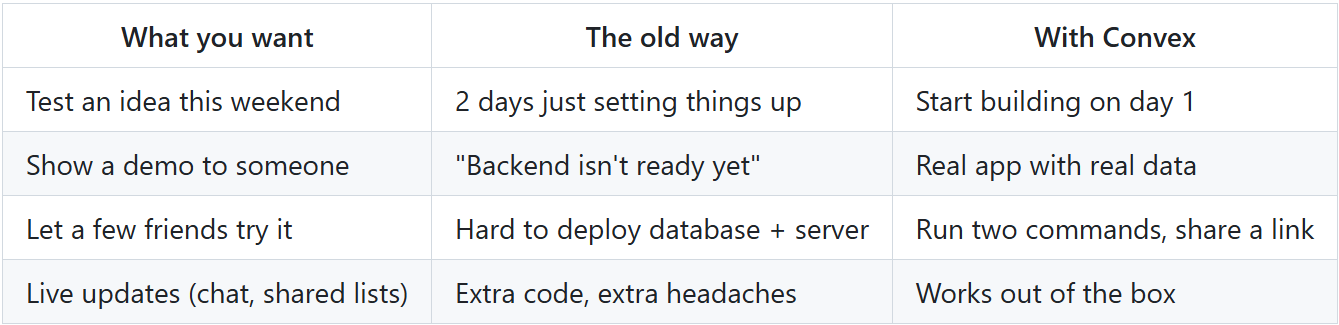
Simple example: You’re not sure if people will use your todo app. You don’t want to spend three weeks on servers. You want to click “Add task” and see it show up. Convex lets you do that in an afternoon.
That’s why so many people use it for POCs and MVPs. Build something small. Show it. Learn. Throw it away or grow it. No big commitment up front.
Where does Next.js fit in?
Next.js builds the lemonade stand — the part people see and click on.
Convex handles the notebook and the helper.
Put them together and you get:
- One language — TypeScript for both the screen and the rules
- Live screens — data changes, your UI updates by itself
- Less busywork — no writing a new API route for every little button
- Fast start — from zero to something working in minutes, not weeks
Good for a weekend POC. Good for an MVP you ship to real users. Good for learning without drowning in tools.
This guide walks you through it step by step — in plain words, no fancy talk.
What You’ll Need
- Node.js installed (version 18 or newer is fine)
- Basic familiarity with React and Next.js
- A terminal and a code editor
That’s it.
Step 1: Create a New Project
The fastest way to start is Convex’s official template for Next.js:
npm create convex@latest my-app -- -t nextjs-shadcn
cd my-app
npm install
This scaffolds a Next.js app with Convex already wired up — including Tailwind CSS and UI components.
Already have a Next.js app? Skip to Step 2 below.
Step 2: Start the Convex Dev Server
Open a terminal in your project folder and run:
npx convex devThe first time you run this, it will:
- Ask you to log in (or develop anonymously)
- Create a cloud project for you
- Create a
convex/folder with backend files - Save your project URL in
.env.local
Keep this terminal running. It watches your backend files and syncs changes automatically — like hot reload, but for your database and server logic.
In a second terminal, start Next.js:
npm run devOpen http://localhost:3000 — your app is live.
Step 3: Understand the Folder Structure
After setup, your project looks roughly like this:
my-app/
├── app/                  ← Your Next.js pages and components
│   ├── layout.tsx
│   └── page.tsx
├── convex/               ← Your backend (database + logic)
│   ├── _generated/       ← Auto-generated types (commit this to git)
│   ├── schema.ts         ← Database tables
│   └── tasks.ts          ← Your backend functions
├── .env.local            ← Contains NEXT_PUBLIC_CONVEX_URL
└── package.json
Simple rule:
app/= what users seeconvex/= where data lives and business logic runs
Step 4: Define Your Database (Schema)
Before storing data, tell Convex what your tables look like.
Create or edit convex/schema.ts:
import { defineSchema, defineTable } from "convex/server";
import { v } from "convex/values";
export default defineSchema({
tasks: defineTable({
text: v.string(),
isCompleted: v.boolean(),
}),
});This creates a tasks table with two fields:
text— a string (the task description)isCompleted— true or false
Save the file. Convex dev server picks it up instantly.
Step 5: Write Backend Functions
Backend logic lives in files inside convex/. There are three main types:
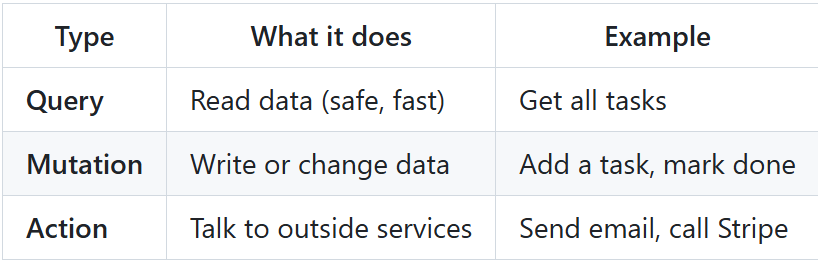
Let’s build a simple tasks API. Create convex/tasks.ts:
import { query, mutation } from "./_generated/server";
import { v } from "convex/values";
// READ: get all tasks
export const list = query({
args: {},
handler: async (ctx) => {
return await ctx.db.query("tasks").collect();
},
});// WRITE: add a new task
export const create = mutation({
args: { text: v.string() },
handler: async (ctx, args) => {
await ctx.db.insert("tasks", {
text: args.text,
isCompleted: false,
});
},
});// WRITE: toggle done/undone
export const toggle = mutation({
args: { id: v.id("tasks") },
handler: async (ctx, args) => {
const task = await ctx.db.get(args.id);
if (!task) return;
await ctx.db.patch(args.id, { isCompleted: !task.isCompleted });
},
});Key idea: Your frontend never touches the database directly. It calls these functions. Convex handles security and validation on the server side.
Step 6: Connect Convex to Next.js
Next.js App Router needs a small wrapper because Convex uses React hooks (which only work in client components).
Create app/ConvexClientProvider.tsx:
"use client";import { ConvexProvider, ConvexReactClient } from "convex/react";
import { ReactNode } from "react";const convex = new ConvexReactClient(process.env.NEXT_PUBLIC_CONVEX_URL!);export function ConvexClientProvider({ children }: { children: ReactNode }) {
return <ConvexProvider client={convex}>{children}</ConvexProvider>;
}Then wrap your app in app/layout.tsx:
import { ConvexClientProvider } from "./ConvexClientProvider";export default function RootLayout({ children }: { children: React.ReactNode }) {
return (
<html lang="en">
<body>
<ConvexClientProvider>{children}</ConvexClientProvider>
</body>
</html>
);
}Important: Create the Convex client outside the component (at the top of the file). If you create it inside the component, it gets recreated on every render and things break.
Step 7: Use Data in Your UI
Now the fun part — showing live data on screen.
Create a client component, e.g. app/TaskList.tsx:
"use client";import { useQuery, useMutation } from "convex/react";
import { api } from "../convex/_generated/api";
import { useState } from "react";export function TaskList() {
const tasks = useQuery(api.tasks.list);
const createTask = useMutation(api.tasks.create);
const toggleTask = useMutation(api.tasks.toggle);
const [text, setText] = useState(""); if (tasks === undefined) {
return <p>Loading tasks...</p>;
} return (
<div>
<form
onSubmit={async (e) => {
e.preventDefault();
if (!text.trim()) return;
await createTask({ text });
setText("");
}}
>
<input
value={text}
onChange={(e) => setText(e.target.value)}
placeholder="Add a task..."
/>
<button type="submit">Add</button>
</form> <ul>
{tasks.map((task) => (
<li key={task._id}>
<label>
<input
type="checkbox"
checked={task.isCompleted}
onChange={() => toggleTask({ id: task._id })}
/>
{task.text}
</label>
</li>
))}
</ul>
</div>
);
}Use it in app/page.tsx:
import { TaskList } from "./TaskList";export default function Home() {
return (
<main>
<h1>My Tasks</h1>
<TaskList />
</main>
);
}What’s happening here?
useQuery— subscribes to live data. When anyone adds or toggles a task, the list updates automatically.useMutation— calls your write functions (create,toggle).api.tasks.list— fully typed. If you rename a function, TypeScript catches it immediately.
Open two browser tabs. Add a task in one — it appears in the other. That’s real-time, with no extra code.
How Real-Time Actually Works
You don’t need WebSockets or polling.
When you call useQuery, Convex keeps a live connection open. When a mutation changes the data, every connected client gets the new result pushed to them.
For you as a developer, it feels like calling fetch() — but the UI stays in sync automatically.
Authentication (When You Need It)
Most real apps need login. Convex supports auth providers like Clerk, Auth0, and Convex Auth (built-in).
The pattern is:
- User logs in on the frontend
- Convex receives a secure token with each request
- In your backend functions, you check who the user is:
export const myProtectedQuery = query({
  args: {},
  handler: async (ctx) => {
    const identity = await ctx.auth.getUserIdentity();
    if (!identity) {
      throw new Error("You must be logged in.");
    }
    // identity.email, identity.name, etc.
  },
});
Convex has ready-made templates with auth already set up:
npm create convex@latest my-app -- -t nextjs-clerkDeploying to Production
When you’re ready to ship:
- Deploy your Convex backend:
npx convex deploy- Deploy your Next.js app to Vercel (or similar):
npx vercel- Set the environment variable
NEXT_PUBLIC_CONVEX_URLin your hosting dashboard to your production Convex URL.
That’s it. Your live app talks to your live backend.
Common Mistakes (And How to Avoid Them)
1. Forgetting "use client"
Convex hooks only work in client components. Add "use client" at the top of any file using useQuery or useMutation.
2. Creating the Convex client inside a component
Always create it once at module level (top of the file), not inside function MyComponent().
3. Not running npx convex dev
If backend changes don’t show up, check that the Convex dev server is running in a separate terminal.
4. Putting secrets in NEXT_PUBLIC_ variables
Anything starting with NEXT_PUBLIC_ is visible in the browser. Never put API keys or secrets there. Use Convex actions for server-side secrets instead.
5. Skipping the schema
Always define tables in schema.ts. It keeps your data structured and gives you full TypeScript types.
When Convex + Next.js Shines
This stack is a great fit for:
- Dashboards — live metrics without refresh
- Chat and messaging — real-time by default
- Collaborative tools — multiple users, same data, instant sync
- SaaS apps — auth, database, and API in one place
- MVPs and prototypes — ship fast, refactor later
It’s less ideal if you need heavy custom SQL, complex reporting across huge datasets, or very specific database engines you must use.
Quick Recap
- Scaffold with
npm create convex@latest my-app -- -t nextjs-shadcn - Run
npx convex dev+npm run devin two terminals - Define tables in
convex/schema.ts - Write logic with
queryandmutationinconvex/ - Wrap your app with
ConvexClientProvider - Read and write data with
useQueryanduseMutation - Deploy with
npx convex deploy+ Vercel
You get a full-stack TypeScript app with real-time data — without building a traditional backend from scratch.
Where to Go Next
- Convex Docs — official documentation
- Next.js Quickstart — Convex’s Next.js guide
- Convex Templates — starter projects with auth, chat, and more
Building something with Convex and Next.js? Start small — a todo app, a notes app, a simple chat. Once you feel the real-time updates click, you’ll wonder why you ever wired up WebSockets manually.
Happy building.
메타데이터
- post_id
- 1543857cb8a0
- slug
- how-to-use-convex-with-next-js-a-simple-guide-for-beginners-1543857cb8a0
- url
- https://medium.com/@ayush.papnai123/how-to-use-convex-with-next-js-a-simple-guide-for-beginners-1543857cb8a0
- canonical_url
- https://medium.com/@ayush.papnai123/how-to-use-convex-with-next-js-a-simple-guide-for-beginners-1543857cb8a0
- author_url
- https://medium.com/@ayush.papnai123
- status
- ok
- fetched_at
- 2026-07-15 04:06:43




