Complete Guide: Setting Up VNC Server and noVNC Client on AWS EC2
This guide provides step-by-step instructions on setting up a VNC server on a t2.micro EC2 instance and a noVNC client on another t2.micro…
Complete Guide: Setting Up VNC Server and noVNC Client on AWS EC2
This guide provides step-by-step instructions on setting up a VNC server on a t2.micro EC2 instance and a noVNC client on another t2.micro EC2 instance. The setup allows you to securely connect to the VNC server and browse URLs remotely.
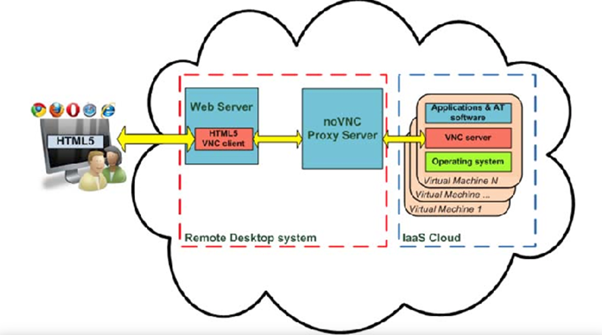
Remote desktop solution — architecture
Understanding the Components
What is VNC?
VNC (Virtual Network Computing) allows you to access and control a remote computer’s desktop environment over a network. It provides a graphical interface similar to a traditional desktop experience.
What is noVNC?
noVNC is an open-source web-based VNC client that allows users to connect to a VNC server through a web browser without installing additional software.
Why Use AWS EC2?
AWS EC2 (Elastic Compute Cloud) provides scalable computing capacity in the cloud, making it an excellent choice for setting up a remote desktop environment.
Setting Up the VNC Server
Launch an EC2 Instance for the VNC Server
- Log in to AWS Console and navigate to EC2 Dashboard.
- Click Launch Instance and configure:
- Instance Type: t2.micro (eligible for free tier)
- Operating System: Ubuntu 22.04 LTS
- Key Pair: Create a new key pair or use an existing one (for SSH access).
- Security Group: Allow inbound access on these ports:
- 5901 (VNC server)
- 6080 (noVNC proxy)
- 22 (SSH access)
- 80, 443 (HTTP & HTTPS for web access)
- Launch the instance and connect via SSH:
- ssh -i your-key.pem ubuntu@<VNC-Server-Public-IP>
Install TigerVNC Server
- Update and upgrade package lists:
- sudo apt update && sudo apt upgrade -y
- Install TigerVNC Server:
- sudo apt install tigervnc-standalone-server -y
- Configure the VNC startup script:
- nano ~/.vnc/xstartup
Add the following content:
!/bin/bash
exec /usr/bin/xterm
- Make the script executable:
- chmod +x ~/.vnc/xstartup
Install XFCE Desktop Environment
XFCE is a lightweight desktop environment suitable for VNC.
sudo apt install xfce4 xfce4-goodies -y
Add a New User and Set a Password
- Create a new user:
- sudo adduser vncuser
- Set a password for the user:
- sudo passwd vncuser
- Grant sudo privileges:
- sudo usermod -aG sudo vncuser
- su — vncuser
Create a Directory for URLs
To store a list of URLs for browsing remotely:
echo “https://www.github.com" > ~/URLS
Start the VNC Server
- Install xterm:
- sudo apt install xterm -y
- Start the VNC server with required settings:
- vncserver -xstartup /usr/bin/xterm :1 -localhost no -SecurityTypes VncAuth -geometry 1024x768 -depth 32
Verify VNC Server Status
To check running VNC sessions:
vncserver -list
Setting Up the noVNC Client
Launch an EC2 Instance for the noVNC Client
Repeat Launch an EC2 Instance for the VNC Server to create another t2.micro instance with the same security group settings.
Install Required Packages
- Update packages and install dependencies:
- sudo apt update
- sudo apt install xauth xorg -y
- sudo apt install git python3 python3-pip -y
- Clone the noVNC repository and install Websockify:
- git clone https://github.com/novnc/noVNC.git
- cd noVNC
- sudo pip3 install websockify
Generate SSL Certificates
Secure the connection using SSL:
openssl req -x509 -nodes -days 365 -newkey rsa:2048 -keyout self.key -out self.pem
Configure Websockify to Proxy VNC Server
Run Websockify to forward traffic:
websockify — web /home/ubuntu/noVNC 6080 <VNC-Server-IP>:5901 — cert=/home/ubuntu/noVNC/self.pem — key=/home/ubuntu/noVNC/self.key
Configure Nginx for SSL
- Edit Nginx configuration file:
- sudo nano /etc/nginx/sites-available/default
- Restart Nginx:
- sudo systemctl restart nginx
Accessing the noVNC Client in a Browser
- Open a browser and navigate to:
- https://<Public-IP-of-noVNC-Client>/vnc.html
- Enter the VNC password when prompted.
- Access the terminal interface.
- To browse stored URLs, use the lynx text browser:
- lynx $(cat ~/URLS)
Conclusion
By following this guide, you have successfully:
- Set up a VNC server on an AWS EC2 instance.
- Installed noVNC and configured Websockify for remote access.
- Secured the connection using SSL certificates and Nginx.
- Accessed the VNC server using a web browser.
This setup provides a lightweight, secure, and accessible remote desktop solution in the cloud!
메타데이터
- post_id
- 15b7cf09bcbe
- slug
- complete-guide-setting-up-vnc-server-and-novnc-client-on-aws-ec2-15b7cf09bcbe
- url
- https://medium.com/@shivarajkulalsn884/complete-guide-setting-up-vnc-server-and-novnc-client-on-aws-ec2-15b7cf09bcbe
- canonical_url
- https://medium.com/@shivarajkulalsn884/complete-guide-setting-up-vnc-server-and-novnc-client-on-aws-ec2-15b7cf09bcbe
- author_url
- https://medium.com/@shivarajkulalsn884
- status
- ok
- fetched_at
- 2026-06-26 21:52:29

