Implementing Complex YOLOv4-PyTorch — An End-to-End Journey
Overview
Implementing Complex YOLOv4-PyTorch — An End-to-End Journey
Overview
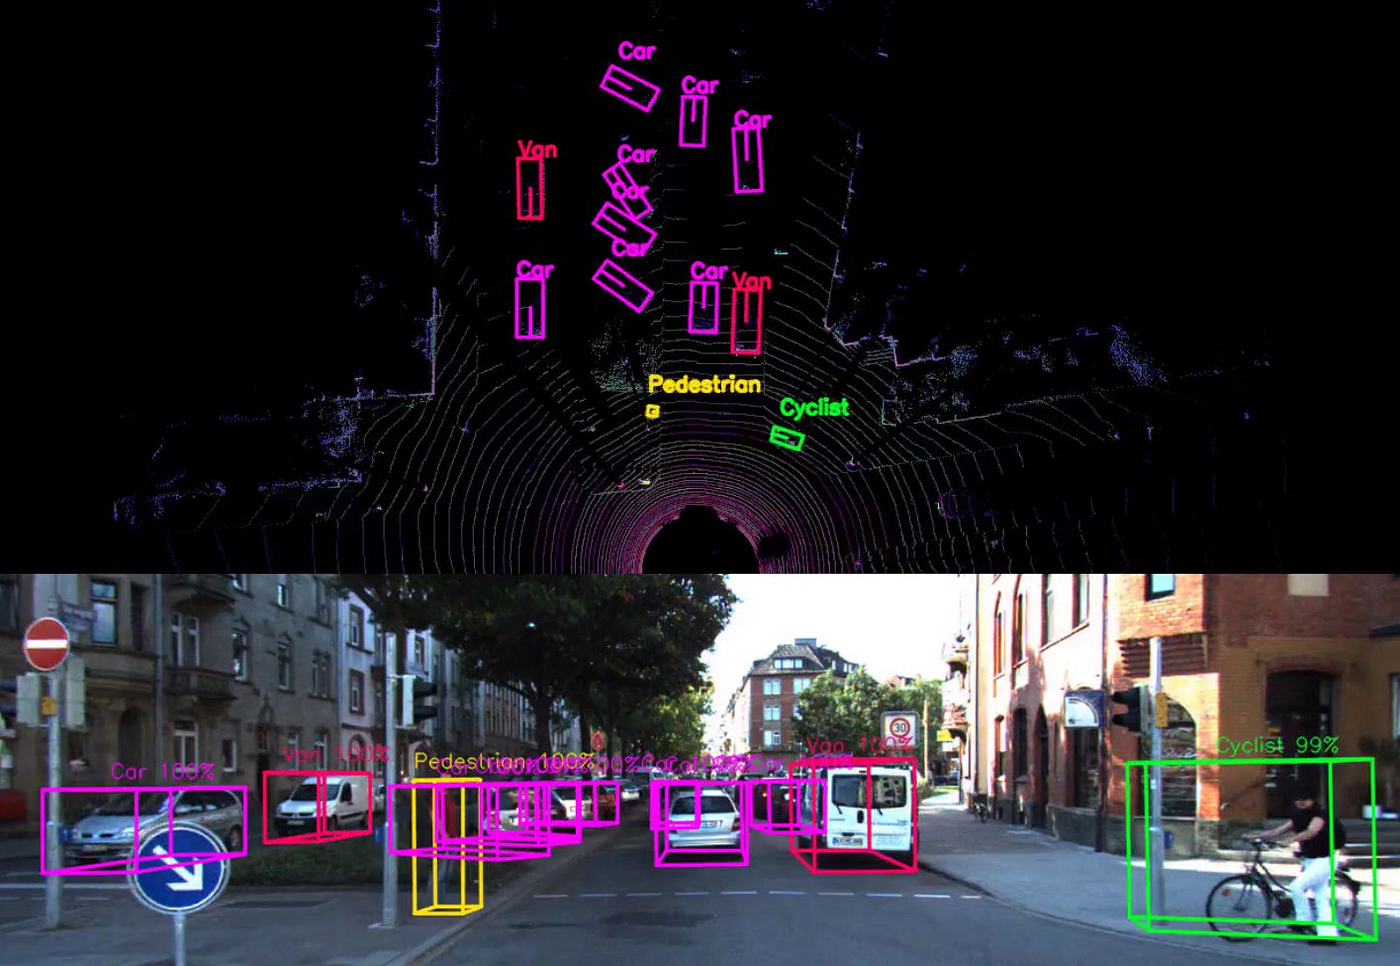
In this article, I’ll walk you through how I implemented the Complex-YOLOv4-PyTorch object detection model. The goal of this project is to detect and localize 3D objects such as Car, Van, Pedestrian, and Cyclist from the popular **KITTI dataset.**
Complex-YOLOv4 is an enhanced version of YOLOv4 that supports 3D object detection in Bird’s Eye View (BEV) by integrating spatial and orientation-aware features. It’s a powerful deep learning model that can be deployed in autonomous driving systems for real-time perception.
Contents:
- System Requirements
- Required Dependencies
- Dataset Preparation
- Training and Testing
- Results
- Credits
1. System Requirements
- Operating System: Windows 10 or Linux
- GPU: NVIDIA GPU with at least 4 GB VRAM (CUDA enabled)
- CUDA Toolkit: Version 10.2 or 11.x
- Python Version: 3.6 to 3.9
- PyTorch Version: 1.7 to 1.10 (compatible with selected CUDA version)
- Anaconda Prompt
- RAM: At least 8 GB
- Disk Space: Minimum 30 GB (for KITTI dataset, logs, and results)
2. Required Dependencies
Clone the github repository from here. Open Anaconda Prompt and navigate to the folder of the cloned repository. Next, create a conda environment (yolo_legacy) and install the required dependencies through pip install <dependency name> .
# Create a new Conda environment
conda create -n yolo_legacy python=3.7
conda activate yolo_legacy

# Essential dependencies
pip install torch==1.5.0+cu101 torchvision==0.6.0+cu101 -f https://download.pytorch.org/whl/torch_stable.html
pip install numpy opencv-python==4.2.0.32
pip install easydict
pip install tqdm
pip install tensorboard
pip install six
pip install shapely
pip install scipy
pip install matplotlib
pip install mayavi
3. Dataset Preparation
Download the official KITTI Dataset from here. The required files to be downloaded are:
- Velodyne point clouds (29 GB)
- Training labels of object data set (5 MB)
- Camera calibration matrices of object data set (16 MB)
- Left color images of object data set (12 GB)
Each dataset file consists of train and test subfolders. Once the files mentioned above are downloaded, navigate to the datasetsubfolder of the cloned repository and paste the files.
Complex-YOLOv4-PyTorch/
├── config/
├── data_process/
├── dataset/
│   └── kitti/         <-- Paste image, calib, velodyne, label files here
├── models/
├── checkpoints/
├── results/
├── src/
│   ├── train.py
│   └── test.py
└── README.md
4. Training and Testing
4.1 Training
The train and test files are located in the src folder of the repository. In the Anaconda Prompt navigate to the src folder and execute the following command.
python train.py --cfgfile <path_to_config> --gpu_idx 0 --batch_size 8 --num_workers 4 --num_epochs 5To execute the train.py script you will need a .cfgfile which can be found in the path below,
Complex-YOLOv4 Pytorch\src\config\cfg\complex_yolov4.cfg
The --batch_sizeand — num_workerscan be varied with respect to the computational capacity of your system. The model is trained for 300 epochs by default. However, — num_epochs can be set to the required number of epochs under 300. Alternatively, you can also use Ctrl+C for early termination of the training process.

Terminal Window of Training Process
The model state dictionaries are saved after every 5 epochs in the form of a .pth file and can be found in the directory, Complex-YOLOv4 Pytorch\checkpoints\complexer_yolo\Model_complexer_yolo_epoch_5.pth
This can be used to load the model states from the .pth file directly for inference.

Tensorboard Dashboard
During training, to monitor the performance of the training process across various metrics open a new Anaconda Prompt terminal and execute the code below.
cd Complex-YOLOv4-Pytorch\logs\complexer_yolo\tensorboard
tensorboard --logdir=./
Next, go to http://localhost:6006/ this will open the Tensorboard window where real-time performance of the training process can be observed across various performance metrics such as accuracy, IoU, loss, precision etc. The corresponding values can also be downloaded in the form of a .csv or JSON file.
4.2 TESTING
Once, the training operation is complete, we will now test the trained model. To test the model on the evaluation set we need to run the code below,
python test.py --pretrained_path <path_to_model> --save_test_output --gpu_idx 0Ensure to paste the path of the .pth file which has the saved model states obtained during the training process. You can directly test for inference by downloading a pretrained model from the repository.

Terminal Window of Testing Process
You can also toggle:
--show_imagefor visual display--output_format videofor video output
5. Results
Once you test your model using the provided test script, you can find the output results in the path Complex-YOLOv4-Pytorch\results
This folder contains image files with detection results for each test sample from the KITTI dataset.

RGB + BEV Visualisation
Each output image includes:
- Bird’s Eye View (BEV) of the LiDAR point cloud, overlaid with rotated bounding boxes that indicate object positions and orientations.
- RGB camera image with 3D bounding boxes projected onto it for visual alignment with real-world perspective.
6. Credits
This implementation is based on the open-source project by Nguyen Mau Dung, hosted on GitHub: Complex-YOLOv4-PyTorch Repository
📧 Author: Nguyen Mau Dung 💬 Email: nguyenmaudung93.kstn@gmail.com
Full credit goes to the original author and contributors of the Complex-YOLOv4 repository. This article is designed to serve as a clear, beginner-friendly guide that simplifies the implementation process, helping users understand, set up, and run the model with ease.
메타데이터
- post_id
- 15c5f3df8a7c
- slug
- implementing-complex-yolov4-pytorch-an-end-to-end-journey-15c5f3df8a7c
- url
- https://medium.com/@baviteshm/implementing-complex-yolov4-pytorch-an-end-to-end-journey-15c5f3df8a7c
- canonical_url
- https://medium.com/@baviteshm/implementing-complex-yolov4-pytorch-an-end-to-end-journey-15c5f3df8a7c
- author_url
- https://medium.com/@baviteshm
- status
- ok
- fetched_at
- 2026-07-20 06:28:39



