AdaBoost Explained Simply (Part 2.2: Building)
AdaBoost — Building 2
AdaBoost Explained Simply (Part 2.2: Building)
[AdaBoost — Building 2]
In the previous article, we learn how the Sample Weights for the incorrectly classified samples are used to determine the Amount of Say each stump gets.
Now we need to learn how to modify the weights so that the next stump will take the errors that the current stump made into the account.
Step1:
Go back to the first stump that we made.
When we create this stump, all of the Sample Weights were the same. That means we did not emphasize the importance of correctly classifying any particular sample.
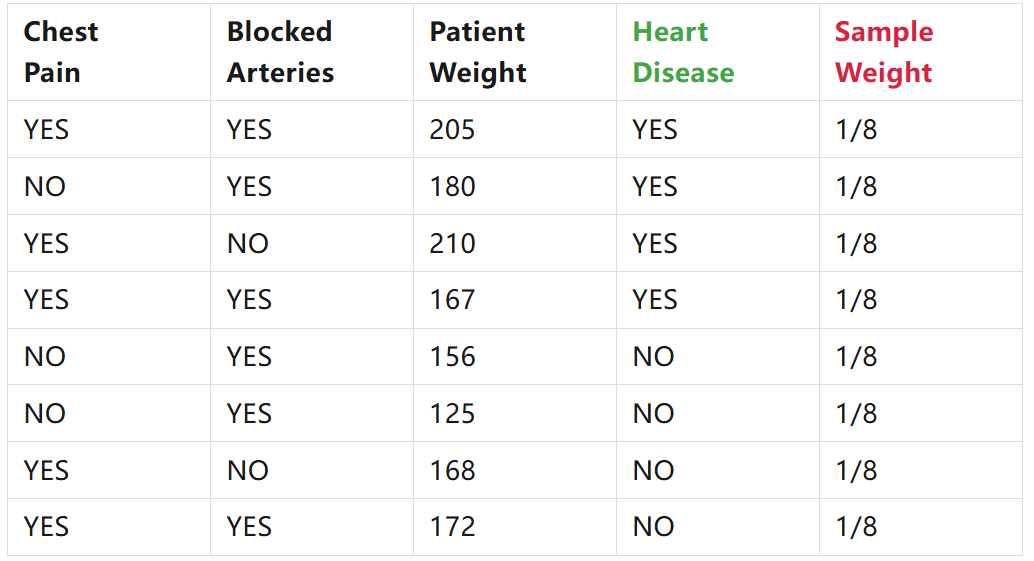
But since the stump incorrectly classified this sample, we will emphasize the need for the next stump to correctly classify it by increasing its sample weight and decreasing all of the other Sample Weights.

Step2:
Increasing the Sample Weight for the incorrectly classified sample:

This is the formula we will use to increase the Sample Weight for the sample that was incorrectly classified.

To get a better understanding of how this part (e^AmountOfSay) will scale the previous Sample Weight, we can draw a graph (x-axis is the Amount of Say).
When the amount of say is relatively large (i.e. the last stump did a good job classifying samples), then we will scale the previous sample weight with a large number. This means that the new sample weight will be much larger than the old one.
When the amount of say is relatively low (i.e. the last stump did not do a very good job classifying samples), then the previous sample weight is scaled by a relatively small number. This means that the new sample weight will only be a little larger than the old one.
In this example, the new sample weigh will be:

(The amount of say is 0.97 calculated in the previous article)
The new sample weight means the new Sample Weight is 0.33, which is more than the old one (1/8=0.125).
Step 3:
Now we need to decrease the Sample Weights for all of the correctly classified samples.

This is the formula we will use to decrease the Sample Weights.

The biggest difference is the NEGATIVE sign in front of the Amount of Say. (The graph is e^(-AmountOfSay), x-axis is the Amount of Say).
When the amount of say is relatively large, then we scale the sample weight by a value very close to 0. This will make the new sample weight very small.
If the amount of say is relatively small, then we will scale the sample weight by a value close to 1. This means that the new sample weight will be just a little smaller than the old one.
In our example,

The new sample weight is 0.05, which is less than the old one (1/8=0.125).
Therefore, we get new weights for all of the data:

Step 4:
Now we need to normalise the new sample weights so that they will add up to 1. For example, the first weight would be: 0.05/(0.05+0.05+0.05+0.33+0.05+0.05+0.05+0.05)=0.07.

Now, when we add up the new sample weights, we get 1 (plus or minus a little rounding error).
These normalised sample weights will be used for the next stump.
Ending:
Now we know
- how to build the first tree in the forest of Adaboost
- how the sample weights for the incorrectly classified samples are used to determine the amount of say each stump gets
- how to modify the weights so that the next stump will take the errors that the current stump made into the account
Next: We will describe how to use the modified sample weights to make the second stump in the forest.
This note summarises the Youtube Videos published by Josh Starmer (Youtube Account: StatQuest with Josh Starmer). I would like to say a big thank you to him and his super useful videos!
메타데이터
- post_id
- 1abdc4df0c99
- slug
- adaboost-explained-simply-part-2-2-building-1abdc4df0c99
- url
- https://medium.com/@createmomo/adaboost-explained-simply-part-2-2-building-1abdc4df0c99
- canonical_url
- https://medium.com/@createmomo/adaboost-explained-simply-part-2-2-building-1abdc4df0c99
- author_url
- https://medium.com/@createmomo
- status
- ok
- fetched_at
- 2026-07-23 11:18:28