Solution Recipe 28: Connect Bookings & Reservation Data to Klaviyo — Introducing Klaviyo Custom…
Sending the right message at the right moment — especially for reservations or appointments — can drive customer engagement and retention.
Solution Recipe 28: Connect Bookings & Reservation Data to Klaviyo — Introducing Klaviyo Custom Objects
Solution Recipes are tutorials to achieve specific objectives in Klaviyo. They can also help you master Klaviyo, learn new third-party technologies, and come up with creative ideas. They are written mainly for developers & technically-advanced users.
- WHAT YOU’LL LEARN: How to quickly connect Klaviyo Custom Objects for things like reservations, bookings, and events — without overhauling your existing integration.
- WHY IT MATTERS: Sending the right message at the right moment — especially for reservations or appointments — can drive customer engagement and retention.
- LEVEL OF SOPHISTICATION: Intermediate
Introduction
Klaviyo Custom Objects make it possible to store complex, multi-layered data in Klaviyo that goes beyond standard profile properties. For example, if you need to track each customer’s multiple restaurant bookings (with details like time, location, and guests), profile properties alone won’t cut it. By leveraging Custom Objects, you can use this information to trigger targeted flows, personalize emails, and build sophisticated segments — right when your customers need them most.
The good news: You don’t need to rebuild your entire integration. Instead, you can piggyback off of your existing event tracking setup and add Custom Objects with a few extra steps.
Prerequisites
Access to Custom Objects on your Klaviyo account. Find out if you’re eligble.
Custom Objects work best if you’re already tracking events such as:
- New Reservation
- Canceled Reservation
- Updated Reservation
For each event, data should include key reservation details — such as status, location, date/time, guests, room/service type, etc.
Step 1: Create a Klaviyo API Key
To interact with Klaviyo’s Custom Objects API, first generate a private API key with Custom Objects Full Access:
- Go to: Create API Key
- Name it something like Sync Custom Objects in Flows
- Set access to Custom Objects Full Access
- Save this key for later steps
Step 2: Define Your Custom Object Data Source
Let’s call our object “Reservation” (but this can be any type: hotel booking, appointment, ticket, etc.).
Have a developer make a POST request to Klaviyo’s Data Source endpoint:
- Docs: Create Data Source
- Endpoint:
[https://a.klaviyo.com/api/data-sources](https://a.klaviyo.com/api/data-sources)
Sample API request:
{
  "data": {
    "type": "data-source",
    "attributes": {
      "visibility": "private",
      "title": "Reservation",
      "description": "Hotel reservation for a profile"
    }
  }
}
Save the returned id—you’ll need this for all future syncs.
Step 3: Sync Reservation Data with a Flow Webhook
The easiest way to get reservation data into a Custom Object is to connect your existing reservation event (e.g. “New Reservation”) to your new object using a Klaviyo flow and a webhook.
Here’s how:
- Create a new flow: Go to Klaviyo Flows and create a flow named “Sync New Reservation to Reservation Object.”
- Set trigger metric: Choose the event (“New Reservation”).
- **Add a Webhook action:
- **Webhook Name: Sync Reservation to Object
- Destination Endpoint:
[https://a.klaviyo.com/api/data-source-record-bulk-create-jobs](https://a.klaviyo.com/api/data-source-record-bulk-create-jobs) (Docs) - Headers:
accept:application/vnd.api+json content-type:application/vnd.api+json revision:2025–07–15 Authorization:Klaviyo-API-Key YOUR_API_KEY
Webhook Payload Example:
{
  "data": {
    "type": "data-source-record-bulk-create-job",
    "attributes": {
      "data-source-records": {
        "data": [
          {
            "type": "data-source-record",
            "attributes": {
              "record": {
                "Email": "{{ email }}",
                "BookingNumber": "{{ event|lookup:’BookingNumber’ }}",
                "Status": "{{ event|lookup:’Status’ }}",
                "Arrival Date": "{{ event|lookup:’Arrival Date’ }}",
                "Number of nights": "{{ event|lookup:’Number of nights’ }}",
                "Adults": "{{ event|lookup:’Adults’ }}",
                "Room": "{{ event|lookup:’Room’ }}",
                "Room Type": "{{ event|lookup:’Room Type’ }}",
                "Location": "{{ event|lookup:’Location’ }}",
                "Booking Date": "{{ event|lookup:’Booking Date’ }}",
                "Departure Date": "{{ event|lookup:’Departure Date’ }}",
                "Number of Rooms": "{{ event|lookup:’Number of Rooms’ }}"
              }
            }
          }
        ]
      }
    },
    "relationships": {
      "data-source": {
        "data": {
          "type": "data-source",
          "id": "YOUR_DATA_SOURCE_ID"
        }
      }
    }
  }
}
Tips:
- Use the Custom Object Data Source
idfrom Step 2. - Include a unique identifier (like
Email). - Map fields from your event as needed.
Test your webhook to verify the payload is accepted (you should see a “200” success), if not, you’ll need to debug the payload in your developer logs.
Reference: Existing New Reservation Example.
{
  "BookingNumber":"6654855",
  "Status": "Confirmed",
  "Arrival Date":"27/09/2025",
  "Number of nights":"2",
  "Adults":"2",
  "Room":"0202",
  "Room Type":"king bed, city view",
  "Location":"0005a",
  "Reservation Status":"reserved",
  "Booking Date":"08/01/2025",
  "Departure Date":"2025-09-29T11:30:00-05:00",
  "Number of Rooms":1,
  ...
}
Step 4: Define the Object Schema in Klaviyo
Now, finalize your Reservation object’s schema:
- Go to Content > Objects in Klaviyo.
- Click Create custom object > Build Your Own.
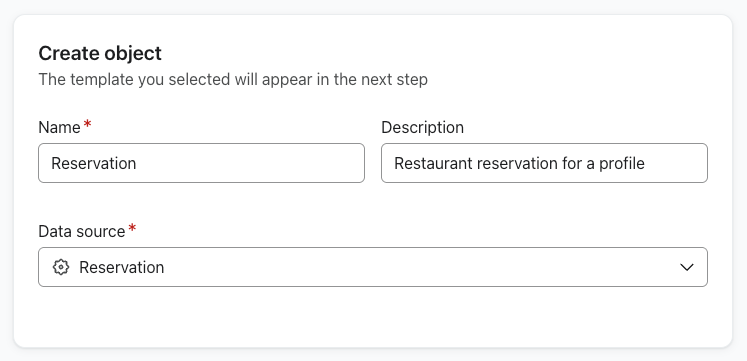
- Name your object (e.g. “Reservation”), add a description, and connect it to your created Data Source.
- Map each property (
BookingNumber,Status, etc.) to a field with the correct data type.

- Use a unique field (like
BookingNumber) for the Object ID. - Define the relationship to profiles — typically via
Email.

Your object is now ready to be used!
Step 5: Automate Event Sync
We now want to finalize the sync of event data into your Reservation Custom Object.
- Activate the “New Reservation” flow.

- Clone this flow for “Updated Reservation” and “Canceled Reservation,” updating the webhook setup as needed for each event.

- Turn all flows live — now, reservation data will populate your Custom Object automatically.
Repeat for any other reservation related events that you may have in order to sync the data to the Reservation Object.
You’re Ready to Use Custom Objects!
Now you can:
- Personalize flows and campaigns with your Reservation data
- Build advanced segments
- Display reservation details in messages or automations
More Resources
- Getting Started with Klaviyo Custom Objects
- How to use Custom Objects in Klaviyo Templates
- How to use Custom Objects in Segments
- How to use Custom Objects in Flows
- Custom Objects FAQ
- API Docs
That’s it!
You’ve now added powerful new data capabilities to your Klaviyo account — without touching your core integration. Enjoy more targeted, timely messages and a better customer experience!
메타데이터
- post_id
- 23a3ddbf266f
- slug
- solution-recipe-28-connect-bookings-reservation-data-to-klaviyo-introducing-klaviyo-custom-23a3ddbf266f
- url
- https://medium.com/klaviyo-developers/solution-recipe-28-connect-bookings-reservation-data-to-klaviyo-introducing-klaviyo-custom-23a3ddbf266f
- canonical_url
- https://medium.com/klaviyo-developers/solution-recipe-28-connect-bookings-reservation-data-to-klaviyo-introducing-klaviyo-custom-23a3ddbf266f
- author_url
- https://medium.com/@olaf.dunn
- status
- ok
- fetched_at
- 2026-06-14 11:28:49