Building a Threat Intelligence Lab with MISP 2.5 on AWS
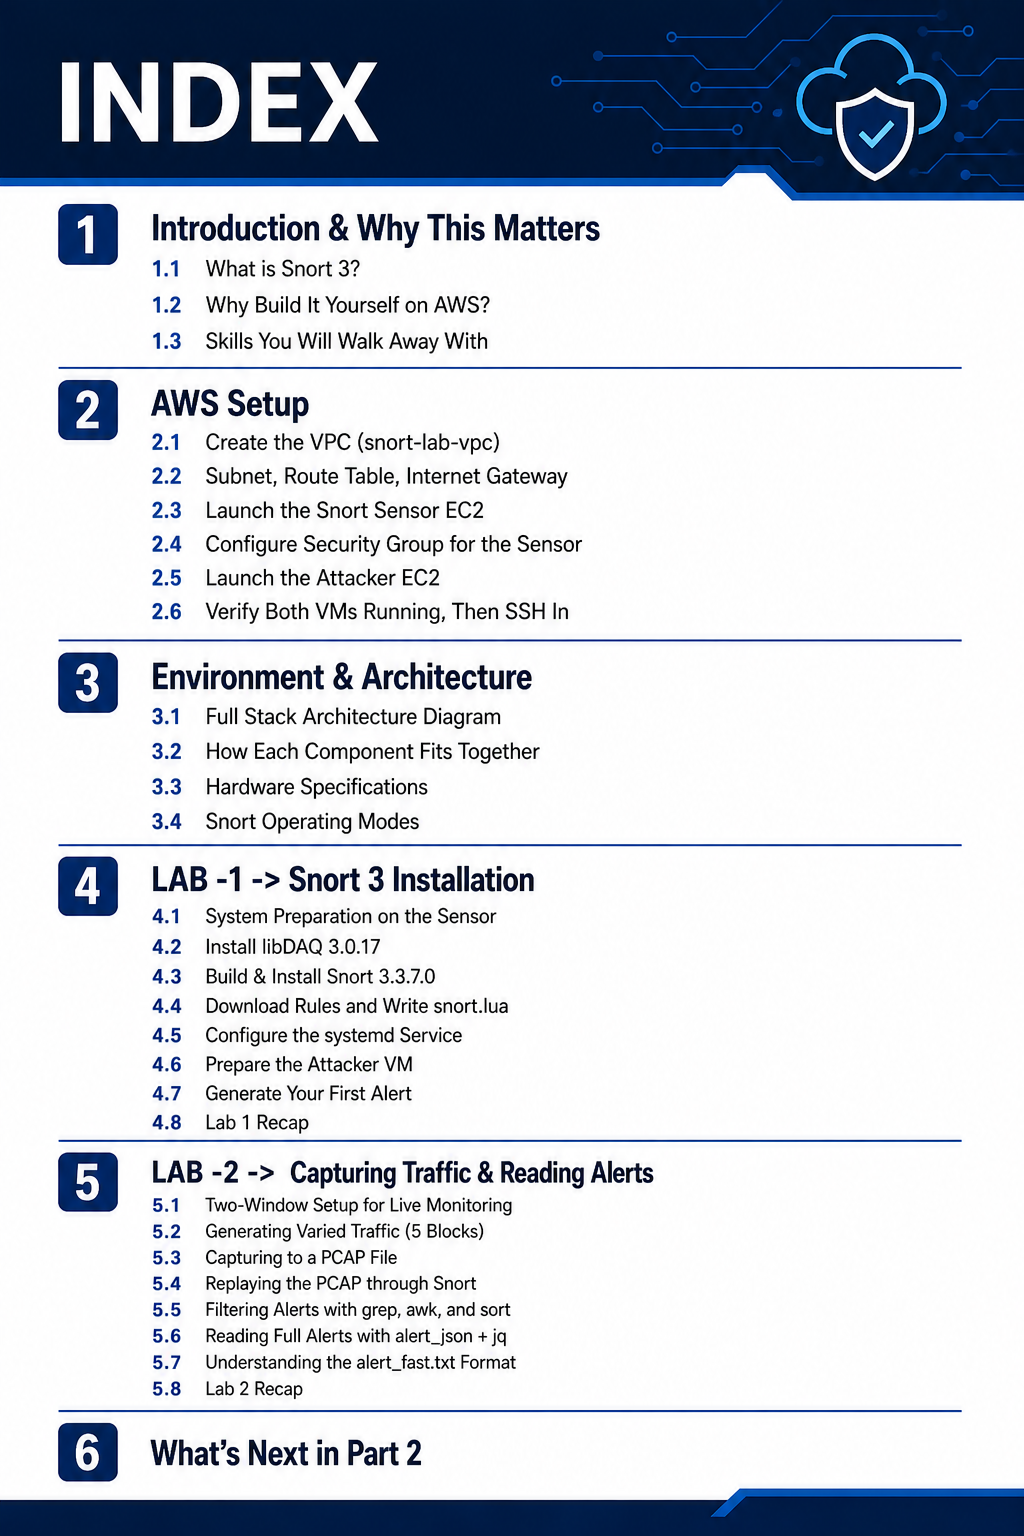
WHAT IS IN PART-1

Building a Threat Intelligence Lab with MISP 2.5 on AWS
WHAT IS IN PART-1
-
What is MISP and why does it matter?
-
Lab architecture
-
Spinning up the EC2 instance
-
Installing MISP 2.5
-
First login and configuration
-
Taxonomies, Galaxies, and Feeds
-
Creating a real threat event
-
Adding IOCs — and watching correlation happen
-
Setting up the TAXII 2.1 server
-
Exporting to STIX 2.1
-
What Part 2 covers
1. What is MISP and why does it matter?
MISP (Malware Information Sharing Platform) is the open-source threat intelligence platform used by national CERTs, ISACs, Europol, NATO, and thousands of private security teams. The core idea is straightforward: when an attack happens, the indicators i.e., IP addresses, domains, file hashes, email addresses etc. get documented in MISP, tagged, categorized, and shared. Other teams pull that intel and use it for detection and blocking.
What makes MISP more than a glorified spreadsheet is automatic correlation. The moment you add an IOC, MISP checks it against other intel data in the database and performs matching. In this article we will see a concrete example later when MISP found a hash I had just added across 1,300 existing events in the feeds.
MISP also speaks STIX 2.1 natively, which means everything stored in it can be exported in a format that SIEMs, EDRs, and firewalls can consume directly. That export-to-STIX capability is the primary reason this project is important beyond just a pipeline.
MISP was originally developed by CIRCL (Computer Incident Response Centre Luxembourg) and has grown into one of the most widely deployed open-source threat intelligence platforms in the world. The MISP community spans national CERTs, financial sector ISACs, military cyber commands, and private SOC teams across more than 70 countries. That community breadth matters: it means the feeds, the galaxies, and the taxonomy libraries built into MISP reflect real adversary behaviour from real incident response, not theoretical frameworks written by vendors who have never handled a live incident.
2. Lab Architecture
Before getting into the steps, here is what the lab looks like end-to-end:

Data flows in one direction: external feeds get pulled into MISP, threat events are created with IOCs and tags, and then the STIX export makes everything available via TAXII for downstream consumption. Simple pipeline.
It is worth understanding why MISP sits at the centre rather than simply subscribing to raw TAXII feeds directly. MISP acts as a curation and enrichment layer. Every indicator that enters the platform gets cross-referenced against the full database, enriched with galaxy cluster labels, and stamped with a TLP marking before it leaves as a STIX bundle. Downstream consumers receive context, not just raw IPs and hashes.
3. Spinning Up the EC2 Instance
I deployed on AWS EC2 rather than a local VM for one practical reason: a real, persistent public IP. MISP writes its base URL into the database at install time. Every API call, every browser link, every TAXII connection references that URL. If the IP changes between sessions, everything breaks. Assigning an Elastic IP on AWS solves that permanently.
Instance configuration:


I accessed the instance using EC2 Instance Connect directly from the browser and no terminal setup was needed. Once in, the Elastic IP was assigned immediately so the base URL is stable for the entire project.


One practical note on the instance type choice: the c7i-flex uses Intel Emerald Rapids processors and delivers consistent CPU performance without the burstable throttling that t3 instances apply under sustained load. During a feed import or a correlation run across thousands of events, MISP will saturate a CPU core for several minutes. A t3 would throttle during exactly those moments. The c7i-flex does not, which makes the feed import step noticeably faster and the correlation results more reliable.
4. Installing MISP 2.5
MISP provides an unattended installer for Ubuntu 24.04. One thing worth flagging: if you copy the installer URL from a browser on Windows and paste it into the terminal, hidden Windows-style line endings get embedded in the string. The shell treats them as literal characters and the wget command fails silently or downloads garbage. Hence, I recommend to type the command directly:

The install runs unattended and takes ~15–30 minutes. At the end it prints the admin credentials:


Verifying services
Before touching the UI, confirm all four services are up:

Redis is the one worth double-checking. Feeds will appear to import without it running, but nothing actually shows up in the event list as the background workers silently fail because there is no message queue to pick up from. All four need to show active (running).


One thing not shown in the installer output but worth being aware of: the MISP background workers handle all the heavy tasks that would otherwise block the web UI. Feed imports, correlation runs, event publishing notifications, and STIX exports all go through Supervisor-managed worker processes running in the background. If workers go down, the UI will appear to work normally but nothing will actually process. That is why verifying Supervisor alongside Apache, MariaDB, and Redis is mandatory. It is the most common source of silent failures in a fresh MISP deployment.
5.First Login and Configuration
Navigate to https://<BASE_URL>. The browser will warn about the self-signed certificate. In Firefox: Advanced → Accept the Risk and Continue. The login page loads with an initial setup notice.

After changing the password, three settings need to be configured before anything else:
Organisation name. Administration → Edit Organisation → set to <ORG_NAME. In this blog I have set it to CyberThreatLab. This name appears on every event created and in all sharing metadata. This is the identifier to identify who produced the intel.


Base URL and live flag. Administration → Server Settings & Maintenance → MISP tab. Set MISP.baseurl to https://<BASE_URL> and flip MISP.live to true. The live flag is a global on/off switch, when false, every API call returns 403 and only site admins can log in.

API key. Administration → List Users → Auth Keys. The installer generated one automatically. This key goes into the Authorization header of every API call and every PyMISP script.

The three settings above form the minimum viable configuration for a functioning MISP instance. Without the correct baseurl, every link inside MISP points to the wrong address and API clients get confused about where to send requests. Without the live flag, the platform silently rejects all external interaction. Without a valid API key, PyMISP scripts and curl commands will receive 403 responses with no useful error message. Getting these three things right before creating any events saves significant debugging time later.
6. Taxonomies, Galaxies, and Feeds
Without taxonomies enabled, the tag picker is empty when creating events that makes tagging useless. The three I enabled:


Galaxies are richer knowledge bases i.e., threat actor profiles, malware families, attack campaigns. They are what turn IoCs into actual threat intelligence, by connecting indicators to known adversaries and their behaviours. I enabled Threat Actor, MITRE ATT&CK Techniques, and Tidal Campaigns clusters.

For external feeds I enabled CIRCL OSINT Feed (threat events from the team that built MISP) and Botvrij.eu (malware and botnet indicators), then triggered a background pull. You can also enable other options provided.

A practical note on feed import timing: when you first trigger a background pull on CIRCL and Botvrij.eu, expect the process to run for 10 to 15 minutes. MISP downloads each event from the feed, deduplicates attributes, runs correlation against the existing database, and indexes everything. The feed status page will show a spinning indicator during this time. The event count in the dashboard will jump significantly once the import finishes, often from a handful of test events to several thousand and that moment is also when the correlation engine has enough data to start surfacing meaningful connections.
7. Creating a Real Threat Event
To create a new event, go to Event Actions → Add Event. For the blog we take the following scenario: a phishing campaign targeting the financial sector.


The choice of Distribution field is worth pausing on. Setting it to Your organisation only during a lab exercise keeps the event private, which is appropriate while you are still adding and verifying attributes. Once all IOCs have been confirmed and the event is tagged correctly, changing Distribution to Community or All communities before publishing makes the event visible to connected MISP instances and TAXII consumers. For this lab the event stays internal, but in a production sharing environment that distribution setting is the mechanism that controls who receives the intelligence.
8. Adding IOCs — and Watching Correlation Happen


After adding the MD5 hash, something interesting happened as seen MISP flagged it immediately:


Once all four IOCs were in, I tagged the event. tlp:green from the Taxonomy Library, meaning this data can be shared within the community. APT28, a galaxy cluster for a Russian state-sponsored group with a documented history of targeting financial and government organisations.
After tagging, the Related Events panel filled in with CIRCL feed data from 2016 through 2024 sharing the same indicators. The picture of the threat got richer without any additional work.

An unpublished event is a draft as it does not appear in API searches and cannot be exported as STIX. Clicked Publish Event in the left sidebar to make it visible outside the UI.

Publishing the event does two things that are not immediately obvious from the UI. First, it makes the event available in API searches, which is what PyMISP scripts and STIX export calls use to query the database. An unpublished event is invisible to the API regardless of its distribution setting. Second, it triggers notifications to any connected MISP servers that have sync configured. In a real ISAC deployment, publishing an event is the act that distributes the intelligence. In this lab it is the step that enables the STIX export in the next section.
9. Setting Up the TAXII 2.1 Server
STIX is the format. TAXII is how you deliver it. Medallion is the OASIS reference implementation of a TAXII 2.1 server, a lightweight Flask app designed for exactly this kind of lab use case.

Configuration in medallion_config.json:

Two things are important to note here. First, both module and module_class are required as missing module_class throws a cryptic AttributeError on startup with no useful hint.
Second, the collections array in taxii_data.json must be nested inside the trustgroup1 key. Placing it at the top level makes collections return empty with no error, another silent failure.


Tested the discovery endpoint. Every TAXII request requires the Accept: application/taxii+json;version=2.1 header as without it, Medallion returns 406:

The discovery endpoint returns a JSON object describing the TAXII server, its title, and the API roots it exposes. Each API root contains collections, and each collection is where STIX bundles get pushed and pulled from. For this lab there is one collection defined in taxii_data.json. Medallion keeps everything in memory by default, meaning a server restart clears all pushed bundles. For persistent storage across restarts, the config supports a MongoDB backend that replacing the module and module_class values with their MongoDB equivalents is the only change required to make the storage durable.
10. Exporting to STIX 2.1
With Event #1968 published and the TAXII server running, the final step for Part 1 was exporting the event as a STIX 2.1 bundle. MISP’s restSearch endpoint handles this directly:


The output file contains all four IOCs converted to STIX 2.1 objects. The C2 IP address becomes an indicator with a detection pattern:

Every attribute that had the IDS flag checked comes through as a typed STIX indicator. Any SIEM, EDR, or TIP that speaks STIX 2.1 can consume this directly there is no transformation needed.
It is worth examining what the STIX 2.1 bundle actually contains beyond the indicators themselves. MISP generates an Identity object representing your organisation, a Report object wrapping all the indicators, and individual Indicator objects for each IDS-flagged attribute. The confidence level, TLP marking, and kill-chain labels applied inside MISP all survive the conversion and appear as STIX 2.1 structured fields. That means a consuming SIEM does not need to strip or reinterpret any metadata that’s why the context travels with the indicators.
11. Where Part 1 Leaves Things
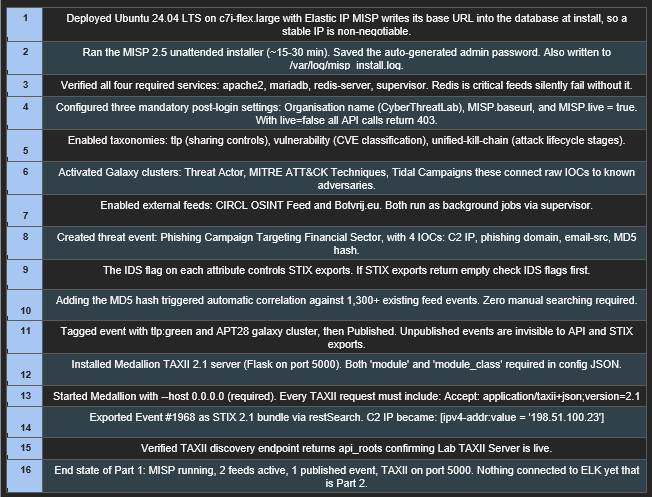
At this point the lab has: an EC2 instance with a stable IP, MISP 2.5 configured with a live organisation and API key, taxonomies and galaxy clusters active, CIRCL and Botvrij.eu feeds pulling data, a published phishing campaign event with four IOCs and automatic correlation against 1,300+ existing events, a Medallion TAXII 2.1 server running on port 5000, and a STIX 2.1 bundle exported cleanly from MISP.
Everything is running. The data is in. But nothing is connected yet as the TAXII server is sitting there with no bundles pushed to it, and the STIX export is just a file on disk.

MISP #STIX #TAXII #ThreatIntelligence #AWS #BlueTeam #SOC
메타데이터
- post_id
- 2665ff9f22de
- slug
- building-a-threat-intelligence-lab-with-misp-2-5-on-aws-2665ff9f22de
- url
- https://medium.com/@adevani20045/building-a-threat-intelligence-lab-with-misp-2-5-on-aws-2665ff9f22de
- canonical_url
- https://medium.com/@adevani20045/building-a-threat-intelligence-lab-with-misp-2-5-on-aws-2665ff9f22de
- author_url
- https://medium.com/@adevani20045
- status
- ok
- fetched_at
- 2026-06-20 20:29:01