WebRTC Essentials: Lab Project
WebRTC Essentials: Lab Project
In our previous article, we talked about the theoretical basics of WebRTC. In this edition, we’ll build a practical, hands-on project that will help you learn the core starter concepts through code.
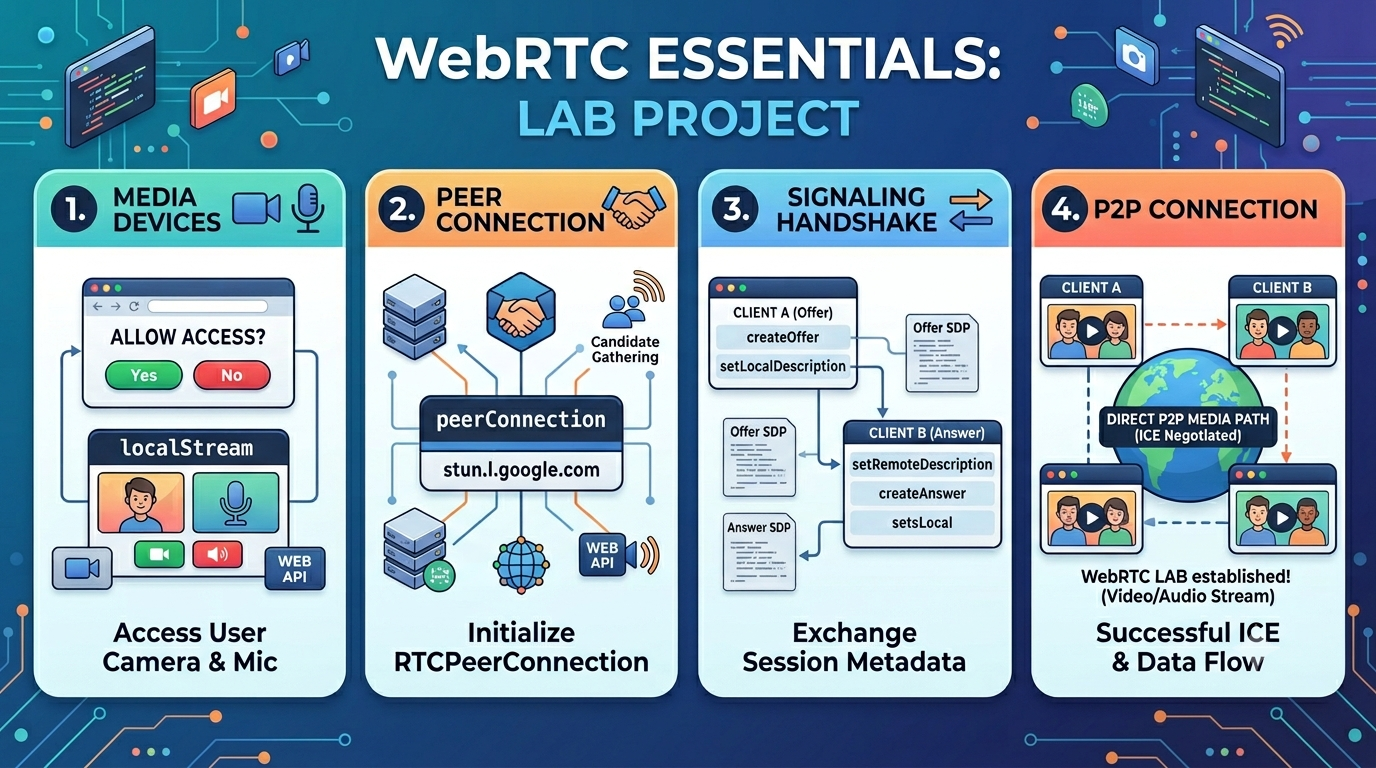
The project is divided into three parts. First, permission and access to the user’s camera. The second is the RTCPeerConnection initialization. And last, the signaling procedure of sharing the connection between the two clients.
First, let’s create a very simple interface for the user; after this, we will implement all functional code step by step. The full source code is available on GitHub.

We’ll use the getUserMedia method, which is part of the MediaDevices interface, a Web API, to get access to the camera and microphone.
This part of the code creates a MediaStream object, which contains both audio and video tracks. You can read more about media devices here.
const localStream = await navigator.mediaDevices.getUserMedia({
    video: true,
    audio: true
});
Once the media stream is active, we can establish the peer-to-peer connection using the RTCPeerConnection interface. When initializing this object, we pass a configuration block containing a STUN server. This triggers the browser to start gathering ICE (Interactive Connectivity Establishment) candidates to map out the best network path.
const peerConnection = RTCPeerConnection({
    iceServers: [{ urls: "stun:stun.l.google.com:19302" }]
})
After establishing the peer connection object, the next step is to create an offer. This process generates a Session Description Protocol (SDP) block that defines our local connection properties (like codecs and media formats). We then set this offer as our local configuration.
// Generate the SDP offer
const offer = await peerConnection.createOffer();
// Save it locally
await peerConnection.setLocalDescription(offer);
After configuring the local description, we transmit our SDP offer to the other peer in the room via a signaling server.
When the remote peer receives this offer, they must register it as their remote description, generate a corresponding SDP answer to accept the handshake, and save that answer locally before sending it back to us.
// Set the received offer as the remote description
await peerConnection.setRemoteDescription(offer);
// Create an answer as an SDP response
const answer = await peerConnection.createAnswer();
// Set the generated answer as the local description
await peerConnection.setLocalDescription(answer);
With both local and remote descriptions securely in place on both ends, the browser automatically kicks off the final stage of ICE negotiation. Once the network path is cleared and the connection locks in, the peer-to-peer pipeline is established, allowing both sides to instantly see and hear each other’s media tracks.
메타데이터
- post_id
- 266e6bfb24c4
- slug
- webrtc-essentials-lab-project-266e6bfb24c4
- url
- https://medium.com/@arman-minasyan/webrtc-essentials-lab-project-266e6bfb24c4
- canonical_url
- https://medium.com/@arman-minasyan/webrtc-essentials-lab-project-266e6bfb24c4
- author_url
- https://medium.com/@arman-minasyan
- status
- ok
- fetched_at
- 2026-07-15 16:48:10