How to Secure Your APIs on WSO2 API Gateway Using Auth0 JWTs
In a modern microservices architecture, securing your endpoints is non-negotiable. Passing credentials back and forth is old school —…
How to Secure Your APIs on WSO2 API Gateway Using Auth0 JWTs
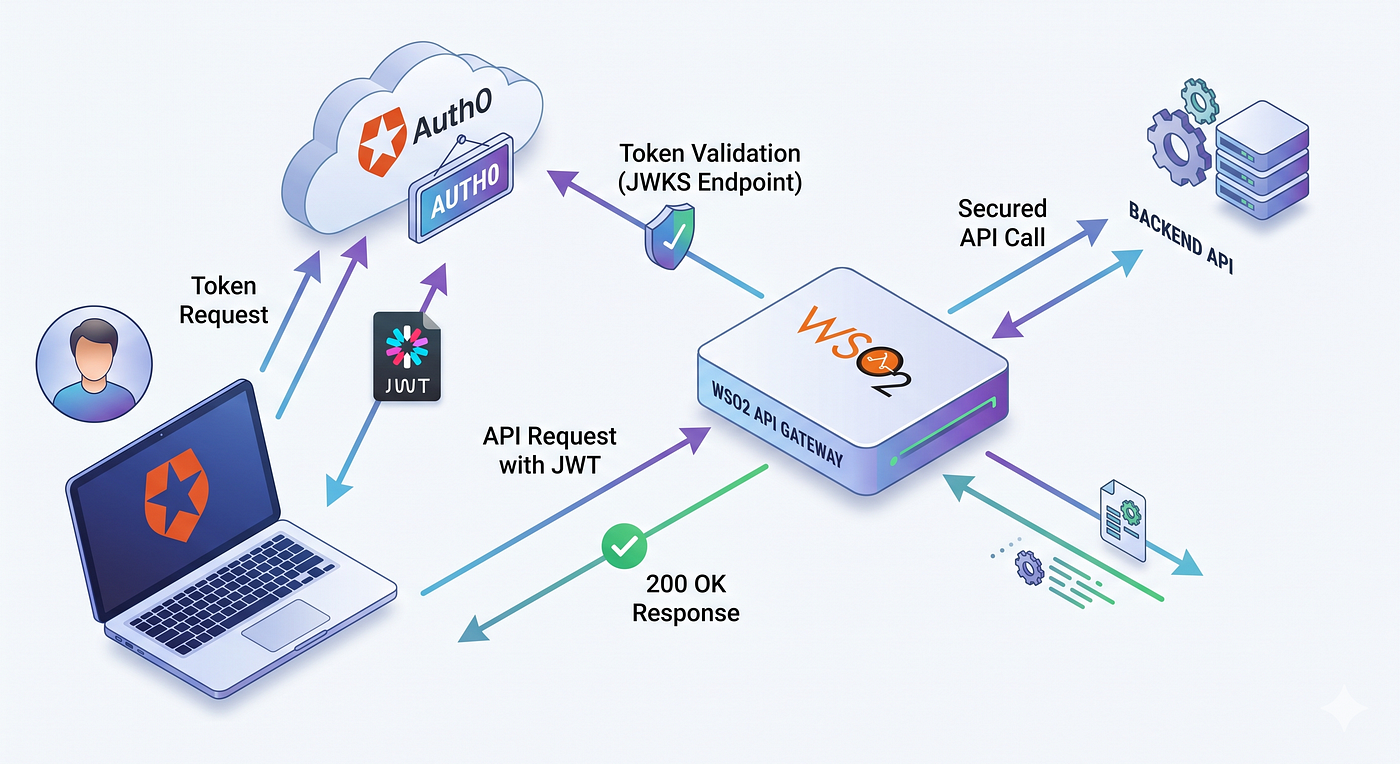
In a modern microservices architecture, securing your endpoints is non-negotiable. Passing credentials back and forth is old school — stateless, token-based authentication using JSON Web Tokens (JWT) is the gold standard.
When you pair an external Identity Provider (IdP) with WSO2 API Gateway, you get a powerful, cloud-native security model that scales effortlessly. This architecture allows your gateway to offload complex user management and token issuance to a dedicated identity platform, while it focuses entirely on high-performance traffic management and token validation.
While this design works with any standard OAuth2/OIDC issuer, this guide will use Auth0 as our example IdP to demonstrate how to configure and test the setup.
What is WSO2 API Gateway?
WSO2 API Gateway is a high-performance, open-source, and cloud-native gateway designed to intercept, secure, and manage API traffic. Built for modern microservices and Kubernetes-first environments, it handles cross-cutting concerns like rate limiting, deep observability, and robust token validation (such as JWT and OAuth2) completely out of the box, ensuring your backend services stay lightweight and protected.
Here is a step-by-step guide to setting up Auth0 JWT authentication with the WSO2 API Gateway.
Setup Auth0
First, we need an Identity Provider (IdP) to issue tokens. We will use Auth0 to create an OAuth application and generate a token. For SimpliCity, I will create an access token using the Client Credentials grant type.
- Log in to your Auth0 Dashboard. (You can easily sign up using a Google account).
- Navigate to Applications > Applications and click Create Application.
- Select Machine to Machine Applications, give it a descriptive name, and click Create.
- Select the default Auth0 Management API as your authorized API and choose any basic permission (for example,
read:client_grants). Click Authorize. - Switch over to the Quick Start tab. You will find a ready-to-go
curlcommand designed to generate an access token using the Client Credentials grant type. Run this command in your terminal to fetch your test JWT.
⚠️ Important Note: Take note of your Token Endpoint. Based on this URL, you can easily deduce your token issuer and JSON Web Key Set (JWKS) endpoint, which the WSO2 Gateway will need later to verify signatures.
- Token Endpoint:
[https://dev-xxxxxx.us.auth0.com/oauth/token](https://dev-xxxxxx.us.auth0.com/oauth/token) - JWKS Endpoint:
[https://dev-xxxxxx.us.auth0.com/.well-known/jwks.json](https://dev-xxxxxx.us.auth0.com/.well-known/jwks.json) - Token Issuer:
[https://dev-xxxxxx.us.auth0.com/](https://dev-xxxxxx.us.auth0.com/)
Setup API Gateway
Now that Auth0 is ready to hand out tokens, let’s configure the WSO2 API Gateway to validate them.
Step 1: Download and Extract the Gateway
Get the latest gateway release files onto your local machine.
wget https://github.com/wso2/api-platform/releases/download/gateway/v1.1.0/wso2apip-api-gateway-1.1.0.zip

# Unzip the downloaded distribution.
unzip wso2apip-api-gateway-1.1.0.zip

# Start the complete stack
cd wso2apip-api-gateway-1.1.0/
Step 2: Configure System-Level JWT Settings
Open your config.toml file located inside the gateway configuration folder and append the following block. Replace the issuer and jwks.remote.uri with the specific Auth0 endpoints you gathered in the previous section.
[policy_configurations.jwtauth_v1]
jwkscachettl = "5m"
jwksfetchtimeout = "5s"
jwksfetchretrycount = 3
jwksfetchretryinterval = "2s"
allowedalgorithms = ["RS256", "ES256"]
leeway = "30s"
authheaderscheme = "Bearer"
headername = "Authorization"
onfailurestatuscode = 401
errormessageformat = "json"
errormessage = "Authentication failed"
validateissuer = true

[[policy_configurations.jwtauth_v1.keymanagers]]
name = "PrimaryIDP"
issuer = "https://dev-xxxxxx.us.auth0.com/"

[policy_configurations.jwtauth_v1.keymanagers.jwks.remote]
uri = "https://dev-xxxxxx.us.auth0.com/.well-known/jwks.json"
skipTlsVerify = false
💡 Deep Dive: For a comprehensive technical breakdown of all available configuration parameters and advanced policy behaviors, check out the official WSO2 JWT Authentication Policy Document.
Step 3: Spin Up the Gateway
With configurations locked in, launch your gateway components using Docker Compose:
docker compose up -dStep 4: Deploy Your Secured API
Next, publish the API definition to the gateway. We’ll use a sample Reading List API. Notice the policies section near the bottom explicitly calls our jwt-auth policy and hooks it up to our PrimaryIDP.
curl -X POST http://localhost:9090/api/management/v0.9/rest-apis \
  -u admin:admin \
  -H "Content-Type: application/yaml" \
  --data-binary @- <<'EOF'
apiVersion: gateway.api-platform.wso2.com/v1alpha1
kind: RestApi
metadata:
  name: reading-list-api-v1.0
spec:
  displayName: Reading-List-API
  version: v1.0
  context: /reading-list/$version
  upstream:
    main:
      url: https://apis.bijira.dev/samples/reading-list-api-service/v1.0
  policies:
    - name: jwt-auth
      version: v1
      params:
        issuers:
          - PrimaryIDP
  operations:
    - method: GET
      path: /books
    - method: POST
      path: /books
    - method: GET
      path: /books/{id}
    - method: PUT
      path: /books/{id}
    - method: DELETE
      path: /books/{id}
EOF
Testing the Setup
Let’s test our defenses to make sure the policy is actively intercepting and evaluating incoming requests.
Scenario A: Requesting Without an Authorization Header
If an anonymous user tries to sneak into your API endpoint without providing a token:
curl http://localhost:8080/reading-list/v1.0/booksExpected Response Output:
{"error": "Unauthorized", "message":"Authentication failed"}The gateway flags the missing token immediately and short-circuits the request before it ever touches your backend infrastructure.
Scenario B: Requesting With a Valid Auth0 JWT Header
Now, grab the JWT access token you generated via the Auth0 Quick Start curl and pass it along inside the standard Authorization: Bearer <token> header:
curl http://localhost:8080/reading-list/v1.0/books \
  -H "Authorization: Bearer eyJhbGciOiJSUzI1NiIsInR5cCI6IkpXVCIsImtpZCI6IlhCVlZ5NER0..."
Expected Response Output:
{
  "books": [
    {
      "id": "1d4c9647-5e62-4f1d-9c30-e1f25c6d0e73",
      "title": "The Great Gatsby",
      "author": "F. Scott Fitzgerald",
      "status": "read"
    },
    {
      "id": "be8c8194-0342-4ed7-bd64-47ad47f214b6",
      "title": "1984",
      "author": "George Orwell",
      "status": "to_read"
    },
    {
      "id": "660f6db1-1390-460d-9c0b-df7a4028ff4e",
      "title": "The Hobbit",
      "author": "J. R. R. Tolkien",
      "status": "reading"
    }
  ]
}
Success! The gateway intercepts the token, fetches the public keys from Auth0’s JWKS endpoint (caching it for subsequent requests), verifies the signature and issuer, and seamlessly forwards the traffic upstream.
Here is a step-by-step guide to setting up Auth0 JWT authentication with the WSO2 API Gateway.
메타데이터
- post_id
- 296decbbbf87
- slug
- how-to-secure-your-apis-on-wso2-api-gateway-using-auth0-jwts-296decbbbf87
- url
- https://medium.com/@chamilaadhi/how-to-secure-your-apis-on-wso2-api-gateway-using-auth0-jwts-296decbbbf87
- canonical_url
- https://medium.com/@chamilaadhi/how-to-secure-your-apis-on-wso2-api-gateway-using-auth0-jwts-296decbbbf87
- author_url
- https://medium.com/@chamilaadhi
- status
- ok
- fetched_at
- 2026-06-27 07:40:21




