The Ultimate Guide to Adding Custom Domains in Azure Portal (Without Losing Your Mind!)
Because nobody wants their professional app stuck with “myapp-xyz123.azurewebsites.net” forever! 😅
The Ultimate Guide to Adding Custom Domains in Azure Portal (Without Losing Your Mind!)
Because nobody wants their professional app stuck with “myapp-xyz123.azurewebsites.net” forever! 😅

Why Your App Deserves a Real Name 🎯
Picture this: You’ve built an amazing web application, deployed it to Azure, and you’re ready to show it to the world. But then you realize your app’s URL looks like it was generated by a drunk robot: myawesomeapp-14726.westus2.azurewebsites.net.
Not exactly the professional image you were going for, right? 🤦♂️
Fear not, fellow developer! Today we’re diving into the magical world of custom domains in Azure Portal, where we’ll transform your app from looking like a tech experiment to a polished, professional service that even your grandmother would trust with her credit card information.
What’s the Big Deal About Custom Domains? 🤔
Before we jump into the technical wizardry, let’s talk about why custom domains are more essential than coffee on a Monday morning:
🏆 Brand Credibility & Trust
- Professional appearance that screams “I know what I’m doing!”
- Users feel secure entering sensitive information
- No more explaining why your banking app has “azurewebsites.net” in the URL
🔐 OAuth Verification Magic
Here’s where things get really interesting! Adding a custom domain isn’t just about looking good — it’s your golden ticket to OAuth app verification. When you have a verified custom domain:
- Google OAuth gets that shiny “Verified” badge ✅
- Microsoft OAuth apps look professional
- No more scary “Unverified app” warnings that make users run away faster than free pizza at a developer conference
🎯 SEO & Marketing Benefits
- Better search engine rankings
- Memorable URLs that customers can actually type
- Professional email addresses (@yourdomain.com vs @gmail.com)
Prerequisites: What You’ll Need 📋
Before we start this adventure, make sure you have:
- ✅ An active Azure subscription (obviously!)
- ✅ A domain name (I’m using one from Porkbun — great choice BTW!)
- ✅ Access to your domain’s DNS settings
- ✅ An Azure App Service already running
- ✅ About 15 minutes and a sense of humor
Step 1: Navigate to the Custom Domains Portal 🧭
First things first, let’s find our way to the custom domains section:
Log into Azure Portal (portal.azure.com)

Navigate to your App Service or search for “domain names”

Pro tip: If you’re like me and get lost in the Azure portal more often than a tourist in Tokyo, just use the search bar and type “custom domain names” — it’s a lifesaver! 🗾
Step 2: Adding Your Custom Domain 🎪
Now comes the fun part! Let’s add that shiny new domain:
Click “Add custom domain” (the blue button that’s calling your name)
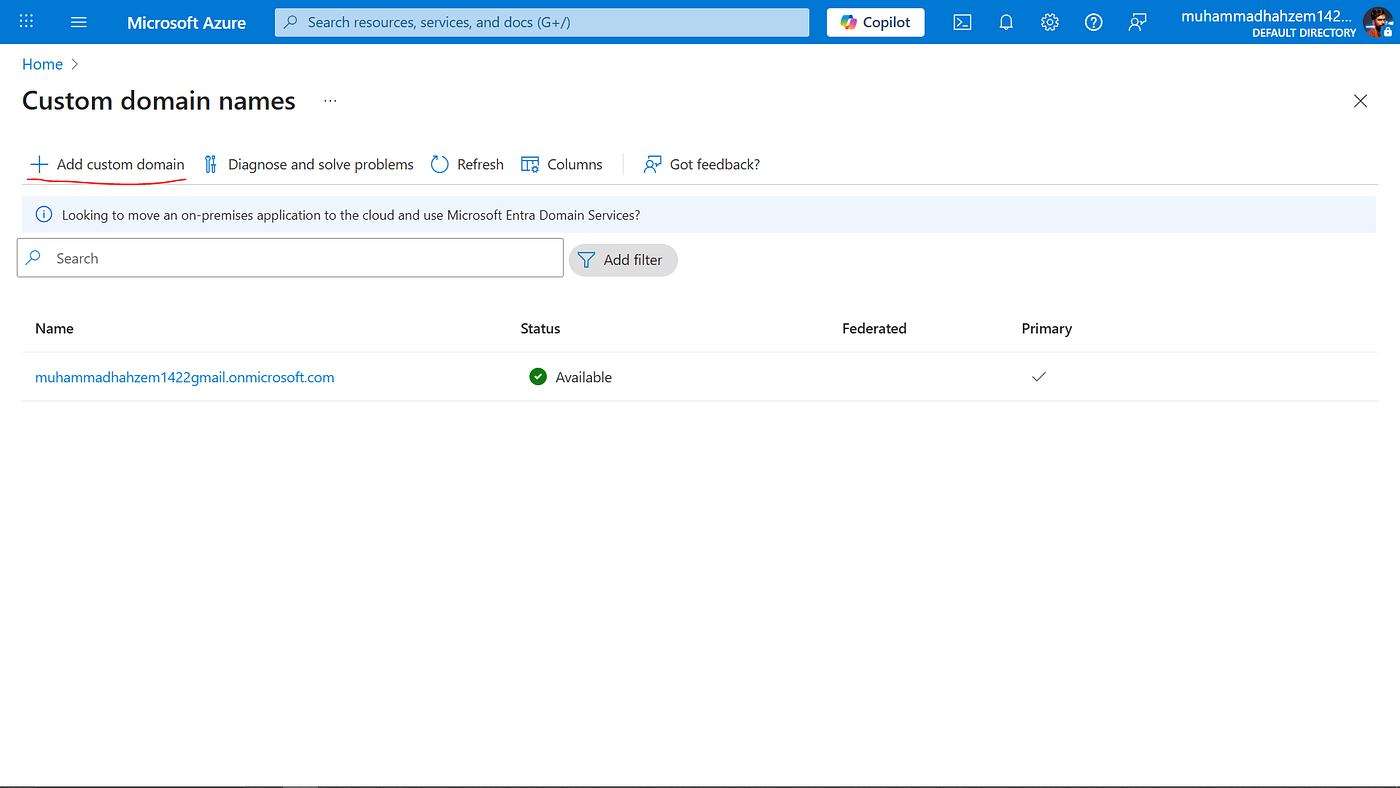
Enter your domain name (e.g., mydomain.com — yes, that’s a real domain from our screenshots!)

Choose your validation method (TXT record is the way to go)

Step 3: DNS Configuration — The Magic Happens Here! ✨
This is where the rubber meets the road. You’ll need to add DNS records to prove you actually own the domain (Azure doesn’t just take your word for it, unfortunately).
TXT Record Setup
Azure will provide you with a verification string that looks something like:
MS=ms51240018In your DNS provider (Porkbun, GoDaddy, Cloudflare, etc.):
- Create a new TXT record
- Host/Name: @ (represents the root domain)
- Value: The MS=msXXXXXX string provided by Azure
- TTL: 3600 seconds (or whatever your provider suggests)

The Waiting Game ⏰
After adding the TXT record, you might need to wait anywhere from 5 minutes to 72 hours for DNS propagation. In reality, it’s usually pretty quick (like ordering pizza quick), but DNS servers around the world need time to get the memo.
Pro tip: Use online DNS checker tools to see if your record has propagated. It’s like tracking a package, but for nerds! 📦
Step 4: Verification and SSL Magic 🔒
Once your DNS records are in place:
- Go back to Azure Portal
- Click “Verify” (cross your fingers and toes)
- Wait for the green checkmark ✅

If verification fails, don’t panic! Common issues include:
- DNS hasn’t propagated yet (patience, young padawan)
- Typos in the TXT record (we’ve all been there)
- Wrong DNS zone configuration
SSL Certificate Setup
Azure will automatically provision an SSL certificate for your custom domain (because we’re living in 2025, not 1995). This usually happens within a few minutes, and boom — you’ve got HTTPS working like magic! 🎩✨
Common Pitfalls (And How to Avoid Them) 🕳️
“My domain isn’t verifying!”
- Check DNS propagation using tools like whatsmydns.net
- Ensure TXT record value is exactly as provided (no extra spaces!)
- Wait longer (I know, I know… patience is hard)
“SSL certificate isn’t working!”
- Give Azure time to provision the certificate (usually 10–30 minutes)
- Ensure your domain is properly verified first
- Check that you’re using the correct domain format
“OAuth still shows unverified!”
- Domain verification in Azure ≠ OAuth provider verification
- You need separate verification with Google, Microsoft, etc.
- Each platform has its own verification process
Pro Tips for Maximum Success 🏅
- Use a reliable DNS provider — Some free providers have slow propagation
- Document your DNS changes — Future you will thank present you
- Test thoroughly — Check both www and non-www versions
- Monitor expiration dates — Set calendar reminders for domain renewal
- Keep backup DNS records — Always backup before making changes
The Sweet Taste of Victory 🍰
Once everything is set up correctly, you’ll have:
- ✅ A professional custom domain for your Azure app
- ✅ Automatic SSL certificate management
- ✅ The foundation for OAuth app verification
- ✅ Bragging rights at the next developer meetup
Troubleshooting: When Things Go Wrong 🔧
Domain Verification Issues
Error: "Unable to verify domain ownership"Solution: Double-check your TXT record value and wait for DNS propagation.
SSL Certificate Problems
Error: "SSL certificate not found"Solution: Ensure domain verification completed successfully first.
Making the Most of Your Custom Domain 🚀
Now that you’ve got your custom domain set up, consider:
- Setting up custom email addresses (@yourdomain.com)
- Configuring OAuth applications with your verified domain
- Setting up monitoring for certificate expiration
- Implementing redirect rules for SEO optimization
You Did It! 🎉
Congratulations! You’ve successfully transformed your Azure app from a generic URL into a professional, trustworthy web presence. Your custom domain isn’t just a pretty URL — it’s a powerful tool for building user trust, improving SEO, and enabling advanced OAuth features.
Remember, in the world of web development, first impressions matter. A custom domain is like wearing a tailored suit to a job interview — it shows you mean business! 👔
Now go forth and impress your users with your shiny new custom domain. And when someone asks you how you got that “Verified” badge on your OAuth app, you can just smile mysteriously and say, “It’s all about the domain, my friend.” 😎
Useful Resources
- Azure Custom Domains Documentation
- DNS Propagation Checker
- Google Search Console
- Microsoft OAuth Documentation
Happy coding, and may your domains always verify on the first try! ✨
메타데이터
- post_id
- 2e7e12f84dc4
- slug
- the-ultimate-guide-to-adding-custom-domains-in-azure-portal-without-losing-your-mind-2e7e12f84dc4
- url
- https://medium.com/@ahzem/the-ultimate-guide-to-adding-custom-domains-in-azure-portal-without-losing-your-mind-2e7e12f84dc4
- canonical_url
- https://medium.com/@ahzem/the-ultimate-guide-to-adding-custom-domains-in-azure-portal-without-losing-your-mind-2e7e12f84dc4
- author_url
- https://medium.com/@ahzem
- status
- ok
- fetched_at
- 2026-06-10 08:17:25