OpenLDAP setup on the Raspberry PI 5 with Ubuntu Server 23.10
Last time we configured a fully featured home server with the Raspberry PI 5 and Ubuntu Server 23.10. Again, we usually stick with Fedora…
OpenLDAP setup on the Raspberry PI 5 with Ubuntu Server 23.10
Photo by Alex Kotliarskyi on Unsplash
Last time we configured a fully featured home server with the Raspberry PI 5 and Ubuntu Server 23.10. Again, we usually stick with Fedora Server but since the vanilla Linux kernel has no support for the Raspberry PI 5 yet, Ubuntu will have to do. Now I wanted to try an updated OpenLDAP setup for a while now, but I just didn’t get to it. We wrote about it before, and we set it up on a Raspberry PI 4, and it did work great. But I just wanted an update.
But first, a quick recap on OpenLDAP. It is an open-source LDAP server, a tool used to configure and manage unique identities across a network. It is not generally useful in a home network, and I recommend against setting it up at home. You will get a network-wide user system, which will allow you to login to any computer in the network with the same user and have the same rights, which is interesting to say the least. This will also give you a correct way to share files with the home network over NFS, by keeping the identity and meaning of all users across the network. It is the only way to have user 1000 be the same across all computers in the network.
So, if it improves sharing, it allows login to all computers using the same users and it provides a generic way of keeping identities configured on a server, why is it bad? Or why do I not recommend it? The thing is, having a set of users in the home network configured and managed by an identity server is interesting indeed, but requires maintenance. When somebody reinstalls their operating system, it requires configuration to join the identity server again. Phones cannot connect to LDAP, so even though we have a set of users, they will only be understood by the computers.
Having a decentralized set of users, people that can manage their own rights and their own computers in a home network is sometimes easier and more profitable for everybody instead of forcing users and rights from a server, which again needs configuration and maintenance. Having said all that, sometimes it’s just something we really need, so if that is your case, strap in and let’s install OpenLDAP on the Ubuntu Server 23.10.
Configuring the server
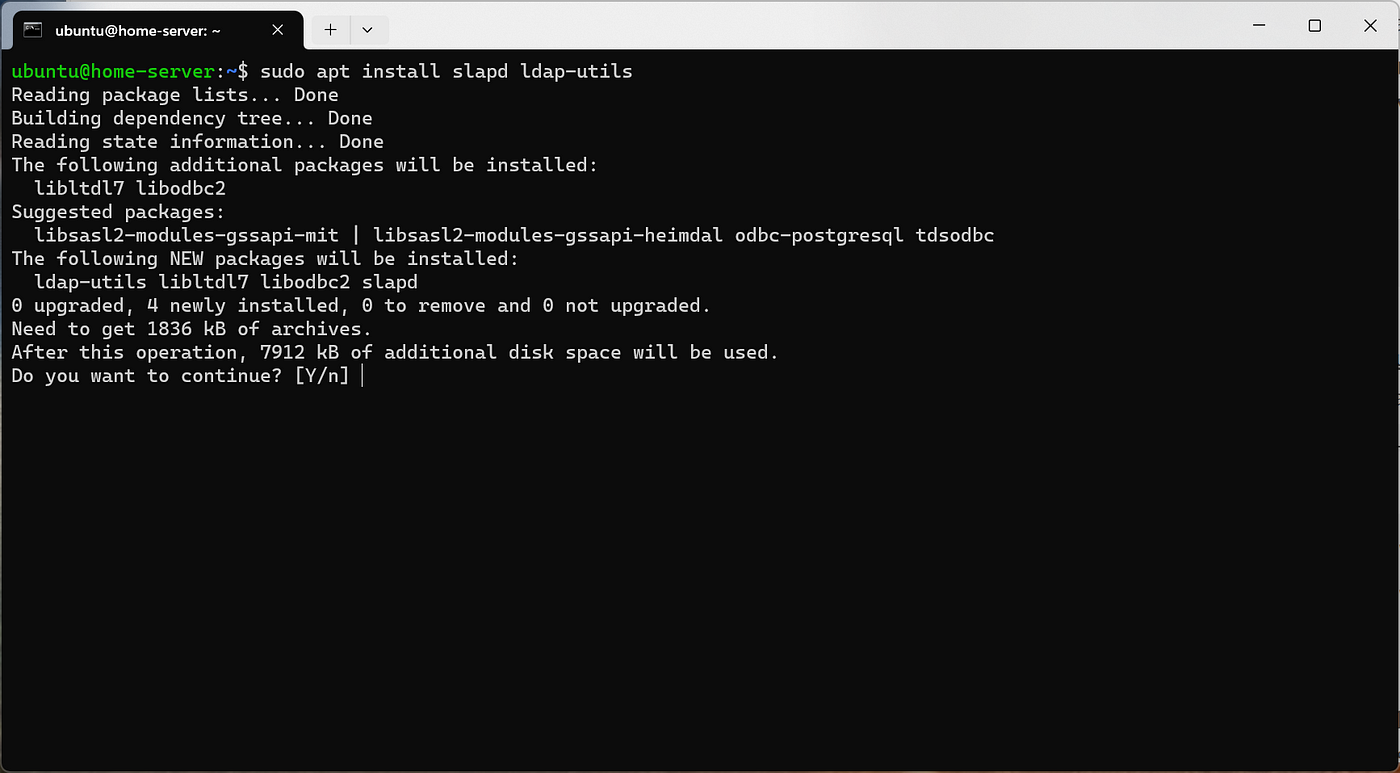
Installing OpenLDAP on the Raspberry PI 5 with Ubuntu Server 23.10
Having an identity server requires a twofold configuration: the server and the clients. The server is easy to setup and we did talk about it before: we SSH into our Raspberry PI 5 and install OpenLDAP as shown in the small screenshot above. By installing slapd, we will get to a configuration tool asking us about basic LDAP stuff, like the administrator password:

Setting up the LDAP administration password
Remember this password because we will need it later to configure LDAP. After installation, it will ask us what services we want to restart. We just keep the default selection and press Ok:

Restarting services after OpenLDAP installation
Next, we run sudo dpkg-reconfigure slapd to setup the LDAP domain name and a few other things. The first question allows us to skip the LDAP server configuration, but that’s why we are here so we select No:

The OpenLDAP configuration wizard
Next, we are asked about the DNS domain name. I usually go with home.io, but you can pick anything, and then we are asked for the organization name which should be home, without the io part:

Configuring the LDAP organization name
Then we are asked for the administrator password again:

Reconfiguring the administrator password
Next, we are asked if we want to keep the LDAP database if we remove the slapd package. If you want to keep it around, select No. I usually select Yes here because since I want to remove slapd, it means I also want a clean slate if I ever want to reinstall it:

Configuring if we want to keep the LDAP database if we remove slapd
Next, we are asked to back up the old LDAP database and we select Yes:

Backing up the old LDAP database
Adding and configuring the network users
Photo by Corinne Kutz on Unsplash
Now that OpenLDAP is configured, we need to add the network users and their rights. Last time we did that using the command line, but this time we will do it using Apache Directory Studio because it’s much easier. So, let’s grab it from the official page and run it. The application requires Java so let’s also download it from the official page. I downloaded the latest JDK, version 21 and installed it. Now we can run Apache Directory Studio:

Running Apache Directory Studio
First, we need to connect to our OpenLDAP server on the Raspberry PI 5, so we select LDAP from the menu and New Connection. This will bring up the New LDAP connection dialog, where we enter the connection name and the server’s IP address:

Entering the server connection details
We press Next and we are brought to the authentication page, where we select Simple Authentication, enter cn=admin,dc=home,dc=io as the user and the password we set before and click Next. In the next screen we we fetch the domain name by pressing the Fetch Base DN button:

Setting up the domain name
Next, we press Finish, and we press on the tiny LDAP Browser icon on the left, just below the menu:

The LDAP browser screen
We can see on the bottom left panel that we are connected to home-server, and on the left sidebar we see the LDAP tree. So, let’s add in some users. The root is the dc=home,dc=io item in the left sidebar tree. So, let’s select it:

Seeing the details of the root LDAP entry
We right click the root item and select New, which brings up the New Entry dialog. We choose to create the entry from scratch:

Creating a new LDAP entry from scratch
Next, we get to pick the object class, which is an organizational unit:

Selecting organizationalUnit as the new item class
We double click on it and click Next to configure its name:

Configuring the organizational unit’s name
We click Finish and here we are:

The people unit in the LDAP tree
Now we right click ou=people and select New Entry again, to create the first user. Again, we create a new entry from scratch, and we will assign three classes to it: inetOrgPerson, posixAccount and shadowAccount. Note that a few others will be added automatically:

Setting the entry classes for a user
We click Next and setup the username:

Setting the uid item of the new entry
We click Next and we are brought to the user configuration page. We have a few things to enter here, like the full name, the user ID, the group ID, and the home folder:

Configuring other user information
We click Finish and we are done. We can add all the network users this way, producing a tree similar to this:

The network LDAP user tree
We need a few more attributes for each user though, such as the password, the email, and the shell. We do this by selecting each user, right clicking on the attributes panel, and selecting New Attribute, and adding each one until we get this complete setup:

Adding more user attributes to each LDAP user
Configuring network sudoers
Photo by Jan Antonin Kolar on Unsplash
Now that we have the users, let’s give them automatic sudo rights. Again, we went through this before, albeit using scripts instead of a graphical user interface. We do this by creating a new organizational unit, sudoers, by right clicking on dc=home,dc=io and selecting New Entry. It will be a new entry from scratch, and the class will be organizational unit:

Creating a new organizational unit
We click Next and name it sudoers:

Naming the new organizational unit
Our LDAP tree should look like this:

The new LDAP tree, having people and sudoers
Before we add items in the sudoers branch, we need to import the sudoers LDAP schema, which will allow us to create LDAP objects that have the sudoRole class. First, we need to add a configuration admin password. We SSH on the Raspberry PI 5 server and type:
#slappasswdThis will ask us for a password, and will provide the password’s hash:

Getting the encrypted LDAP password
We copy the password hash, and we create a file called root.ldif, with the following:
dn: olcDatabase={0}config,cn=config
changetype: modify
replace: olcRootPW
olcRootPW: {SSHA}IjbYZHQ09OmNxExvhA4KioLEOLsVwZlS
Note the password hash pasted at olcRootPW. Now we run:
#sudo ldapadd -Y EXTERNAL -H ldapi:/// -f root.ldifNow that we have our configuration admin password, we can import the required sudoers schema using:
#sudo ldapadd -D cn=admin,cn=config -W -f sudoers.schema.ldifYou can grab the sudoers.schema.ldif file from my Github. Ok, now we can add LDAP entries with the sudoRole class. Back in Apache Directory Studio we right click on sudoers and create a new entry, again from scratch, and give it the sudoRole class:

The new sudoRole class is available
We give it the name radu, just like the username:

Setting the new sudoer name
This is how the new entry looks:

The new radu entry in the sudoers tree
We need to give it a few more attributes, and we do that by right clicking on the main panel and selecting New Attribute. We will add sudoCommand, sudoHost, sudoRunAsUser, sudoUserand sudoOrder:

Final configuration for the sudo user radu
As for the users, we do the same for sudoers, one for each user we grant sudo rights. We also need to add a defaults entry to configure sudo options for all sudoers:

The defaults entry in sudoers with sudoRole class
For this one we add a few sudoOption attributes and we set it the lowest sudoOrder, so it will always execute first:

The final defaults configuration
Configuring automatic mounting of network shares
Photo by Elaine Casap on Unsplash
We configured network users and we configured sudoers, but we can have one more thing automated by LDAP: mounting network shares. And yes, we have a past article about this too for those who prefer scripting.
Each time a user will login using LDAP, a set of preconfigured shares will mount automatically in a designated folder accessible to them. For that, we need a new class for some new LDAP entries, automountMap. Again, it’s not there by default, so we will need to import the AutoFS schema which you can find on my Github. Again, we connect to the Raspberry PI and run the known command by now:
#sudo ldapadd -D cn=admin,cn=config -W -f autofs.schema.ldifWe will again need to enter the configuration admin password we defined earlier, but after that we can continue our setup using Apache Directory Studio. We add again an organizational unit called automount:

The new LDAP tree, with the automount organizational unit
And in it we will add two entries having the autmountMap class: auto.direct and auto.master:

The new LDAP tree, with the new automountMap entries
And now we add our shares as entries with the automount class. The first one will be in the auto.master entry:

Note the automount information on the /- entry. It’s the URI to the LDAP server all the way to dc=home,dc=io. This will be the string AutoFS will use to find the auto.direct entry where the actual shares are. And the rest will be in the auto.direct entry:

Configuring the LDAP SMB shares with Apache Directory Studio
Note how the cn indicates the mount location on the client, and the automountInformation indicates the network share location. This way, the SMB share defined at //192.168.68.113/media will be automatically mounted at /mnt/network-storage/media when the client logs in using LDAP. We should reboot the server at this point. Also note the fstype options which configure the SMB mount to login as guest, and to mount with read and write capabilities.
Configuring the clients to login with LDAP
Photo by Micah Williams on Unsplash
That’s all for the server. As you can see, it’s an enormous amount of work which for a home network I believe is completely unjustified. Of course, once configured you can export your whole LDAP tree into a text file and import it every time you reinstall the server, but even so, taking care of schema files, two administrator passwords, and dealing with Apache Directory Studio which is not exactly the best looking and easiest setup applications possible, makes everything tough.
But anyway, the server is configured, let’s set up LDAP login on the clients. The following will have to be executed on all Linux clients in the network. As we said before, not all devices are compatible with LDAP login, mobiles specifically so. Windows can connect to Active Directory, which is an LDAP implementation, but it will probably need support software. And since Windows 11 requires a Microsoft cloud account, nobody knows what the LDAP status is there anymore. Apple computers know how to connect to LDAP, but again it’s not really used anymore since they too rely on cloud networking. But for Linux the steps are easy, and we start by installing the following:
#sudo apt install libnss-ldap libpam-ldap ldap-utils sssd libsss-sudo autofs autofs-ldap cifs-toolsWe need autofs to enable automatic mounting and it’s corresponding autofs-ldap for reading the automount information from LDAP. The same way we need libsss-sudo to read the sudoers information from LDAP. We then use sssd to read login information from LDAP, using libnss-ldap and libpam-ldap. We also installed cifs-tools to allow mounting of SMB shares. After installation, we are asked for the LDAP server address:

Entering the LDAP server address
We configure the domain name for the home network:

Entering the LDAP domain name
We select the LDAP version to use:

Selecting the LDAP version 3
We then make the local root Database admin:

We keep the default Yes here
We disable LDAP login as it’s not needed for querying:

Disabling LDAP login
We enter the admin priviledged account we created at the beginning:

Entering the LDAP admin account
And the password:

Entering the LDAP admin password
Note that the above configuration wizard is available only for Ubuntu systems. Fedora does things a bit more manually, but we will run a full OpenLDAP configuration for Fedora too in a later article. After everything is installed, we need to check a few configurations. First, we should enable automatic home folder creation by editing /etc/pam.d/common-session and adding the following line:
session optional pam_mkhomedir.so skel=/etc/skel umask=077The above will create a new home folder if it’s missing by copying the /etc/skel folder where the home folder should be. This is important because logging in with LDAP users for the first time will get you to a shell prompt without a home folder. By adding the above, if this happens, the home folder will be provided automatically on demand. We will then check /etc/nsswitch.conf to have sss added as login options:

The updated nsswitch.conf file
And finally, we configure sssd by creating the /etc/sssd/sssd.conf file with the following:
[domain/home.io]
id_provider = ldap
autofs_provider = ldap
auth_provider = ldap
chpass_provider = ldap

ldap_uri = ldap://192.168.68.113/

ldap_search_base = dc=home,dc=io
ldap_id_use_start_tls = false
ldap_tls_reqcert = allow
ldap_auth_disable_tls_never_use_in_production = true

cache_credentials = true
enumerate = true

ldap_autofs_search_base = dc=home,dc=io
ldap_autofs_map_object_class = automountMap
ldap_autofs_entry_object_class = automount
ldap_autofs_map_name = ou
ldap_autofs_entry_key = cn
ldap_autofs_entry_value = automountInformation

[sssd]
domains = home.io

[pam]
offline_credentials_expiration = 0

[nss]
homedir_substring = /home/ldap

[sudo]

[autofs]
The file will not be considered if it has the wrong rights, so let’s fix them:
#sudo chmod 600 /etc/sssd/sssd.congWe enable and start sssd:
#sudo systemctl start sssd
#sudo systemctl enable sssd
We are done. We should reboot the configured client at this point. Note that we must run the above client setup on all Linux home network clients and on the server too, so we may SSH into the server using LDAP:
#ssh radu@192.168.68.113

(radu@192.168.68.113) Password:
Creating directory '/home/ldap/radu'.
Welcome to Ubuntu 23.10 (GNU/Linux 6.5.0-1008-raspi aarch64)
Note the above automatic home folder creation. We were able to login, let’s check sudo rights:

Sudo rights all in working order
And let’s also check the automatically mounted network shares:

Showing the automounted shares in /mnt/network-storage
That’s pretty much it. Sorry for the ridiculously long article, but this is what it takes to have a fully configured LDAP server. Of course, even if you copy precisely everything written in this article, you may still encounter errors and misconfigurations particular to your setup and Linux distribution. This is my go-to configuration though and on my Ubuntu Server 23.10 it works as expected. Thank you for reading and see you next time!
메타데이터
- post_id
- 2ecf9b6b2364
- slug
- openldap-setup-on-the-raspberry-pi-5-with-ubuntu-server-23-10-2ecf9b6b2364
- url
- https://medium.com/@raduzaharia/openldap-setup-on-the-raspberry-pi-5-with-ubuntu-server-23-10-2ecf9b6b2364
- canonical_url
- https://medium.com/@raduzaharia/openldap-setup-on-the-raspberry-pi-5-with-ubuntu-server-23-10-2ecf9b6b2364
- author_url
- https://medium.com/@raduzaharia
- status
- ok
- fetched_at
- 2026-07-24 17:21:49