OpenVINO 2024.4 meets Streamlit
How to run your own local chatbot with Gemma2B-it, powered by openvino, optimum-intel and streamlit
OpenVINO 2024.4 meets Streamlit
How to run your own local chatbot with Gemma2B-it, powered by openvino, optimum-intel and streamlit
image created by the author and… powerpoint
As ugly as my headline can be, this is the truth.
This article is a tutorial, no more, no less.
You have my tips, to how to not waste time with dependencies and all kind of python&kernels nightmares… but still what you will learn is how to create a chatbot using the following:
- Gemma2B-it
- in openvino format, quantized INT4
- with a Streamlit User Interface
No more, No less.
If after this quite painful storytelling you are still reading, let’s get started!
By the way, this is going to be the result!
image by the author — after 17 minutes of article reading time
Let’s celebrate it, first
It has been only 7 weeks from the previous release and now OpenVINO 2024.4 is out. So for this tutorial we are gonna use it!
The new OpenVINO release includes:
- Support for Intel latest addition to the AIPC family — Lunar Lake and many Lunar Lake optimizations
- Lighter memory footprint on Intel Core Ultra AIPC
- Broader AI model support, including Phi3, Llama3.1, MiniCPM, YOLOX and many others.
- New notebooks to use multi-modalities: image-to-text with Phi3Vision, MiniCPMv2.6; chatbots with Gemma2 (like mine); image generation with Flux1
- Faster LLMs on Intel GPUs, thanks to XMX systolic optimizations
- OpenVINO Model Server support for OpenAI compatible APIs
- Support for Python3.12
So in this tutorial we well prove the claims, at least some of them. Not related to hardware like AIPC (I don’t have one), but we will test Gemma2–2B-it and the support for Python 3.12
Why Gemma2–2B-it? I wrote about this model in one of my previous articles, and after testing it I believe this is the best model under 3B parameters around. I will leave the link at the end of this tutorial.
I wanted to try out also the new features for the OpenAI compatible API, but the tutorial in the official page are not that intuitive to me: I will do it later on.

image from source
Why OpenVINO?
Lately OpenVINO came back to the limelight. As a framework it has been around quite a bit, but recently Intel did a great job to fill a huge existing gap.
Maybe you noticed already. Every time you want to do something in Artificial Intelligence you need CUDA — mean you need an NVidia GPU. The developers team at Intel finally created an accelerator able to use also Intel Integrated GPUs.
And the new generation of Intel chips have built in abilities hardwired to handle the heavy matrix multiplication required by AI models!
So if you are thinking about buying a new laptop, consider the AI-PC series, and you are not going to regret it!
Straight to the initial setup
The installation process with Python 3.12 on my Windows PC was super easy. Create a new project folder (mine is Gemma2b_OV_streamlit) and open a terminal window.
# Step 1: Create virtual environment
python -m venv venv
# Step 2: Activate virtual environment
venv\Scripts\activate
# Step 3: Upgrade pip to latest version
python -m pip install --upgrade pip
# Step 4: Download and install the package
pip install openvino-genai==2024.4.0
Now the missing packages are optimizations. You can find the official installation page here.
pip install optimum-intel[openvino] tiktoken streamlit==1.36.0Note that with the installation of the optimum-intel libraries, a bunch of other packages are included:
Installing collected packages: sentencepiece, pytz, ninja, mpmath, jstyleson,
grapheme, xxhash, wrapt, watchdog, urllib3, tzdata, typing-extensions,
tornado, toml, threadpoolctl, tenacity, tabulate, sympy, smmap, six,
setuptools, safetensors, rpds-py, regex, pyyaml, pyreadline3, pyparsing,
pygments, psutil, protobuf, pillow, numpy, networkx, natsort, narwhals,
multidict, mdurl, MarkupSafe, kiwisolver, joblib, idna, fsspec, frozenlist,
fonttools, filelock, dill, cycler, colorama, charset-normalizer, certifi,
cachetools, blinker, attrs, aiohappyeyeballs, about-time, yarl, tqdm, scipy,
requests, referencing, python-dateutil, pydot, pyarrow, onnx, multiprocess,
markdown-it-py, jinja2, humanfriendly, gitdb, Deprecated, contourpy, cma,
click, autograd, alive-progress, aiosignal, torch, tiktoken, scikit-learn,
rich, pydeck, pandas, matplotlib, jsonschema-specifications,
huggingface-hub, gitpython, coloredlogs, aiohttp, tokenizers, pymoo,
jsonschema, transformers, nncf, datasets, altair, streamlit, optimum,
optimum-intel
This is quite convenient, because having torch, sentencepiece, transformers and huggingface_hub already in your venv, is helping a lot if you want to exapand your AI applications.
With this we are all set, we need only to download the models.
There are several repositories in OpenVINO format for Gemma2. I am using circulus/on-gemma2–2b-it-ov-awq-int4, but any of them is ok as long as you download all the files into a subdirectory called model.
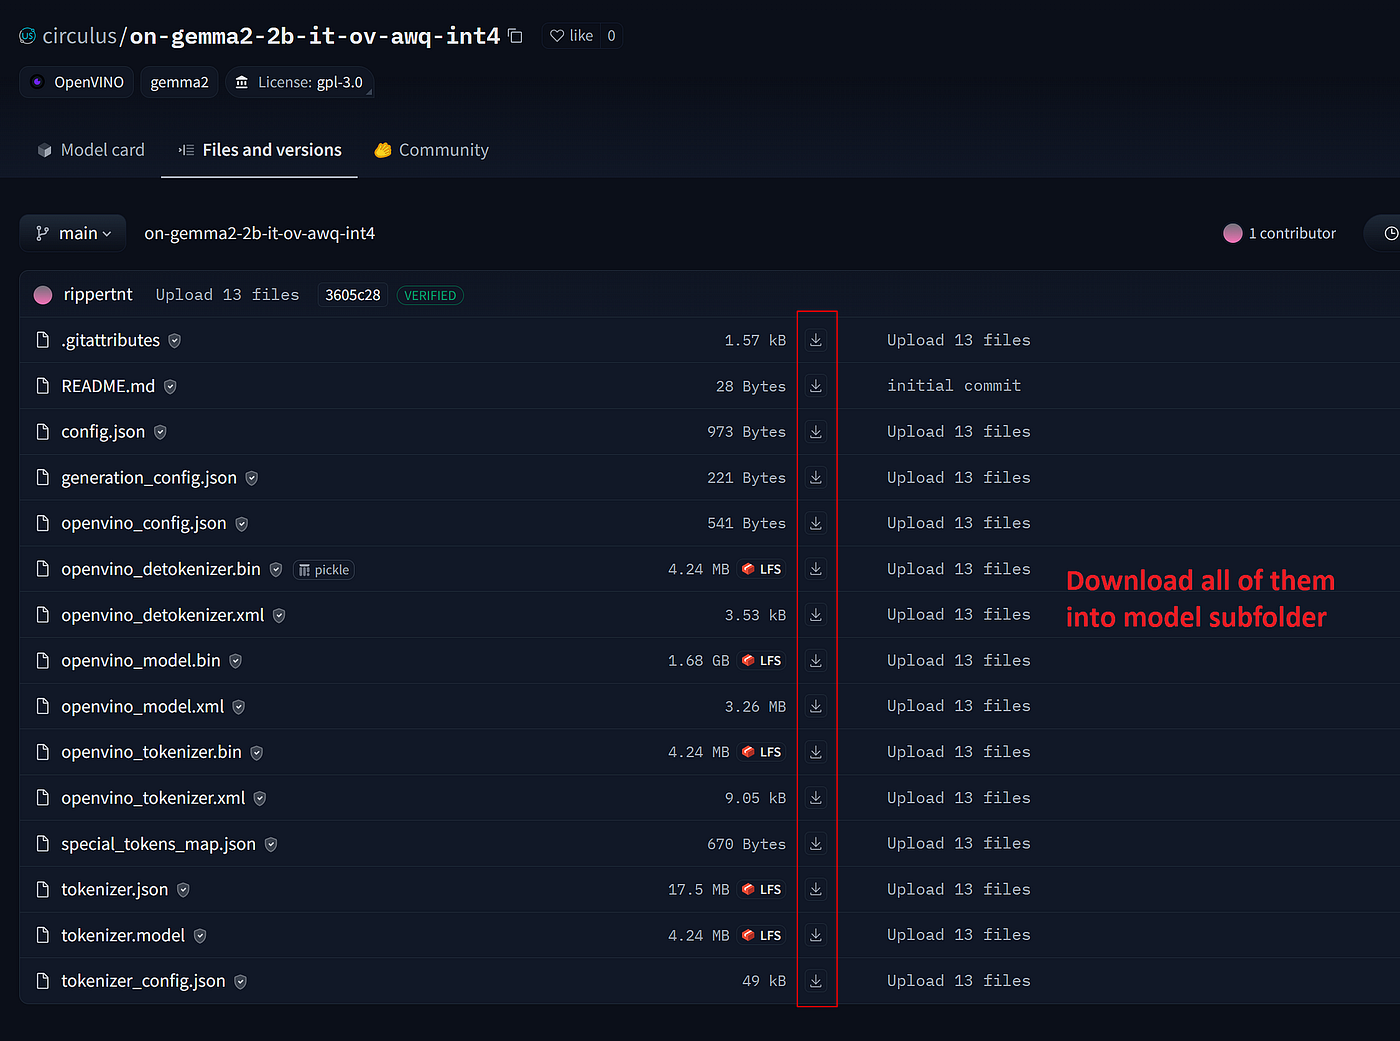
download all the files from https://huggingface.co/circulus/on-gemma2-2b-it-ov-awq-int4/tree/main
Once all the files are downloaded we are ready to start.
Create a new python file with your Code editor: mine is called stappFULL.py.
Go for the code
Let’s explore first the core of the generation process: we will deal with the graphic interface later on.
This is also a good practice: remember that first of all the logic of your code must work by itself. Only when that is done, you can move to the UI.
Our chat-bot should be able to stream out the output during the generation process. For this reason we need to use the generate()method, the only one able to deal with the TextStreamerclass. Don’t be scared, I will explain everything.
from optimum.intel.openvino import OVModelForCausalLM
from transformers import AutoTokenizer, AutoConfig
from threading import Thread
from transformers import TextIteratorStreamer
import streamlit as st
import warnings
warnings.filterwarnings(action='ignore')
import datetime
import random
import string
from time import sleep
import tiktoken
Here above we have the main imports for the app. OVModelForCausalLM is the class we need for text-generation tasks, and at the same time we will use the classic transformers Tokenizerclass and the TextStreamerfor the generation with streaming.
We always need both a tokenizer and a model. Additionally we are using a Thread. Process and threads are the basic components in OS. Process is the program under execution whereas the thread is part of process. Threads of a process can be used when same process is required multiple times. A process can consists of multiple threads.
Why do we need threads? Because Streamlit execute the program sequentially, so you may have to always wait until the end of an operation before being able to get some results. Threads run in parallel improving the application performance. And since now almost every CPU has more cores, we can assign parallel threads and let our program run without waiting the sequential conclusion of the previous part.
[embed]Streamlit and LLM are a good match
Ok so we need a tokenizer, a model and a thread to handle the text-iterator-streamer. In python with OpenVINO will be like this:
model_id = 'model' #sabre-code/gemma-2-2b-it-openvino-int4
tokenizer = AutoTokenizer.from_pretrained(model_id)
ov_model = OVModelForCausalLM.from_pretrained(
    model_id = model_id,
    device='CPU',
    ov_config={"PERFORMANCE_HINT": "LATENCY",
               "NUM_STREAMS": "1", "CACHE_DIR": ""},
    config=AutoConfig.from_pretrained(model_id)
)
#Credit to https://github.com/openvino-dev-samples/chatglm3.openvino/blob/main/chat.py
streamer = TextIteratorStreamer(tokenizer, timeout=180.0,
                                skip_prompt=True,
                                skip_special_tokens=True)
I don’t have a dedicated GPU, and my Intel chip Integrated GPU basically has 0.5Gb VRAM: since all the heavy lifting will be moved to the shared RAM we will not see an improved speed in the generation. But again, this is only to explain why I had to set device='CPU'.
Note that the streamer object does have some interesting argument, called timeout. You should carefully pick up the time there. I left it quite big (180 seconds) because Gemma2–2B does have 2.6B parameters, and if your prompt is quite long, the evaluation time of the model can take time. Basically if you take longer than 180 seconds before generating the first token, the app will throw you an error.
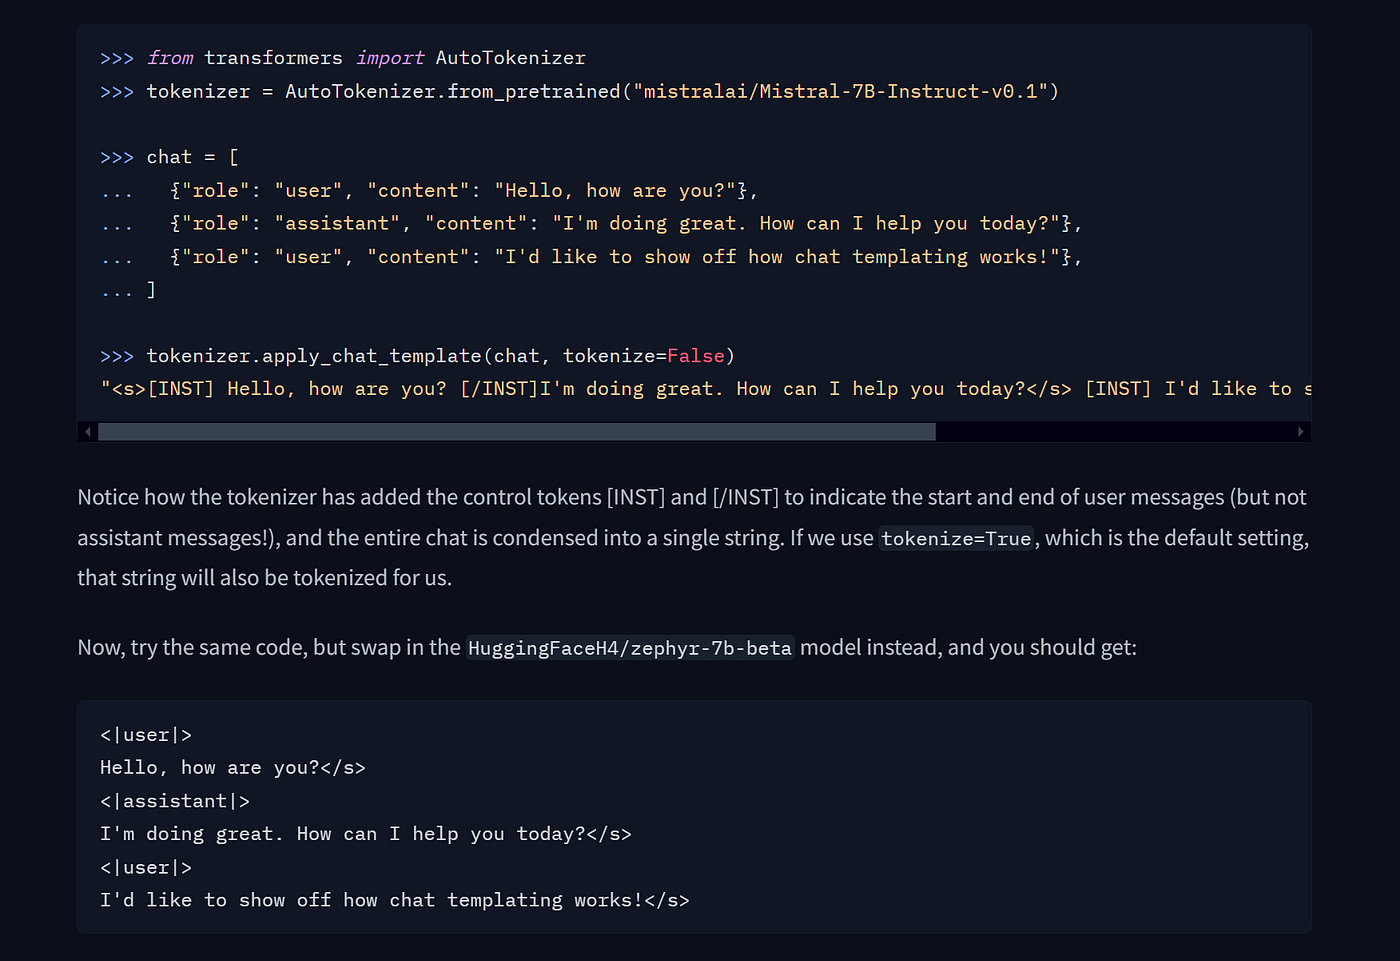
this is what the tokenizer chat template is doing! — from HuggingFace
Now you can prepare for a generation. As briefly explained before, we will need the generate() method. Anyway, we cannot pass a normal string to the model: we need first to transform it into something the LLM is able to understand.
Meet yout tokenizer! We will use it to pass the correct tokens sequence to the model, for generation. In this case, since we are leveraging a chat model, we will use the apply_chat_template() method.
conv_messages = [{"role": "user", "content": 'What is Science?'}]
full_response = ""
model_inputs = tokenizer.apply_chat_template(conv_messages,
                                            add_generation_prompt=True,
                                            tokenize=True,
                                            return_tensors="pt")
With this we can now pass it to the model, assign a thread for the text-streamer, and start the thread.
generate_kwargs = dict(input_ids=model_inputs,
                        max_new_tokens=st.session_state.maxlength,
                        temperature=st.session_state.temperature,
                        do_sample=True,
                        top_p=0.5,
                        repetition_penalty=st.session_state.repeat,
                        streamer=streamer)
t1 = Thread(target=ov_model.generate, kwargs=generate_kwargs)
t1.start()
Like this nothing will happen… Well in reality it is happening (in the back-end, the CPU thread is already processing the inputs…) but we need to expose it to the front-end to be able to see it.
start = datetime.datetime.now()
firstToken = 0
for chunk in streamer:
    if firstToken == 0:
        ttft = datetime.datetime.now() -start
        firstToken = 1
    full_response += chunk
    message_placeholder.markdown(full_response + "🟡")
    delta = datetime.datetime.now() -start
    totalseconds = delta.total_seconds()
    prompttokens = len(encoding.encode(myprompt))
    assistanttokens = len(encoding.encode(full_response))
    totaltokens = prompttokens + assistanttokens
    st.session_state.speed = totaltokens/totalseconds
    statspeed.markdown(f'💫 speed: {st.session_state.speed:.2f}  t/s')
I start counting the time (to be able to know some basic statistics, like speed, generation time, time to first token, and so on). Then we iterate over the streamer object (that is indeed an Iterator object…): for each new token in the stream we pile it up into the full_response string.
Note that I am doing a strange if:
if firstToken == 0:
        ttft = datetime.datetime.now() -start
        firstToken = 1
Here I am raising a flag before the for loop starts (firstToken=0) and then I reset it soon after the first token (the first iteration in the for loop:). I want to take the timedeltafrom the start of the generation up to the first generated token.
To show in real-time the speed of the generation I am counting, at every iteration, how many tokens have been processed (prompt + output) and the time delta in seconds: in this way I can compute the speed 😁.
And here is where we use the tiktoken library, by the way!
Well and this is it. This is the core of the generation. In my previous article we used this method for a textual interface in the terminal window.
Now we can move to the Streamlit interface.
[embed]this is how much easy is Streamlit
Streamlit interface: the easy way
Streamlit is an amazing framework. With almost no knowledge of CSS, HTML and Javascript you can build an amazing User Interface.
There are plenty of widgets (basic elements) and also a dedicated section for chat-bots. I recommend version 1.36.0 or higher.
From now on I will as well incorporate the code we discussed about together in the previous section. It will be in other functions, or directly inside the main routine. But at least now you know what they are used for!
from optimum.intel.openvino import OVModelForCausalLM
from transformers import AutoTokenizer, AutoConfig
from threading import Thread
from transformers import TextIteratorStreamer
import streamlit as st
import warnings
warnings.filterwarnings(action='ignore')
import datetime
import random
import string
from time import sleep
import tiktoken

# for counting the tokens in the prompt and in the result
#context_count = len(encoding.encode(yourtext))
encoding = tiktoken.get_encoding("cl100k_base")

modelname = "Gemma2-2B-it"
model_id = 'model' #https://huggingface.co/circulus/on-gemma2-2b-it-ov-awq-int4/tree/main
Here we have basically the main imports. We are also defining the encoding object: we will call it every time we want to count the tokens in a string. The last 2 variables are to be used for logs and for the model/tokenizer (model_id is basically the model path).
# Set the webpage title
st.set_page_config(
    page_title=f"Your LocalGPT ✨ with {modelname}",
    page_icon="🌟",
    layout="wide")

if "hf_model" not in st.session_state:
    st.session_state.hf_model = "Gemma2-2B-it"
# Initialize chat history for the LLM
if "messages" not in st.session_state:
    st.session_state.messages = []
The first streamlit action must always be the page config. After that we begin our session states variables initialization.
Session_states in Streamlit are variables that are not reset at every re-run of the application. This is quite the important topic to understand: every time there is a change in a widget (means an interactive object) in the app, streamlit run again from top to bottom the entire code. If we don’t store some values in session_states everything will be set to the initial default values.
# Initialize the ChatMEssages for visualization only
if "chatMessages" not in st.session_state:
    st.session_state.chatMessages = []

if "repeat" not in st.session_state:
    st.session_state.repeat = 1.35

if "temperature" not in st.session_state:
    st.session_state.temperature = 0.1

if "maxlength" not in st.session_state:
    st.session_state.maxlength = 500

if "speed" not in st.session_state:
    st.session_state.speed = 0.0

if "numOfTurns" not in st.session_state:
    st.session_state.numOfTurns = 0

if "maxTurns" not in st.session_state:
    st.session_state.maxTurns = 5  #must be odd number, greater than equal to 5
As you can see, there are quite a few of them. Some are going to be linked to widgets (sliders or text), the others can be considered as global variables, shared across the app.
def writehistory(filename,text):
    with open(filename, 'a', encoding='utf-8') as f:
        f.write(text)
        f.write('\n')
    f.close()

def genRANstring(n):
    """
    n = int number of char to randomize
    """
    N = n
    res = ''.join(random.choices(string.ascii_uppercase +
                                string.digits, k=N))
    return res
For convenience I also created 2 functions. The first one is used to automate the process of writing the chat logs into a text file. It is a basic file operation in python.
The second one is a function that generate a random n number of characters to append to the log filename. In this way even if we run multiple times the app, we are not overwriting existing log files.
@st.cache_resource
def create_chat():
        tokenizer = AutoTokenizer.from_pretrained(model_id)
        ov_model = OVModelForCausalLM.from_pretrained(
            model_id = model_id,
            device='CPU',
            ov_config={"PERFORMANCE_HINT": "LATENCY", "NUM_STREAMS": "1", "CACHE_DIR": ""},
            config=AutoConfig.from_pretrained(model_id)
        )
        #Credit to https://github.com/openvino-dev-samples/chatglm3.openvino/blob/main/chat.py
        streamer = TextIteratorStreamer(tokenizer, timeout=60.0, skip_prompt=True, skip_special_tokens=True)
        return tokenizer,ov_model,streamer

@st.cache_resource
def countTokens(text):
    encoding = tiktoken.get_encoding("cl100k_base") #context_count = len(encoding.encode(yourtext))
    numoftokens = len(encoding.encode(text))
    return numoftokens
Meet the cache resource. Streamlit runs your script from top to bottom at every user interaction or code change. This execution model makes development super easy. But it comes with two major challenges:
- Long-running functions run again and again, which slows down your app.
- Objects get recreated again and again, which makes it hard to persist them across reruns or sessions.
But don’t worry! Streamlit lets you tackle both issues with its built-in caching mechanism. Caching stores the results of slow function calls, so they only need to run once. This makes your app much faster and helps with persisting objects across reruns. Cached values are available to all users of your app. If you need to save results that should only be accessible within a session, use Session State instead (we already discussed about them).
In our case we are using @st.cache_resource. To cache a function in Streamlit, you must decorate it with one of two decorators (st.cache_data or st.cache_resource).
st.cache_datais the recommended way to cache computations that return data: loading a DataFrame from CSV, transforming a NumPy array, querying an API, or any other function that returns a serializable data object (str, int, float, DataFrame, array, list, …). It creates a new copy of the data at each function call, making it safe against mutations and race conditions. The behavior ofst.cache_datais what you want in most cases – so if you're unsure, start withst.cache_dataand see if it works!st.cache_resourceis the recommended way to cache global resources like ML models or database connections – unserializable objects that you don't want to load multiple times. Using it, you can share these resources across all reruns and sessions of an app without copying or duplication. Note that any mutations to the cached return value directly mutate the object in the cache (more details below).
Since we are caching a Language Model, its tokenizer and the iterator object, we go for the st.cache_resource.
You may have noticed that the def create_chat()basically use the code explained in the previous section to load all the elements required for OpenVINO inference.
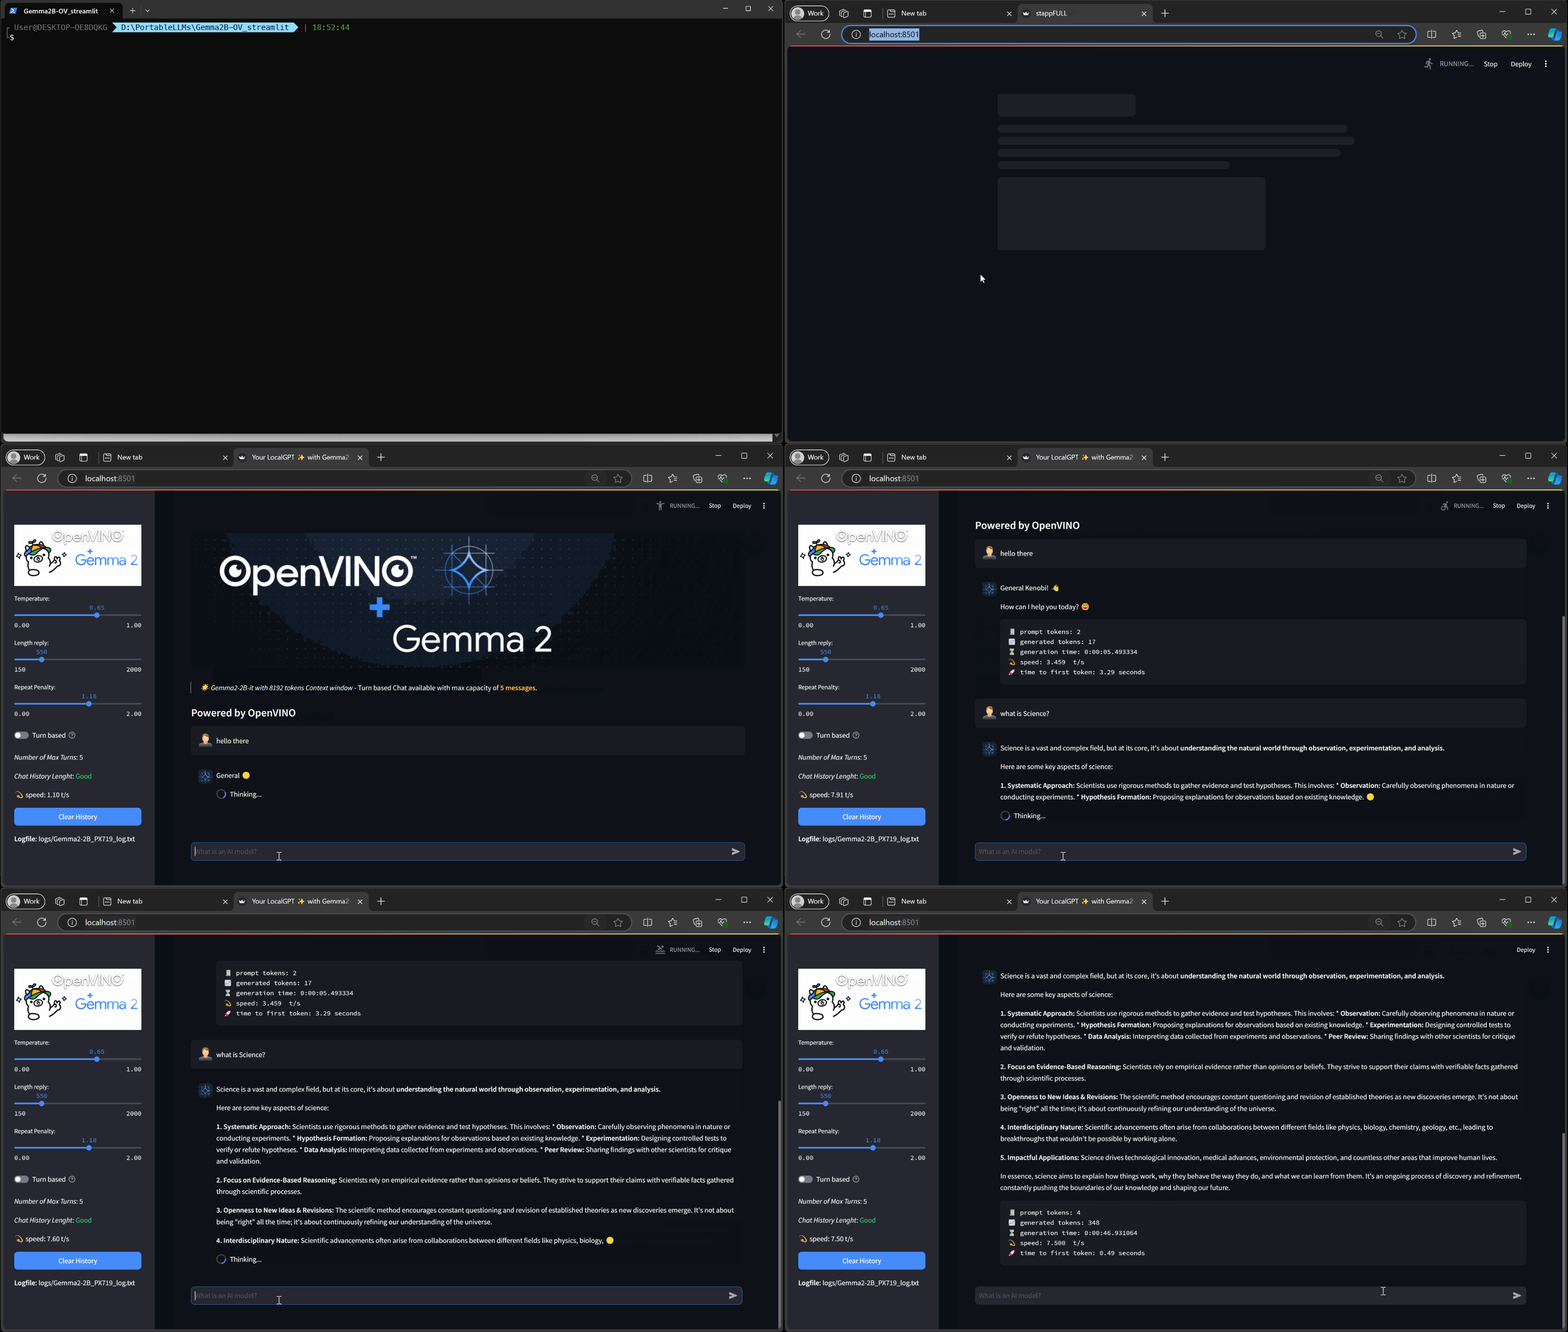
keep going — we are almost there!
Now that we have the functions too, we make sure that in the first run we create the log-file and same its name in the session_state:
# create THE SESSIoN STATES
if "logfilename" not in st.session_state:
## Logger file
    logfile = f'logs/Gemma2-2B_{genRANstring(5)}_log.txt'
    st.session_state.logfilename = logfile
    #Write in the history the first 2 sessions
    writehistory(st.session_state.logfilename,f'{str(datetime.datetime.now())}\n\nYour own LocalGPT with 🌀 {modelname}\n---\n🧠🫡: You are a helpful assistant.')
    writehistory(st.session_state.logfilename,f'🌀: How may I help you today?')
From now on do not be intimidated: there will be many lines of code, but nothing too complicated. If you are worried about getting lost, I created a GitHub repository with all the files and code:
In your main project directory, create 2 more sub-folder: one will contain the supporting images (/images) and the other is for the log files (/logs).
Let’s continue.
#AVATARS
av_us = 'images/user.png' # './man.png' #"🦖" #A single emoji, e.g. "🧑💻", "🤖", "🦖". Shortcodes are not supported.
av_ass = 'images/assistant2.png' #'./robot.png'
nCTX = 8192
### START STREAMLIT UI
# Create a header element
st.image('images/Gemma-2-Banner.original.png',use_column_width=True)
mytitle = f'> *🌟 {modelname} with {nCTX} tokens Context window* - Turn based Chat available with max capacity of :orange[**{st.session_state.maxTurns} messages**].'
st.markdown(mytitle, unsafe_allow_html=True)
st.markdown(f'#### Powered by OpenVINO')We assign the correct icons and images to the user and assistant chatbox. Then we prepare the header and some nice text on the top of the main area. Here below the explanation… visually
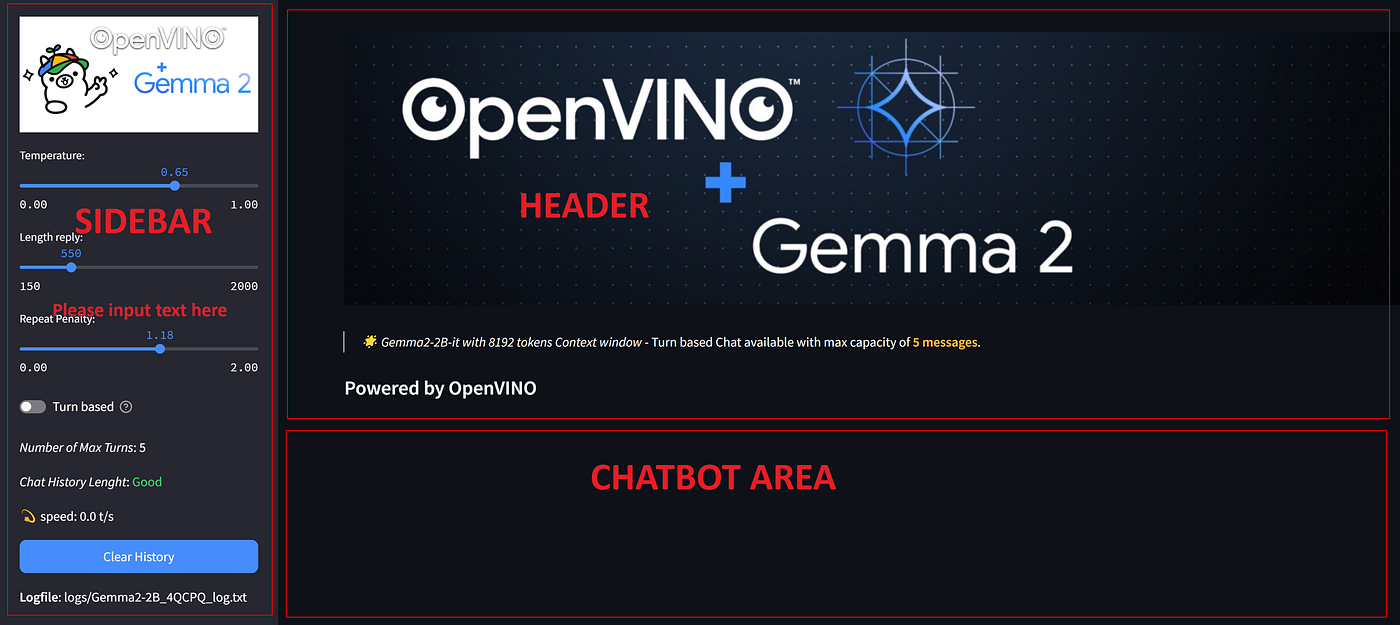
layout of the User Interface
Let’s prepare the sidebar and the main chat area: the user and assistant conversations are saved in a session_state list of dictionaries, following the standard chat_template format. At every re-run streamlit goes over the list and render all the messages, using the avatars to beautify it a little.
# CREATE THE SIDEBAR
with st.sidebar:
    st.image('images/banner.png', use_column_width=True)
    st.session_state.temperature = st.slider('Temperature:', min_value=0.0, max_value=1.0, value=0.65, step=0.01)
    st.session_state.maxlength = st.slider('Length reply:', min_value=150, max_value=2000,
                                           value=550, step=50)
    st.session_state.repeat = st.slider('Repeat Penalty:', min_value=0.0, max_value=2.0, value=1.176, step=0.02)
    st.session_state.turns = st.toggle('Turn based', value=False, help='Activate Conversational Turn Chat with History',
                                       disabled=False, label_visibility="visible")
    st.markdown(f"*Number of Max Turns*: {st.session_state.maxTurns}")
    actualTurns = st.markdown(f"*Chat History Lenght*: :green[Good]")
    statspeed = st.markdown(f'💫 speed: {st.session_state.speed}  t/s')
    btnClear = st.button("Clear History",type="primary", use_container_width=True)
    st.markdown(f"**Logfile**: {st.session_state.logfilename}")

tokenizer,ov_model,streamer = create_chat()

# Display chat messages from history on app rerun
for message in st.session_state.chatMessages:
    if message["role"] == "user":
        with st.chat_message(message["role"],avatar=av_us):
            st.markdown(message["content"])
    else:
        with st.chat_message(message["role"],avatar=av_ass):
            st.markdown(message["content"])
The main section starts now. We check a new prompt from the user: if the user message is submitted, we immediately render it in the chat-bot area and prepare it for the generation:
# Accept user input
if myprompt := st.chat_input("What is an AI model?"):
    # Add user message to chat history
    st.session_state.messages.append({"role": "user", "content": myprompt})
    st.session_state.chatMessages.append({"role": "user", "content": myprompt})
    st.session_state.numOfTurns = len(st.session_state.messages)
    # Display user message in chat message container
    with st.chat_message("user", avatar=av_us):
        st.markdown(myprompt)
        usertext = f"user: {myprompt}"
        # Save the prompt in the logfile
        writehistory(st.session_state.logfilename,usertext)
Note that we are using 2 different lists. One is used as a global chat history, to render the entire conversations. The second one st.session_state_chatMessages is used only for the generation. In fact, to avoid overflowing the maximum context window of the model (8192 tokens) we trim the conversation after 5 turns. This is a common practice: keep the last conversation history only, trimming starting from the bottom.
The code below does exactly this operation: while preparing the generation, it first check the length of the conversation history and then decide if to keep it all or trim it.
    # Display assistant response in chat message container
    with st.chat_message("assistant",avatar=av_ass):
        message_placeholder = st.empty()
        with st.spinner("Thinking..."):
            start = datetime.datetime.now()
            response = ''
            conv_messages = []
            if st.session_state.turns:
                if st.session_state.numOfTurns > st.session_state.maxTurns:
                    conv_messages = st.session_state.messages[-st.session_state.maxTurns:]
                    actualTurns.markdown(f"*Chat History Lenght*: :red[Trimmed]")
                else:
                    conv_messages = st.session_state.messages
            else:
                conv_messages.append(st.session_state.messages[-1])
Next comes the generatio call. This part shoud not be a surprise for you, at least not anymore. We are simply adding some graphic elements, following the streamlit best practices.
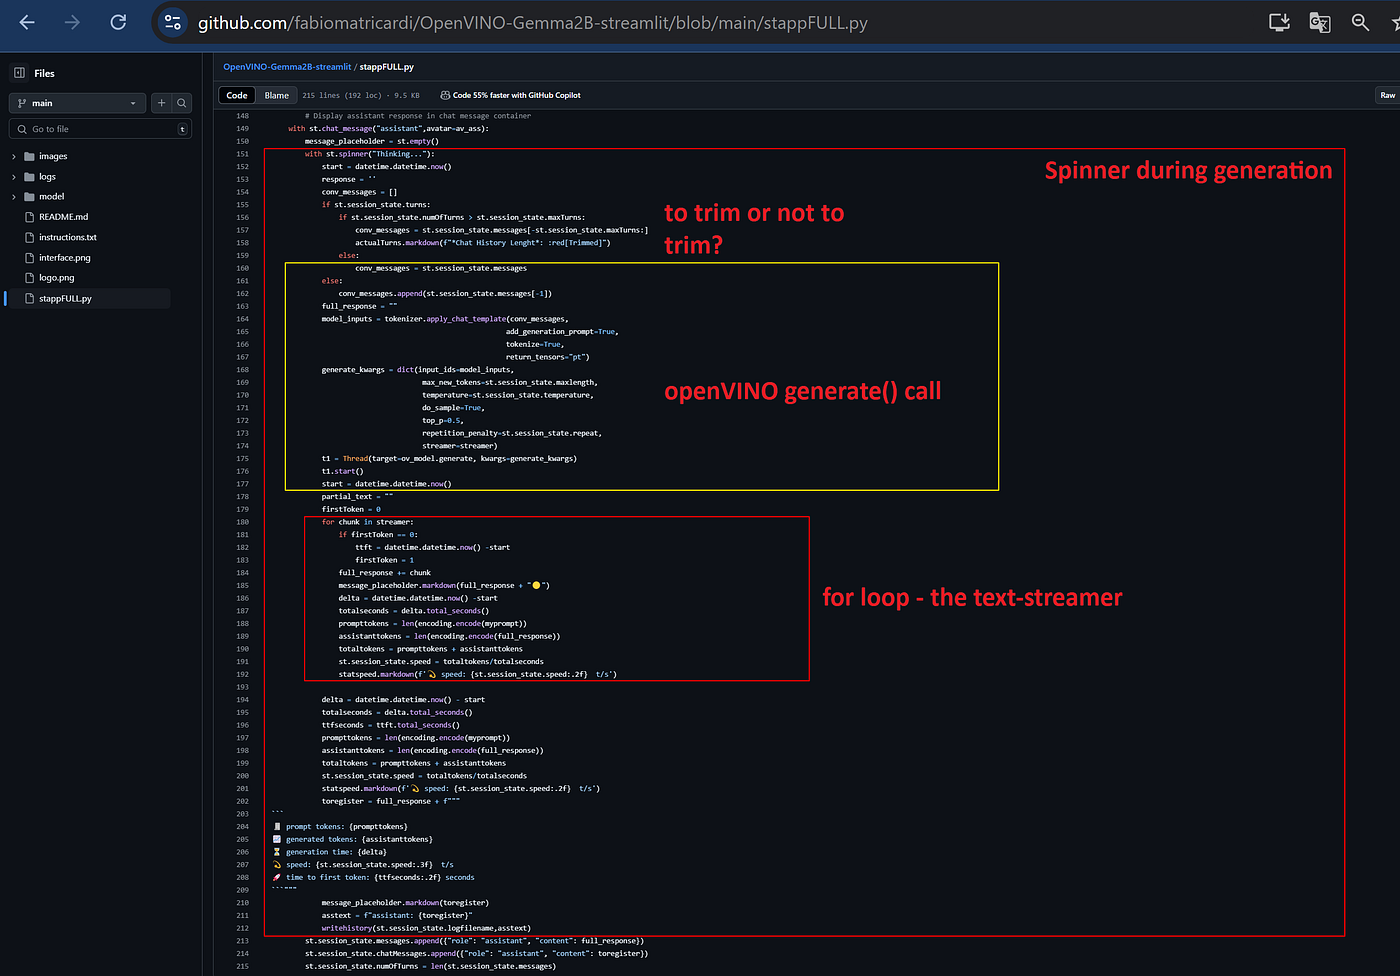
structure — to not get lost…
Note that I am keeping the indentation, so you will not mess up with a copy/paste.
            full_response = ""
            model_inputs = tokenizer.apply_chat_template(conv_messages,
                                                        add_generation_prompt=True,
                                                        tokenize=True,
                                                        return_tensors="pt")
            generate_kwargs = dict(input_ids=model_inputs,
                                    max_new_tokens=st.session_state.maxlength,
                                    temperature=st.session_state.temperature,
                                    do_sample=True,
                                    top_p=0.5,
                                    repetition_penalty=st.session_state.repeat,
                                    streamer=streamer)
            t1 = Thread(target=ov_model.generate, kwargs=generate_kwargs)
            t1.start()
            start = datetime.datetime.now()
            partial_text = ""
            firstToken = 0
            for chunk in streamer:
                if firstToken == 0:
                    ttft = datetime.datetime.now() -start
                    firstToken = 1
                full_response += chunk
                message_placeholder.markdown(full_response + "🟡")
                delta = datetime.datetime.now() -start
                totalseconds = delta.total_seconds()
                prompttokens = len(encoding.encode(myprompt))
                assistanttokens = len(encoding.encode(full_response))
                totaltokens = prompttokens + assistanttokens
                st.session_state.speed = totaltokens/totalseconds
                statspeed.markdown(f'💫 speed: {st.session_state.speed:.2f}  t/s')
        # The generation is completed - we prepare the final render and log
            delta = datetime.datetime.now() - start
            totalseconds = delta.total_seconds()
            ttfseconds = ttft.total_seconds()
            prompttokens = len(encoding.encode(myprompt))
            assistanttokens = len(encoding.encode(full_response))
            totaltokens = prompttokens + assistanttokens
            st.session_state.speed = totaltokens/totalseconds
            statspeed.markdown(f'💫 speed: {st.session_state.speed:.2f}  t/s')
There should be nothing new here a part from the statspeed.markdown() thing. Well, in streamlit there is a convenient way to replace existing text or values in a widget. Once you have declared it, assigning a name to it, you can call it from whatever place in the program.
statspeedis an element in the sidebar: at every token we are updating the value with the new calculated speed. Is the same way, at the end of the for loop, we calculate the entire generation speed (prompt+reply).
# statistics to append to the user message and the log
            toregister = full_response + f"""
🧾 prompt tokens: {prompttokens} 📈 generated tokens: {assistanttokens} ⏳ generation time: {delta} 💫 speed: {st.session_state.speed:.3f} t/s 🚀 time to first token: {ttfseconds:.2f} seconds
            message_placeholder.markdown(toregister)
            # string for the log file
            asstext = f"assistant: {toregister}"
            writehistory(st.session_state.logfilename,asstext)
        st.session_state.messages.append({"role": "assistant", "content": full_response})
        st.session_state.chatMessages.append({"role": "assistant", "content": toregister})
        st.session_state.numOfTurns = len(st.session_state.messages)
Here we prepare the text for the chat history. Note that in the messages we append only the full_response( that does not contain all the statistics): in the chatMessages, instead, we include also the KPIs collected in the toregister string.
We have to do this, otherwise in the next generation call, our Gemma2–2B will evaluate in the prompt also the statistics text… and believe me that is going to mess up the model!
Save the file, and with the venv activated, in the terminal run:
streamlit run .\stappFULL.pyConclusions
Hope it was enjoyable, and only a little boring. In this tutorial I tried to uncover some little secrets and tips you hardly find elsewhere.
If you came up to the hand… BRAVO!
For now here again, in case you missed, the GitHub repo
If this story provided value and you wish to show a little support, you could:
- Clap a lot of times for this story
- Highlight the parts more relevant to be remembered (it will be easier for you to find them later, and for me to write better articles)
- Join my totally free weekly Substack newsletter here
- Sign up for a Medium membership ($5/month to read unlimited Medium stories)
- Follow me on Medium
- Read my latest articles https://medium.com/@fabio.matricardi
Here are a few more articles to feed your curiosity:
Referenced Sources:
[embed]Google’s Gemma2-2B, A Compression Marvel How to Build a Small Titanpub.towardsai.net

This story is published on Generative AI. Connect with us on LinkedIn and follow Zeniteq to stay in the loop with the latest AI stories.
Subscribe to our newsletter and YouTube channel to stay updated with the latest news and updates on generative AI. Let’s shape the future of AI together!

메타데이터
- post_id
- 31a8ef1e13d1
- slug
- openvino-2024-4-meets-streamlit-31a8ef1e13d1
- url
- https://generativeai.pub/openvino-2024-4-meets-streamlit-31a8ef1e13d1
- canonical_url
- https://generativeai.pub/openvino-2024-4-meets-streamlit-31a8ef1e13d1
- author_url
- https://medium.com/@fabio.matricardi
- status
- ok
- fetched_at
- 2026-07-31 18:50:38