Installing and understanding Calico on a Kubernetes Cluster.
Author: Marie F. from Kubway
Installing and understanding Calico on a Kubernetes Cluster.
Author: Marie F. from Kubway
Stage 2 of 3 in the “Creating a mixed cluster Kubernetes with kubeadm” journey.
Introduction
This story explain how to install and understand Calico in a Kubernetes cluster as a CNI (Container Network Interface). You can read this story as a single one but if you enjoy, I invite you to a complete journey where the final destination is a Kubernetes mixed cluster with Linux and Windows nodes and pods.
The first stage of the journey was to install a Kubernetes cluster with a linux controller node. That second one is about installing Calico as a CNI in default mode which is VXLAN mode with a particular focus on how pod IPs are assigned. The third and last one will be to add a Windows Worker node in the Kubernetes cluster.
Pre-requisites and objectives
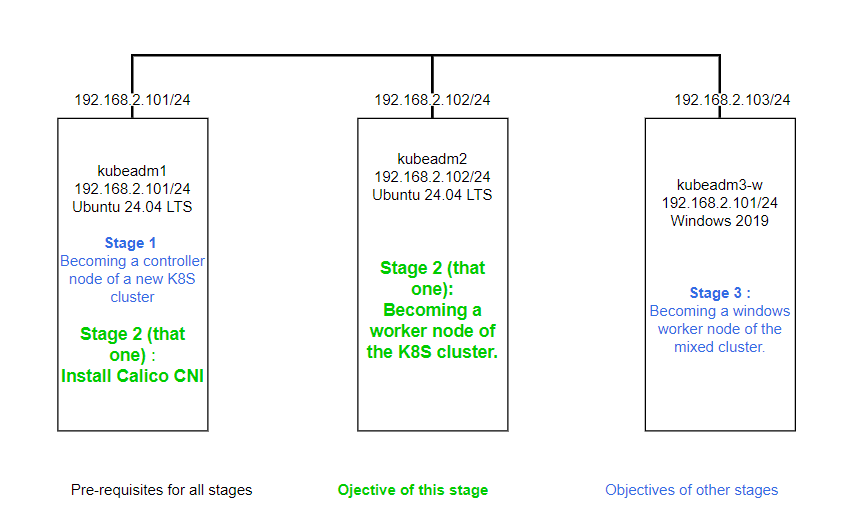
In this stage, we need the single node node cluster version 1.31.0 we installed in stage 1 and a second fresh installed linux virtual machine.
We will install now Calico version 3.30.0 as a CNI and then use the second fresh installed linux virtual machine to add a linux worker node to the Kubernetes cluster.
Installing Calico
CALICO_VERSION=3.30.0 # Choose one there https://github.com/projectcalico/calico/tags
# Operator installation
kubectl create -f https://raw.githubusercontent.com/projectcalico/calico/v$CALICO_VERSION/manifests/tigera-operator.yaml
# Get model for creating custom resources
curl  https://raw.githubusercontent.com/projectcalico/calico/v$CALICO_VERSION/manifests/custom-resources.yaml -O
Customize custom-resources with your own values. Take care especially to choose a cidr ipPools for the pods (10.245.0.0/24 in my example) within the pod-network-cidr you select when you create the cluster (10.245.0.0/16 in my example). Calico IP pools are ranges of IP addresses that Calico uses to assign to pods. Otherwise, ipPool will not be create and you will have an error message “waiting for enabled IP pool to be created” in the installations.operator.tigera.io CRD you have created.
Encapsulation supported values are “IPIPCrossSubnet”, “IPIP”, “VXLAN”, “VXLANCrossSubnet” and “None”. You can leave “VXLANCrossSubnet” which is the default. Because in our lab, both nodes are on the same subnet, there will never be encapsulation. You can change without any difference to “None” and if you want to force encapsulation even in the subnet to have a look on how VXLAN works, you can change to “VXLAN”.
# Change cidr ipPools
sudo sed -i 's+192.168.0.0/16+10.245.0.0/24+' custom-resources.yaml
# Remove encapsulation configuration no "None" if you like.
sudo sed -i 's+encapsulation: VXLANCrossSubnet+encapsulation: None+' custom-resources.yaml
# Force Vxlan encapsulation even within the Subnet if you like too.
sudo sed -i 's+encapsulation: VXLANCrossSubnet+encapsulation: VXLAN+' custom-resources.yaml
If you change only cidr ipPools, custom-resources.yaml file will be that one. You can notice blocksize 26 too, which means than every node in the cluster will get a /26 mask for its local pods.
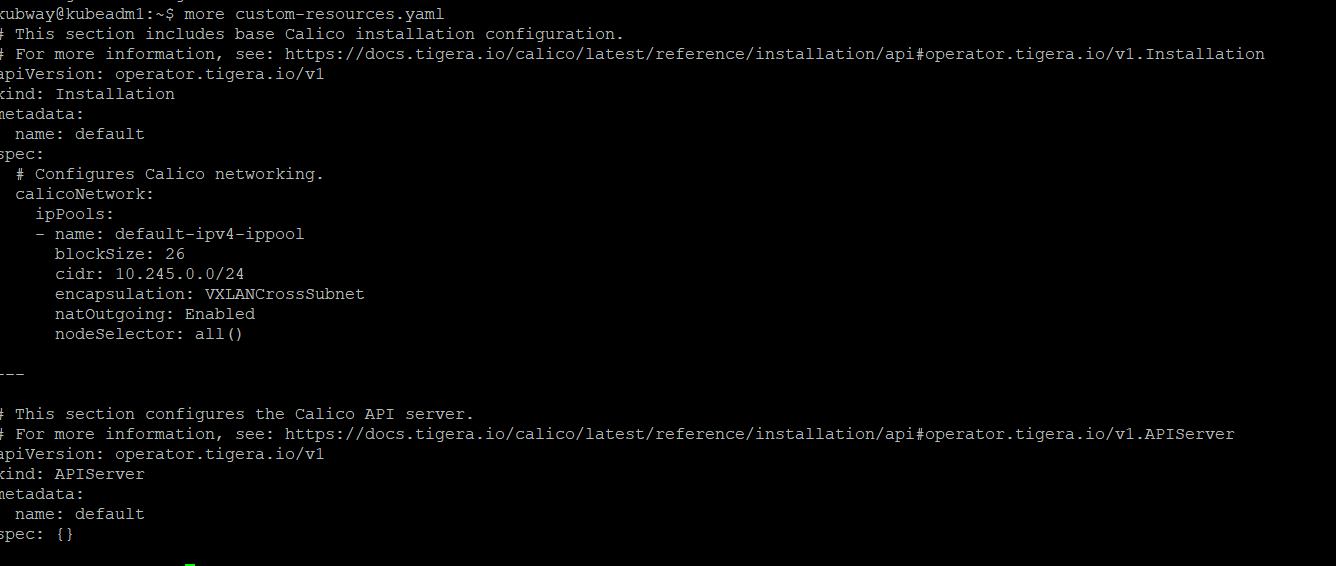
You can then apply the yaml file.
k apply -f custom-resources.yamland then wait for the pods becomes ready
watch kubectl get pods -n calico-systemYour first node on the cluster is now ready and the pods which are not statics becomes ready.

Because in this configuration, we don’t use BGP, we can disable it.
kubectl patch installation default --type=merge -p '{"spec": {"calicoNetwork": {"bgp": "Disabled"}}}'You can also see the calico ippool which has been created for the controler node.

Installing calicoctl
calicoctl is a cli tool for configuring Calico.
# Install calicoctl
curl -L https://github.com/projectcalico/calico/releases/download/v3.28.1/calicoctl-linux-amd64 -o calicoctl
chmod +x ./calicoctl
sudo mv ./calicoctl /usr/local/bin/
You can already use calicoctl to show calico ipam configuration , note the strictAffinity value, we will have to change it before installing the Windows worker node. You can watch also IP Pools and the first Block which has been created for this first cluster node.
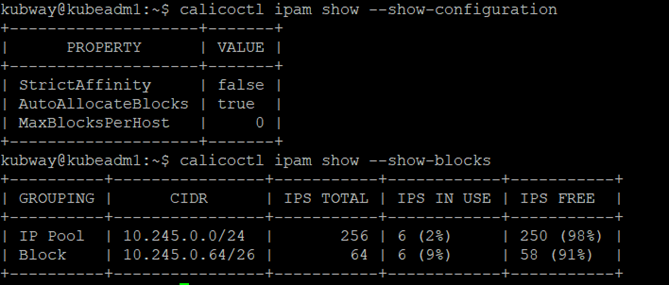
At this time, we have only one node on the cluster and it is a controler. So, if we want to run a pod on that node without adding “node-role.kubernetes.io/control-plane” toleration, we should untaint the node. In this case, the new pod will get an IP from IP Pool/ Block. Let’s go further and create a linux worker node first.
k taint node kubeadm1 node-role.kubernetes.io/control-plane-Installing a linux worker node
When we had created the controller node, we get a join command with a token to add other nodes. If you lost it, you can generate a new one on the controller node kubeadm1.
kubeadm token create --print-join-commandExecute the command you get on the fresh installed linux kubeadm2 you have as a pre-requisite.
sudo kubeadm join 192.168.1.101:6443 --token 3vrzj3**********61pm --discovery-token-ca-cert-hash sha256:41730054******82dd3f8860Note that because calico-node is a daemonset, you don’t have to install calico on it, a pod is automatically created on it. So the linux worker node becomes Ready.

You can notice with “calicoctl ipam show — show-blocks” that there is a new block for this secondary node.
Conclusion
That ends the second part with the success of having a Kubernetes cluster with 2 Ready linux nodes. The third and last one will be to add a Windows worker node in the cluster.
References
메타데이터
- post_id
- 337fa7cd8ba2
- slug
- installing-and-understanding-calico-on-a-kubernetes-cluster-337fa7cd8ba2
- url
- https://medium.com/@Kubway/installing-and-understanding-calico-on-a-kubernetes-cluster-337fa7cd8ba2
- canonical_url
- https://medium.com/@Kubway/installing-and-understanding-calico-on-a-kubernetes-cluster-337fa7cd8ba2
- author_url
- https://medium.com/@Kubway
- status
- ok
- fetched_at
- 2026-06-17 12:55:42





