The Easiest Guide to Send and Receive SMS with Jasmin SMS Gateway: MT & MO Explained
So this is my first experience in writing an article in the medium, and in the last years i have got so much experience
The Easiest Way to Send & Receive SMS (MT & MO) Using Jasmin Gateway
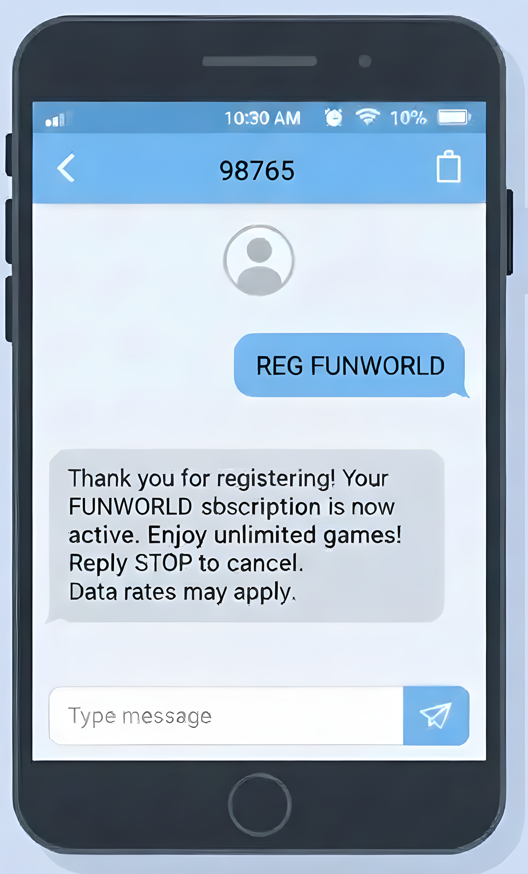
Real-world case of sending (MT) and receiving (MO) message.
Over the past year, I’ve been working at a VAS company and gaining hands-on experience in the world of telecommunications. I’ve learned many things here and one area I’ve focused on a lot is SMS messaging.
Have you ever wondered how developers send SMS to users’ phones or receive messages from them? If so, you’re in the right place. In this article, we’ll walk through the easiest ways to set up **Jasmin SMS Gateway** for both sending (MT) and receiving (MO) messages. You’ll get step-by-step instructions, and a very simple simulation so you can see it in action right away. By the end, you’ll have a fully working SMS system ready for testing and experimentation.
Important Requirements!
Before you proceed, make sure you have fulfilled the following requirements — otherwise, this tutorial will not work!
- Access to the Operator: The operator will provide you with private credentials so you can connect to their SMSC (Short Message Service Center).
- Whitelisted Server IP: Your staging or production server must be whitelisted by the operator to perform SMS request. So you need to do this tutorial in your live server.
- Registered Short Code (SDC): SDC is a service short code provided and owned by the operator (eg., 98765, 95545, etc.). It must be registered and routed by the operator before any MO or MT traffic can reach our system.
- MSISDN (phone number) compatible with the operator: For testing, we must use an MSISDN that is recognized or issued by the operator.
Table of Contents
- Installation
- Connect to Jasmin using Telnet
- Adding SMPP Connection
- Configure MTRouter
- Adding Custom HTTP Connection
- Configure MORouter
- Create Group
- Create User
- Add API Handler
- Testing
- Conclusion
Installation

Jasmin — Open source SMS gateway
We won’t dive deep into explaining every part of the architecture. Instead, let’s focus on installing Jasmin. The easiest way to get started is by using **Docker. I assume docker already installed on your server. Create a docker-compose.yml file, and make sure to include [Redis](https://redis.io) and [RabbitMQ](https://www.rabbitmq.com) **since both are required for Jasmin to run.
version: "3.10"

services:
  redis:
    container_name: redis
    image: redis:alpine
    restart: unless-stopped
    healthcheck:
      test: redis-cli ping | grep PONG
    ports:
    - "6379:6379"
    deploy:
      resources:
        limits:
          cpus: '0.2'
          memory: 128M
    security_opt:
      - no-new-privileges:true

  rabbitmq:
    container_name: rabbitmq
    image: rabbitmq:3.10-management-alpine
    restart: unless-stopped
    healthcheck:
      test: rabbitmq-diagnostics -q ping
    ports:
    - "5672:5672"
    deploy:
      resources:
        limits:
          cpus: '0.5'
          memory: 525M
    security_opt:
      - no-new-privileges:true

  jasmin:
    container_name: jasmin
    image: jookies/jasmin:latest
    restart: unless-stopped
    ports:
      - 2775:2775
      - 8990:8990
      - 1401:1401
    depends_on:
      redis:
        condition: service_healthy
      rabbitmq:
        condition: service_healthy
    environment:
      REDIS_CLIENT_HOST: redis
      AMQP_BROKER_HOST: rabbitmq
    deploy:
      resources:
        limits:
          cpus: '1'
          memory: 256M
    security_opt:
      - no-new-privileges:true
after the container created, run it:
docker-compose up -dYou should now see that the containers are running successfully.
Remember: In this tutorial, we’re not mounting the Jasmin volumes. This means that if the container is restarted, any existing configuration (users, groups, routes, connectors, etc.) will be lost. If you decide to mount the Jasmin volumes, you need an additional configuration. you can refer to the official documentation **here**.

Connect to Jasmin using Telnet
Great!
Now connect to your staging server using SSH, then run the command below to access Telnet. Port **8990** is the default port used by Jasmin.
telnet 127.0.0.1 8990Next, You’ll need to enter the username and password.
The default username is **jcliadmin, and the default password is `jclipwd`.
You can check the full documentation [here](https://docs.jasminsms.com/en/latest/installation/index.html#adding-smpp-connection)**.
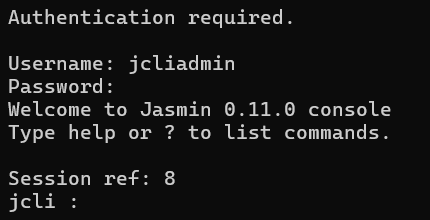
Successfully login to Jasmin
Adding SMPP Connection
Jasmin provides a wide range of commands. We will only cover the ones relevant for this tutorial.
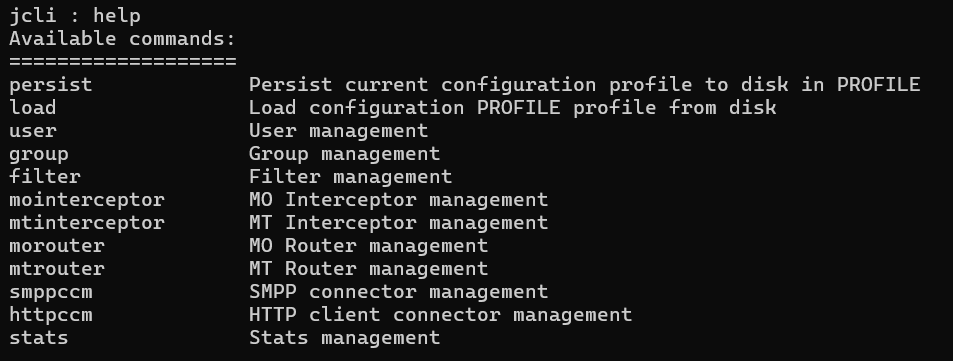
Jasmin available commands
First, we need to add the SMPP (Short Message Peer-to-Peer) connection. SMPP is a protocol used to send and receive SMS between an application — such as an SMS Gateway, internal system, or provider — and the operator’s or aggregator’s SMSC (Short Message Service Center). Type command below:
smppccm -athen, type this configuration:
cid SMPP-TEST             # Unique SMPP connector ID (connector name)
host 127.0.0.1          # SMSC IP address provided/authorized by the operator
port 1337               # SMPP port assigned by the operator
username johndoe        # System ID (SMPP username) provided by the operator
password johndoe        # SMPP password provided by the operator
logrotate midnight      # Rotate the SMPP connector logs at midnight
submit_throughput 110   # Maximum allowed sending throughput (e.g., 110 SMS/second)
ok
if the command is successful, you will see the following result below.
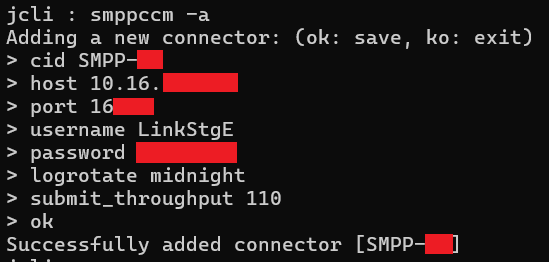
Successfully add SMPP connector
then, check the registered SMPP:
smppccm -l
SMPP Already Registered
Note: the SMPP already registered but not yet started.
To start it, run again smppccm but with parameters.
smppccm -1 SMPP-TEST # replace SMPP-TEST with your SMPP connector IDyou will see the following result:

SMPP connector successfully started
now check again the registered SMPP using the previous command, you will see it started now :D

you can read the full version of SMPP docs **here**.
Configure MTRouter
MTRouter determines where outgoing (MT) SMS messages are sent. Jasmin provides a built-in HTTP API to deliver MT messages. We can use the following URL which it is accept HTTP GET/POST request.
# example: https://sms.example.com:8080/secure/send
# for production, needs HTTP Basic Auth (username/password) make it more secure
http://<jasmin host>:<rest api port>/secure/send

# for staging or testing only
http://127.0.0.1:1401/send
we will use the staging endpoint because it only for testing. There’s many objects that inherit from MTRoute to offer flexible ways to route messages. But in this tutorial, we will use a *DefaultRoute*type.
Here’s an example to add a new MTRoute:
mtrouter -aconfiguration:
> type DefaultRoute # in this tutorial, we use DefaultRoute
> connector smppc(SMPP-TEST) #bind it to your SMPP connector ID
> rate 0.0 #defines the maximum throughput; 0.0 means unlimited
> ok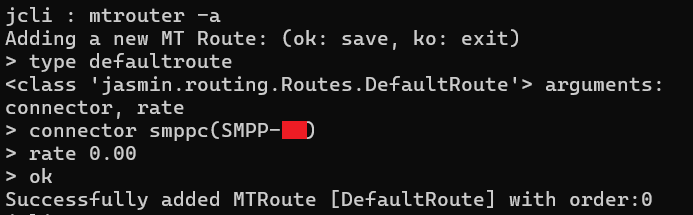
Successfully add MTRouter
Now, let’s check using this command mtrouter -l

you can read the full docs for more customization **here**.
Adding Custom HTTP Connection
HTTPCCM (HTTP Connector/Client Manager) connects Jasmin to custom endpoint. Before we can receive MO messages, we need to register our backend endpoint first.
We can also create a custom endpoint For MT messages, but because Jasmin already provides a built-in MT endpoint (
/send), we can use it instead of creating a new one. Unlike MO, Jasmin does not provide a built-in MO endpoint.
Below is an example how to add a custom endpoint path:
httpccm -aconfiguration:
> cid HTTP-MO-01 # custom endpoint name
> url http://10.15.20.125/receive-sms/mo.php # your custom endpoint
> method GET # GET,POST
> ok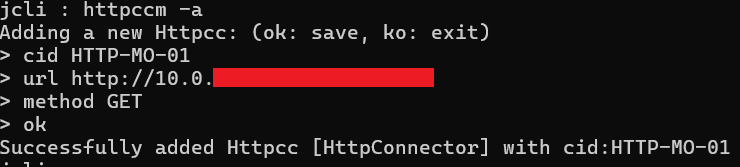
Successfully added custom http
check our custom http connection using httpccm -l

Custom MO endpoint registered successfully
you can read the full docs **here.**
Configure MORouter
After adding a custom HTTP endpoint, it’s time to register it with our MORouter so that Jasmin can recognize the MO path. This can be done using the following command:
morouter -aconfiguration:
> type DefaultRoute # we use DefaultRoute here
> connector http(HTTP-MO-01) # connect to your custom http endpoint.
> ok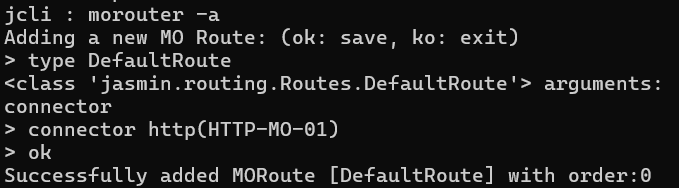
Successfully added MORoute with order 0
check our custom MORouter using morouter -l

As you can see, if there is no registered MORoute, it will be assigned as #0 (the lowest). A lower order number indicates higher priority, meaning the route will be used first. You can read the full docs **here**.
Create Group
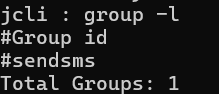
To perform the request, Jasmin requires valid account credentials. Therefore, we need to create a user group first. This can be done using the following command: group -a
group -aconfiguration:
> gid sendsms # your custom group id name
> ok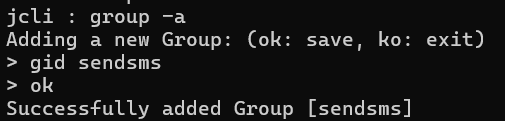
Successfully added Group id
check using group -l
Create User
User Group already registered, now we need to create the user account and bind it to group id that we have created before. We can use the following command: user -a
user -aconfiguration
> uid youruid # your custom user id
> gid sendsms # your group id that created before
> username johndoe # your custom username
> password johndoe # your custom password
> ok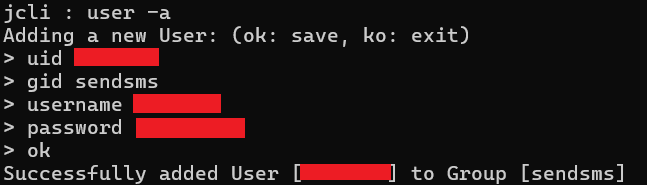
Successfully added user to group
check using user -l

you can read the full docs **here**.
Add API Handler
We’re all done, and now it’s time to create a simple handler for our MO route. Here’s an example using Golang. Make sure the path matches the custom HTTP connection you registered earlier.
// go fiber
r := fiber.New(fiber.Config{
  Views: engine,
 })

// init handler

h := handler.NewIncomingHandler()

// SMS
sms := r.Group("sms")
sms.Get("mo", h.MobileOriginated)
Create SMSRequest.goto handle the incoming MOrequest
you can read the full docs [here.](http://We’re all done, and now it’s time to create a simple handler for our MO route. Here’s an example using Golang. Make sure the path matches the custom HTTP connection you registered earlier.)
package model

type SMSRequest struct {
  From      string `json:"from" form:"from" query:"from" validate:"required" `
  To        string `json:"to" form:"to" query:"to" validate:"required"`
  Content   string `json:"content" form:"content" query:"content" validate:"required"`
 }
Next, create a file named incoming_handler.go and add theMobileOriginated method. Replace the placeholders variable in {} with your actual configuration values.
func (h *IncomingHandler) MobileOriginated(c *fiber.Ctx) error {
 req := new(model.SMSRequest)

 if err := c.QueryParser(req); err != nil {
       return err
 }

 // ==== Simulate READ ONLY FOR KEYWORD CONTAINS 'TESTING-STG' ====
 if strings.Contains(req.Content, "TESTING-STG") {
  content := url.QueryEscape(
          "Hi Yudas! MO delivered successfully. this is an automatic reply using Jasmin!"
        )
  urlMT := fmt.Sprintf(
          "http://{baseURL}:1401/send?username={username}&password={password}&from={sdc}&to={msisdn}&content=%s", content)
  req, err := http.NewRequest(http.MethodGet, urlMT, nil)
  if err != nil {
   return err
  }

  tr := &http.Transport{
   MaxIdleConns:       20,
   IdleConnTimeout:    60 * time.Second,
   DisableCompression: true,
  }

  client := &http.Client{
   Timeout:   90 * time.Second,
   Transport: tr,
  }

  resp, err := client.Do(req)
  if err != nil {
   return err
  }

  defer resp.Body.Close()
  _, err = io.ReadAll(resp.Body)
  if err != nil {
   return err
  }
  if resp.StatusCode != http.StatusOK {
   return errors.New("failed to send sms")
  }

  return c.Status(fiber.StatusOK).SendString("ACK/Jasmin")
 }
}
As stated in the documentation, the receiving endpoint must respond with a
**200 OKstatus header and a body containing an acknowledgment of the received SMS-MO. If either of these conditions is not met, thedeliverSmHttpThrowerservice will attempt to resend the same message. You can read the full docs [here](https://docs.jasminsms.com/en/latest/apis/http/index.html#configuration-deliversm-thrower).**
In order to acknowledge SMS-MO receipt, the receiving end point must reply back with exactly the following html body content:
***ACK/Jasmin* you can read the full docs [here](https://docs.jasminsms.com/en/latest/apis/http/index.html#receiving-sms-mo)**.
TESTING
All setup is ready now, let’s test our MT by sending a simple request using curl to Jasmin endpoint.
curl -G "http://localhost:1401/send" \
     --data-urlencode "username={username}" \
     --data-urlencode "password={password}" \
     --data-urlencode "from={sdc}" \
     --data-urlencode "to={msisdn}" \
     --data-urlencode "content=TESTING MT JASMIN"
if you see the output like this, that means your SMS is accepted for delivery. Success “9ab2867c-96ce-4405-b890–8d35d52c8e01”
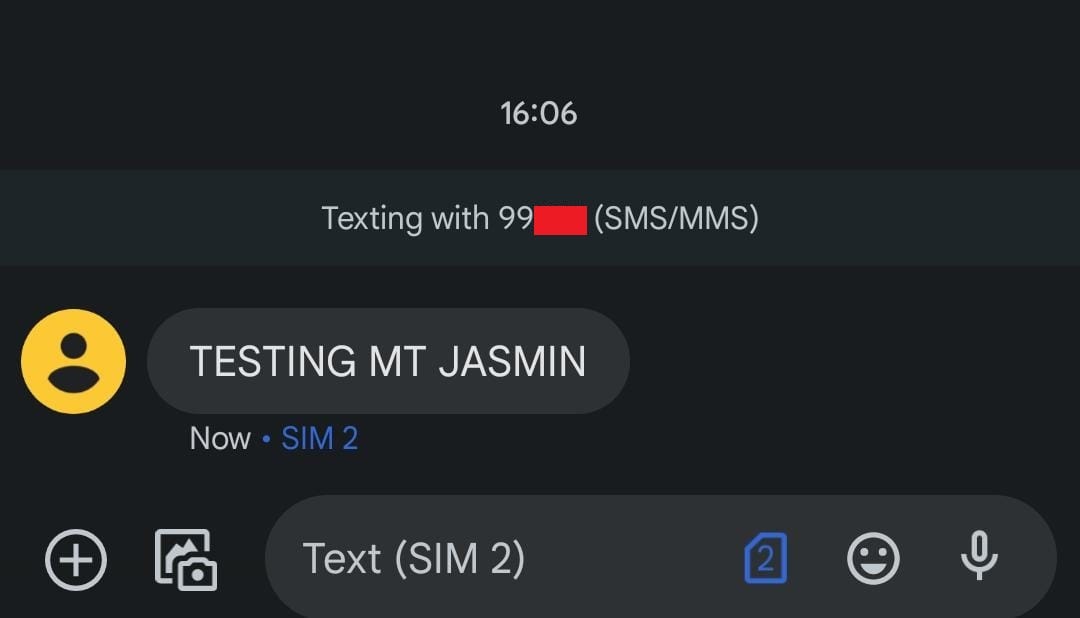
MT successfully delivered to given msisdn
Now, let’s test our MO by sending a message with the prefix keyword TESTING-STG, as we coded in the handler earlier. If it succeeds, it should trigger the automatic reply that we configured previously.
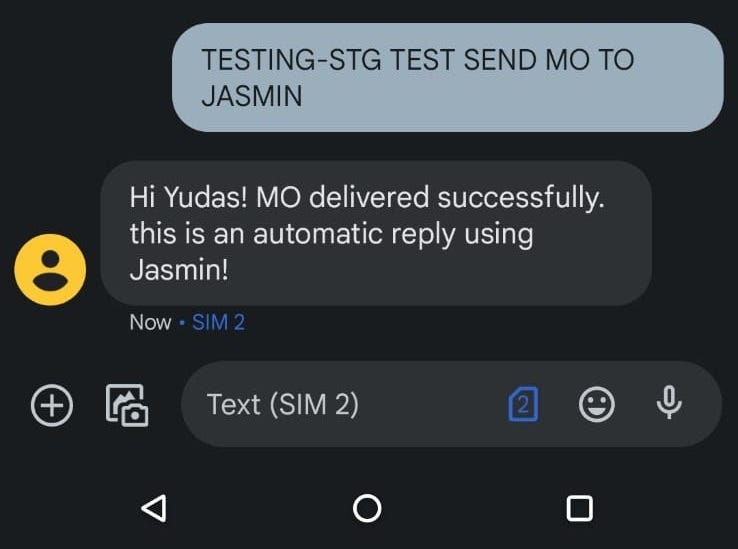
MO Successfully sent and trigger the automatic reply
Conclusion
In this tutorial, we’ve learned how to set up Jasmin SMS Gateway and handle MO/MT messages. Here’s a quick summary of what you can do with Jasmin, along with possible improvements and advanced features not covered in this article:
- Multiple connections: You can connect to more than one telco at the same time using MORouter, MTRouter, and SMPP connectors.
- Send multiple messages: Jasmin can handle bulk messaging efficiently.
- Flexible charging: Implement different billing models per service or user account, including premium content.
- Delivery reports: Receive DLRs and send them back to merchants for real-time tracking.
- Routing by country: MORouter supports prefix-based routing for international numbers.
- Advanced MO handling: Combine RabbitMQ, Go routines, and prefix keywords like
REG,UNREG,BLACKLISTED, orRENEWALfor automated workflows. - User accounts & quotas: Create multiple accounts and set MT/MO quotas per account — useful for aggregators or premium services.
- Scalable architecture: With multiple connectors, queues, and routing rules, Jasmin can handle high-volume messaging efficiently.
Thank you for reading my first article! 😄 If you have any suggestions or feedback, feel free to leave a comment below. I’d love to hear your thoughts!
메타데이터
- post_id
- 36155e17673b
- slug
- the-easiest-guide-to-send-and-receive-sms-with-jasmin-sms-gateway-mt-mo-explained-36155e17673b
- url
- https://medium.com/@yudasmalabi/the-easiest-guide-to-send-and-receive-sms-with-jasmin-sms-gateway-mt-mo-explained-36155e17673b
- canonical_url
- https://medium.com/@yudasmalabi/the-easiest-guide-to-send-and-receive-sms-with-jasmin-sms-gateway-mt-mo-explained-36155e17673b
- author_url
- https://medium.com/@yudasmalabi
- status
- ok
- fetched_at
- 2026-07-14 15:35:44