How to manage user licensing in OutSystems 11 with automatic mechanism of inactivating and…
In many OutSystems 11 software factories, the licensing factor of the number of users is a constant concern. The fact that this is a…
How to manage user licensing in OutSystems 11 with automatic mechanism of inactivating and activating users
In many OutSystems 11 software factories, the licensing factor of the number of users is a constant concern. The fact that this is a chargeable unit makes this topic easy to suggest for optimization. How can we get the stream of users in such a way that we are actually paying for the number of users using our apps? Well, we can always create an automatism that inactivates users who don’t authenticate for more than a given time (well, this should each evaluate their context to determine the value of x). Similarly, we have to maintain a smooth, transparent user experience, ensuring that, all these users who inactivate themselves for lack of activity, the day when they try to authenticate can do so and go on to be active again. This article explains, in a generic and simple way as effecting this implementation. It should be noted that the base case is simple, and the reader can then adjust or scale to a more indicated context for the factory where the implementation will be executed.
So let us begin by understanding the following: We must create a module, in case it doesn’t exist already, where we will have to centralize this new feature, just as a new abstraction of the login action to centralize its use.
For the example, it will be created in a module called “UserManagement_FS”, of the type “Service”, in an application called “Factory Management” (such in order to simplify the example, the timer itself executing automatism will be included in this module, and the even, in a real scenario, can be inserted into a module oriented to similar asynchronous processes):

Fig 1 — Module creation to contain the suggested implementation
Next, a Static Entity called “Users_InactiveMotive” is created that will support the types of possible client inactivation. For our example, we will create two records, and only the first one will be used in automatism: Fraud and Inactivity:

Fig 2 — Supporting static entity creation to inactivation motives
The Static Entity can have the attributes Id (Integer, Mandatory, Is AutoNumber: No), Label (Text, Mandatory) and Is_Active (Boolean, Mandatory). It must be defined as Public in such a way to be able to be referenced by future consumers.
The next step is to create an extension Entity to the “User” Entity. In case it already exists in your factory, you can use it in case it makes more sense. That Entity must have the primary key defined to be of the User Identifier type (you will have a relationship from 1 to 1 with the “User” Entity). That new Entity should have an attribute that is the foreign key for the “Users_InactiveMotive” Entity. In addition, you can also have a DateTime attribute called “DatetimeOfInactivation” to save the information from when the user was inactivated by the reason identified in the “Users_InactiveMotive” foreign key attribute. “UserExtended” Entity will not be public:

Fig 3 — “UserExtended” Entity definition
Now that you have the necessary Entities ready, we have the following implementations to do:
- User inactivation automatism without X-time activity;
- Login action abstraction that manipulates and checks inactive users cases by inactivity;
- Inactivation action creation with reason defined in input for application consumption.
User inactivation automatism
NOTE: this version of the solution is less great at the performance level, since it will iterate user by user, but that it is easier to maintain and implement for those who have no domain over SQL language. Because the focus of this paper is OutSystems, it has been chosen to scale this solution.
First, we must define together with stakeholders the time that must be set for a user to be given as without activity.
In order to be able to adjust this value simply at any time, we can use a Site Property for this effect, keeping the implementation as simple as possible (for more advanced systems we can always use an Entity).
We can call that Site Property “WaitForInactivityPeriod” and define your type as Integer, with in the example your default value will be 90 (corresponding to 90 days, appreciably 3 months):

Fig 4 — Creation of Site Property to save the value of the number of waiting days for the system inactivate users in respect of the date of their last login
Next, we create a Server Action with the name “InactiveUsersWithNoRecentActivity” without any kind of input or output parameter. That Server Action should not be public, staying with the “Public” property with the value “No”:

Fig 5 — Definition of the Server Action base that will be executed by timer
The next step is to define an “Aggregate” that returns all users who are in a position to be inactivated. This part can be treacherous and we have to have a lot of attention when you set the rule. For the case of the example the rule will be:
All users who do not authenticate to more than the time defined on the previously mentioned Site Property, or, users who have never logged in and form created to the more than the time defined on the Site Property. The definition then passes through, in “Aggregate”, use the “User” Entity as Source, and use two filters: “User.Is_Active” to “True” ( there is no point in processing users that are already inactive) and the filter that corresponds to the rule defined previously :
If(User.Last_Login <> NullDate(),
  DiffDays(User.Last_Login, CurrDate()) > Site.WaitForInactivityPeriod,
    DiffDays(User.Creation_Date, CurrDate()) > Site.WaitForInactivityPeriod)
A point we must set up for performance and good practice issues, is the Max Records of “Aggregate”. Here we must evaluate the factory context, efficiently understand what the percentage of really functional users is often in order to limit the search. As is obvious, we don’t need to get the total users, but it’s always good to have a good metric in order to avoid slower search, but, at the same time, in order to prevent them from being records for the processing job. For the example, we’ll set up 200 (it’s just an example!!!).

Fig 6 — Creation of Aggregate to obtain all users who must be inactivated
Now, we have to iterate each of the records returned by the “Aggregate” and manipulate the data to configure the users correctly with the corresponding inactivation motive. For this, an “For Each” is added to iterate each of the previous “Aggregate” records, followed by an “Assign” where we will map the “False” value to the “Is_Active” attribute of the current record. In the following, we add the “UpdateUser” operation from the original “User” Entity CRUDs and map the current record to the “UpdateUser” input:

Fig 7 — Inactivation of each iterated user in the record of the User Entity
In order to maintain integrity, we now have to ensure that we create or update an existing record referring to the user to be iterated in the “UserExtended” Entity by filling the attributes conforming to the situation.
The next step is to add the “UserExtended” Entity as source in the initial “Aggregate” in order to know if the user in question already has an associated record in that Entity. This to avoid using the “UserExtended” Entity’s “CreateOrUpdate operation, and can thus make the create or update decision before invoking the database (case the “UserExtended.Id” is null, we make the create, otherwise, the update):

Fig 8 — Join creation with UserExtended Entity in the original Aggregate in order to obtain the record associated with the iterated user in For Each
NOTE: This approach may not be really compensatory if the “Aggregate” in question becomes too slow (many records, “UserExtended” Entity with many attributes, little indexing of it, etc.). It may be preferable not to join this Entity in the “Aggregate” and in the CRUD use the “CreateOrUpdateUserExtended” version. We should always evaluate each case in the example in order to check for a better alternative to implement each step for each of the scenarios it is being developed.
We can add, in the flow of the “For Each,” after “UpdateUser,” an “Assign” where we map the correct values to the “UserExtended” record to be iterated: “UsersInactiveMotiveId = “Inactivity” and “DateTimeOfInactivation” = “ CurrDateTime()”.

Fig 9 — Mapping correct values in the iterated record of UserExtended Entity
Then, we put an “If” where we will check if the value of “UserExtended.Id” in the record to be iterated is zero. In this case, we put an “Assing” where we map the “UserExtended.Id” value equal to the “User.Id” of the current record to be iterated (the “UserExtended” identifier is of “UserId” type in order to keep with simplicity and efficiency the ratio 1 to 1) and we place “CreateUserExtended” CRUD operation next. In the case of False, we put “UpdateUserExtended” CRUD operation. In both cases, we map to their inputs, the record of “UserExtended” Entity to be iterated at the time:

Fig 10 — Record Creation or Update from UserExtended Entity
Finally, the two CRUD nodes of the “UserExtended” Entity should be connected to the “For Each” thus closing the cycle (with adjustments to the disposition of the nodes to become more perceptible):

Fig 11 — Closing of the user inactivation iteration cycle
We need to automate the process that runs the logic of this Server Action. For this, a “Timer” is created that must run with the periodicity that is most indicated for each case and occurs at the most convenient time (lower load, for example). In this example the “Timer” will be parameterized to run every day by 1AM:

Fig 12 — Timer definition that will run user inactivation logic
Now that we’ve been able to inactivate users for lack of activity, we need to have a transparent way so they can be reactivated when they try to authenticate again.
Login action abstraction that manipulates and checks inactive users by inactivity
To create an abstraction of the login action, first of all, we must obtain the dependence on the original Login action. To do this, we write “User_Login” in the Service Studio search input and then select Server Action from the “Users” module:

Fig 13 — Import of the original Login Server Action dependence
We need to create a Server Action called “DoLogin”, with the “Public” property defined as “Yes”, where the customized logic will abstract in accordance with the intended. In the flow of that Server Action we put the original Login’s action that we reference earlier. We create the input variables “Username” (Text, Mandatory), “Password” (Text, Mandatory) and RememberLogin (Boolean). These inputs must be mapped to the corresponding inputs of the original Login action inserted in the new Server Action flow:

Fig 14 — Creating a new Server Action customized for Login
We know that an inactive user cannot make Login, so we will have to add the logic required for inactive user activation by inactivity before the original Login Server Action. For this, we must get the “UserExtended” record referring to the user who is authenticating. We use an “Aggregate”, with “Max Records” set to 1. In order to get the correct user, we must add how source the “User” Entity create an inner join (only with), in order to get the right record by “Username” (which is the attribute obtained by input parameters):

Fig 15 — Creation of “Aggregate” to get user status
Now, it is known that it only makes sense to check and manipulate users who are inactive. As such, you can then put an “If” that will check that the “User.Is_Active” attribute is True or False. If it’s True, you go to the original Login action, and you don’t need any kind of processing:

Fig 16 — Decision making for if the user is active or inactive
Then developing the False branch, we must check that the user has the “Inactivity” inactivation reason for the foreign key in “UserExtended” Entity:

Fig 17 — Checking the inactivation motive for decision
For the case of the inactivation reason to be different from “Inactivity” we must end the flow with the output of an error message for consumers. This leads to a create a “Structure” that supports two essential attributes for this: the “IsSuccess” (boolean) attribute and the “Message” (text) attribute. This structure must be defined as public:
NOTE: in many factories, this structure is used so genericly that it must exist at a Foundation level, from a highly reusable module. For the example, the structure will be created in the module of the whole development, but for each case, the correct module must be evaluated to insert the same in order to ensure reuse.

Fig 18 — Created Structure to map values required to the output of actions
We come to define an output variable in Server Action “DoLogin” in order to be able to pass the information necessary to consumers:

Fig 19 — Definition of output variable to pass information concerning the operation of the action to consumers
Now, we know that for the case that the user is not inactive by inactivity, we should not allow it to login and expose the reason, through the attributes of the output variable, to its consumers. Hence, in the False branch of the “If” defined earlier, we put an “Assign” where we will map the False values to the “IsSucces” attribute of the output variable structure and a message explaining the reason for non-success in the “Message” attribute of structure of the output variable.
NOTE: In this case, a simple message will be set to the output on a Site Property in order to maintain the simplicity of the example. Taking into account the ability to scale, we can create an attribute in the Static Entity “Users_InactiveMotive”, called “AssociatedMessage”, where we save the message to transmit to each of the down motives, then making the mapping to the “Message” attribute of the output variable structure from the value of that Entity for the respective inactivation reason.
After mapping the values to the output variable, we place an “End” node:

Fig 20 — False branch definition
If the inactivation motive is “Inactivity”, we must then proceed to edit the “UserExtended” Entity record in order to “clean” the data that identified inactivation, as we must activate the respective user in the “User” Entity record.
NOTE: In the example we keep the case simple, but in more advanced scenarios, we can create some kind of audit about these events and even create more attributes in the “UserExtended” Entity to store activation and inactivation actions.
For this, in the “True” branch of “If” where we decided if the inactivation motive is “Inactivity”, we place an “Assign” where we map the following values to the attributes mentioned above:
- “GetUserExtended.List.Current.UserExtended.UsersInactiveMotiveId” = “NullIdentifier()”
- “GetUserExtended.List.Current.UserExtended.DatetimeOfInactivation” = “NullDate()”
- “GetUserExtended.List.Current.User.Is_Active” = “True”

Fig 21 — Map values to reactivated user
To finalize the data update, we put the update CRUDs, both of the “User” and “UserExtended” Entities in the flow and map the “Aggregate” records as input to each of them:

Fig 22 — Mapping of the User entity record for its respective update CRUD action

Fig 23 — Mapping of the UserExtended entity record for its respective update CRUD action
Right now, we can connect this branch from the flow to the original Login action. Following the original Login, we put an “Assign” where we map the “True” value to the “IsSuccess” attribute of the output-variable structure to inform consumers that everything ran as expected.
Then, we reorganize the flow to be easier to interpret. The result stays as follows:

Fig 24 — Finalization of the main flow of the new Server Action to the Login
To finalize the action, we can create an Exception Handler, of the type “InvalidLogin”, for when the original Login action fails, thus capturing the error and manipulating the “IsSuccess” attribute and the “Message” attribute of the output variable structure for the following values:
- “GeneralOutput.IsSuccess” = “False”
- “GeneralOutput.Message” = “InvalidLogin.ExceptionMessage”
The result is as follows:

Fig 25 — Exception Handler for the failure case in the original Login action
With this, the new custom Login action is finished.
It is missing then defining a Server Action to be able to inactivate a user in various contexts for a reason given as input.
Server Action creation for inactivation with motive defined in input
Now that there is a data model that supports inactivating users and recording the respective reason, we can create a Server Action to treat those cases.
In this example, the name of the Server Action will be “InactivateUserById”, with its property “Public” defined with the value “Yes” to be consumed by any tool that makes sense to treat these types of cases (any kind of backoffice or similar ). That Server Action must have an input variable named “UserId,” of User Identifier type, which will be used to identify the user to inactivate, and an input variable called “UserInactiveMotiveId” of the Users_Identifier type, which will be usedto identify the inactivation motive:

Fig 26 — Creation of Server Action to treat user inactivations genericly for the reason identified in the respective input
The next step is to create an “Aggregate” that will get the necessary records to manipulate. In this case, the “Aggregate” should get the “User” Entity record with a Left Join (With our Without) with the “UserExtended” Entity, filtering the query by the user Id. In addition, we must also filter by the “Is_Active” = “True” attribute of the “User” Entity record, since that we don’t want to inactivate an already inactive user. The “MaxRecords” property must be set to value 1, since that we only want a single user, referenced by their Id in the input variable:

Fig 27 — Aggregate definition which will obtain the required records
Then, we check if the “Aggregate” doesn’t return records. If this happen, probably the UserId has been incorrectly inserted or, the user associated with the record is already inactive. We put a “If” where we check if that “Aggregate” is empty. We are going to treat this case through the use of a similar output variable of the same type as used in Server Action that inactivates users in the timer seen earlier.
To do this, we create an output variable, of the type “GeneralOutput”. After the “If”, we put an “Assign” where we will map the value of the “IsSuccess” attribute and the “Message” attribute of the output variable. For “IsSuccess”, we map the value “False”. For the “Message” field, in the example, we will use the value coming from a Site Property called “ManualInactivationErrorMessage”. Then, we can finalize this branch of the flow with a “End” node:

Fig 28 — Check if there is any user to process under the Aggregate filter conditions

Fig 29 — Mapping the values for the output variable in the case of not finding a user to inactivate
In the False branch of the “If”, we start by putting an “Assign” where we will map the “False” value to the “GetUserToInactivate.List.Current.User.Is_Active” attribute of the “User” Entity recording from “Aggregate”:

Fig 30 — Map False value to inactivate user in User record
Next, we put the “UpdateUser” operation after the “Assign” and map the “User” Entity record from “Aggregate” (the same record as in the previous “Assign”, where we map the “False” value to the “ Is_Active”) for your input:

Fig 31 — Update of the User record in the database
To map the required values in the “UserExtended” Entity record, an “Assign” is placed where the following values are mapped:
- “GetUserToInactivate.List.Current.UserExtended.UsersInactiveMotiveId”=” UserInactiveMotiveId”
- “GetUserToInactivate.List.Current.UserExtended.DatetimeOfInactivation”=” CurrDateTime()”

Fig 32 — Mapping correct values for the UserExtended record
In order to make the “UserExtended” Entity Create or Update decision outside the database, then, we put a “If” that will verify if the “UserExtended.Id” attribute of the record returned by “Aggregate” is NullIdentifier():

Fig 33 — Check if there is already a record in UserExtended Entity for the user to be inactivated
In case there is no record, in the True branch, we map the value of the input-variable “UserId” to the “UserExtended.Id” attribute of the record to be created in an “Assign”, place the “CreateUserExtended” operation and maps out the record manipulated earlier for their input. In the False branch, the same procedure is done (without mapping the value of the variable “UserId” to the “UserExtended.Id” attribute) but instead, we of using the “CreateUserExtended” operation, we use the “UpdateUserExtended” operation:

Fig 34 — Creation or Update of UserExtended record relative to the user to inactivate
To finalize the flow, we put an “Assign” where we map the “True” value to the “IsSuccess” attribute of the action output variable structure. We define the outputs, both of the “CreateUserExtended” operation and the operation ”UpdateUserExtended” for that “Assign” and we finalize with an “End” node:
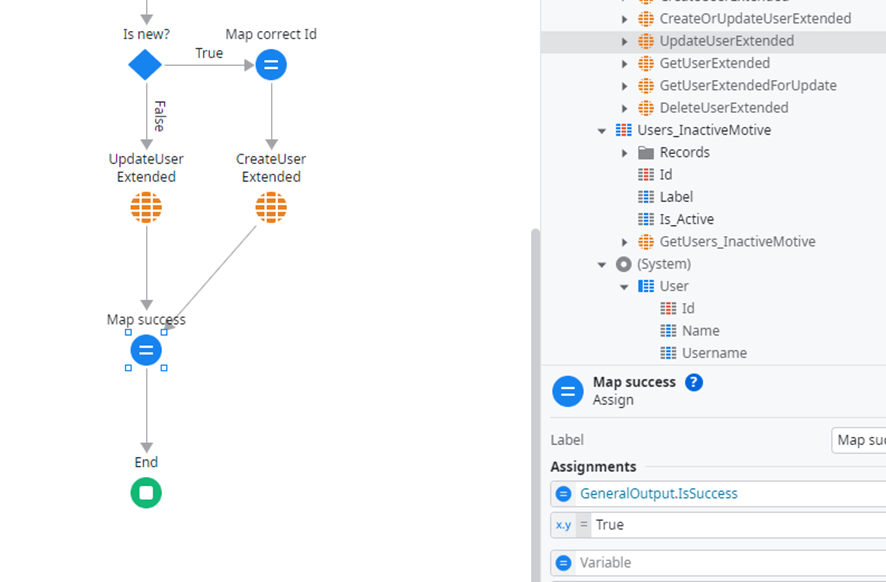
Fig 35 — Server Action InactivateUserById Finalization
Finally, we publish (don’t forget to do “Remove unused dependenties”), we test and check that the result meets with the expected.
With this, we can see that we can do even more and further refine the process. We can create attributes, new checks, create a more dynamic process and cover more scenarios. For example, we can create a Server Action to reactivate inactive users for other reason than inactivity, using justification fields, status machines that contemplate approvals and so. All this is left for the reader’s imagination.
This example is basic, simple, and with decisions, which considering the different contexts, states, volumetry or availability, may have to be different, but at least it serves as a guide to start something and understand how to do it.
The implementation of the example can be checked in the following Forge component:
As always, I hope this article can be useful for as many people as possible!
메타데이터
- post_id
- 3bb244ec64db
- slug
- how-to-manage-user-licensing-in-outsystems-11-with-automatic-mechanism-of-inactivating-and-3bb244ec64db
- url
- https://medium.com/itnext/how-to-manage-user-licensing-in-outsystems-11-with-automatic-mechanism-of-inactivating-and-3bb244ec64db
- canonical_url
- https://medium.com/itnext/how-to-manage-user-licensing-in-outsystems-11-with-automatic-mechanism-of-inactivating-and-3bb244ec64db
- author_url
- https://medium.com/@ricardomlpereira
- status
- ok
- fetched_at
- 2026-06-20 20:29:01