Exposing Local Projects with Cloudflare Tunnel Manager — Share Local Dev Sites with Secure URLs
How I use Cloudflare and cloudflared to manage websites and local tunnels under a single domain.
Exposing Local Projects with Cloudflare Tunnel Manager — Share Local Dev Sites with Secure URLs
Running my own domain (sergevandenoever.nl) gives me a lot of flexibility to organize all my personal projects — whether they’re static sites, apps running on Vercel, or local experiments I want to share temporarily. Cloudflare ties everything together: it routes visitors to the right site, handles SSL, and keeps things secure.
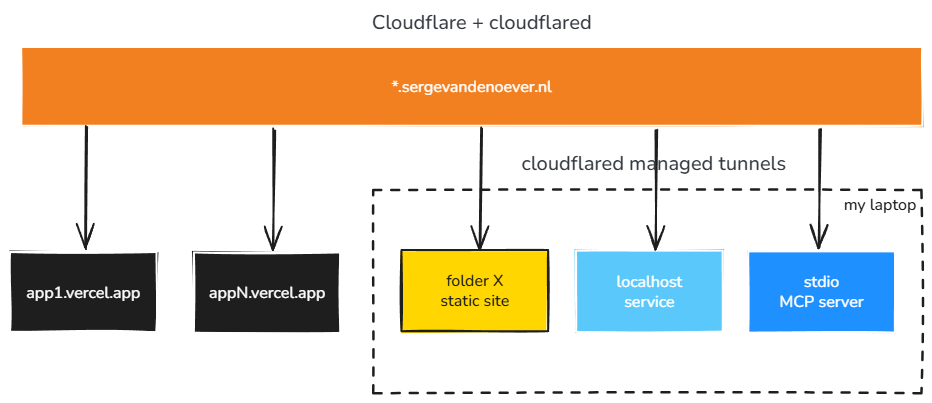
When it comes to sharing multiple Vercel sites under my own domain, Cloudflare Workers are a great solution (I’ll cover that in a future post!). But there’s another common scenario: temporarily exposing a folder or locally running site or API to the world on a memorable URL — without deploying it anywhere or messing with DNS records manually.
That’s where Cloudflared comes in, providing a quick way to create tunnels from your computer to the public internet via Cloudflare. To make that process even simpler and tidier, I wrote **Cloudflare Tunnel Manager**.
Why Use Cloudflare Tunnel Manager?
If you’ve ever used tools like ngrok or even vanilla cloudflared, you know the basics: you get a public URL mapped to your local port. But real-world usage quickly leads to little headaches:
- Tunnels and credentials pile up if you open many different ones.
- DNS entries aren’t always cleaned up — leaving stale subdomains in Cloudflare.
- Credential and config files accumulate in your
~/.cloudflareddirectory. - Manual steps are needed to set up pretty subdomains, and automate cleanup.
Cloudflare Tunnel Manager wraps all this up:
- It provides a single command to start a tunnel for either a folder (served via HTTP) or a running local process.
- It sets up the subdomain and DNS automatically.
- And, crucially: when you stop it (using
Ctrl+C) it will clean up everything—DNS registration, temporary files, and the tunnel itself. No mess, no stale entries!
Features at a Glance
- Expose any folder or localhost service with one command.
- Automatic subdomain and DNS setup — no manual dashboard fiddling required.
- Smart naming: subdomains are based on the folder or your chosen name.
- Automatic cleanup on exit:
When you press
Ctrl+Cto stop the tunnel, the tool will: - Remove the Cloudflare DNS entry for the tunnel.
- Delete any credential and config files it created (using readable, non-UUID names).
- Terminate the
cloudflaredprocess cleanly. - Cross-platform: works on Windows, macOS, and Linux.
- Colorful, informative debug output so you know what’s happening at every step.
- No need to worry about orphaned tunnels or DNS records!
Getting Started
1. Prerequisites
- Python 3.8+ (tested with 3.12)
[cloudflared](https://developers.cloudflare.com/cloudflare-one/connections/connect-networks/downloads/) installed and available in yourPATH- Your domain added to Cloudflare
2. Install Directly from GitHub
Install using pipx for a clean, isolated CLI experience:
pipx install git+https://github.com/svdoever/cloudflare-tunnelmanagerIf you’re new to pipx, install it like this:
pip install --user pipx
pipx ensurepath
To upgrade later, simply run:
pipx upgrade cloudflare-tunnelmanager3.Login with cloudflared and select domain
Before using the tool, authenticate the cloudflared too with Cloudflare:
cloudflared loginThis will open your browser and let you select which domain to use. The tool will automatically detect and use this domain.
Usage Examples
1. Share the Current Directory
Serve your current folder as a static site at myfolder.yourdomain.com (the subdomain will match your folder name):
cloudflare-tunnelmanager folder --port 80802. Serve a Specific Folder
cloudflare-tunnelmanager folder --port 8080 --folder ./docs3. Tunnel a Running Localhost Service
Let’s say you have a dev server on port 3000:
cloudflare-tunnelmanager localhost --port 30004. Use a Custom Subdomain
cloudflare-tunnelmanager localhost --port 3000 --subdomain preview5. Expose Multiple Services at Once
Run several tunnels, each on its own subdomain (in separate terminals):
# Terminal 1 - API
cloudflare-tunnelmanager localhost --port 5000 --subdomain api
# Terminal 2 — Docs
cloudflare-tunnelmanager folder — port 8080 — folder ./docs — subdomain docsHow It Works
Under the hood, Cloudflare Tunnel Manager automates all the steps you’d usually have to do manually with cloudflared:
Tunnel Management:
- Determine the domain selected for tunnels in the
cloudflared logincommand (e.g.yourdomain.com) - It creates a new Cloudflare tunnel, or reuses one if the same subdomain/folder combo already exists.
- Tunnel and credentials files are named after your chosen subdomain or folder, not with cryptic UUIDs.
Automatic DNS Setup:
- As soon as the tunnel is ready, it registers a DNS CNAME in your Cloudflare account for the subdomain (e.g.
preview.yourdomain.com). - If the subdomain is unavailable, it falls back to the tunnel ID for reliability.
Service Handling:
- If you use the
foldercommand, it spins up a simple HTTP server for you. - If you use
localhost, it checks that your service is already running on the specified port.
Browser Integration:
- The public URL opens automatically in your default browser.
Automatic Cleanup on Exit:
This is a biggie: When you press Ctrl+C or otherwise exit the tool, it automatically deletes:
- The Cloudflare DNS entry for the subdomain.
- The credentials and config files it created in
~/.cloudflared/. - The tunnel itself.
If, for any reason, cleanup fails (e.g. permission issues), it will give you step-by-step instructions for manual removal.
Result: You never have to clean up leftover DNS records or tunnel files manually. When the tool exits, your Cloudflare dashboard and .cloudflared directory are exactly as they were before.
Troubleshooting & FAQ
What if I forget to stop the tunnel?
- The tool’s cleanup happens on a clean exit (
Ctrl+C). If your computer crashes or you force-kill the process, you can: - Manually delete leftover files in
~/.cloudflared/(look for files named after your subdomain). - Remove DNS entries from your Cloudflare dashboard if needed.
- Run
cloudflared tunnel delete -f <tunnel-name>to clear any leftover tunnel.
DNS propagation seems slow?
- Sometimes it takes a minute for DNS changes to propagate, especially on the first run. Just wait a few moments or clear your DNS cache.
Port already in use?
- Use a different port or stop the conflicting process.
How do I see what’s happening?
- The tool prints detailed, color-coded debug output at every step. Errors are clearly explained with actionable suggestions.
Conclusion
Cloudflare Tunnel Manager is the “it just works” solution I needed for local sharing. If you need to expose a documentation folder, share a dev server, or temporarily demo a new project on your own domain, it’s as simple as running a single command. And best of all, you don’t have to worry about cleanup:
Just press Ctrl+C when you’re done, and everything—DNS, tunnels, and files—is cleaned up automatically.
Try it out: https://github.com/svdoever/cloudflare-tunnelmanager Questions or suggestions? I’d love feedback or pull requests!
메타데이터
- post_id
- 3c1bf01db2b2
- slug
- exposing-local-projects-with-cloudflare-tunnel-manager-share-local-dev-sites-with-secure-urls-3c1bf01db2b2
- url
- https://medium.com/@svdoever/exposing-local-projects-with-cloudflare-tunnel-manager-share-local-dev-sites-with-secure-urls-3c1bf01db2b2
- canonical_url
- https://medium.com/@svdoever/exposing-local-projects-with-cloudflare-tunnel-manager-share-local-dev-sites-with-secure-urls-3c1bf01db2b2
- author_url
- https://medium.com/@svdoever
- status
- ok
- fetched_at
- 2026-08-04 04:36:11