Building Resilient Cloud Infrastructure: Azure VM Management with Auto Scaling
The project aimed to improve Level Up Corporation’s Azure virtual machines’ operating efficiency, remote administration, and…
Building Resilient Cloud Infrastructure: Azure VM Management with Auto Scaling

Overview
More than 100 Azure Virtual Machines (VMs) are essential to the operations of Level Up Corporation, a leader in cloud-hosted applications worldwide. Managing these virtual machines (VMs) in both Linux and Windows systems is becoming more difficult for the company’s IT staff as it grows. This was addressed by starting a project to deploy secure remote access, load balancing, and auto scaling technologies that guarantee high availability, improved security, and easier management of the Azure virtual machine infrastructure.
Business Case Scenario
When conducting essential remote administration and troubleshooting duties on Azure virtual machines, Level Up Corporation’s globally distributed IT staff requires solutions that guarantee low downtime and strong security. In order to ensure optimal performance and continuous service delivery, the organization needs effective resource scaling and traffic distribution mechanisms for its more than 100 virtual machines running mission-critical applications. While security is still of utmost importance to reduce risks like data breaches and unauthorized access, a scalable solution is necessary to support the company’s continued expansion.
Project Goal
The project aimed to improve Level Up Corporation’s Azure virtual machines’ operating efficiency, remote administration, and troubleshooting capabilities. This was accomplished by putting in place load balancing to distribute traffic evenly among virtual machines (VMs), auto scaling groups to dynamically change the number of VMs based on demand, and secure remote access via RDP for Windows VMs and SSH for Linux VMs. In addition to a thorough virtual network configuration that includes subnets, Network Security Groups, routing rules, and a VPN gateway option, Azure Bastion was set up for secure virtual machine control without disclosing public IP addresses.
Step-by-Step Guide to Solve the Issue:
1. Deploy Azure VMs:
🟣 Create both Linux and Windows Azure Virtual Machines (VMs) according to business needs.
🟣 For Linux VMs, configure SSH access using a key pair for secure, encrypted communication.
🟣 For Windows VMs, enable Remote Desktop Protocol (RDP) for secure access.
Navigate to the search bar above and search “Virtual machines”, then select the first option that appears
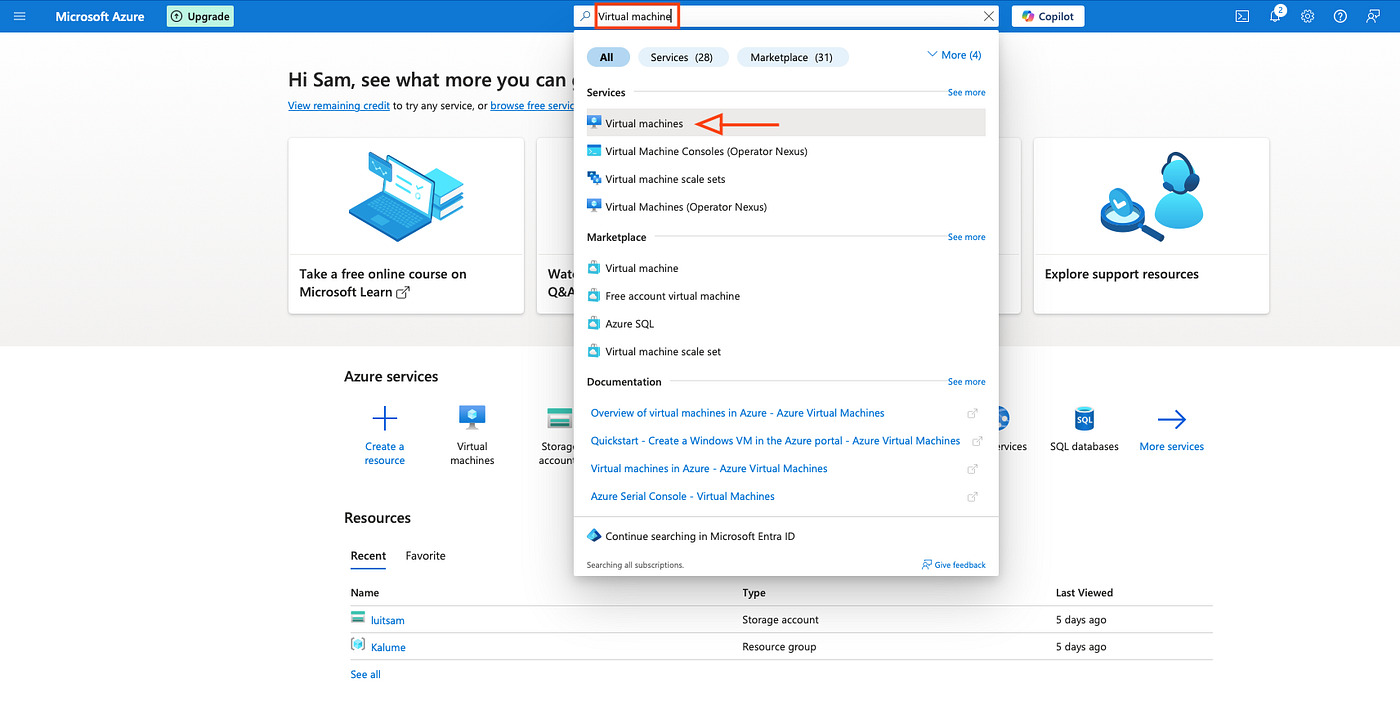
Virtual machine
Once the Virtual Machines window opens, select the “Create” button and the select “Azure virtual machine” from the drop-down menu.
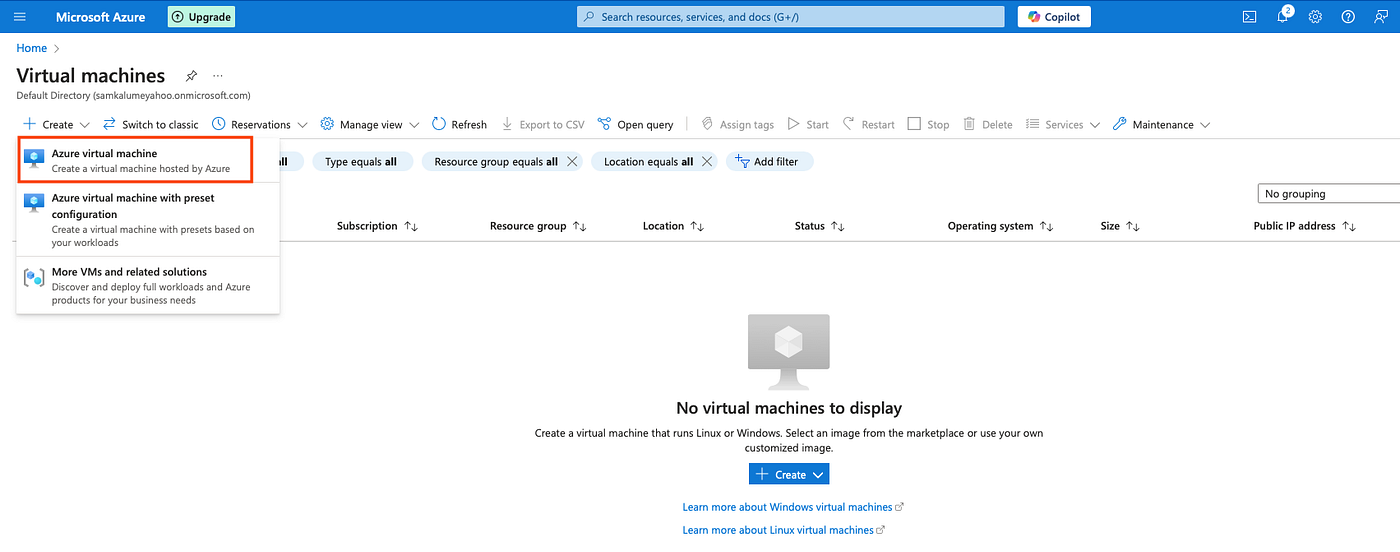
Azure virtual machine
Within the Basics tab, select your subscription and use an existing resource group or you could create a new one. I’ve decided to create a new resource group.
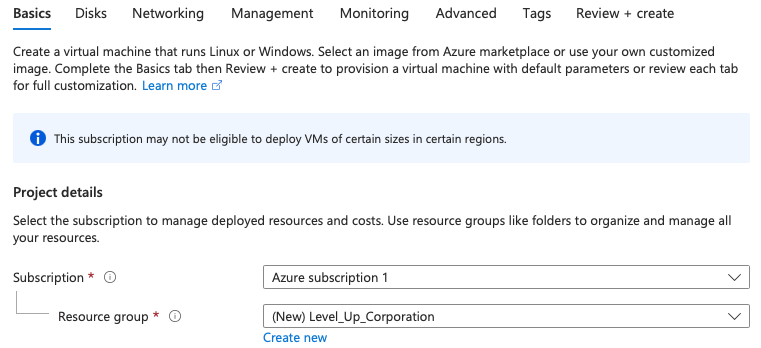
Subscription and Resource group
Underneath the Instance details section, I’ve selected these configurations:
☑️ Virtual machine name: Kali-LinuxVM
☑️ Region: (US) West US 2
☑️ Availability options: No infrastructure redundancy required
☑️ Security type: Standard
☑️ Image: Windows Server 2022 Datacenter: Azure Edition — x64 Gen2 (free services eligible)
☑️ VM architecture: x64
☑️ Size: Standard_B1s- 1 vcpu, 1 GiB memory ($7.59/month) (free services eligible)
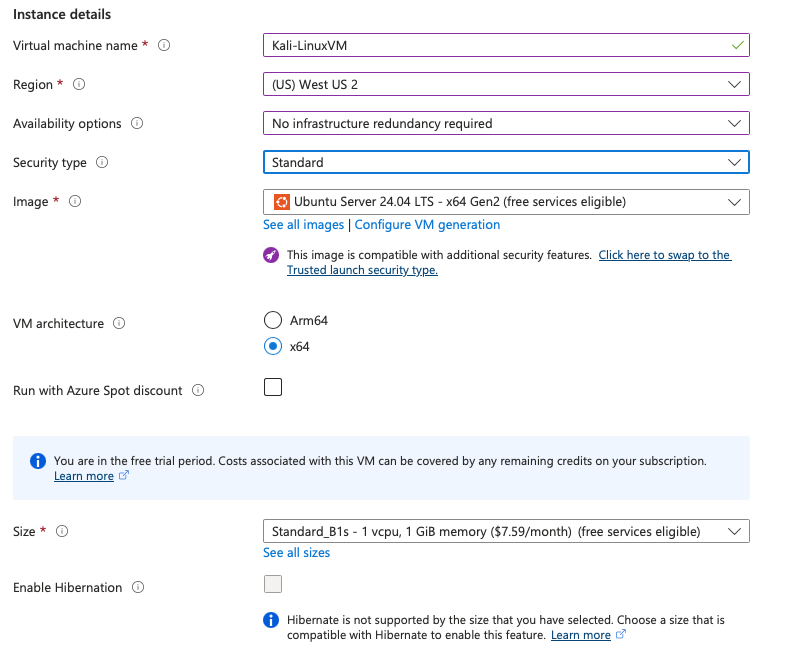
Instance details
Underneath the Administrator account section, select the following configurations:
⭐️ Authentication type: SSH public key
⭐️ Username: Provide a username
⭐️ SSH public key source: Generate new key pair
⭐️ SSH Key Type: RSA SSH Format
⭐️ Key pair name: Give your key pair a name
Below the Inbound port rules section, make sure you use the following settings:
💎 Public inbound ports: None
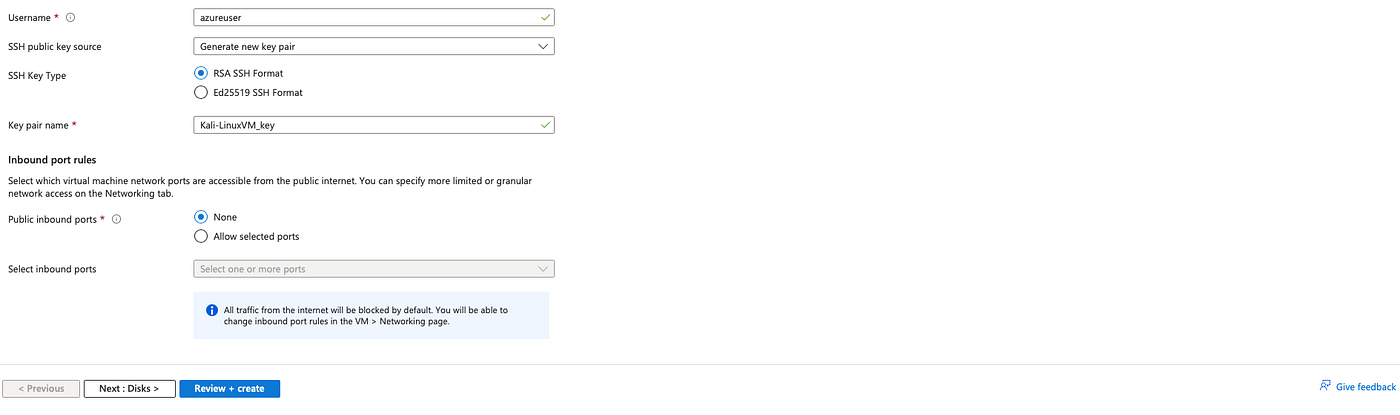
💎 Select “Review + create” at the Create a virtual machine page, click Create. On the next page make sure you passed the validation.
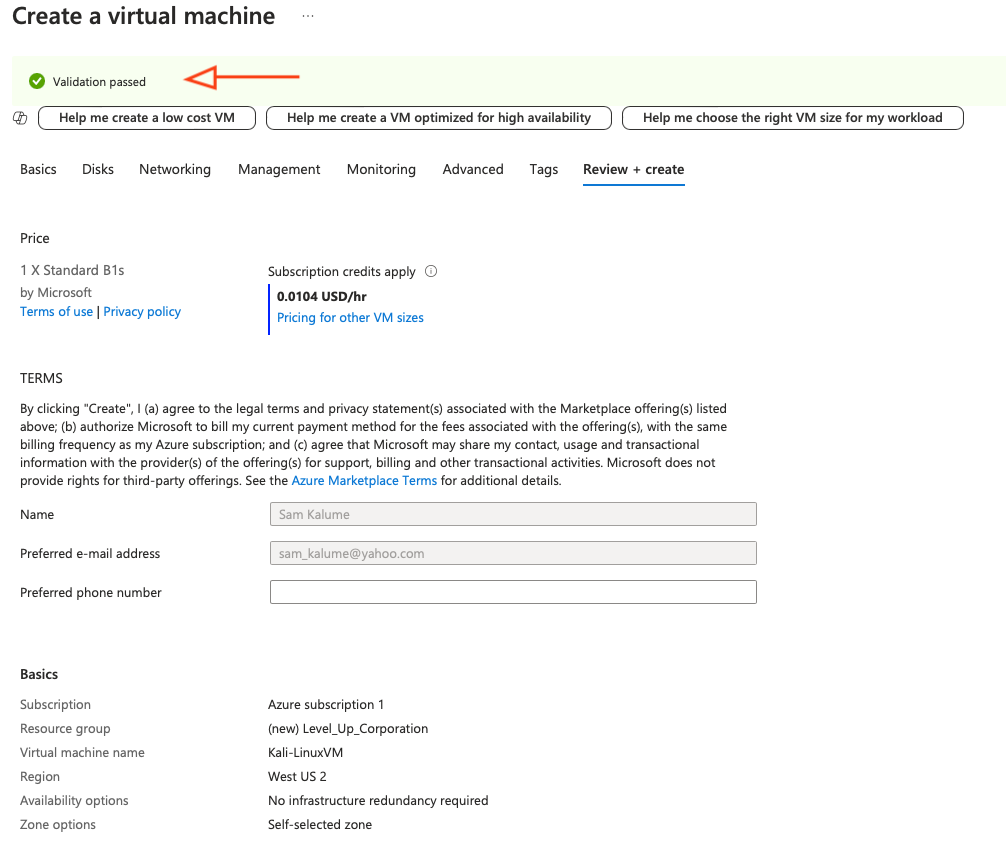
Validation passed
💎 To ensure the private key downloads, select *Download private key and create resource. This will verify that a file will download with the name of your key pair with a .pem* extension. (Keynote: Remember to always be aware of where your file got saved within your local computer)
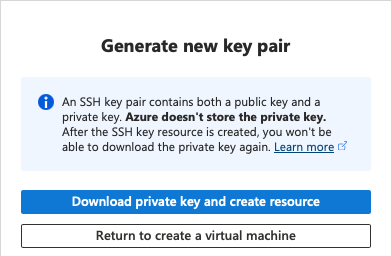
Download private key and create resource
You will see that your Linux Virtual Machine was successfully deployed
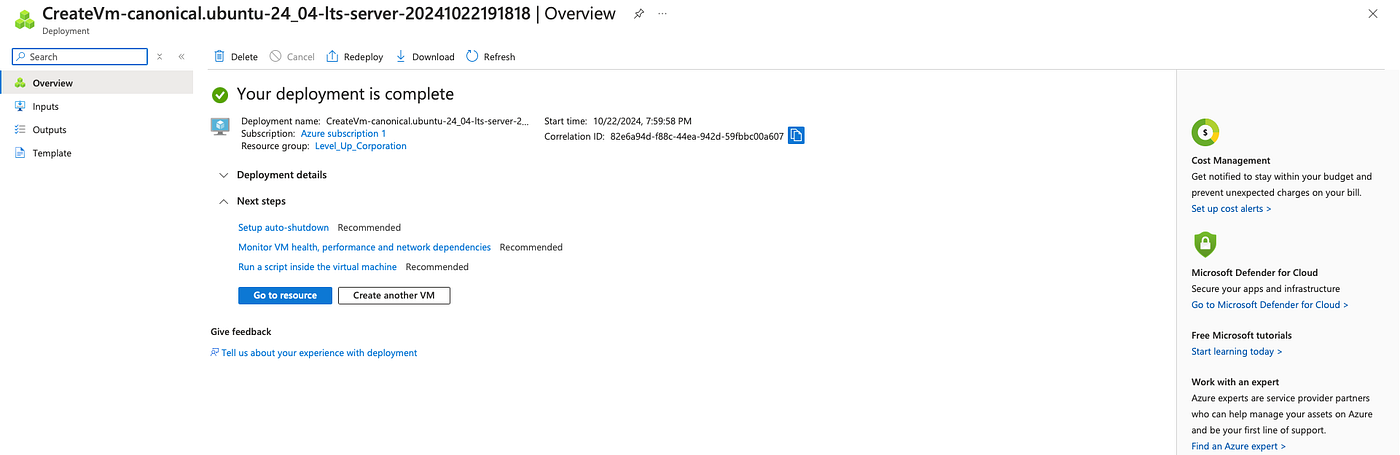
Linux VM is successfully deployed
2. Set up a Network Security Group (NSG):
🟣 Create NSGs to control inbound and outbound traffic to the VMs.
🟣 Allow SSH access for Linux VMs and RDP access for Windows VMs.
🟣 Apply appropriate security rules to ensure only authorized users can access the VMs.
Navigate to the search bar and search for “Network security groups”, select the first option that pops up.
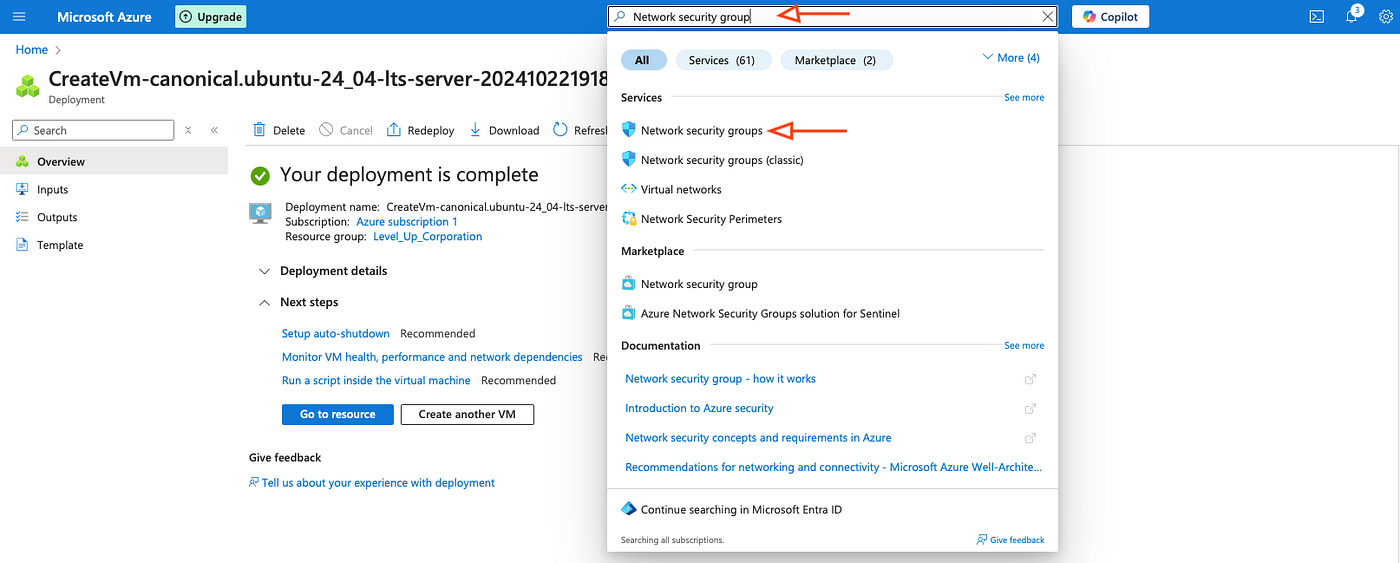
Network Security Group
Azure generated a default NSG when we created our Linux virtual machine. We must modify the inbound rules to permit SSH access on port 22 in order to SSH into our Linux virtual machine

Modify the Inbound Security Rules
🔘 Select the default NSG that was created
🔘 Select Inbound security rules.
🔘 Select Add.
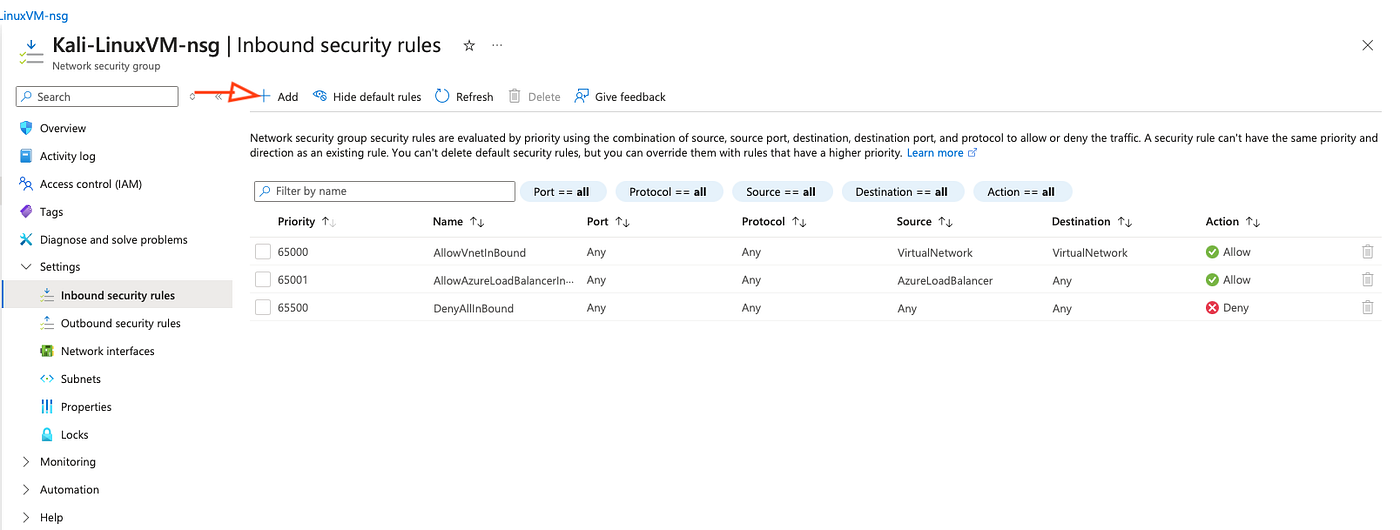
Inbound security rules
Choose SSH from the Service drop-down menu, leaving the Allow Action option selected. You can alter the name of your inbound security rule to something you like. I’ll choose Add and utilize the default name that Azure generated for me.
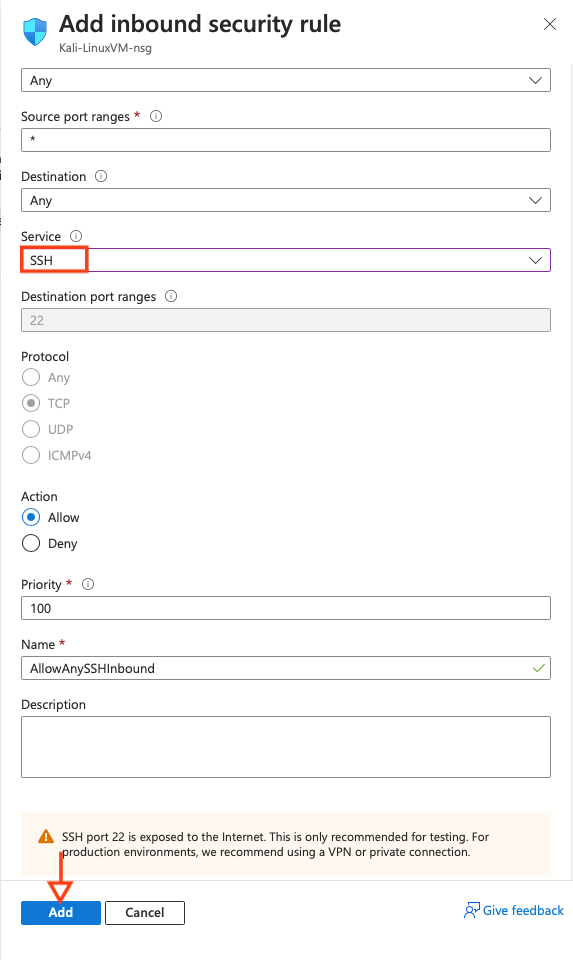
Include SSH as an Inbound security rule
Our recently introduced SSH Inbound security rule is now visible, as you can see below. We should be able to safely access our Linux virtual machine instance from a distance thanks to this.

Port 22
3. SSH into Linux Azure VM
The most popular way to reach a Linux virtual machine instance hosted on Azure is using the Secure Shell Protocol (SSH). Next, we’ll learn how to use SSH to connect to a Linux virtual machine with a public IP address.
In order to verify that our Linux virtual machine has a public IP address select Overview in the left menu, then proceed on selecting “Network interfaces”. You will then see the Public IP address as well as the name of your Virtual machine.

Verification of Public IP address
Disclaimer: Make sure your virtual machine’s status is running before attempting to SSH into our Linux virtual machine.
Choose Virtual Machines from the Azure interface. Then, from the list, pick the virtual machine we previously established. Pick the Connect option from the drop-down menu and choose Connect from the first blade in the top menu.
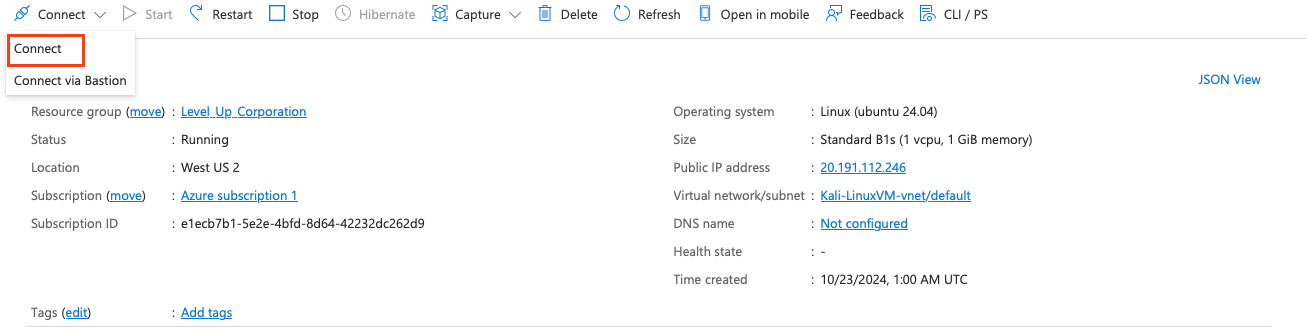
Select Connect
You will see that there’s two options to SSH into the instance.
- SSH using Azure CLI
- Native SSH
We had created a key pair earlier so we’ll select the “Native SSH” options.
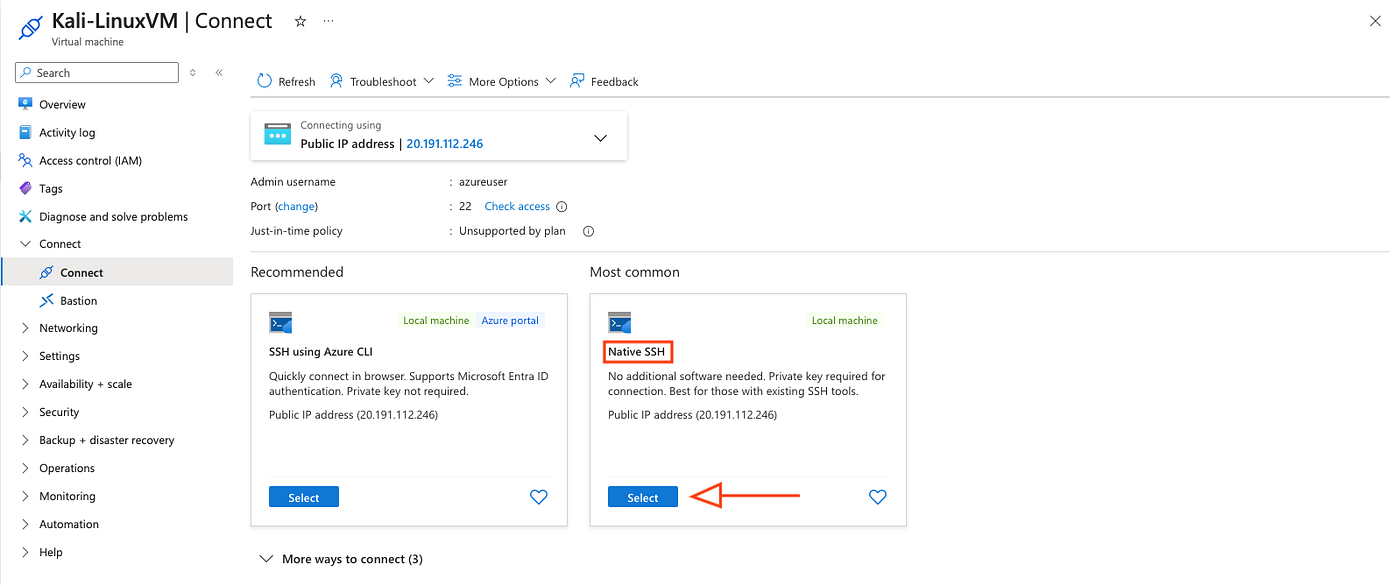
Select Native SSH
When you choose the Native SSH option, a popup box with instructions on how to SSH into your Linux virtual machine instance and modify the permissions of your key pair appears. You can also choose the operating system of your local computer.
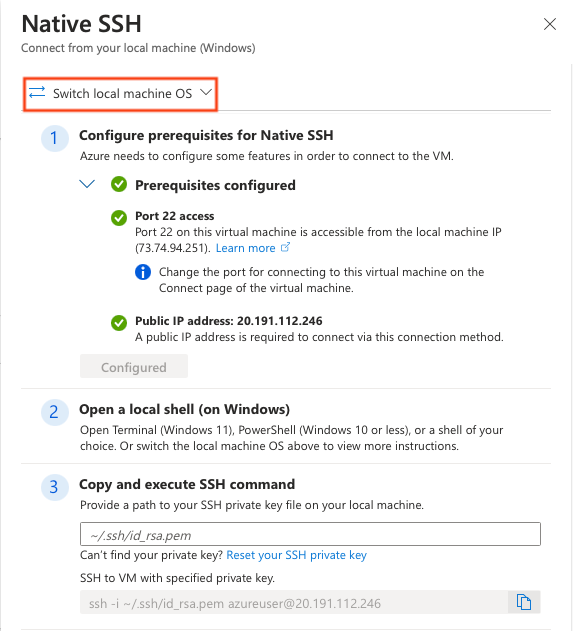
Native SSH
I downloaded my key pair to my downloads folder. To access my Downloads folder, I’ll launch a terminal on my Mac and type the following command.
cd DownloadsI’ll use the following command to provide my key pair read-only access after I’m in my Downloads directory.
Disclaimer: Don’t forget to use the name of your unique key pair. The following one is merely for illustration.
chmod 400 Kali-LinuxVM_key.pemIf the aforementioned command runs successfully, no output will be visible to you. Enter the following command with your username and unique key pair name to SSH into our Linux virtual machine.
ssh -i [your pair name] [your username]@[your VM's Public IP address]The question “Are you sure you want to continue connecting (yes/no/[fingerprint])?” will appear after you run the aforementioned command. Entering “yes” should allow you to connect to your Linux virtual machine.
Confirming Access
Use the “whoami” command to confirm that you have access to your Linux virtual machine. Your username should match the one you selected when we installed our Linux virtual machine.
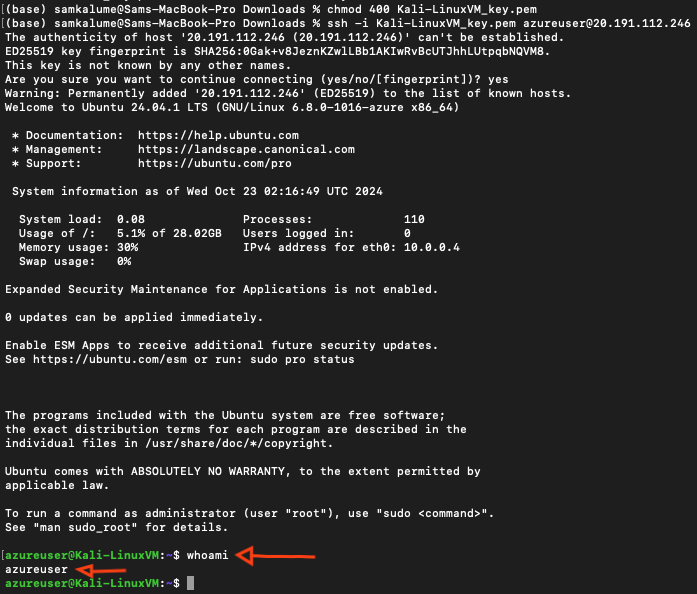
SSH access successful
4. Configure Auto Scaling Groups:
🟣 Set up Auto Scaling Groups for the VMs to automatically adjust the number of instances based on real-time application demand.
🟣 This ensures that the right amount of resources is always available to handle the traffic load, minimizing downtime.
Steps:
In Azure, an Auto Scaling Group is called a Virtual Machine Scale Set.
✅ Use the search box at the top of the Azure portal to look for “virtual machine size sets”.
✅ To Create virtual machine scale set.
✅ Choose the relevant Subscription under the Basics tab. I’ll make a new Resource group and call it “Liverpool.”
✅ Give your virtual machine scale set a name under Scale set information, then choose the nearest region.
✅ Orchestration mode: Flexible
✅ Security type: Standard
✅ Scaling: Autoscaling: Scaling on any schedule according to a CPU metric.
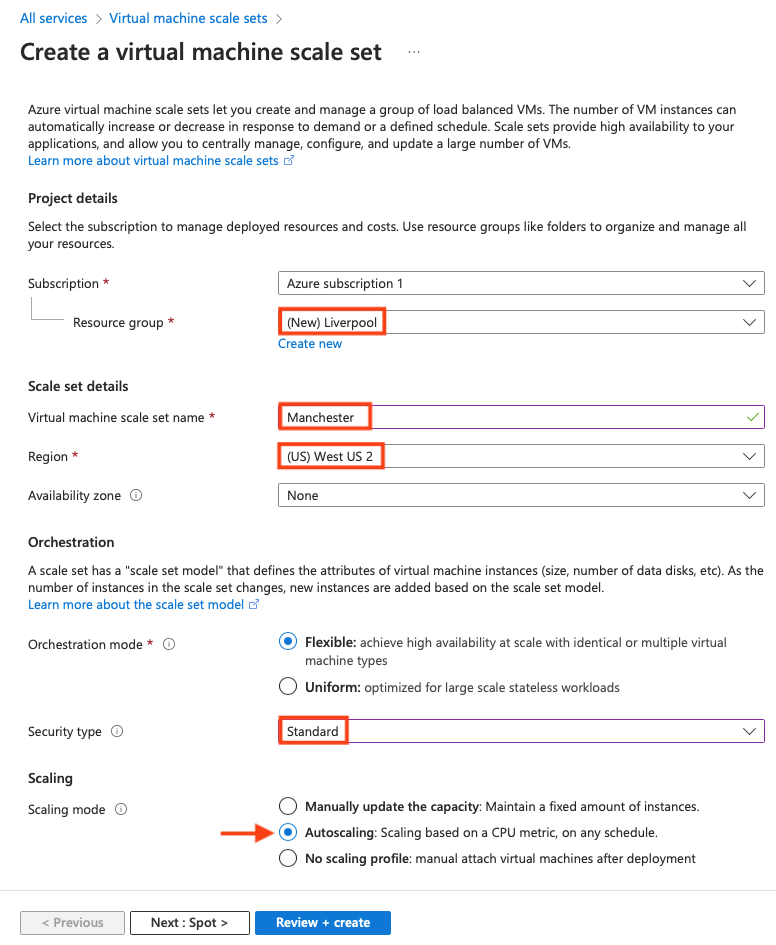
Make sure you scroll down to the Scaling Configuration section to review all scaling options. To do so select “Configure”
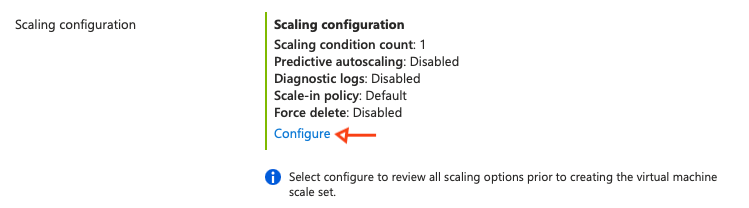
Scaling configuration
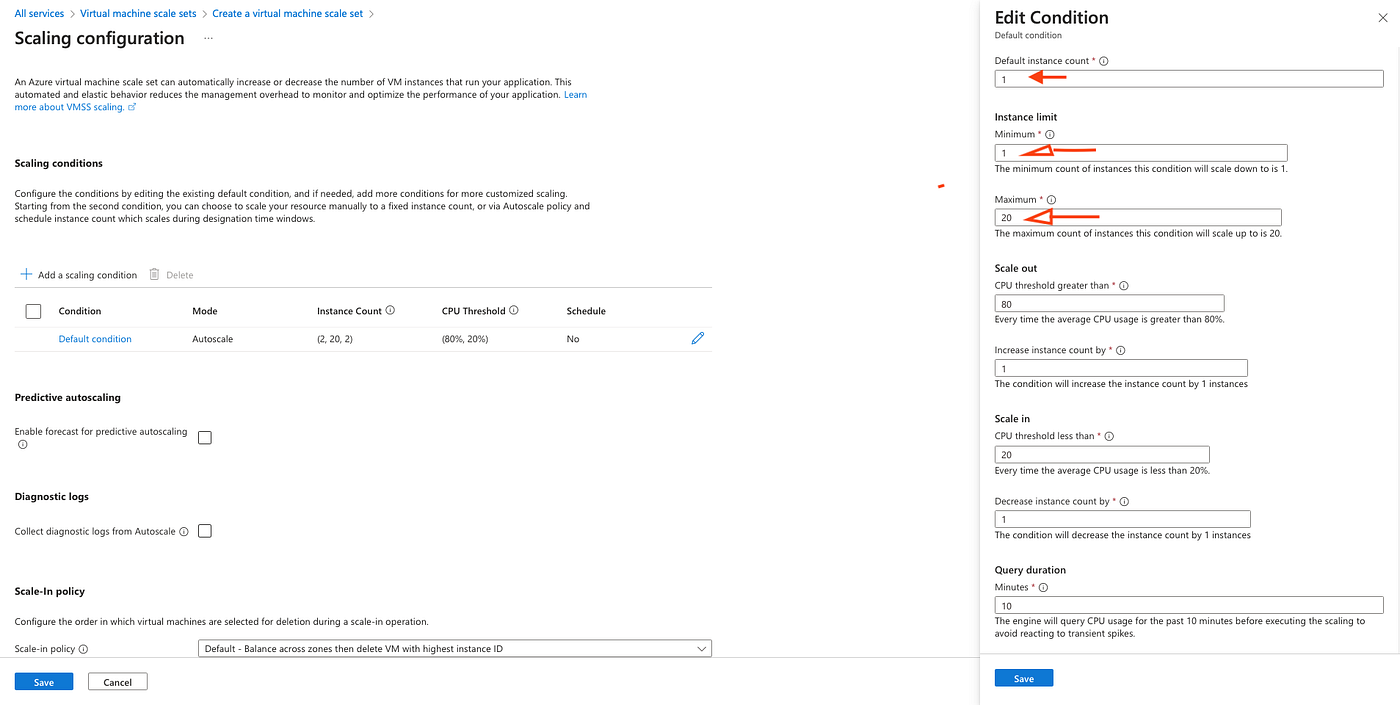
Select “Default condition”, on the right, a second window with the details will open. Two is the initial instance count by default. Under the instance limit, I set this option to 1, the minimum to 1, and the maximum to 20%. The number of instances will rise by one when the CPU threshold surpasses 80%. The instance count will drop by one if the instance CPU threshold falls below 20%. To check CPU utilization against these thresholds, queries will be sent to the instances every ten minutes. To get back to the original Basics page, select Save.
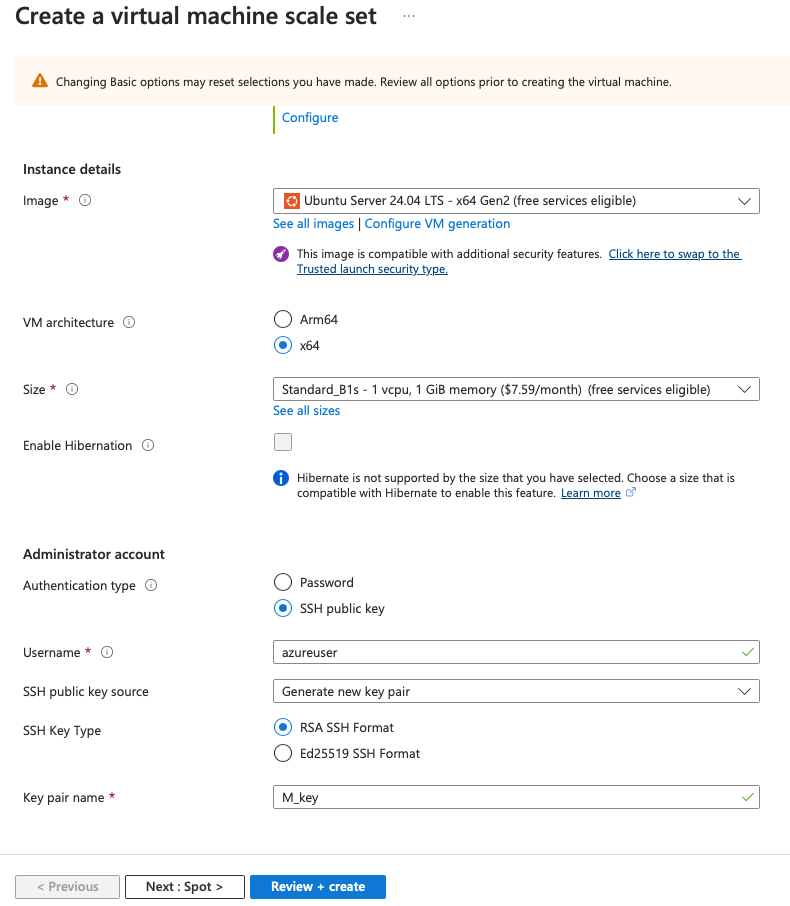
🔹 Under Instance details, I’ll use the default Image (Ubuntu Server 24.04 LTS — X64 Gen2 (free services eligible)
🔹 Size: Standard_B1s — 1 cpu, 1 GiB memory($7.59)/month) (free services eligible)
🔹 I’ll choose SSH public key as the authentication option under the Administrator account section, keep the username at its default value, select Generate new key pair as the source of the SSH public key, select RSA SSH Format as the SSH key type, and give my key pair a unique name next to Key pair name.
☑️ Leave all the settings under Disks tab to their default settings. Navigate to the “Networking” tab and leave the default setting to None right next to Load balancing options.
☑️ Select “Review + create” once validation has passed select “Create”
☑️ A window will popup and that will allow you to download a new key pair that was generated. Click on Download private key and create resource.
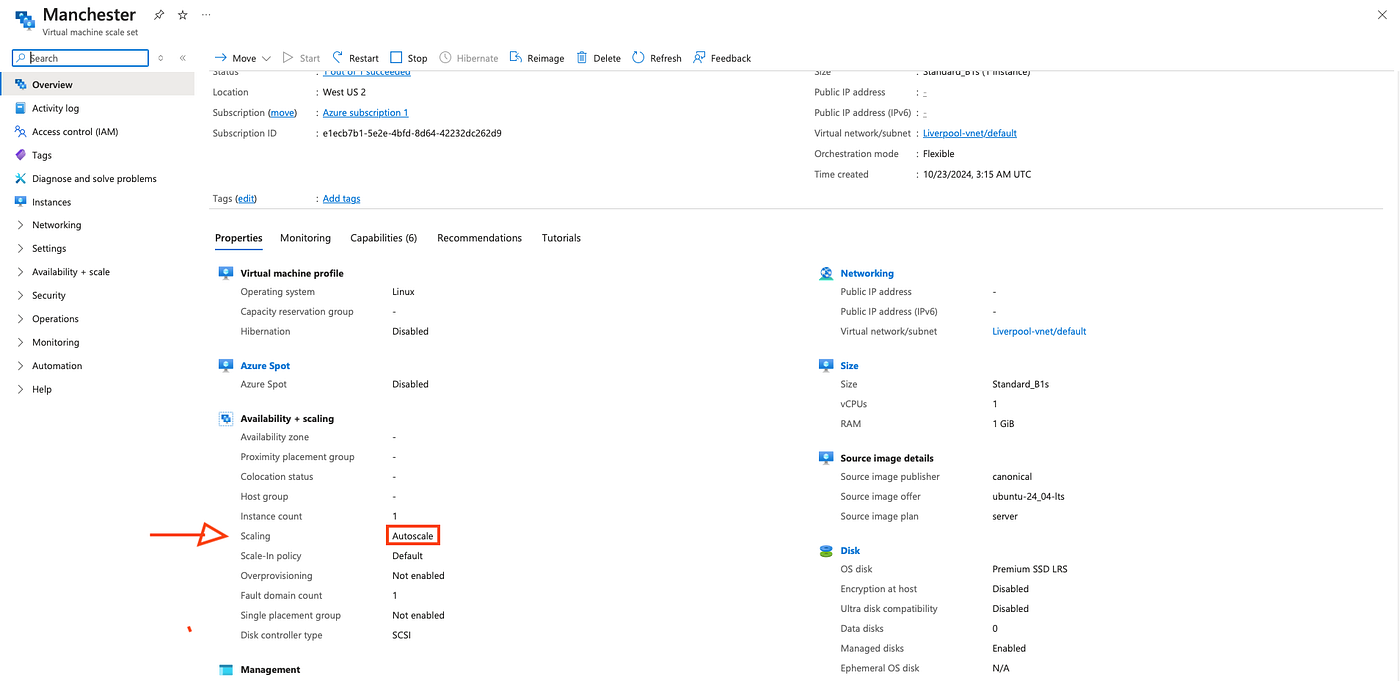
☑️ To access details after deployment is finished, choose Go to resource.
You can see the image below that Scaling option is set to Autoscale.
Conclusion
Through the provision of an all-inclusive, safe, and expandable solution for Azure Virtual Machine management, this project addresses a significant real-world problem. With load balancing and auto scaling in place, Level Up Corporation can dynamically modify resources to satisfy demand while maintaining performance and uptime. The business lowers downtime and removes the possibility of unwanted access by safeguarding remote access using Azure Bastion, SSH, and RDP, improving operational security and efficiency. The capacity to use cloud technology to provide dependable, scalable, and secure IT infrastructure skills is crucial in contemporary cloud environments and this is demonstrated during the course of this project.
메타데이터
- post_id
- 4300a441e336
- slug
- building-resilient-cloud-infrastructure-azure-vm-management-with-auto-scaling-4300a441e336
- url
- https://medium.com/@samkalume.sk65/building-resilient-cloud-infrastructure-azure-vm-management-with-auto-scaling-4300a441e336
- canonical_url
- https://medium.com/@samkalume.sk65/building-resilient-cloud-infrastructure-azure-vm-management-with-auto-scaling-4300a441e336
- author_url
- https://medium.com/@samkalume.sk65
- status
- ok
- fetched_at
- 2026-06-09 15:37:30