How to Integrate AWS SES SMTP with Linux for Reliable Email Delivery
A step-by-step guide to configuring Amazon SES SMTP on Linux using msmtp and Postfix for application emails, alerts and other
Integrating AWS SES with SMTP on Linux
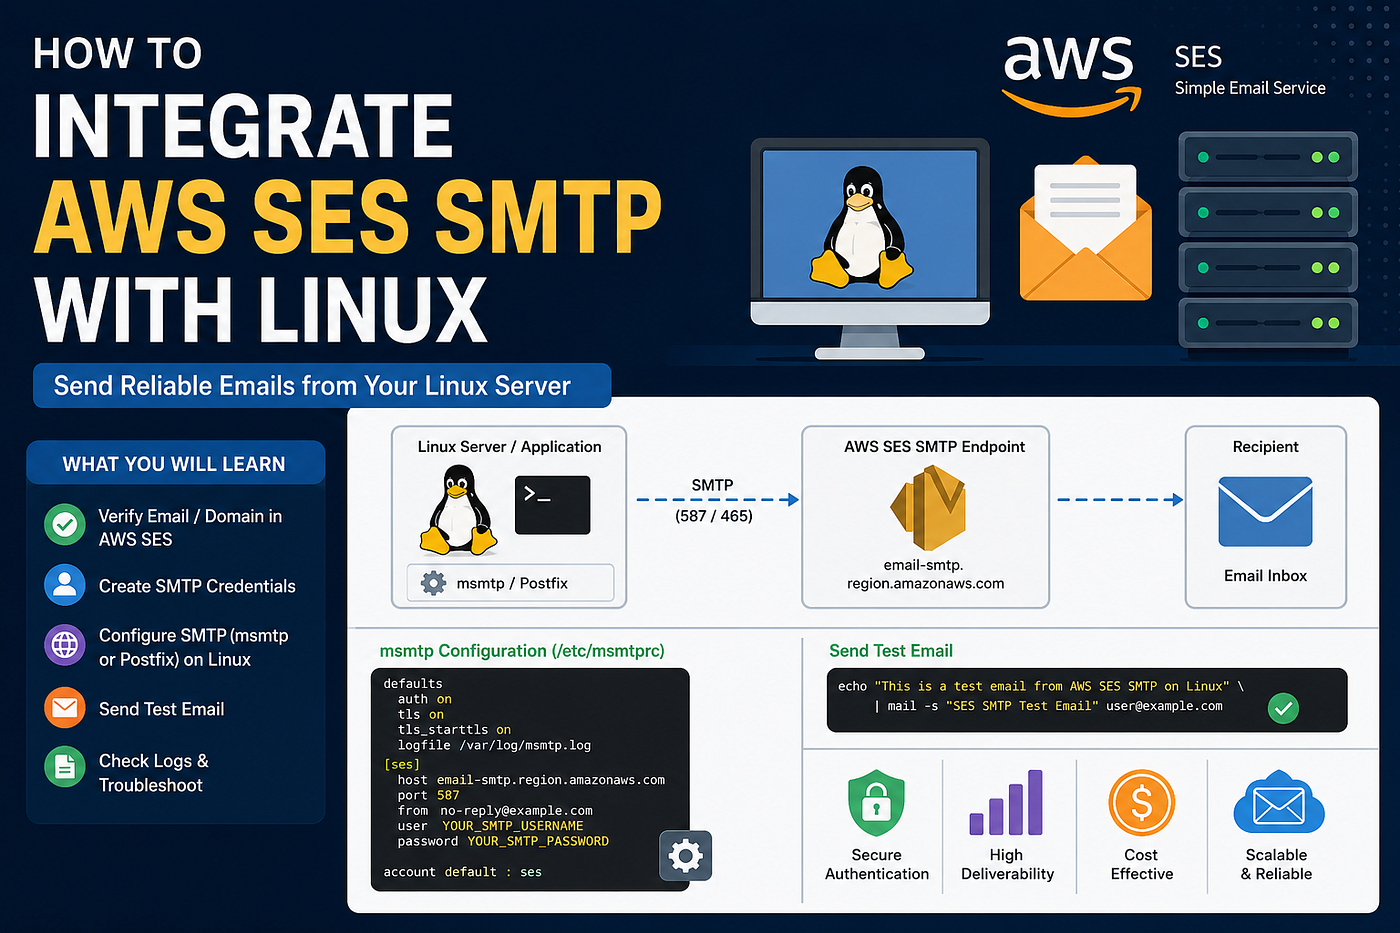
Instead of running our own mail server, a better approach is to use Amazon Simple Email Service, commonly called AWS SES.
In this article, we will configure AWS SES SMTP on a Linux server and send a test email from the command line.
What We Are Going to Build
We will configure a Linux server to send emails using AWS SES SMTP.
The flow looks like this:
Linux Server / Application
        |
        | SMTP
        |
AWS SES SMTP Endpoint
        |
        |
Recipient Email Inbox
Prerequisites
Before starting, make sure you have:
1. An AWS account
2. A verified email address or domain in AWS SES
3. AWS SES SMTP credentials
4. A Linux server
5. Port 587 or 465 allowed for outbound traffic
For production email sending, your SES account should be moved out of the sandbox.
Step 1: Verify Email or Domain in AWS SES
Open the AWS Console and go to:
Amazon SES → Verified identitiesYou can verify either:
Email address
or
Domain
For testing, verifying a single email address is enough.
For production, domain verification is better because it allows you to send emails from addresses like:
no-reply@example.com
support@example.com
alerts@example.com
After verification, AWS SES may ask you to add DNS records, such as DKIM records, in Route 53 or your DNS provider.
Step 2: Create SMTP Credentials
Go to:
Amazon SES → SMTP settings → Create SMTP credentialsAWS will create an IAM user for SMTP sending.
Download or copy these values:
SMTP Username
SMTP Password
Important point:
AWS access keys and SES SMTP credentials are not the same.Do not use your normal AWS access key and secret key as SMTP credentials.
Step 3: Find Your SES SMTP Endpoint
The SMTP endpoint depends on your AWS region.
For example:
US East 1:
email-smtp.us-east-1.amazonaws.com
Use the same region where your SES identity is verified.
Example SMTP details:
SMTP Server: email-smtp.ap-south-1.amazonaws.com
SMTP Port: 587
Encryption: STARTTLS
Authentication: Required
Step 4: Test SMTP Connectivity from Linux
Log in to your Linux server and run:
openssl s_client -starttls smtp -connect email-smtp.ap-south-1.amazonaws.com:587If the connection is successful, you should see the certificate and SMTP response output.
If it fails, check:
Security group outbound rules
NACL rules
Firewall rules
Corporate firewall
Cloud provider restrictions
Step 5: Install msmtp on Linux
For simple SMTP email sending from Linux, it msmtp is lightweight and easy to configure.
Ubuntu / Debian
sudo apt update
sudo apt install msmtp msmtp-mta mailutils -y
Amazon Linux / RHEL / CentOS
sudo dnf install msmtp mailx -yIf It msmtp is not available directly; enable EPEL or install it from your package repository.
Step 6: Configure msmtp
Create the msmtp configuration file:
sudo vi /etc/msmtprcAdd the following configuration:
defaults
auth           on
tls            on
tls_starttls   on
tls_trust_file /etc/ssl/certs/ca-certificates.crt
logfile        /var/log/msmtp.log
account        ses
host           email-smtp.ap-south-1.amazonaws.com
port           587
from           no-reply@example.com
user           YOUR_SES_SMTP_USERNAME
password       YOUR_SES_SMTP_PASSWORD
account default : ses
Replace these values:
no-reply@example.com
YOUR_SES_SMTP_USERNAME
YOUR_SES_SMTP_PASSWORD
email-smtp.ap-south-1.amazonaws.com
Set proper permissions:
sudo chmod 600 /etc/msmtprcCreate the log file:
sudo touch /var/log/msmtp.log
sudo chmod 666 /var/log/msmtp.log
Step 7: Send a Test Email
Run this command:
echo "This is a test email from AWS SES SMTP on Linux" | mail -s "SES SMTP Test Email" user@example.comIf everything is configured correctly, the recipient should receive the email.
You can also test using msmtp directly:
cat <<EOF | msmtp user@example.com
From: no-reply@example.com
To: user@example.com
Subject: SES SMTP TestHello,This email was sent from a Linux server using AWS SES SMTP.Thanks
EOFStep 8: Configure Postfix to Relay Emails Through SES
If your server or application already uses Postfix, you can configure Postfix to relay emails through AWS SES.
Install Postfix:
Ubuntu / Debian
sudo apt install postfix mailutils libsasl2-modules -yAmazon Linux / RHEL
sudo dnf install postfix cyrus-sasl-plain mailx -yEdit Postfix configuration:
sudo vi /etc/postfix/main.cfAdd or update:
relayhost = [email-smtp.ap-south-1.amazonaws.com]:587
smtp_sasl_auth_enable = yes
smtp_sasl_security_options = noanonymous
smtp_sasl_password_maps = hash:/etc/postfix/sasl_passwd
smtp_use_tls = yes
smtp_tls_security_level = encrypt
smtp_tls_note_starttls_offer = yes
Create the SMTP password file:
sudo vi /etc/postfix/sasl_passwdAdd:
[email-smtp.ap-south-1.amazonaws.com]:587 YOUR_SES_SMTP_USERNAME:YOUR_SES_SMTP_PASSWORDSecure and generate the Postfix map:
sudo chmod 600 /etc/postfix/sasl_passwd
sudo postmap /etc/postfix/sasl_passwd
Restart Postfix:
sudo systemctl restart postfix
sudo systemctl enable postfix
Send a test email:
echo "Testing AWS SES SMTP relay using Postfix" | mail -s "Postfix SES Test" user@example.comStep 9: Check Logs
For msmtp:
cat /var/log/msmtp.logFor Postfix:
sudo tail -f /var/log/maillogor on Ubuntu:
sudo tail -f /var/log/mail.logCommon successful log message:
status=sentCommon failure messages:
Authentication failed
Connection timed out
Email address is not verified
Message rejected
Daily sending quota exceeded
Common Issues and Fixes
1. Authentication Failed
Check whether you are using SES SMTP credentials.
Do not use AWS IAM access keys directly.
2. Email Address Not Verified
If your SES account is still in sandbox mode, both sender and recipient email addresses must be verified.
Fix:
Verify recipient email addressor
Request production access for SES3. Connection Timeout
Check whether port 587 is allowed outbound from the server.
Test using:
telnet email-smtp.ap-south-1.amazonaws.com 587or:
openssl s_client -starttls smtp -connect email-smtp.ap-south-1.amazonaws.com:5874. Emails Going to Spam
Make sure your domain has proper DNS records:
SPF
DKIM
DMARC
Also, avoid sending emails from random addresses.
Use a proper sender address like:
no-reply@example.comSecurity Best Practices
Do not hardcode SMTP credentials inside application code.
Use:
Environment variables
Secrets Manager
Parameter Store
Restricted file permissions
Also, rotate SMTP credentials periodically.
For production workloads, prefer domain verification instead of single email verification.
Final Thoughts
AWS SES is a reliable and cost-effective way to send emails from Linux servers, applications, cron jobs, monitoring scripts, and backend services.
For small use cases, it msmtp is simple and lightweight.
For servers that already depend on local mail delivery, Postfix with SES relay is a better option.
Once SES is configured correctly, you can avoid maintaining your own email server and let AWS handle the email delivery layer.
메타데이터
- post_id
- 45558b405cd0
- slug
- how-to-integrate-aws-ses-smtp-with-linux-for-reliable-email-delivery-45558b405cd0
- url
- https://medium.com/@manojkumarcloud/how-to-integrate-aws-ses-smtp-with-linux-for-reliable-email-delivery-45558b405cd0
- canonical_url
- https://medium.com/@manojkumarcloud/how-to-integrate-aws-ses-smtp-with-linux-for-reliable-email-delivery-45558b405cd0
- author_url
- https://medium.com/@manojkumarcloud
- status
- ok
- fetched_at
- 2026-06-21 12:17:11