Containers Are Just Linux Processes With Better Boundaries
Building a mini-Docker from scratch with Linux namespaces and chroot
Containers Are Just Linux Processes With Better Boundaries
Building a mini-Docker from scratch with Linux namespaces and chroot
header image how containers work
When I first started using Docker, I thought containers were some kind of lightweight virtual machines. Tiny computers inside my computer. Magic boxes that somehow ran my code in isolation.
I was wrong.
And if you think the same way, you’re in good company. Most developers start with docker run commands, not Linux internals. That's why containers can feel like magic or, worse, like something too complex to truly understand.
But here’s the truth that changed everything for me:
A container is just a regular Linux process.
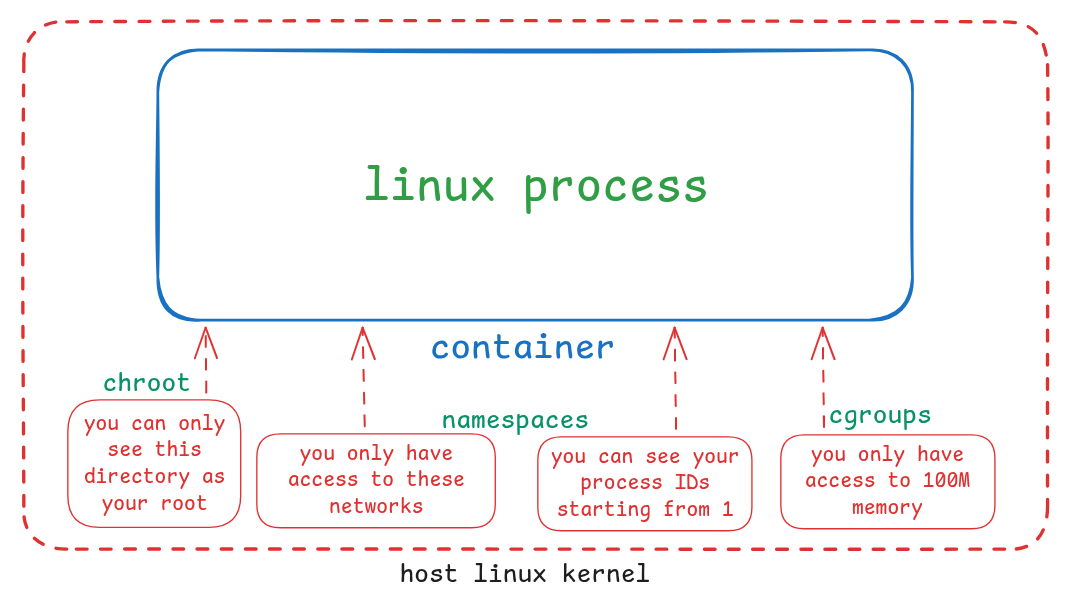
That’s it. Not a mini-VM. Not a separate operating system. Just a process like any other program running on your computer but with some clever boundaries drawn around it.

Image explaining how a linux process with access limited looks like
In this article, I’ll show you exactly how this works by building three tiny programs in Go. Each one will peel back another layer of the container mystery:
- First, we’ll launch a process with no isolation at all
- Then, we’ll add namespace isolation (where things start to feel “container-like”)
- Finally, we’ll add filesystem isolation using Alpine Linux file system
If you have a Linux machine, Go installed, and sudo access, you can run every single line of code yourself. No Docker required.
The Lightbulb Moment: Containers vs Virtual Machines
Before we dive into code, let’s clear up the biggest misconception.
Here’s what makes virtual machines and containers fundamentally different:
Virtual Machines:
- Emulate an entire computer, including fake hardware
- Run a complete guest operating system with its own kernel
- Heavy they take time to boot and consume significant memory
- Isolated through a hypervisor (a strong, thick boundary)
Containers:
- Reuse the host’s Linux kernel
- No separate kernel or operating system
- Lightweight they start in milliseconds and use minimal memory
- Isolated through Linux kernel features (a clever, thin boundary)

vms vs containers
Think of it this way: A virtual machine is like building a house inside a warehouse. A container is like drawing rooms on the warehouse floor with tape. Both give you separated spaces, but one is far lighter than the other.
The key insight:
A container is not a special machine type. It’s a process tree with controlled visibility and privileges.
That single sentence is worth reading twice.
What You’ll Need
To follow along(better if you can, but not a must), you’ll need:
- A Linux machine (Ubuntu, Debian, Fedora, or similar)
- Go installed (any recent version works)
sudoaccess (we'll need it for namespace and chroot operations)
Please clone this repo for all the code files, scripts: https://github.com/isurucuma/linux-containerization
Don’t worry if you’ve never written Go before. The code is simple, and I’ll explain every important line.
Step 1: Running a Process With No Isolation
Let’s start with the simplest possible version: launching a process without any container features at all.
Here’s our first program:
package main

import (
 "fmt"
 "os"
 "os/exec"
)

func main() {
 if len(os.Args) < 2 {
  panic("usage: run <cmd> [args...] | child <cmd> [args...]")
 }

 switch os.Args[1] {
 case "run":
  run()
 case "child":
  child()
 default:
  panic("unknown command")
 }
}

func run() {
 if len(os.Args) < 3 {
  panic("usage: run <cmd> [args...]")
 }

 fmt.Printf("[parent] cmd=%v pid=%d\n", os.Args[2:], os.Getpid())

 args := append([]string{"child"}, os.Args[2:]...)
 cmd := exec.Command("/proc/self/exe", args...)
 cmd.Stdin = os.Stdin
 cmd.Stdout = os.Stdout
 cmd.Stderr = os.Stderr

 if err := cmd.Run(); err != nil {
  panic(err)
 }
}

func child() {
 if len(os.Args) < 3 {
  panic("usage: child <cmd> [args...]")
 }

 command := os.Args[2]
 commandArgs := os.Args[3:]

 fmt.Printf("[child] cmd=%v pid=%d\n", os.Args[2:], os.Getpid())

 cmd := exec.Command(command, commandArgs...)
 cmd.Stdin = os.Stdin
 cmd.Stdout = os.Stdout
 cmd.Stderr = os.Stderr

 if err := cmd.Run(); err != nil {
  panic(err)
 }
}
Save this as without-constraints/main.go and run it:
go build -o bin/without-constraints ./cmd/without-constraints
./bin/without-contraints run /bin/sh
You’ll see output like:

without-constraints program output
What’s Actually Happening Here?
This program does something that might seem odd at first: it runs itself twice.
- You call it with
runmode - It immediately launches itself again in
childmode - The child mode then runs your actual command (
/bin/sh)
“Why the two-step dance?” you might ask. Great question.

image illustrating how the parent process runs itself as another chile process
This re-execution pattern is the foundation of how container runtimes work. When we add isolation features in the next steps, those features need to be applied when creating a new process, not when calling a function. The parent process sets up the isolation flags, then spawns a child process that lives inside those boundaries.
The Magic of /proc/self/exe
Look at this line closely:
args := append([]string{"child"}, os.Args[2:]...)
cmd := exec.Command("/proc/self/exe", args...)
/proc/self/exe is a special file that points to the currently running program. It's like a mirror: when you look at it, you see yourself.
So when we do exec.Command("/proc/self/exe", ...), we're telling Linux: "Run this same program again, but with different arguments."
Why not just call child() directly as a function? Because namespace isolation (which we'll add next) requires a brand new process. You can't "become isolated" mid-execution you have to be born isolated.
What to Notice
Right now, there’s zero isolation:
- Both PIDs are visible on the host
- Both processes share the same hostname
- Both see the same filesystem
- Both see the same list of running processes
This is just regular process launching. But it’s the skeleton we’ll build on.
Understanding Namespaces: The Core Container Trick
Before we write more code, you need to understand what namespaces actually are.
Imagine you’re in a busy office building. You can see everyone, hear every conversation, and access every room. Now imagine someone gives you special glasses that only show you people on your floor. And earplugs that only let through sounds from your department. And a key card that only opens certain doors.
You’re still in the same building, using the same electricity and plumbing. But your view of the building is now scoped.

That’s what Linux namespaces do.
A namespace gives a process a private view of some system resource. The kernel is shared (the building), but each process can have its own perspective (the filtered view).
Here are the three namespaces we’ll use:
- UTS Hostname and domain name. Your container can be named “web-server” even if the host is named “laptop-001”.
- PID Process ID numbering Inside the container, your app appears to be PID 1 (like it’s the only thing running).
- Mount Filesystem mount table You can mount/unmount filesystems without affecting the host
Why this matters:
- Without UTS isolation, your container would show the host’s hostname (information leakage)
- Without PID isolation, running
pswould show every process on the host (no privacy) - Without mount isolation, your mount operations could mess with the host filesystem (dangerous!)
These boundaries aren’t absolute security barriers they’re visibility controls. But they provide most of the separation people expect from containers.
Step 2: Adding Namespace Isolation
Now let’s add the actual “container” part. We’ll modify our program to create isolated namespaces.
Here’s the updated code:
package main

import (
 "fmt"
 "os"
 "os/exec"
 "syscall"
)

func main() {
 if len(os.Args) < 2 {
  panic("usage: run <cmd> [args...] | child <cmd> [args...]")
 }

 switch os.Args[1] {
 case "run":
  run()
 case "child":
  child()
 default:
  panic("unknown command")
 }
}

func run() {
 if len(os.Args) < 3 {
  panic("usage: run <cmd> [args...]")
 }

 fmt.Printf("[parent] cmd=%v pid=%d\n", os.Args[2:], os.Getpid())

 args := append([]string{"child"}, os.Args[2:]...)
 cmd := exec.Command("/proc/self/exe", args...)
 cmd.Stdin = os.Stdin
 cmd.Stdout = os.Stdout
 cmd.Stderr = os.Stderr
 cmd.SysProcAttr = &syscall.SysProcAttr{
  Cloneflags: syscall.CLONE_NEWUTS | syscall.CLONE_NEWPID | syscall.CLONE_NEWNS,
 }

 if err := cmd.Run(); err != nil {
  panic(err)
 }
}

func child() {
 if len(os.Args) < 3 {
  panic("usage: child <cmd> [args...]")
 }

 command := os.Args[2]
 commandArgs := os.Args[3:]

 fmt.Printf("[child] cmd=%v pid=%d\n", os.Args[2:], os.Getpid())

 cmd := exec.Command(command, commandArgs...)
 cmd.Stdin = os.Stdin
 cmd.Stdout = os.Stdout
 cmd.Stderr = os.Stderr

 if err := cmd.Run(); err != nil {
  panic(err)
 }
}
Save this as namespaces/main.go and run it:
go build -o bin/namespaces ./cmd/namespaces
sudo ./bin/namespaces run /bin/sh
(Note: You need sudo because creating new namespaces requires elevated privileges.)
I will change the hostname inside the container

changing hostname inside the container
But lets spawn a new terminal and see the host’s hostname

check the hotname from the host
As you can see the host’s hostname is not changed, that itself explains how namespaces work
The One Line That Changes Everything
The magic happens right here:
cmd.SysProcAttr = &syscall.SysProcAttr{
    Cloneflags: syscall.CLONE_NEWUTS | syscall.CLONE_NEWPID | syscall.CLONE_NEWNS,
}
This tells the Linux kernel: “When you create this new process, put it in brand new UTS, PID, and mount namespaces.”
Those flags are:
CLONE_NEWUTS: Give this process its own hostname viewCLONE_NEWPID: Give this process its own PID numbering (it becomes PID 1 in its own universe)CLONE_NEWNS: Give this process its own mount table view

What You’ll See
When you run the command, you might see something like:

Notice anything wild? The child process thinks it’s PID 1!
From the child’s perspective, it’s the first process in the entire system (like the init process that starts when Linux boots). But from the host's perspective, it's just process 218xx among thousands.
This is the container illusion in action.
What’s Still Missing?
Even with namespaces, the process is still using the host’s root filesystem. If you run ls /, you'll see the host's directories. If you run cat /etc/hostname, you'll see the host's hostname.
Namespaces gave us isolation, but we haven’t given our container its own filesystem yet.
That’s the next step.
Step 3: Adding Filesystem Isolation
Now we’re going to do something that will make this feel like a “real” container: give it its own root filesystem.
We’ll use Alpine Linux rootfs(root file system) a tiny Linux distribution that’s only about 5MB that contains everything needed for a minimal Linux environment.
Getting Alpine Minirootfs
First, use the following shell script file to download the Alpine’s mini root filesystem: https://raw.githubusercontent.com/isurucuma/linux-containerization/refs/heads/main/setup-chroot.sh
./setup-chroot.shYou now have a complete (minimal) Linux filesystem sitting in a folder. It has /bin, /etc, /lib, and all the usual directories just without your host's specific files.

The Code
Here’s our final version:
package main

import (
 "fmt"
 "os"
 "os/exec"
 "syscall"
)

func main() {
 if len(os.Args) < 2 {
  panic("usage: run <rootfs> <cmd> [args...] | child <rootfs> <cmd> [args...]")
 }

 switch os.Args[1] {
 case "run":
  run()
 case "child":
  child()
 default:
  panic("unknown command")
 }
}

func run() {
 if len(os.Args) < 4 {
  panic("usage: run <rootfs> <cmd> [args...]")
 }

 rootfs := os.Args[2]
 fmt.Printf("[parent] rootfs=%s cmd=%v pid=%d\n", rootfs, os.Args[3:], os.Getpid())

 args := append([]string{"child", rootfs}, os.Args[3:]...)
 cmd := exec.Command("/proc/self/exe", args...)
 cmd.Stdin = os.Stdin
 cmd.Stdout = os.Stdout
 cmd.Stderr = os.Stderr
 cmd.SysProcAttr = &syscall.SysProcAttr{
  Cloneflags: syscall.CLONE_NEWUTS | syscall.CLONE_NEWPID | syscall.CLONE_NEWNS,
 }

 if err := cmd.Run(); err != nil {
  panic(err)
 }
}

func child() {
 if len(os.Args) < 4 {
  panic("usage: child <rootfs> <cmd> [args...]")
 }

 rootfs := os.Args[2]
 command := os.Args[3]
 commandArgs := os.Args[4:]

 fmt.Printf("[child] rootfs=%s cmd=%v pid=%d\n", rootfs, os.Args[3:], os.Getpid())

 if err := syscall.Sethostname([]byte("alpine-container")); err != nil {
  panic(err)
 }

 if err := syscall.Mount("", "/", "", uintptr(syscall.MS_PRIVATE|syscall.MS_REC), ""); err != nil {
  panic(err)
 }

 if err := syscall.Chroot(rootfs); err != nil {
  panic(err)
 }

 if err := os.Chdir("/"); err != nil {
  panic(err)
 }

 if err := os.MkdirAll("/proc", 0o755); err != nil {
  panic(err)
 }

 if err := syscall.Mount("proc", "/proc", "proc", 0, ""); err != nil {
  panic(err)
 }
 defer syscall.Unmount("/proc", 0)

 cmd := exec.Command(command, commandArgs...)
 cmd.Stdin = os.Stdin
 cmd.Stdout = os.Stdout
 cmd.Stderr = os.Stderr

 if err := cmd.Run(); err != nil {
  panic(err)
 }
}
Save this as chroot/main.go.
Running Your First “Real” Container
Try this:
go build -o bin/chroot ./cmd/chroot
sudo go run chroot/main.go run ./chroot /bin/sh
You’ll get a shell prompt. Now type:
hostnameYou’ll see alpine-containernot your host's hostname.
Try this:
ls /You’ll see Alpine’s filesystem, not your host’s.
Try this:
psYou’ll only see processes in your container’s PID namespace.

You just built a container from scratch.
Breaking Down the Critical Lines
Let’s walk through what’s happening in the child() function:
1. Set a custom hostname:
syscall.Sethostname([]byte("alpine-container"))This proves our UTS namespace is working. We can change the hostname without affecting the host.
2. Prevent mount propagation:
syscall.Mount("", "/", "", uintptr(syscall.MS_PRIVATE|syscall.MS_REC), "")This tells Linux: “Any mounts I do from now on should stay private to me.” Without this, mount operations could leak to the host system.
3. Change the root filesystem:
syscall.Chroot(rootfs)chroot means "change root." After this call, / no longer points to the host's root directory it points to our Alpine directory. It's like swapping out the entire filesystem while the process is running.
4. Move into the new root:
os.Chdir("/")Even after changing the root, our current working directory might still reference the old filesystem. This moves us fully into the new context.
5. Mount /proc:
os.MkdirAll("/proc", 0o755)
syscall.Mount("proc", "/proc", "proc", 0, "")
/proc is a special virtual filesystem that shows information about processes. We need to mount it inside our new root so commands like ps work correctly.
The defer statement ensures we clean up the mount when the container exits.
The Full Picture: What We’ve Built
Let’s recap what our tiny container runtime does:
- Creates a new process with isolated namespaces (UTS, PID, mount)
- Changes the root filesystem to a minimal Alpine Linux environment
- Sets up a custom hostname to prove isolation
- Mounts
/procso process inspection works - Runs your command inside this isolated context
This is genuinely how containers work under the hood. The core ideas are identical to Docker, just without all the production features.
So What Does Docker Actually Add?
You might be wondering: “If I just built a container in 100 lines of Go, what is Docker doing with its millions of lines of code?”
Great question. Docker adds all the stuff you need to run containers in production:

Think of it this way:
- Linux kernel provides the raw primitives (namespaces, cgroups, chroot)
- OCI runtimes (like
runc) turn those primitives into a standard container format - Docker wraps everything in beautiful developer UX and production features
But the core truth remains: containers are just processes with boundaries.
Why This Matters
Understanding this changes how you work with containers:
When debugging:
- Instead of thinking “the container is broken,” you can think “which isolation boundary is causing this issue?”
- You can use tools like
nsenterto peek into namespaces - You understand why mounting volumes is just mount namespace manipulation
When securing:
- You know containers share the kernel (so a kernel vulnerability affects all containers)
- You understand why rootless containers need user namespaces
- You can reason about what capabilities and seccomp profiles actually control
When optimizing:
- You understand why containers start fast (no OS boot, just process fork)
- You know why they’re light (shared kernel, no hardware emulation)
- You can make informed decisions about when to use containers vs VMs
The One Thing to Remember
If you take away only one thing from this article, let it be this:
Containers are not mini virtual machines. They are Linux processes with constrained visibility and privilege.
When you run docker run, you are not booting a new operating system. You're not starting a virtual machine. You're launching a process that the Linux kernel has placed inside carefully drawn boundaries.
The magic isn’t in the container technology itself it’s in how cleverly Linux lets processes have their own view of the system while sharing the same kernel.
Going Further
If this sparked your curiosity and you want to keep learning, here are some natural next steps:
- Add cgroups to limit memory, CPU, and PID usage
- Explore user namespaces for rootless containers (running containers without sudo)
- Add network namespaces and virtual ethernet pairs for isolated networking
- Replace chroot with pivot_root (the production-grade way to change roots)
- Read the OCI runtime specification to see how the industry standardized all of this
But honestly, if you’ve made it this far and run the code yourself, you already understand containers at a deeper level than most developers who use them daily.
And that understanding will serve you well.
Ready to try it yourself? All the code from this article is available to run. Fire up a Linux terminal and start with Step 1. By Step 3, you’ll have built your own container runtime from scratch.
Use this repo: https://github.com/isurucuma/linux-containerization
No magic required. Just Linux, doing what it does best.
메타데이터
- post_id
- 465661f89d58
- slug
- containers-are-just-linux-processes-with-better-boundaries-465661f89d58
- url
- https://medium.com/codex/containers-are-just-linux-processes-with-better-boundaries-465661f89d58
- canonical_url
- https://medium.com/codex/containers-are-just-linux-processes-with-better-boundaries-465661f89d58
- author_url
- https://medium.com/@isurucuma
- status
- ok
- fetched_at
- 2026-07-13 06:23:13