How to Build a Highly Available MySQL Setup with HAProxy and Keepalived
A step-by-step tutorial for load balancing two MySQL clusters through a single floating virtual IP, with automatic failover between two…
How to Build a Highly Available MySQL Setup with HAProxy and Keepalived
A step-by-step tutorial for load balancing two MySQL clusters through a single floating virtual IP, with automatic failover between two HAProxy nodes
▶️ **YouTube , [📸 Instagram](https://www.instagram.com/devops_voice) , [💼 LinkedIn](https://www.linkedin.com/in/tushar-jadhav29/) , [✍️ Medium](https://medium.com/@tushar.jadhav29)**
**Non-Member= Click HERE!**
Introduction
A single load balancer is a single point of failure. If it goes down, it doesn’t matter how resilient your MySQL clusters are — nothing can reach them.
This guide walks through a production-style setup that removes that weak point:
- Two HAProxy nodes compiled from source and installed under a custom path
- Keepalived running VRRP between them, sharing one floating virtual IP (VIP)
- Two independent MySQL clusters — one on port
3306, one on port3308— each load balanced through its own HAProxy listener - systemd services for both HAProxy and Keepalived, so everything survives a reboot
- A working failover test so you know it actually works before you trust it in production
By the end, you’ll have a setup where either HAProxy node can go down and traffic keeps flowing through the VIP without a single manual step.
HAProxy High Availability Architecture
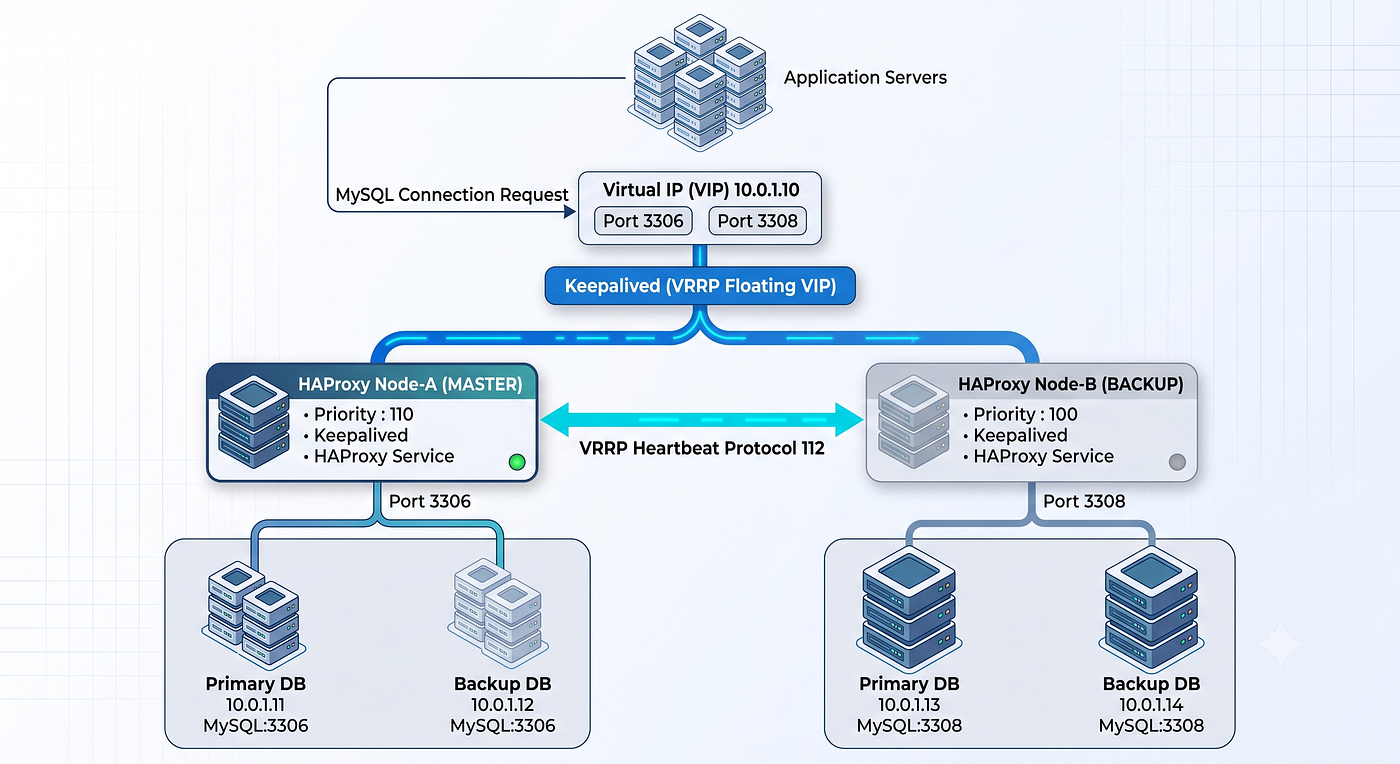
Architecture overview
Here’s the full picture before we touch a terminal:
- Clients connect to one address only: the virtual IP,
10.x.x.10 - Keepalived decides which HAProxy node currently owns that IP, using the VRRP protocol
- The active node (MASTER) holds the VIP and forwards connections; the standby node (BACKUP) sits idle, watching for a heartbeat
- Each HAProxy instance runs two independent listeners:
3306→ MySQL cluster 1 (db1,db2)3308→ MySQL cluster 2 (db3,db4)- Inside each listener, HAProxy uses
mysql-checkto confirm a backend is actually alive before sending it traffic, andbalance firstto concentrate connections on the primary node while keeping the second as a hot spare
If node A’s HAProxy process dies, Keepalived detects it within a couple of seconds and moves the VIP to node B automatically — no DNS changes, no application reconfiguration, no manual intervention.
Prerequisites
Before you start, confirm two things:
- Network interface name. Run
ip aon both nodes. This guide useseth0, but cloud VMs (Azure, AWS, GCP) often useens5,eth0, or similar — adjust theinterfaceline inkeepalived.confto match. - What
mysql-checkdoes and doesn't do. HAProxy's built-in MySQL check confirms the backend accepts a connection — it does not check theread_onlyflag. If you need HAProxy to route writes only to the writable node, you'll want an agent-based check instead of the built-in one (see the FAQ below).
You’ll also need:
- Two Linux servers to run HAProxy + Keepalived (referred to as Node A and Node B)
- Two MySQL clusters already running, reachable at their internal IPs
- Root or sudo access on both HAProxy nodes
- A free private IP on the same subnet to use as the VIP
Step 1 — Prepare the directory structure
Everything in this guide installs under /data/softwares instead of the usual system paths. This keeps HAProxy and Keepalived self-contained, easy to back up, and easy to remove cleanly.
sudo mkdir -p /data/softwares/src
sudo mkdir -p /data/softwares/haproxy/{sbin,etc,run,lib}
sudo mkdir -p /data/softwares/keepalived
/data/softwares/
├── haproxy/ ← HAProxy install
│ ├── sbin/haproxy
│ ├── etc/haproxy.cfg
│ └── run/
├── keepalived/ ← Keepalived install
│ └── etc/keepalived.conf
└── src/ ← Source tarballsInstallation Flow

Step 2 — Install HAProxy from source
Install build dependencies
sudo yum groupinstall "Development Tools" -y
sudo yum install openssl-devel pcre2-devel systemd-devel zlib-devel lua-devel wget -y
Download HAProxy 3.4 (LTS)
cd /data/softwares/src
sudo wget https://www.haproxy.org/download/3.4/src/haproxy-3.4.0.tar.gz
sudo tar -xzvf haproxy-3.4.0.tar.gz
cd haproxy-3.4.0
Compile with a custom prefix
sudo make TARGET=linux-glibc \
  USE_OPENSSL=1 \
  USE_PCRE2=1 \
  USE_ZLIB=1 \
  USE_LUA=1 \
  USE_SYSTEMD=1 \
  PREFIX=/data/softwares/haproxy

sudo make install PREFIX=/data/softwares/haproxy
This puts the binary at /data/softwares/haproxy/sbin/haproxy.
Verify the build
/data/softwares/haproxy/sbin/haproxy -vCreate a dedicated system user
Running HAProxy as its own unprivileged user limits the blast radius if it’s ever compromised.
sudo useradd -r -s /sbin/nologin haproxy

sudo chown -R haproxy:haproxy /data/softwares/haproxy/run
sudo chown -R haproxy:haproxy /data/softwares/haproxy/lib
Create the systemd service
sudo vi /etc/systemd/system/haproxy.service## ini
[Unit]
Description=HAProxy Load Balancer
After=network-online.target
Wants=network-online.target
[Service]
Environment="CONFIG=/data/softwares/haproxy/etc/haproxy.cfg" "PIDFILE=/data/softwares/haproxy/run/haproxy.pid"
ExecStartPre=/data/softwares/haproxy/sbin/haproxy -f $CONFIG -c -q
ExecStart=/data/softwares/haproxy/sbin/haproxy -Ws -f $CONFIG -p $PIDFILE
ExecReload=/data/softwares/haproxy/sbin/haproxy -f $CONFIG -c -q
ExecReload=/bin/kill -USR2 $MAINPID
Restart=always
Type=notify
[Install]
WantedBy=multi-user.targetNote the ExecStartPre line — HAProxy validates the config before attempting to start, so a typo in haproxy.cfg fails loudly at startup instead of silently breaking traffic.
Repeat Step 2 on both HAProxy nodes.
Step 3 — Create the MySQL health-check user
HAProxy needs a MySQL user to run its health checks against. On both nodes of each MySQL cluster, run:
## sql
CREATE USER 'haproxy_check'@'%' IDENTIFIED BY '';
FLUSH PRIVILEGES;
This account needs no privileges beyond connecting — HAProxy’s mysql-check only opens and closes a connection to confirm the server responds.
Step 4 — Configure HAProxy
sudo vi /data/softwares/haproxy/etc/haproxy.cfg## haproxy
global
log /dev/log local0
maxconn 4096
user haproxy
group haproxy
daemon
stats socket /data/softwares/haproxy/run/admin.sock mode 660 level admin
defaults
log global
mode tcp
option tcplog
retries 3
timeout connect 5s
timeout client 60m
timeout server 60m
#---------------------------------------
# Stats page
#---------------------------------------
listen stats
bind *:8404
mode http
stats enable
stats uri /stats
stats refresh 5s
stats admin if TRUE
#---------------------------------------
# MySQL Cluster 1 (Port 3306)
#---------------------------------------
listen mysql-cluster1
bind *:3306
mode tcp
option mysql-check user haproxy_check
balance first
server db1 10.0.1.11:3306 check port 3306 inter 2s rise 2 fall 2
server db2 10.0.1.12:3306 check port 3306 inter 2s rise 2 fall 2 backup
#---------------------------------------
# MySQL Cluster 2 (Port 3308)
#---------------------------------------
listen mysql-cluster2
bind *:3308
mode tcp
option mysql-check user haproxy_check
balance first
server db3 10.0.1.13:3308 check port 3308 inter 2s rise 2 fall 2
server db4 10.0.1.14:3308 check port 3308 inter 2s rise 2 fall 2 backupA few details worth understanding, not just copying:
**balance first** sends all traffic to the first available server and only spills over to the next once it's saturated or down — ideal when one node should stay primary and the other should mostly sit as a hot spare.**backup** ondb2anddb4marks them as fallback servers: they only receive traffic when the primary in their listener fails its health check.**inter 2s rise 2 fall 2** means HAProxy checks each backend every 2 seconds and needs 2 consecutive successes or failures before flipping its state — this avoids flapping on a single slow response.
Validate and start
/data/softwares/haproxy/sbin/haproxy -f /data/softwares/haproxy/etc/haproxy.cfg -c

sudo systemctl daemon-reload
sudo systemctl enable haproxy
sudo systemctl start haproxy
sudo systemctl status haproxy
Repeat this configuration on both nodes — they should be identical.
Step 5 — Install Keepalived from source
Install build dependencies
sudo yum install openssl-devel libnl3-devel ipset-devel iptables-devel gcc make wget -yDownload and compile with a custom prefix
cd /data/softwares/src
sudo wget https://www.keepalived.org/software/keepalived-2.3.1.tar.gz
sudo tar -xzvf keepalived-2.3.1.tar.gz
cd keepalived-2.3.1

sudo ./configure \
  --prefix=/data/softwares/keepalived \
  --sysconfdir=/data/keepalived

sudo make
sudo make install
Verify
/data/softwares/keepalived/sbin/keepalived -vCreate the systemd service
sudo vi /etc/systemd/system/keepalived.service## ini
[Unit]
Description=Keepalived VRRP
After=network-online.target
Wants=network-online.target
[Service]
Type=forking
PIDFile=/run/keepalived.pid
ExecStart=/data/softwares/keepalived/sbin/keepalived -f /data/softwares/keepalived/etc/keepalived/keepalived.conf -p /run/keepalived.pid
ExecReload=/bin/kill -HUP $MAINPID
Restart=always
[Install]
WantedBy=multi-user.targetsudo mkdir -p /data/softwares/keepalived/etc/keepalivedRepeat on both nodes.
Step 6 — Configure Keepalived for VRRP failover
This is the piece that actually creates the virtual IP and moves it between nodes. The two config files are almost identical — only state and priority differ.
Show Image
Node A (MASTER)
sudo vi /data/softwares/keepalived/etc/keepalived/keepalived.conf

global_defs {
    router_id HAPROXY_A   # Add entry in hosts file for dsn resolution #
    enable_script_security
    script_user root
}

vrrp_script chk_haproxy {
    script "/usr/bin/killall -0 haproxy"
    interval 2
    weight   -20
    fall     2
    rise     2
}
vrrp_instance VI_1 {
    state MASTER
    interface eth0
    virtual_router_id 55
    priority 110
    advert_int 1
    authentication {
        auth_type PASS
        auth_pass haPass123
    }
    virtual_ipaddress {
        10.0.1.10/24
    }
    track_script {
        chk_haproxy
    }
}
Node B (BACKUP)
sudo vi /data/softwares/keepalived/etc/keepalived/keepalived.conf

global_defs {
    router_id HAPROXY_B # Add entry in hosts file for dsn resolution #
    enable_script_security
    script_user root
}

vrrp_script chk_haproxy {
    script "/usr/bin/killall -0 haproxy"
    interval 2
    weight   -20
    fall     2
    rise     2
}
vrrp_instance VI_1 {
    state BACKUP
    interface eth0
    virtual_router_id 55
    priority 100
    advert_int 1
    authentication {
        auth_type PASS
        auth_pass haPass123
    }
    virtual_ipaddress {
        10.0.1.10/24
    }
    track_script {
        chk_haproxy
    }
}
What each piece is doing:
**priority 110vs100** — the higher number wins the VIP when both nodes are healthy. Node A is preferred by default.**vrrp_script chk_haproxy** — Keepalived runskillall -0 haproxyevery 2 seconds. If the process is gone, it subtractsweight -20from that node's priority, which drops it below the other node and triggers a failover.**virtual_router_id** must match on both nodes, and must be unique on the subnet if you're running more than one VRRP group.**auth_pass** is a plaintext shared secret between the two nodes — treat your real value like a credential, not just a config placeholder.
Start Keepalived on both nodes
sudo systemctl daemon-reload
sudo systemctl enable keepalived
sudo systemctl start keepalived
sudo systemctl status keepalived
Step 7 — Test and verify everything
Don’t skip this step. A failover setup you haven’t tested is just a hope.
Confirm which node currently holds the VIP
ip addr show eth0 | grep 10.0.1.10Run this on both nodes — only the current MASTER should show the address.
Check backend health from HAProxy’s side
echo "show stat" | sudo socat stdio /data/softwares/haproxy/run/admin.sock | cut -d, -f1,2,18Check the stats dashboard
Open in a browser:
http://10.0.1.10:8404/statsTest a real connection through the VIP
mysql -h 10.0.1.10 -P 3306 -u youruser -p -e "SELECT @@hostname;"Force a failover and watch it happen
On the current MASTER node:
sudo systemctl stop haproxyThen immediately re-check the VIP on both nodes:
ip addr show eth0 | grep 10.0.1.10Within 2–6 seconds (roughly interval × fall), the VIP should disappear from node A and appear on node B. Re-run the MySQL test command against 10.0.1.10 — it should keep working without any change on the client side. Then restart HAProxy on node A and confirm the VIP returns (since node A has the higher priority).
Troubleshooting and common pitfalls
- VIP doesn’t move on failure — check
journalctl -u keepalivedon both nodes. The most common cause is a mismatchedvirtual_router_id, a firewall blocking VRRP (protocol 112), or the wronginterfacename. - HAProxy won’t start — always run the
-cconfig check first; it will point at the exact line with a syntax error, before systemd ever gets involved. - Health checks always fail — confirm the
haproxy_checkMySQL user exists on every node in the cluster, and that nothing (firewall, security group,bind-address) is blocking the HAProxy nodes from reaching MySQL on the check port. - Split-brain (both nodes think they’re MASTER) — almost always a network partition between the nodes preventing VRRP adverts from arriving. Make sure both nodes are on the same broadcast domain and that no security group or NIC-level filter is blocking multicast/VRRP traffic.
- VIP flaps under load — increase
fall/riseslightly, or check whether thechk_haproxyscript itself is timing out under load.
Conclusion
You now have two MySQL clusters — on 3306 and 3308 — sitting behind a single virtual IP, load balanced by HAProxy, with Keepalived handling automatic failover between two independent HAProxy nodes. Nothing in this setup depends on a single server staying up, and every piece — HAProxy, Keepalived, the VIP — has been tested end to end, not just configured and assumed to work.
From here, the next useful additions are usually: a read_only-aware health check if your cluster has a single enforced writable node, TLS termination at the HAProxy layer if clients connect over an untrusted network, and centralized log shipping from both nodes so failover events show up somewhere you're actually watching.
HAProxy + Keepalived HA Guide for MySQL Clusters (2026) Step-by-step guide to a highly available MySQL setup with HAProxy and Keepalived: dual clusters, a floating VIP, and tested automatic failover.
***🐧 Linux Server Configuration — Complete Administrator’s Guide (Beginner → Advanced → Production)***
***🏆 Ultimate DevOps & SRE Learning Hub (2026 Edition) — 100% Free, Real-World Knowledge***
🌟 Final Note
This single page is designed to be:
- 📌 Bookmarked
- 📌 Shared
- 📌 Used daily
Thank you for reading! 😊🚀
If you’re a Linux admin, DevOps engineer, cloud engineer, or SRE — this page is your personal technical library.
👏 If it helped you, clap & share 💬 Drop a comment if you want a topic-wise PDF or roadmap next
Happy Learning & Troubleshooting! 🚀
메타데이터
- post_id
- 46fc042e9eca
- slug
- how-to-build-a-highly-available-mysql-setup-with-haproxy-and-keepalived-46fc042e9eca
- url
- https://medium.com/beyond-localhost/how-to-build-a-highly-available-mysql-setup-with-haproxy-and-keepalived-46fc042e9eca
- canonical_url
- https://medium.com/beyond-localhost/how-to-build-a-highly-available-mysql-setup-with-haproxy-and-keepalived-46fc042e9eca
- author_url
- https://medium.com/@tushar.jadhav29
- status
- ok
- fetched_at
- 2026-07-16 09:26:33