Deploy FortiGate VM to OpenStack
Deploying a FortiGate VM instance in OpenStack allows you to integrate robust firewall and security capabilities directly within your cloud…
Deploy FortiGate VM to OpenStack
Deploying a FortiGate VM instance in OpenStack allows you to integrate robust firewall and security capabilities directly within your cloud infrastructure. In this tutorial, we’ll walk through the steps to launch and configure a FortiGate VM on OpenStack, helping you enhance network security and manage traffic efficiently within your OpenStack environment. This guide is ideal for anyone looking to add FortiGate’s advanced protection to their OpenStack cloud setup.
We will deploy FortiGate VM to OpenStack by following this topology:
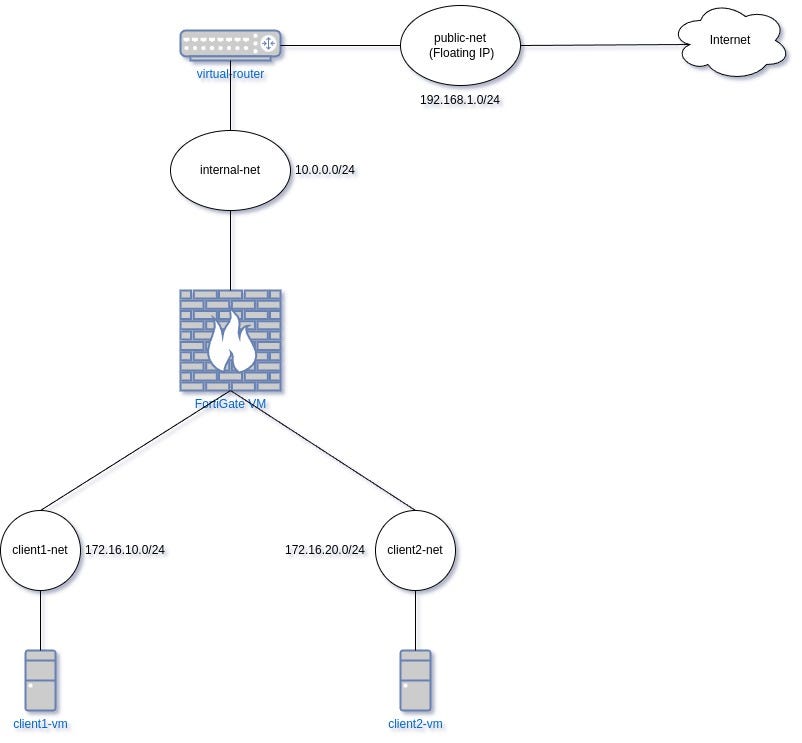
Deploy FortiGate VM to OpenStack — Topology
Pre-requisites:
- OpenStack is already installed and operational with
internal-netandpublic-netare already configured - Images needed for client VMs is already added. In this tutorial, We’ll use CirrOS image
- To enable permanent trial license, We need to use FortiGate VM ≥ v7.2.1. Also, we need a FortiCare account for one permanent trial license. See link at references for detail about this
With all prerequisites in place, let’s move on to the main deployment steps!
- Create
client1-netandclient2-netalong with it’s subnet. These networks will be used by client VMs later
# Create client1-net and it's subnet
openstack network create client1-net
openstack subnet create client1-subnet --network client1-net --subnet-range 172.16.10.0/24 --dns-nameserver 8.8.8.8

# Create client2-net and it's subnet
openstack network create client2-net
openstack subnet create client2-subnet --network client2-net --subnet-range 172.16.20.0/24 --dns-nameserver 8.8.8.8- Deploy the FortiGate VM image to OpenStack. Here, we’ll use FortiGate VM v7.4.5 (Downloaded File:
FGT_VM64_KVM-v7.4.5.M-build2702-FORTINET.out.kvm.zip). Extract the file and upload thefortios.qcow2to OpenStack. The image will require 10 GB of minimal disk size and 2 GB minimal RAM size (this is aligned with resource constraints for FortiGate VM permanent trial license)
# Extract the file
unzip FGT_VM64_KVM-v7.4.5.M-build2702-FORTINET.out.kvm.zip

# Upload the image to OpenStack. Note that --min-ram is in MB
openstack image create --disk-format qcow2 --min-disk 10 --min-ram 2048 --file fortios.qcow2 fortigate-v7.4.5- Create a flavor that will be used for FortiGate VM. Here, we’ll specify the resource as follows:
- RAM: 2048 MB (2 GB)
- Root Disk : 10 GB
- Ephemeral Disk: 32 GB. This disk is mandatory and will be used to store logs. Feel free to use Cinder Volume if you don’t want to use Ephemeral Disk
- vCPU: 1
openstack flavor create --ram 2048 --disk 10 --ephemeral 32 --vcpus 1 m1.fortios- Next, we’ll create a user-data file as default configuration for the FortiGate VM. It’s basically CLI commands that will be executed in the FortiGate VM right after creation. Here is the user-data example. Save it to a file named
user-data
#FGT VM Config File

#Configure Hostname
config sys global
set hostname fortigate-vm
end

#Configure port1, port2, and port3 to use DHCP and allow HTTP, HTTPS, PING, and SSH access
#Note that: port1 is internal-net, port2 is client1-net, and port3 is client2-net
#This will depends on how you specify the sequence of ports while creating the VM
config system interface
edit port1
set mode dhcp
set allowaccess http https ssh ping
next
edit port2
set mode dhcp
set defaultgw disable
set allowaccess http https ssh ping
next
edit port3
set mode dhcp
set defaultgw disable
set allowaccess http https ssh ping
next
end

#Configure system DNS server address
config system dns
set primary 8.8.8.8
end

#Configure firewall policy and NAT to allow access from port2 and port3 to port1
#This will allow clients to access using all network protocol to outside/internet
config firewall policy
edit 1
set name "client1-net internet access"
set dstintf "port1"
set srcintf "port3"
set srcaddr "all"
set dstaddr "all"
set action accept
set schedule "always"
set service "ALL"
set nat enable
next
edit 2
set name "client2-net internet access"
set dstintf "port1"
set srcintf "port2"
set srcaddr "all"
set dstaddr "all"
set action accept
set schedule "always"
set service "ALL"
set nat enable
end- Next, create the root volume using FortiGate image. After that, create the FortiGate VM using that root volume. Specify the network interfaces in the right sequence:
internal-net:port1client1-net:port2client2-net:port3
# Create root volume for the FortiGate VM
openstack volume create --size 10 --image fortigate-v7.4.5  --bootable fgt-vm

# Create FortiGate VM using that root volume
openstack server create --flavor m1.fortios --volume fgt-vm --ephemeral size=32 --user-data user-data --config-drive true --nic net-id=internal-net --nic net-id=client1-net --nic net-id=client2-net fgt-vm- Wait until VM state is Active/Running. After that, we need to disable port security for ports in FortiGate VM to allow normal firewall traffic (we’ll use FortiGate VM firewall rules instead of OpenStack security group)
# Note all IP address values from this command output
openstack server list --name fgt-vm -c Networks

# Disable port security for ports associated with those IP addresses
openstack port list -f value | egrep '<ip_address_1>|<ip_address_2>|<ip_address_3>' | awk '{print $1}' | xargs -I@ /bin/bash -c "openstack port set --no-security-group --disable-port-security @"- Next, associate a floating IP address to
internal-netport of FortiGate VM for internet access
# Create a new floating IP in public-net
openstack floating ip create public-net

# Associate floating IP to internal-net port of FortiGate VM
openstack server add floating ip fgt-vm <floating_ip_ID>- After that, enter the VM console. Here, we’ll enter via Skyline GUI (VNC). Default login is admin with no password. For first login, you’ll be enforced to set a new password for admin user

FortiGate VM First Login
- If you want to activate the permanent trial license, activate using FortiCare account
execute vm-license-options account-id <account_email>
execute vm-license-options account-password <account_password>
execute vm-license
After that, the VM will reboot

Assigning Permanent Trial License to FortiGate VM
After boot up, issue this command and verify the license status
get system status- As a network appliance, It’s best to set the interfaces addresses to static instead of relying on DHCP. First, get all assigned IP addresses to the FortiGate VM by OpenStack and take notes of them
openstack server list --name fgt-vm -c NetworksAfter that, go to the FortiGate VM CLI. Then, configure all 3 ports to use static mode with those IP addresses
config system interface
  edit "port1"
    set mode static
    set ip <ip_address_1> <subnet_mask_internal-net>
    set allowaccess ping https ssh http
  next
  edit "port2"
    set mode static
    set ip <ip_address_2> <subnet_mask_client1-net>
    set allowaccess ping https ssh http
  next
  edit "port3"
    set mode static
    set ip <ip_address_3> <subnet_mask_client2-net>
    set allowaccess ping https ssh http
end- Next, configure static default route for
port1so the firewall can access the outside network. First, get the gateway IP address forinternal-net
# Get the router name
openstack router list

# Show the router. Note the interfaces info and find IP address for internal-net network
openstack router show <router_name>
Next, go to the FortiGate VM CLI. Then configure static default route to the gateway IP address
config router static
  edit 1
  set gateway <gateway_ip_address>
  set device "port1"
end
Verify the outside network access by PING to internet address or any network address in the OpenStack router

PING to internet addres from FortiGate VM successful
- As additional configuration, you can configure configuration autosave
config system global
  set cfg-save automatic
end - For client testing, create a new 2 client VMs in
client1-netandclient2-netrespectively
# Create the volume for client1 and client2
openstack volume create --size 10 --image cirros-0.6.2 --bootable client1
openstack volume create --size 10 --image cirros-0.6.2 --bootable client2

# Create client1 and client2 VM using existing 'micro' flavor
openstack server create --volume client1 --flavor micro --nic net-id=client1-net client1
openstack server create --volume client2 --flavor micro --nic net-id=client2-net client2

# Get the IP addresses of those VMs
openstack server list --name client1 -c Networks
openstack server list --name client2 -c Networks

# Disable port security as firewall rule for those VMs will be handled by FortiGate VM
openstack port list -f value | egrep '<ip_address_client1>|<ip_address_client2>' | awk '{print $1}' | xargs -I@ /bin/bash -c "openstack port set --no-security-group --disable-port-security @"- After that, go to those VMs console interface. For CirrOS instances, login with default username and password shown in the login banner

CirrOS instances login
- Change the default route of client VMs pointing to respective FortiGate VM address for each network
# client1 default route
ip route delete default
ip route add default via <client1-net_address_of_fortigate_vm> dev eth0 src <client1_ip_address>
ip route

# client2 default route
ip route delete default
ip route add default via <client2-net_address_of_fortigate_vm> dev eth0 src <client2_ip_address>
ip route
Set IP route for the client instances
- Now, do connectivity test to outside/internet address from client VMs

PING to internet from client1 successful

Traffic to internet from client2 is passed through FortiGate VM
Your FortiGate VM setup in OpenStack is now up and running, ready to secure your network. With this powerful integration, you’re equipped to manage traffic, enhance security, and gain better visibility within your cloud environment.
References:
메타데이터
- post_id
- 47cd57f85e95
- slug
- deploy-fortigate-vm-to-openstack-47cd57f85e95
- url
- https://medium.com/@kevintim/deploy-fortigate-vm-to-openstack-47cd57f85e95
- canonical_url
- https://medium.com/@kevintim/deploy-fortigate-vm-to-openstack-47cd57f85e95
- author_url
- https://medium.com/@kevintim
- status
- ok
- fetched_at
- 2026-06-27 07:40:21