Building a Cloud Resume with AWS Services and GitHub Actions
In today’s digital age, having an online resume that showcases your skills and experience dynamically and interactively can greatly enhance…
Building a Cloud Resume with AWS Services and GitHub Actions
In today’s digital age, having an online resume that showcases your skills and experience dynamically and interactively can greatly enhance your professional profile. In this guide, we’ll walk through the process of creating a cloud-based resume using AWS services and automating the deployment using GitHub Actions.
We’ll use the following services:
- AWS Lambda: To create a serverless function that retrieves resume data stored in DynamoDB.
- Amazon DynamoDB: A NoSQL database service to store resume data in a structured format.
- Amazon API Gateway: To create a RESTful API that interacts with the Lambda function.
- Amazon S3: To host the front-end HTML, CSS, and JavaScript files of the resume.
- GitHub Actions: For automating the deployment of changes to our S3-hosted resume.
Prerequisites
Before we begin, ensure you have:
- An AWS account with appropriate permissions to create Lambda functions, DynamoDB tables, API Gateway APIs, and S3 buckets.
- Basic familiarity with AWS services, JavaScript, and GitHub.
Setups:
Step 1: Setting Up DynamoDB:
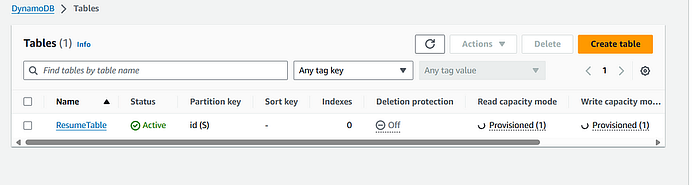
Create a DynamoDB Table:
- Go to the Amazon DynamoDB Console.
- Click Create table.
- Name your table (
ResumeTable) and define the primary key (id). - Click Create.
Press enter or click to view image in full size
Press enter or click to view image in full size
Add Resume Data:
- Populate your DynamoDB table with resume data. You can use the AWS Management Console or AWS SDKs/APIs to insert data. Here’s a sample JSON structure:
{
  "basics": {
    "name": "John Doe",
    "label": "Programmer",
    "image": "",
    "email": "john@gmail.com",
    "phone": "(912) 555-4321",
    "url": "https://johndoe.com",
    "summary": "A summary of John Doe…",
    "location": {
      "address": "2712 Broadway St",
      "postalCode": "CA 94115",
      "city": "San Francisco",
      "countryCode": "US",
      "region": "California"
    },
    "profiles": [{
      "network": "Twitter",
      "username": "john",
      "url": "https://twitter.com/john"
    }]
  },
  "work": [{
    "name": "Company",
    "position": "President",
    "url": "https://company.com",
    "startDate": "2013-01-01",
    "endDate": "2014-01-01",
    "summary": "Description…",
    "highlights": [
      "Started the company"
    ]
  }],
  "volunteer": [{
    "organization": "Organization",
    "position": "Volunteer",
    "url": "https://organization.com/",
    "startDate": "2012-01-01",
    "endDate": "2013-01-01",
    "summary": "Description…",
    "highlights": [
      "Awarded 'Volunteer of the Month'"
    ]
  }],
  "education": [{
    "institution": "University",
    "url": "https://institution.com/",
    "area": "Software Development",
    "studyType": "Bachelor",
    "startDate": "2011-01-01",
    "endDate": "2013-01-01",
    "score": "4.0",
    "courses": [
      "DB1101 - Basic SQL"
    ]
  }],
  "awards": [{
    "title": "Award",
    "date": "2014-11-01",
    "awarder": "Company",
    "summary": "There is no spoon."
  }],
  "certificates": [{
    "name": "Certificate",
    "date": "2021-11-07",
    "issuer": "Company",
    "url": "https://certificate.com"
  }],
  "publications": [{
    "name": "Publication",
    "publisher": "Company",
    "releaseDate": "2014-10-01",
    "url": "https://publication.com",
    "summary": "Description…"
  }],
  "skills": [{
    "name": "Web Development",
    "level": "Master",
    "keywords": [
      "HTML",
      "CSS",
      "JavaScript"
    ]
  }],
  "languages": [{
    "language": "English",
    "fluency": "Native speaker"
  }],
  "interests": [{
    "name": "Wildlife",
    "keywords": [
      "Ferrets",
      "Unicorns"
    ]
  }],
  "references": [{
    "name": "Jane Doe",
    "reference": "Reference…"
  }],
  "projects": [{
    "name": "Project",
    "startDate": "2019-01-01",
    "endDate": "2021-01-01",
    "description": "Description...",
    "highlights": [
      "Won award at AIHacks 2016"
    ],
    "url": "https://project.com/"
  }]
}
Take reference from here: https://jsonresume.org/schema
Press enter or click to view image in full size
Press enter or click to view image in full size

Step 2: Creating an AWS Lambda Function
- Create a Lambda Function:
- Go to the AWS Lambda Console.
- Click the Create function.
- Choose an Author from scratch, name your function (
ResumeFunction), and select a runtime (e.g., Python). - Click the Create function.
Press enter or click to view image in full size
Press enter or click to view image in full size

Write Lambda Code:
- Replace the default code with the Lambda function code that retrieves data from DynamoDB and formats it into a JSON response. Here’s a sample Lambda function:
import json
import boto3
def lambda_handler(event, context):
try:
dynamodb = boto3.resource('dynamodb')
table = dynamodb.Table('ResumeTable') response = table.get_item(Key={'id': '1'})
resume = response.get('Item', {}) # Convert sets to lists (if necessary)
for key, value in resume.items():
if isinstance(value, set):
resume[key] = list(value) return {
'statusCode': 200,
'headers': {
'Content-Type': 'application/json',
'Access-Control-Allow-Origin': '*' # Adjust CORS policy as needed
},
'body': json.dumps(resume)
}
except Exception as e:
return {
'statusCode': 500,
'body': json.dumps({'error': str(e)})
}Customize the code to fit your DynamoDB table structure and data.
Step 3: Setting Up API Gateway
- Create an API in API Gateway:
- Go to the Amazon API Gateway Console.
- Click Create API.
- Choose HTTP API or REST API depending on your preference.
- Name your API (
ResumeAPI) and click Create API.
Press enter or click to view image in full size
Press enter or click to view image in full size

Create a Resource and Method:
- Click Actions -> Create Resource.
- Enter
resumeas the resource name and click Create a resource. - With the
resumeresource selected, click Actions -> Create Method -> GET. - Select your Lambda function (
ResumeFunction) and click Save.
Press enter or click to view image in full size
Press enter or click to view image in full size

Deploy API:
- With the
GETmethod selected, click Actions -> Deploy API. - Choose or create a new stage (e.g.,
prod) and click Deploy.
Note Down API Endpoint:
- After deployment, note down the API Gateway endpoint URL. This URL will be used to fetch resume data from your Lambda function.
Step 4: Creating a front end with HTML, CSS, and JavaScript
Create HTML Template:
- Create an HTML file (
index.html) with a structured layout to display your resume data. Use the provided HTML template in your development environment.
<!DOCTYPE html>
<html lang="en">
<head>
  <meta charset="UTF-8">
  <meta name="viewport" content="width=device-width, initial-scale=1.0">
  <title>Harshal Jethwa's Resume</title>
  <style>
    body {
      font-family: 'Helvetica Neue', Arial, sans-serif;
      margin: 0;
      padding: 20px;
      background-color: #f0f2f5;
      color: #333;
    }
    .container {
      max-width: 800px;
      margin: auto;
      background: #fff;
      padding: 30px;
      border-radius: 10px;
      box-shadow: 0 0 10px rgba(0, 0, 0, 0.1);
    }
    .header {
      /* text-align: center; */
      margin-bottom: 30px;
    }
    .header h1 {
      margin: 0;
      font-size: 2.5em;
      color: #0073e6;
    }
    .header p {
      font-size: 1.2em;
      margin: 5px 0;
      text-align: left; /* Align text to the left */
    }
    .profile-links {
      margin-top: 10px;
    }
    .profile-links a {
      display: block; /* Ensures each link is on a new line */
      margin-bottom: 5px; /* Adds space between links */
      text-decoration: none;
      color: #0073e6;
    }
    .profile-links a:hover {
      text-decoration: underline;
    }
    .profile-links img {
      width: 20px;
      height: 20px;
      margin-right: 5px;
      /* vertical-align: middle; */
    }
    .section {
      margin-bottom: 30px;
    }
    .section h2 {
      border-bottom: 2px solid #0073e6;
      padding-bottom: 5px;
      color: #0073e6;
      font-size: 1.8em;
    }
    .section p, .section ul, .section div {
      margin-bottom: 10px;
      line-height: 1.6;
    }
    .skills, .languages, .interests, .projects, .certificates {
      display: flex;
      flex-wrap: wrap;
    }
    .skills li, .languages li, .interests li, .projects li, .certificates li {
      flex: 1 1 45%;
      margin-bottom: 10px;
    }
    /* Added new style for email and phone alignment */
    /* .contact-info {
      text-align: left;
    }
    .email {
      text-align: right;
    } */
  </style>
</head>
<body>
  <div class="container">
    <div class="header">
      <h1 id="name">Loading...</h1>
      <b><p id="label"> </p> </b>
      <p id="location"></p>
      <div class="profile-links" id="profiles"></div>
      <!-- Adjusted structure for contact info -->
      <div class="contact-info">
        <p style="text-align: left;" class="email header">Email: <span id="email"></span></p>
        <p>Phone: <span id="phone"></span></p>
      </div>
    </div>
<div class="section">
<h2>Work Experience</h2>
<div id="work-experience"></div>
</div> <div class="section">
<h2>Education</h2>
<div id="education"></div>
</div> <div class="section">
<h2>Skills</h2>
<ul id="skills"></ul>
</div> <div class="section">
<h2>Projects</h2>
<ul id="projects"></ul>
</div> <div class="section">
<h2>Languages</h2>
<ul id="languages"></ul>
</div> <div class="section">
<h2>Certificates</h2>
<ul id="certificates"></ul>
</div> <div class="section">
<h2>Achievements</h2>
<div id="achievements"></div>
</div> <div class="section">
<h2>Interests</h2>
<ul id="interests"></ul>
</div> <div class="section">
<h2>Volunteer Work</h2>
<div id="volunteer"></div>
</div>
</div> <script>
const apiUrl = 'API-GATEWAY-URL'; fetch(apiUrl)
.then(response => response.json())
.then(data => {
console.log('API Response:', data); const resumeData = data;
console.log('Resume Data:', resumeData); if (resumeData.name) document.getElementById('name').innerText = resumeData.name;
if (resumeData.label) document.getElementById('label').innerText = resumeData.label;
if (resumeData.location) {
const location = resumeData.location;
document.getElementById('location').innerText = `${location.city ?? ''}, ${location.region ?? ''}, ${location.countryCode ?? ''}`;
}
if (resumeData.email) document.getElementById('email').innerText = resumeData.email;
if (resumeData.phone) document.getElementById('phone').innerText = resumeData.phone; const profilesContainer = document.getElementById('profiles');
if (resumeData.profiles) {
resumeData.profiles.forEach(profile => {
if (profile.url && profile.network) {
const a = document.createElement('a');
a.href = profile.url;
a.target = '_blank';
a.innerText = profile.network;
profilesContainer.appendChild(a);
}
});
} const workExperienceContainer = document.getElementById('work-experience');
if (resumeData.work) {
resumeData.work.forEach(job => {
const { name, position, startDate, endDate, summary } = job;
const div = document.createElement('div');
div.innerHTML = `<p><strong>${position ?? ''} at ${name ?? ''}</strong> (${startDate ?? ''} - ${endDate ?? ''})<br>${summary ?? ''}</p>`;
workExperienceContainer.appendChild(div);
});
} const educationContainer = document.getElementById('education');
if (resumeData.education) {
resumeData.education.forEach(edu => {
const { institution, area, studyType, startDate, endDate, score } = edu;
const div = document.createElement('div');
div.innerHTML = `<p><strong>${institution ?? ''}</strong> - ${area ?? ''} (${studyType ?? ''}) ${startDate ?? ''} - ${endDate ?? ''}, Score: ${score ?? ''}</p>`;
educationContainer.appendChild(div);
});
} const skillsContainer = document.getElementById('skills');
if (resumeData.skills) {
resumeData.skills.forEach(skill => {
const li = document.createElement('li');
li.innerText = `${skill.name ?? ''} (${skill.level ?? ''})`;
skillsContainer.appendChild(li);
});
} const languagesContainer = document.getElementById('languages');
if (resumeData.languages) {
resumeData.languages.forEach(lang => {
const li = document.createElement('li');
li.innerText = `${lang.language ?? ''} (${lang.fluency ?? ''})`;
languagesContainer.appendChild(li);
});
} const interestsContainer = document.getElementById('interests');
if (resumeData.interests) {
resumeData.interests.forEach(interest => {
const li = document.createElement('li');
li.innerText = interest.name ?? '';
interestsContainer.appendChild(li);
});
} const projectsContainer = document.getElementById('projects');
if (resumeData.projects) {
resumeData.projects.forEach(project => {
const li = document.createElement('li');
li.innerText = `${project.name ?? ''} - ${project.description ?? ''}`;
projectsContainer.appendChild(li);
});
} const certificatesContainer = document.getElementById('certificates');
if (resumeData.certificates) {
resumeData.certificates.forEach(cert => {
const li = document.createElement('li');
li.innerText = `${cert.title ?? ''} (${cert.date ?? ''})`;
certificatesContainer.appendChild(li);
});
} if (resumeData.Achievement && resumeData.Achievement.organization) {
document.getElementById('achievements').innerText = resumeData.Achievement.organization;
} if (resumeData.volunteer) {
const volunteer = resumeData.volunteer;
const volunteerContainer = document.getElementById('volunteer');
volunteerContainer.innerHTML = `<strong>${volunteer.organization ?? ''}</strong> - ${volunteer.position ?? ''} (${volunteer.startDate ?? ''} - ${volunteer.endDate ?? ''})`;
}
})
.catch(error => {
console.error('Error fetching data:', error);
document.getElementById('name').innerText = 'Error loading resume data';
});
</script>
</body>
</html>Fetch Data Using JavaScript:
- Use JavaScript
fetchAPI to retrieve data from the API Gateway endpoint (ResumeAPI).
Populate Resume Data:
- Parse the JSON response from the API and populate the HTML elements dynamically with resume details.
- Replace API_GATEWAY_URL with your URL.
Step 5: Hosting Front-End on Amazon S3
- Create an S3 Bucket:
- Go to the Amazon S3 Console.
- Click Create bucket.
- Name your bucket and click Create.
Upload HTML and Assets:
- Upload your
index.html, CSS, JavaScript, and any other assets (images, fonts) to the S3 bucket.
Set Bucket Permissions:
- Select the uploaded files, and click Actions -> Make public to ensure they are accessible.
Configure Static Website Hosting:
- In the S3 bucket properties, go to Static website hosting.
- Select Use this bucket to host a website.
- Enter
index.htmlas the Index document. - Save the configuration.
Note Down Endpoint URL:
- After saving, note down the S3 Endpoint URL. This URL will be your resume’s public URL.
Press enter or click to view image in full size
Press enter or click to view image in full size

Step 6: Implementing GitHub Actions for Deployment
- Create GitHub Repository:
- Go to GitHub and create a new repository.
- Initialize it with a README or push your existing project.
- Add GitHub Actions Workflow:
- Inside your repository, create a
.github/workflowsdirectory. - Create a YAML file (e.g.,
deploy.yml) for your GitHub Actions workflow:
name: Deploy to S3on:
push:
branches:
- mainjobs:
deploy:
runs-on: ubuntu-latest steps:
- name: Checkout repository
uses: actions/checkout@v2 - name: Set up Python
uses: actions/setup-python@v2
with:
python-version: '3.12' # Specify the Python version you need - name: Install dependencies
run: |
python -m pip install --upgrade pip
pip install boto3 # Install boto3 if your script requires it - name: Configure AWS credentials
uses: aws-actions/configure-aws-credentials@v2
with:
aws-access-key-id: ${{ secrets.AWS_ACCESS_KEY_ID }}
aws-secret-access-key: ${{ secrets.AWS_SECRET_ACCESS_KEY }}
aws-region: us-east-1 # Change to your bucket's region
# Run your Python script if needed - name: Install AWS CLI
run: |
sudo apt-get update
sudo apt-get install -y awscli - name: Sync files to S3
run: |
aws s3 sync . s3://resumedata-aws --deleteConfigure Github Secrets:
- Go to your GitHub Secrets
- Under Secrets and Variables, add the following secrets:
AWS_S3_BUCKET: The name of your S3 bucket.AWS_ACCESS_KEY_ID: Your AWS Access Key ID.AWS_SECRET_ACCESS_KEY: Your AWS Secret Access Key.
Push Code to GitHub:
- Push your code to the GitHub repository. The GitHub Actions workflow will automatically deploy the latest version of your resume to the S3 bucket.
Press enter or click to view image in full size
Press enter or click to view image in full size

Press enter or click to view image in full size
Press enter or click to view image in full size

Conclusion
By following this guide, you have created a dynamic, cloud-based resume hosted on AWS. You’ve utilized AWS Lambda, DynamoDB, API Gateway, and S3 to build and deploy your resume, and automated the deployment process using GitHub Actions. This setup not only enhances your resume’s accessibility and interactivity but also demonstrates your proficiency with modern cloud technologies.
Feel free to customize and extend this project further by adding new features or integrating additional services. Happy coding!
GitHub: https://github.com/HARSHALJETHWA19/resume
Follow me :
Linkedin: https://www.linkedin.com/in/harshaljethwa/
GitHub: https://github.com/HARSHALJETHWA19/
Twitter: https://twitter.com/harshaljethwaa
Thank You!!!
메타데이터
- post_id
- 49ca7de6792a
- slug
- building-a-cloud-resume-with-aws-services-and-github-actions-49ca7de6792a
- url
- https://awstip.com/building-a-cloud-resume-with-aws-services-and-github-actions-49ca7de6792a
- canonical_url
- https://awstip.com/building-a-cloud-resume-with-aws-services-and-github-actions-49ca7de6792a
- author_url
- https://medium.com/@harshaljethwaa
- status
- ok
- fetched_at
- 2026-07-10 13:01:02