Developing an expense tracker app using Esmerald (part 2)
This post serves as a continuation of our python app for tracking expenses using Esmerald and Saffier frameworks.
Developing an expense tracker app using Esmerald (part 2)
This post serves as a continuation of our python app for tracking expenses using Esmerald and Saffier frameworks.
You can find part 1 here:
What did we do so far?
- A full API application with 3 modules (Accounts, Categories and Transactions)
- Our DB model created (using Saffier migrations)
- Routing done
What is next?
For this part, we going to add authentication to our application. Our objective here is to restrain access to Categories and Transaction from non authenticated access.
For the users application, the restrain is done is applied only to read and update operations, the create will be accessed without authentication so that we may create our users.
The authentication method
For our application we will opt for a JWT authentication. We will have a login endpoint, using traditional username/password and generate a token which will be required for each API call.
We begin with
Middleware
Esmerald has a native JWT middleware base class that we will use as the super class for our custom middleware.
The first step is to create a new directory in our application root, designated “middleware”
And in this directory we will create our middleware for our JWT.
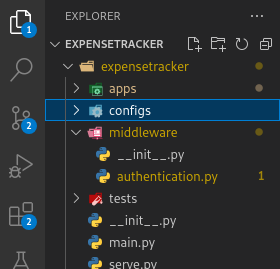
And our authentication.py
from esmerald.contrib.auth.saffier.middleware import JWTAuthMiddleware

from apps.account.v1.models import User
from esmerald.conf import settings

jwt_config = settings.jwt_config

class CustomJWTMidleware(JWTAuthMiddleware):
    def __init__(self, app: "ASGIApp"):

        super().__init__(app, config=jwt_config, user_model=User)
Let’s go into detail here.
We import our jwt_config property from our settings, in the previous post we created a property for jwt_config which indicates the type of token and signing key.
Note: This property will depend on the settings file you are pointing to in the environment variable ESMERALD_SETTINGS_MODULE.
Another thing you will notice is the usage of our User model in accounts app, this is the model that Esmerald middleware will cross reference to obtain the user using the token received.
And that’s all you need for your middleware.
Now, if you want a more complex or custom way of retrieving the logged user, you can redefine the method retrieve_user and create your own logic, this is a more simple scenario.
Login
Now that we have our middleware, which is responsible for retrieving the logged user (using the token received in the HTTP header) in our view request object.
We will need the Login endpoint, which is responsible for authenticating user and return the token.
For this we will create another app in our Apps directory designated “auth”. This app won’t have a model and no DAO (as it uses Account‘s).
This is our app layout:

Now, our pydantic schema:
"""
Generated by 'esmerald createapp' using Esmerald 2.0.3.
"""
from pydantic import BaseModel

class ErrorSchema(BaseModel):
    detail: str

class LoginSchema(BaseModel):
    """
    Login schema
    """
    username: str
    password: str
And our view
from datetime import timedelta, datetime
from esmerald.conf import settings
from esmerald.openapi.datastructures import OpenAPIResponse
from esmerald.exceptions import NotAuthorized
from esmerald.routing.views import APIView
from esmerald.routing.handlers import post
from esmerald.security.jwt.token import Token

from account.v1.daos import UserDAO
from .schemas import LoginSchema, ErrorSchema

class LoginView(APIView):
    """
    Login API view
    """
    path = "/login"

    @post(
        path="/",
        tags=["Authentication"],
        summary="Login",
        description="Logins a user, returns a JWT Token"
    )
    async def login(self, data: LoginSchema) -> str:
        dao = UserDAO()

        if not await dao.check_credentials(
            data.username,
            data.password
        ):
            raise NotAuthorized

        user = await dao.get_by_username(data.username)

        expiration_date = datetime.now() + timedelta(minutes=30)
        token = Token(exp=expiration_date, sub=user.id)

        return token.encode(
            key=settings.jwt_config.signing_key,
            algorithm=settings.jwt_config.algorithm
        )
So, let’s go step by step on what this View does.
The first step is to check if user/password match. this is done using our DAO class of the accounts app, if not valid, we reject right there.
After checking credentials, we create ou Token object. The token class is a pydantic representation which comes already defined in Esmerald. We create our token with a subject being the user internal ID and validity of 30 minutes.
Note: The sub parameter can be anything you want it to be, the only thing you need to ensure, as long as the retrieve_user from your middleware has the reverse operation.
So as the sub you could user something like:
token = Token(exp=expiration_date, sub=f"{ user.id }1234")And retrieve user would have to be something like this:
async def retrieve_user(self, token_sub: Any) -> T:
        """
        Retrieves a user from the database using the given token id.
        """
        try:
            sub = int(token_sub[:-4])
            token_sub = sub.
        except (TypeError, ValueError):
            ...  # noqa

        user_field = {self.config.user_id_field: token_sub}
        try:
            return await self.user_model.query.get(**user_field)  # type: ignore
        except DoesNotFound:
            raise NotAuthorized() from None
        except Exception as e:
            raise AuthenticationError(detail=str(e)) from e
As you can see, I would exclude the final 4 digits which are a “dummy” filler.
Now. After creating the token, we encode it and return it. Notice that both the algorithm and the signing key are from jwt_config property from settings. This allows you to change your JWT config per settings file.
And finally, our URL file:
"""
Generated by 'esmerald createapp' using Esmerald 2.0.3.
"""
from esmerald import Gateway

from .views import LoginView

route_patterns = [
    Gateway(handler=LoginView)
]
Using the middleware
Now that we have our own middlware, it’s time to use it in our application. Esmerald has many levels on where we can apply the middleware (Routes, Views and handlers).
We will apply it at the level of the routing (all views and handlers included). To do this, we make the following changes to our general URL files:
from esmerald import Include
from .middleware.authentication import CustomJWTMidleware

route_patterns = [
    Include(namespace='account.v1.urls', name="account", path="/account/"),
    Include(namespace='category.v1.urls', name="category", path="/category/", middleware=[CustomJWTMidleware]),
    Include(namespace='transaction.v1.urls', name="transaction", path="/transaction", middleware=[CustomJWTMidleware]),
    Include(namespace="auth.urls", name="auth", path="/auth")
]
The route for categories and transactions are now calling the CustomJWTMiddleware, this will be applied to all views and methods in this route (in our case, we only have one View).
We also add our login URL to our main URL file.
Now, you will notice that the accounts app does not have the middleware, the reason is that we don’t want to block the all the URLs, but only read and update operations.
For that we apply this middleware to our handlers (GET and PUT). Our view will have be like this:
"""
Generated by 'esmerald createapp' using Esmerald 2.0.3.
"""
from esmerald import Request
from esmerald.openapi.datastructures import OpenAPIResponse
from esmerald.exceptions import NotAuthorized
from esmerald.routing.views import APIView
from esmerald.routing.handlers import get, post, put

from expensetracker.middleware.authentication import CustomJWTMidleware
from .daos import UserDAO
from .schemas import *

class UserView(APIView):
    """
    User management API View
    """
    path = "/users"

    @post(
        path="/",
        tags=["User"],
        summary="Create a user",
        description="Creates a new user in the system",
        responses={
            200: OpenAPIResponse(model=UserOutSchema),
            400: OpenAPIResponse(model=ErrorSchema, description="Bad response")
        }
    )
    async def create(self, data: UserCreateSchema) -> UserOutSchema:
        dao = UserDAO()
        return await dao.create(**data.model_dump())

    @get(
        path="/",
        middleware=[CustomJWTMidleware],
        tags=["User"],
        summary="Get user",
        description="Returns the logged user",
        responses={
            200: OpenAPIResponse(model=UserOutSchema),
            400: OpenAPIResponse(model=ErrorSchema, description="Bad response"),
            401: OpenAPIResponse(model=ErrorSchema, description="Not autorized")
        }
    )
    async def get_current(self, request: Request) -> UserOutSchema:
        dao = UserDAO()
        return await dao.get(obj_id=request.user)

    @put(
        path="/{id:int}",
        middleware=[CustomJWTMidleware],
        tags=["User"],
        summary="Update user",
        description="Updates the logged user",
        responses={
            200: OpenAPIResponse(model=UserOutSchema),
            400: OpenAPIResponse(model=ErrorSchema, description="Bad response"),
            401: OpenAPIResponse(model=ErrorSchema, description="Not autorized")
        }
    )
    async def update_user(
        self,
        request: Request,
        id: int,
        data: UserUpdatechema
    ) -> None:
        if request.user != id:
            raise NotAuthorized()

        dao = UserDAO()
        await dao.update(id, data)
With this, POST will be accessible without authentication whereas PUT and GET will not.
Accessing the user
It’s time to show where Esmerald’s magic comes into play when you use an authentication middleware based on Esmerald’s existing ones.
When using the middleware, when your HTTP handler is called, you will have the authenticated user in your request object, no dependency injection needed.
Let’s check the example of our TransactionView
class TransactionView(APIView):
    """
    Transactions API View
    """
    path = "/transactions"

    @get(
        path="/mytransactions",
        tags=["Transaction"],
        summary="Gets user transactions",
        description="Returns all transactions for the user",
        responses={
            200: OpenAPIResponse(model=[TransactionOutListSchema]),
            401: OpenAPIResponse(model=ErrorSchema, description="Not autorized")
        }
    )
    async def get_by_user(self, request: Request) -> List[TransactionOutListSchema]:
        dao = TransactionDAO()
        return await dao.get_user_transactions(request.user)
...
By receiving the request object (which is optional, you may omit it from your method). You will have the attribute user instantiated with your defined model object.
Important note: If you try to access request.user and have no BaseAuthMidlleware object in your middleware configuration, you will get an error during runtime.
Testing it
Now that our preparations are done, let’s see how it performs. For this matter, we will use an HTTP Rest client (I’ll be using an HTTP Rest client on VSCode)
First thing, we’re going to create 2 users This is our call and response for each user

Requests for Bob and Alice user creation
And our respective responses

Creation response for Bob

Creation response for Alice
Now, let’s attempt to create a category using the following request

Request for creating a income category
When you run it, because of our authentication middleware in our URL files, you will get an error:

We need to pass a token, in order to do that, we will use our login endpoint with our credentials to get our token.
Let’s login with Bob:

And our token will be the request response
eyJhbGciOiJIUzI1NiIsInR5cCI6IkpXVCJ9.eyJleHAiOjE2OTg1MDgwMDMsImlhdCI6MTY5ODUwMjYwMywic3ViIjoiMTQifQ.vfsME1Hf3uJSsWkUuIcOL_bEtZFiHOLxCCrnrms4fr8
And now, we just add it to our request

Request for category creation using token generate
And the result is our newly created category

This concludes the second part of our tutorial with functional application and now with authentication added.
메타데이터
- post_id
- 4b7dbb419f03
- slug
- developing-an-expense-tracker-app-using-esmerald-part-2-4b7dbb419f03
- url
- https://medium.com/@pcorreia25/developing-an-expense-tracker-app-using-esmerald-part-2-4b7dbb419f03
- canonical_url
- https://medium.com/@pcorreia25/developing-an-expense-tracker-app-using-esmerald-part-2-4b7dbb419f03
- author_url
- https://medium.com/@pcorreia25
- status
- ok
- fetched_at
- 2026-07-24 21:51:36