How to Create an Internal Hyper-V Virtual Switch with NAT Using PowerShell
How to Create an Internal Hyper-V Virtual Switch with NAT Using PowerShell
If you’re running multiple virtual machines on your Windows system, there are times when you want them to communicate with each other and access the internet without exposing them directly to your physical network.
That’s where an Internal Virtual Switch comes in.
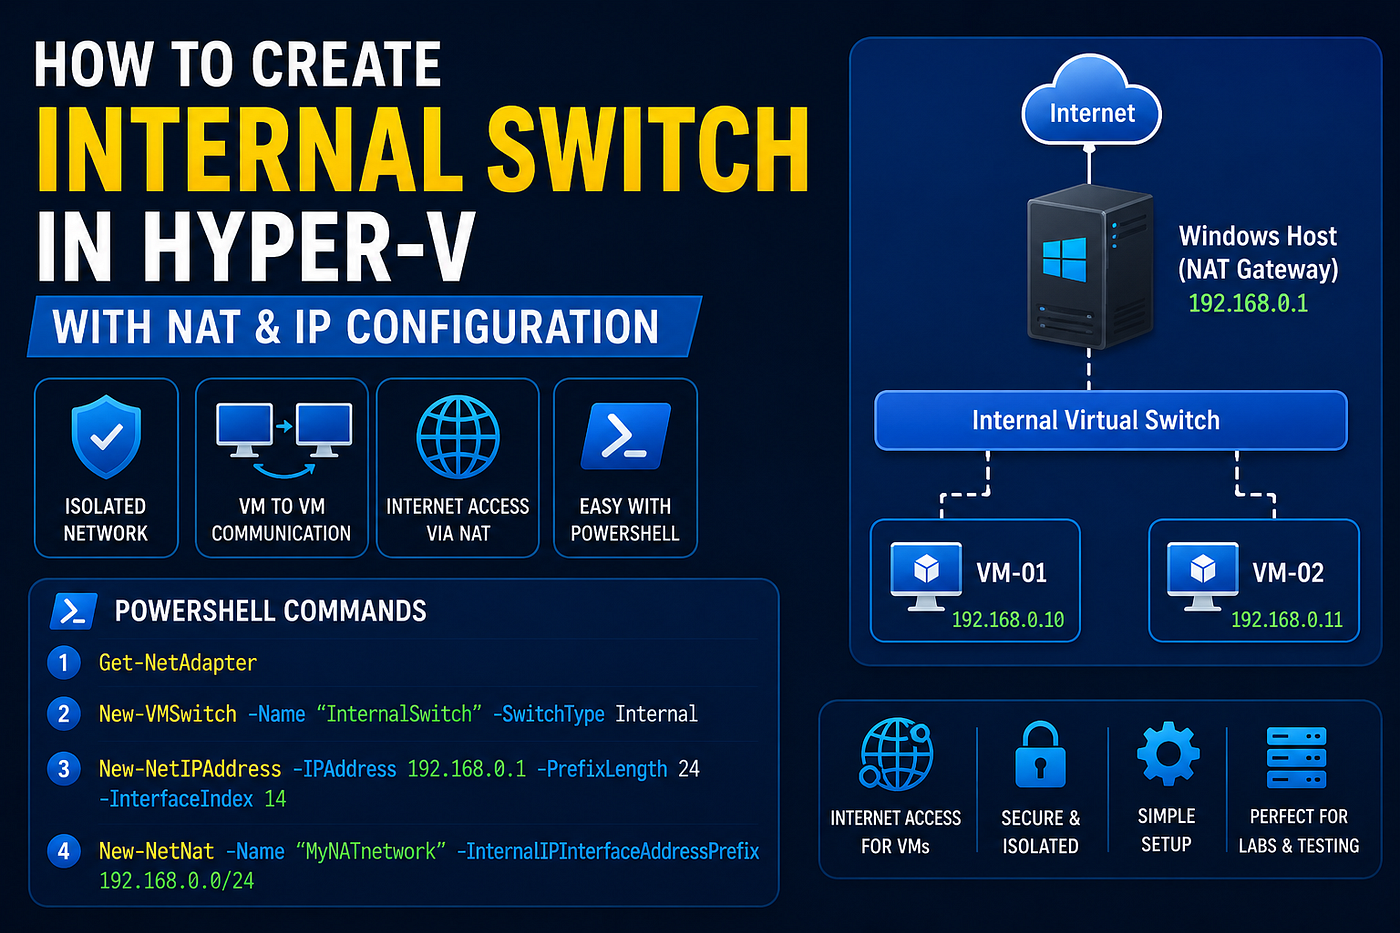
By combining an Internal Hyper-V Switch with Windows NAT, you can create an isolated virtual network while still allowing your VMs to access the internet.
In this guide, I’ll walk through the complete setup using PowerShell.
What is an Internal Virtual Switch?
An Internal Virtual Switch allows communication between:
- The Host Machine
- Virtual Machines connected to the switch
Unlike an External Switch, it does not directly connect to your physical network adapter.
When combined with NAT, the host acts as a gateway for internet connectivity.
Architecture
Internet
              │
              ▼
      Windows Host Machine
              │
      NAT (192.168.0.1)
              │
      Internal Virtual Switch
              │
     ┌────────┴────────┐
     │                 │
   VM-01            VM-02
192.168.0.10    192.168.0.11
Prerequisites
Before starting, ensure:
- Hyper-V is installed.
- Windows PowerShell is running as Administrator.
- You have permission to create Hyper-V virtual switches.
Step 1 — Check Existing Network Adapters
Open PowerShell as Administrator and list the available network adapters.
Get-NetAdapterThis command displays all network interfaces on the host.
Step 2 — Create an Internal Virtual Switch
Create a new Internal Switch.
New-VMSwitch -Name "InternalSwitch" -SwitchType InternalVerify the switch has been created successfully.
Get-VMSwitchStep 3 — Assign an IP Address to the Internal Switch
Identify the Interface Index of the newly created virtual adapter using:
Get-NetAdapterAssign an IP address to the Internal Switch.
New-NetIPAddress `
    -IPAddress 192.168.0.1 `
    -PrefixLength 24 `
    -InterfaceIndex 14
Note: Replace 14 with the Interface Index shown on your system.
This IP becomes the default gateway for virtual machines connected to the Internal Switch.
Step 4 — Configure NAT
Create a NAT network so that connected virtual machines can access external networks through the host.
New-NetNat `
    -Name "MyNATnetwork" `
    -InternalIPInterfaceAddressPrefix 192.168.0.0/24
This enables internet connectivity for VMs using the 192.168.0.0/24 network.
Step 5 — Verify the Configuration
Check that the virtual switch exists.
Get-VMSwitchVerify the assigned IP address.
Get-NetIPAddressVerify the NAT configuration.
Get-NetNatStep 6 — Configure the Virtual Machine
Inside the virtual machine, configure the network adapter with an IP address from the same subnet.
Example:
IP Address : 192.168.0.10
Subnet Mask: 255.255.255.0
Gateway    : 192.168.0.1
DNS        : 8.8.8.8
Alternatively, configure DHCP if you have one available.
Step 7 — Test Connectivity
Verify communication with the host.
ping 192.168.0.1Test internet connectivity.
ping google.comIf both tests succeed, your Internal Switch and NAT configuration are working correctly.
Common Use Cases
This setup is useful for:
- Home labs
- Azure Stack HCI testing
- Hyper-V development environments
- Nested virtualization
- Kubernetes labs
- Windows Server testing
- Isolated application environments
Benefits
Using an Internal Switch with NAT provides several advantages:
- Keeps VMs isolated from the physical network.
- Allows internet access without exposing VMs directly.
- Easy to configure using PowerShell.
- Ideal for development and testing environments.
- No additional networking hardware required.
Final Thoughts
Creating an Internal Virtual Switch with NAT is one of the easiest ways to build a secure Hyper-V lab environment.
With just a few PowerShell commands, you can provide internet connectivity to your virtual machines while keeping them isolated from the production network.
Whether you’re learning Hyper-V, testing applications, or building a home lab, this approach offers a simple and reliable networking solution.
Commands Used
# View network adapters
Get-NetAdapter
# Create Internal Virtual Switch
New-VMSwitch -Name "InternalSwitch" -SwitchType Internal# Assign IP Address
New-NetIPAddress -IPAddress 192.168.0.1 -PrefixLength 24 -InterfaceIndex 14# Create NAT Network
New-NetNat -Name "MyNATnetwork" -InternalIPInterfaceAddressPrefix 192.168.0.0/24# Verify Configuration
Get-VMSwitch
Get-NetIPAddress
Get-NetNat메타데이터
- post_id
- 4d39b0bec435
- slug
- how-to-create-an-internal-hyper-v-virtual-switch-with-nat-using-powershell-4d39b0bec435
- url
- https://medium.com/@durgeshmishrablog/how-to-create-an-internal-hyper-v-virtual-switch-with-nat-using-powershell-4d39b0bec435
- canonical_url
- https://medium.com/@durgeshmishrablog/how-to-create-an-internal-hyper-v-virtual-switch-with-nat-using-powershell-4d39b0bec435
- author_url
- https://medium.com/@durgeshmishrablog
- status
- ok
- fetched_at
- 2026-07-10 21:17:37