Deploying a Highly Available Web Application with Azure Load Balancer
1. Problem Solved by This Project
Deploying a Highly Available Web Application with Azure Load Balancer
1. Problem Solved by This Project
A single server hosting an application is a single point of failure. If the server goes down due to hardware failure, software crash, or high traffic, the entire application becomes unavailable to users.
This project solves the following critical problems:
- High Availability: If one web server (Virtual Machine) fails, the load balancer automatically redirects traffic to the remaining healthy servers. This ensures the application remains online, minimizing downtime and providing a seamless user experience.
- Scalability: As traffic to the application increases, new virtual machines can be added to the backend pool of the load balancer. The load balancer will automatically start distributing traffic to these new servers, allowing the application to handle more users without performance degradation.
- Improved Performance: By distributing incoming requests across multiple servers, the load on any single server is reduced. This prevents any one server from being overwhelmed, leading to faster response times and a better overall performance for all users.
2. Use Case Scenario
An e-commerce company runs its online store on a single Azure Virtual Machine (VM).
The Challenge: During a major sales event (like Black Friday), the website experiences a massive traffic.The single VM becomes overloaded, causing the website to slow down and eventually crash. The company loses sales and customer trust.Furthermore, if the VM requires maintenance or unexpectedly fails, the entire store goes offline.
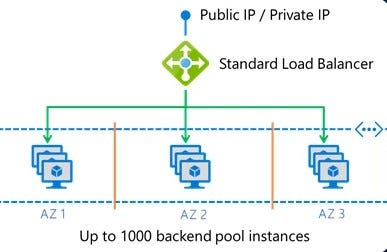
The Solution:The company implements an Azure Load Balancer. They set up two identical VMs, each running the e-commerce website. The Azure Load Balancer is placed in front of these VMs.
How it works
- when a customer visits the website, their request first hits the load balancer.
- The load balancer intelligently forwards the request to one of the available VMs. The next customer’s request might go to VM2.
- If VM1 goes offline for maintenance, the load balancer’s health probe detects this and instantly stops sending traffic to it, directing all new requests to the healthy VM2.
- The result is a website that stays online, remains fast even during peak traffic, and can be scaled easily by adding more VMs.
3. Step-by-Step Implementation Guide
we’ll walk through creating a public standard load balancer that distributes traffic between two vritual machines.
Headlines
- Design Architecture
- Deploy Azure Resources
- Configure Load Balancer Rules
- Implement Health Probes
- Test Failover & Scaling
- Optimize & Monitor
First, we need a resource group to contain our assets and a virtual network for them to communicate.
Create a Resource Group:
- In the Azure Portal, search for and select “Resource groups”.
- Click + Create.
- Choose your subscription, give the resource group a name (webApp..) and select a region
- Click Review + create, then Create.

Create a Virtual Network (VNet)
In the Azure Portal, search for and select “Virtual networks”.
- Click + Create.
- Select the resource group you just created
- Give the VNet a name.
- Go to the IP Addresses tab. The default address space is usually fine. Add a subnet with a name like (web app)
- Click Review + create, then Create.


Create the Backend Virtual Machines
These are the servers that will run our web application.
Create the First Virtual Machine (VM1):
- In the Azure Portal, search for and select “Virtual machines”.
- Click + Create > Azure virtual machine.
- Basics Tab:
- Resource Group:
WebApp-RG - Virtual machine name:
WebApp-VM1 - Region:
East US - Image:
Ubuntu Server 20.04 LTS - Gen2(or a Windows Server image) - Authentication type: Choose either SSH public key or Password.


Networking Tab:
- Virtual network:
WebApp-VNet - Subnet:
WebApp-Subnet - Public IP: Select None. We will access the VMs through the load balancer’s public IP.
- NIC network security group: Advanced.

- Configure network security group: Click Create new.
- Give it a name (
WebApp-NSG) - Click Add an inbound rule.
- Destination port ranges:
80(for HTTP) and22(for SSH/management). - Protocol:
TCP. - Action:
Allow. - Priority: Give it a unique number, like
300. - Name:
Allow-HTTP-SSH. - Click Add. Then click OK.
- Click Review + create, then Create.
Create the Second Virtual Machine (VM2):
- Repeat the exact same steps as above, but name this machine
WebApp-VM2. - On the Networking tab, ensure you select the existing
WebApp-NSGthat you created for the first VM.
Install a Web Server on Each VM:
- To test the load balancer, we need a web server running on each VM. Connect to each VM (using SSH for Linux) and run the following commands to install a simple web server (Nginx).
- On VM1:
sudo apt-get update
sudo apt-get install -y nginx
# Create a unique test page to identify VM1
echo "Hello from WebApp-VM1" | sudo tee /var/www/html/index.html
On VM2:
sudo apt-get update
sudo apt-get install -y nginx
# Create a unique test page to identify VM2
echo "Hello from WebApp-VM2" | sudo tee /var/www/html/index.html
Phase 3: Deploy and Configure the Azure Load Balancer
Now we create the load balancer and configure it to manage traffic to our VMs.
- Create a Public IP Address for the Load Balancer:
- In the Azure Portal, search for and select “Public IP addresses”.
- Click + Create.
- SKU: Standard.
- Name:
WebApp-LB-IP. - Resource Group:
WebApp-RG. - Click Create.

- Create the Load Balancer:
- In the Azure Portal, search for and select “Load balancers”.
- Click + Create.
- Resource Group:
WebApp-RG. - Name:
WebApp-LB. - Region:
East US. - SKU: Standard.
- Type: Public.
- Public IP address: Select Add a public IP address and choose the
WebApp-LB-IPyou just created. - Click Review + create, then Create.

Configure the Load Balancer:
- Navigate to the
WebApp-LBresource you just created. - a. Create a Backend Pool: This is the group of VMs that will receive traffic.
- Go to Backend pools in the left menu.
- Click + Add.
- Name:
WebApp-BackendPool. - Virtual network:
WebApp-VNet. - Click + Add under Virtual machines.
- Select the checkboxes for
WebApp-VM1andWebApp-VM2. - Click Add, then click Save.
- b. Create a Health Probe: This tells the load balancer how to check if a VM is healthy.
- Go to Health probes in the left menu.
- Click + Add.
- Name:
WebApp-HealthProbe. - Protocol: TCP.
- Port:
80. - Interval:
5(check every 5 seconds). - Click Add.
- c. Create a Load Balancing Rule: This rule connects the public IP to the backend pool.
- Go to Load balancing rules in the left menu.
- Click + Add.
- Name:
WebApp-LBRule. - IP Version:
IPv4. - Frontend IP address:
WebApp-LB-IP(should be pre-selected). - Protocol: TCP.
- Port:
80. - Backend port:
80. - Backend pool:
WebApp-BackendPool. - Health probe:
WebApp-HealthProbe. - Click Add.
Verification and Testing
- Find the Public IP of the Load Balancer:
- Go to the Overview page of your
WebApp-LBload balancer. - Copy the Public IP address.
- Test in a Web Browser:
- Open a web browser and paste the public IP address into the address bar.
- You should see either “Hello from WebApp-VM1” or “Hello from WebApp-VM2”.
- Open a new private/incognito browser window or clear your cache and refresh. The message may change to the other VM, demonstrating the load balancing.
- Test High Availability:
- Go to your list of Virtual Machines in the Azure Portal.
- Select
WebApp-VM1and click Stop. - Wait a minute for the VM to shut down and for the health probe to detect the failure.
- Refresh your web browser (with the public IP). You will now only see the message “Hello from WebApp-VM2”, as the load balancer has stopped sending traffic to the failed VM.
- Start
WebApp-VM1again. After a few moments, it will be added back into the rotation, and you will be able to see its message again upon refreshing.
References
메타데이터
- post_id
- 4ef8fc0e616e
- slug
- deploying-a-highly-available-web-application-with-azure-load-balancer-4ef8fc0e616e
- url
- https://medium.com/@eyad9abd/deploying-a-highly-available-web-application-with-azure-load-balancer-4ef8fc0e616e
- canonical_url
- https://medium.com/@eyad9abd/deploying-a-highly-available-web-application-with-azure-load-balancer-4ef8fc0e616e
- author_url
- https://medium.com/@eyad9abd
- status
- ok
- fetched_at
- 2026-07-13 12:04:51