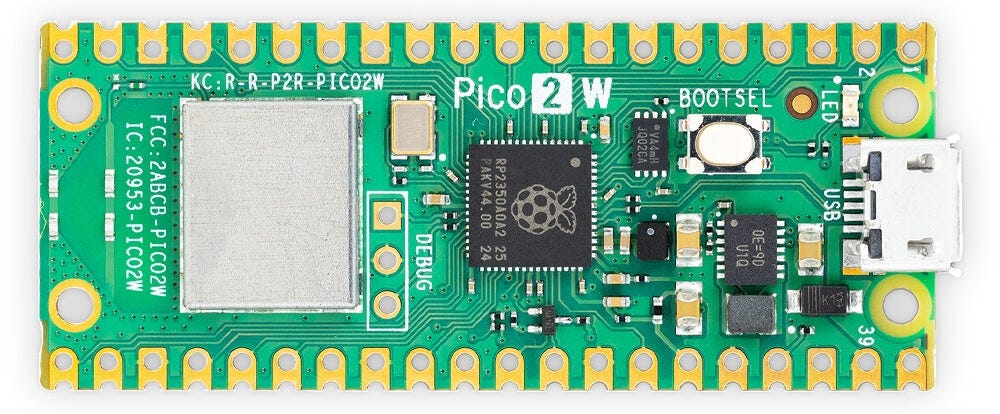
Build a wireless bird identification station (based on ESP32-S3 or Pico 2w)
What we’re building
Build a wireless bird identification station (based on ESP32-S3 or Pico 2w)
What we’re building
The system has three parts:
- A wireless microphone node — an INMP441 I2S digital MEMS mic connected to an ESP32-S3 or Pico 2W, streaming raw audio over WiFi
- A bridge service on a Raspberry Pi 4B — receives the TCP audio stream, filters it, and writes 15-second WAV files
- BirdNET-Pi — picks up those WAV files and runs them through a neural network trained on 6,000+ bird species
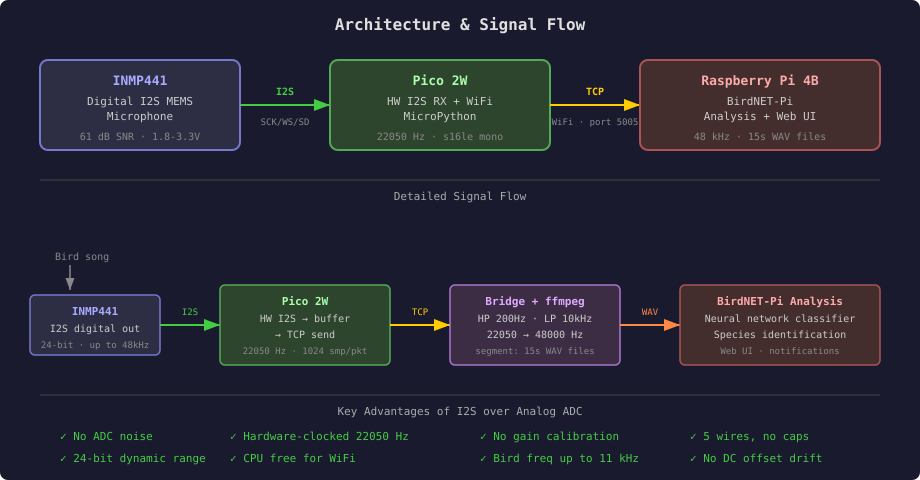
The microphone captures audio at 22,050 Hz — more than enough for bird songs (most fall between 1–10 kHz). The digital I2S interface means zero analog noise, zero gain calibration, and the hardware handles all the timing. Your CPU stays free for WiFi duties.
Choosing your platform: ESP32-S3 vs Pico 2W
Current frimware supports two microcontroller options. Here’s comparison:
[embed]

ESP32-S3-DevKitC-1 — the recommended board for this project. Image: Espressif Systems
Hardware shopping list
Total cost: $13–19 (excluding the Pi you probably already have)
Pick one microcontroller:
Option A — ESP32-S3 (recommended):
- ESP32-S3-N16R8 dev board — ~$5–8 (AliExpress/Amazon)
- USB-C cable
Option B — Pico 2W:
- Raspberry Pi Pico 2W (must be the W variant!) — ~$6
- Micro-USB cable
Shared components:
- INMP441 I2S MEMS Microphone module — ~$2–5
- 5 jumper wires (Dupont female-to-female)
- Breadboard (optional, for prototyping)
You also need:
- Raspberry Pi 4B with BirdNET-Pi installed
- A 2.4 GHz WiFi network (neither board supports 5 GHz)
Meet the INMP441 microphone
The INMP441 is a tiny digital MEMS microphone that speaks I2S — a standard protocol for digital audio. Unlike analog microphones that need ADC conversion, gain calibration, and fight electrical noise, the INMP441 outputs a clean 24-bit digital signal directly.

The INMP441 module — 6 pins, no external components needed. The sound port (tiny hole) is on the bottom.
Key specs:
[embed]
Why I2S beats analog for this project:
[embed]
The INMP441 won over SPH0645 (non-standard I2S timing, needs workaround code) and ICS-43434 (expensive, poor MicroPython community support). At $2–5, it’s a no-brainer.
Wiring guide: ESP32-S3
Five wires plus one ground tie. No capacitors needed. Takes about 3 minutes on a breadboard.

Wiring diagram: INMP441 to ESP32-S3. Five signal wires + L/R tied to GND.
Pin connections:
[embed]

Important notes:
- The L/R pin must be connected to GND — don’t leave it floating or you’ll get silence
- Any GPIO works on ESP32-S3 for I2S, so if 4/5/6 are inconvenient, change them in
main.py - Keep wires short (< 10 cm) to avoid noise on the I2S bus
About WiFi noise
The ESP32’s WiFi radio can inject single-sample clicks into the I2S data. The firmware handles this with:
- A slew-rate limiter — caps sample-to-sample change to +/-3000
- A DC-blocking high-pass filter — removes sub-38 Hz rumble
You don’t need to do anything — it’s built into the code.
Wiring guide: Pico 2W
Same five connections, but with one critical constraint: the WS pin number must be exactly SCK + 1. This is a MicroPython I2S driver requirement. GP16 (SCK) + GP17 (WS) satisfies it.

Wiring diagram: INMP441 to Pico 2W. Note: WS (GP17) must be exactly SCK (GP16) + 1.
Pin connections:
[embed]

Pico W/2W pinout — we use GP16, GP17, GP18 (pins 21–24 on the right side). Image: Raspberry Pi Foundation
Important: The INMP441’s sound port (tiny hole) is on the bottom of the module. When mounting, make sure nothing covers the underside.
Firmware setup
Get the code
Everything — firmware, bridge service, and install script — lives in one repository:
git clone https://github.com/pR13S7/BirdNET-Wifi-Pico-mic.git
cd BirdNET-Wifi-Pico-mic
What’s inside:
You’ll reference this repo for both the firmware upload (next section) and the Pi bridge setup later.
[embed]
Step 1: Flash MicroPython
For ESP32-S3:
- Download the firmware from micropython.org/download/ESP32_GENERIC_S3 — get the
SPIRAM_OCTvariant for N16R8 boards - Put the board in download mode: hold BOOT, press RESET, release BOOT
- Flash:
pip install esptool
esptool.py --chip esp32s3 --port /dev/ttyACM0 erase_flash
esptool.py --chip esp32s3 --port /dev/ttyACM0 write_flash -z 0 firmware.bin- Press RESET
For Pico 2W:
- Download the
.uf2from micropython.org/download/RPI_PICO2_W — make sure it’s the W variant - Hold BOOTSEL, plug in USB
- Drag
.uf2onto the RPI-RP2 drive - Done — it reboots automatically
Step 2: Upload the streaming firmware
Open Thonny (or use mpremote):
- Open
esp32/main.py(orpico/main.pyfor Pico 2W) - Edit three lines:
WIFI_SSID = "your_network"
WIFI_PASSWORD = "your_password"
SERVER_IP = "192.168.1.XXX" # your Pi's IP address- Save to the device as
main.py - Press RESET or power-cycle
The LED tells you what’s happening:
- ESP32-S3: Red = connecting WiFi, Blue = connected to bridge, Green pulse = streaming
- Pico 2W: Blinking = connecting WiFi, Solid = streaming
Pi bridge setup
The bridge is the glue between your wireless mic and BirdNET-Pi. It listens for TCP connections, pipes audio through ffmpeg for filtering and resampling, and writes 15-second WAV files that BirdNET-Pi’s analysis service picks up automatically.
Install BirdNET-Pi (if you haven’t already)
curl -s https://raw.githubusercontent.com/Nachtzuster/BirdNET-Pi/main/newinstaller.sh | bashVerify the web UI loads at [http://birdnetpi.local.](http://birdnetpi.local.)
Install the bridge service
From the cloned repo:
cd bridge/
sudo bash install.sh --mode pico    # or: --mode esp32, --mode both
The --mode flag sets the input sample rate (16 kHz for Pico, 48 kHz for ESP32). Use --mode both to run two mic nodes simultaneously — one on port 5005 (Pico) and one on port 5006 (ESP32).
The script handles everything:
- Copies the bridge script to
/opt/mic_bridge/ - Creates a systemd service that starts on boot and auto-restarts on crash
- Masks BirdNET-Pi’s built-in recording service (which would conflict)
- Detects your StreamData path automatically
- Verifies
ffmpegis installed
What the bridge does under the hood
- Listens on TCP port 5005 (or 5006 for ESP32 in dual mode)
- Receives raw 16-bit mono PCM audio from the microcontroller
- Pipes through
ffmpeg:
- High-pass at 200 Hz (removes wind/handling rumble)
- Resamples to 48 kHz (what BirdNET expects)
-
Writes 15-second WAV segments to a hidden staging directory
-
A background thread moves completed segments to
~/BirdSongs/StreamData/— using copy+delete (not rename) so BirdNET-Pi’s inotify watcher fires correctly -
BirdNET’s analysis service detects the new file and runs classification
Verify it’s working
Watch the bridge logs in real time:
journalctl -u birdnet-mic-bridge -fYou should see connection messages and KB/s throughput when the mic connects. If running dual mode, check the second service too:
journalctl -u birdnet-mic-bridge-2 -fFirst Detections!
Verify everything is running:
sudo systemctl status birdnet-mic-bridge.service
sudo systemctl status birdnet_analysis.service
Power on your microcontroller. Within seconds, WAV files start appearing:
ls -lt ~/BirdSongs/StreamData/*.wav | head -5Open http://birdnetpi.local in your browser. If birds are singing, you should see detections within the first minute.

BirdNET-Pi’s web interface — real-time detections with spectrograms and confidence scores. Image: BirdNET-Pi project

Spectrogram detail — you can listen to the recording and verify the identification. Image: BirdNET-Pi project
Tips for outdoor deployment
Once it’s working on your desk, here’s how to take it outside:
Power: The whole mic node draws ~40–80 mA over WiFi. A 10,000 mAh USB power bank gives you 5+ days of continuous monitoring. Even a tiny 1,000 mAh bank runs for 10+ hours.
Weatherproofing: Use a small waterproof junction box or food container. Drill a single small hole for the mic’s sound port. Point the hole downward to prevent rain ingress.
Placement: Near bird activity — feeders, nest boxes, water features, hedgerows. Elevated positions (2–3 meters) with clear line-of-sight to your router work best.
WiFi range: Both boards work reliably at 10–15 meters through one wall. For longer range, consider a directional antenna on your router or a WiFi repeater near the mic.
Quick Reference Card

Project Links
- Source code: GitHub — BirdNET-Wifi-Pico-mic
- BirdNET-Pi: github.com/Nachtzuster/BirdNET-Pi
- MicroPython I2S examples: github.com/miketeachman/micropython-i2s-examples
- INMP441 on AliExpress: Search “INMP441 I2S microphone module” — typically $2–3 with free shipping
메타데이터
- post_id
- 4f7fca1ad731
- slug
- build-a-wireless-bird-identification-station-based-on-esp32-s3-or-pico-2w-4f7fca1ad731
- url
- https://medium.com/@vandrieiev/build-a-wireless-bird-identification-station-based-on-esp32-s3-or-pico-2w-4f7fca1ad731
- canonical_url
- https://medium.com/@vandrieiev/build-a-wireless-bird-identification-station-based-on-esp32-s3-or-pico-2w-4f7fca1ad731
- author_url
- https://medium.com/@vandrieiev
- status
- ok
- fetched_at
- 2026-07-13 06:23:13