A Proof Of Concept For Yet Another Crazy Project
Taking the first steps on building a VIDEO EDITOR IN GODOT.
A Proof Of Concept For Yet Another Crazy Project
Taking the first steps on building a VIDEO EDITOR IN GODOT.
introduction
I have made it clear in the past years that Godot is capable of a lot more than just developing video-games, and has sweeping applications in everything from regular GUI applications to even web-development or web-integrated applications of many different types. Something like a video-game often requires complex capabilities that aren’t typically offered by regular windowing or graphical frameworks. Godot’s capabilities are also offered through a modern Vulkan-based rendering pipeline. Godot itself is also incredibly lightweight, and applications in Godot have very little memory trade-off to get started. I have demonstrated Godot’s versatility by building several applications, including image editors, a 3D web-viewer, and an interactive NAS client.
Something I have wanted to get back into recently is video-editing. In the past, video-editing has always been the one thing that I dual-booted my machine for. By this point I have long done away with any non-free operating system. As a result, I really need a great video-editing software to use on my Linux systems.
Of course, the open-source community has offerings for this. There is always Kdenlive, and I believe the more popular Davinci Resolve is available for Linux. Beyond this, it would be entirely possible to pay for an Adobe suite and just run a compatibility layer to get the software working on my system. However, none of these options work particularly well for me.
I am not a huge fan of Kdenlive. It is a lot less feature-rich than a lot of other video-editors, and in many cases it seems like settling for worse software because you are on Linux. It is also leagues away from anything I am used to. Me being me, I don’t want access to software to be holding me back. Our community has already developed incredibly compelling options to perform a myriad of different creative tasks; Blender, Open Broadcaster Software, VLC, and Gimp are all great examples of free and open source software that have excelled in their particular niche often beyond what the proprietary competition has to offer. Unfortunately, for something as complex as video-editing software no such standard open-source competitor exists. There is something to be said for having a nice piece of software for the job that doesn’t cost anything as there now is for 3D modeling with Blender or recording with Open Broadcaster Software.
why godot?
There are a lot of different options for this; why would I choose Godot?
- The project starts with Godot. As I use the engine more and for more things, I have been thinking about the variety of things I could do with it. This is one of the many things; it is a surprisingly capable and versatile tool.
- I think there might be an incredibly easy way to do this in Godot, at least if we were to compare it to other solutions. I think it might be surprising how fast this all comes together. Godot will make it far easier to render these things together, arrange, them, and translate data in and out of our application. The only downside is the open-source licensing not being able to include certain codecs.
- Godot gives us easy access to a lot of different capabilities in Node form, as well as giving us the ability to write C++ extensions. As a result, essentially anything becomes possible in Godot and this will become very important at a certain point.
Godot also offers great performance in this package, as well as a great platform for recognizing and taking advantage of our hardware. It is also multi-platform. Considering the low number of platform-agnostic windowing frameworks that are free and their limitations, Godot is almost an obvious choice for this project.
Project Design
A video-editor from a low-level perspective is a pretty complicated piece of software. First of all, videos are arrangements of frames at a certain FPS alongside an audio track. A proper video-editor needs to include editing components for all of these, the frames themselves, the groups of frames, and at least minimal audio editing. This essentially creates a very simple image editor on top of the video editor with a sound editor built-in.
Complicated!
Fortunately, Godot has solutions that I think will make this far less complicated than we could ever possibly imagine. The first step to any project is of course research, and in my research I have uncovered a few different interesting things about Godot, videos in Godot, and images/textures in Godot. These are going to be central pillars of my design:
- The
ViewportNode has aget_texturefunction. - There is also a
VideoStreamPlayer, which allows us to load a source video and get the texture of individual frames. - Godot also has the ability to run Bash commands, this will be useful for calling outside software for these initial tests.
getting started
The first step is setting up the project itself, and adjusting the settings to something more appropriate. This is mainly changing the icon and the scaling mode of the application. Of course, Godot prioritizes games so most of these settings are optimized for a very different type of application. After changing these settings, I put together a basic UI in order to prove my concept and hopefully demonstrate what I am going for.
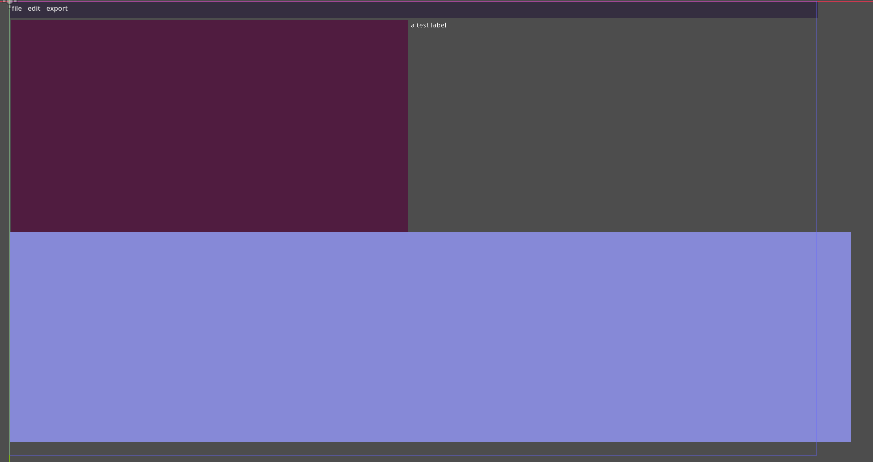

At the top of the screen is a menubar — as we would expect this is for IO, amongst more complex settings. Beneat this, to the left we have an inspector panel and on the right we have a SubViewportContainer . Beneath this, we have a timeline indicated by a ligh-blue box. All of this gives us a feel for how the app will operate; we go to the menubar, load in an import and then we add it to the sub-viewport. Given that we can easily get the texture of a viewport, ideally this will allow us to quickly get the current texture of whatever is in this frame. If this all works correctly, I will have created an incredibly simple system for editing video. Whereas usually we would need to make a full-blown image editor working on a frame-to-frame basis, in this case we can simply use Godot’s own nodes and take a screenshot of the application.
It isn’t perfect, but this will allow us to script a basic sequence of commands to prove that this concept will work, which is still up in the air at this point. Fortunately, there are only a few small additions to this UI that are required to test the efficacy of this application in the first place.
proving my concept
As a final addition to this UI to test the concept, I am going to add a number slider:

This will be our first real feature; we are going to need to be able to get the individual frames of each video we add, this slider is a temporary way for us to seek through these frames. Of course, first we are going to need to be able to import a video and load it into the viewport as an image. On my new script for the editor, I binded the signal of the file menu to a new function:

extends Control
@onready var render_viewport = get_node("VBoxContainer2/HBoxContainer/SubViewportContainer/SubViewport")
var file_menus = {1: do_new, 2: do_save, 3: do_save_as, 0: do_open,
4: do_import}
func _ready() -> void:
 pass # Replace with function body.

# Called every frame. 'delta' is the elapsed time since the previous frame.
func _process(delta: float) -> void:
 pass

func _on_file_button_selected(id: int) -> void:
 file_menus[id].call()

func do_import() -> void:
 pass

func do_new() -> void:
 pass

func do_save() -> void:
 pass

func do_open() -> void:
 pass

func do_save_as() -> void:
 pass
It isn’t the most elegant solution, but this simple code will bring us to call the do_import function every time we select it in the file menu. In this function, we are going to need to make a new file browser visible that allows us to select a file. Step one for this is making a simple file dialog scene that we can instantiate in our code:

Now when we do_import , we will bind a new final function to the file_selected signal.
func do_import() -> void:
 file_importer = load("res://main/filebrowser.tscn").instantiate()
 file_importer.file_selected.connect(import_file_from_manager)
 add_child(file_importer)
 file_importer.popup()
Here is our final function, which will be passed the path:
func import_file_from_manager(path : String) -> void:
 var imported_file = load(path)
From here, we finally have the ability to get an imported file. From here,we are going to need to figure out what type of file we are actually dealing with and handle it appropriately. We are currently going for an MVP that proves we can render back another video using Godot, so we will focus on a singular file-importing system for now. The test of this simple system is whether or not we will be able to render a new video with a label on it. This is what the sample label inside of the viewport is for.
video scrubbing
A video is loaded through our new file manager using the load function will automatically load as a video-stream. Likewise, images load in directly as textures. This does add some convenience now, though it adds a lot more nuance later. For now, we are exclusively going to be loading videos through Godot’s supported video format — Ogg Theora. First, I recorded a small sample video of my desktop using Open Broadcaster Software. Then I used freempeg to convert this video into Ogg Theora — this is the only video format Godot natively supports, but there is a good chance we could expand on this going forward by writing additional C++ extensions for Godot. I started by getting the type of our incoming video stream:
func import_file_from_manager(path : String) -> void:
 var imported_file = load(path)
 print(imported_file)
This printed the following in the terminal:
Godot Engine v4.3.stable.official.77dcf97d8 - https://godotengine.org
OpenGL API 4.6 (Core Profile) Mesa 24.3.3 - Compatibility - Using Device: AMD - AMD Radeon RX 6750 XT (radeonsi, navi22, LLVM 19.1.5, DRM 3.59, 6.12.9-200.fc41.x86_64)

<VideoStreamTheora#-9223372012007717620>
So if it is of this type, we will add a new video player to our sub-viewport.
func import_file_from_manager(path : String) -> void:
 var imported_file = load(path)
 print(imported_file)
 if imported_file is VideoStreamTheora:
  var newplayer = VideoStreamPlayer.new()
  newplayer.stream = imported_file
  newplayer.autoplay = true
  render_viewport.add_child(newplayer)
  newplayer.play()
  newplayer.paused = true
This seemed to work. After importing a file, it appeared in the viewport.

It is likely one of our biggest challenges is going to be scaling this to all work fluently. Fortunately, our goal isn’t to put the frame at the correct dimensions. Instead, I want a drag/drop-based editor that has the camera’s dimensions drawn out — allowing us to place objects all around those dimensions. So then my next step is making it possible to zoom and drag, for now this is a simple script:
extends Control
@onready var render_viewport = get_node("midsection/midsection2/frame2/viewframe/SubViewport")
@onready var camera = get_node("midsection/midsection2/frame2/viewframe/SubViewport/Camera2D")
var file_menus = {1: do_new, 2: do_save, 3: do_save_as, 0: do_open,
4: do_import}
var videos = []
var file_importer = null
var zoom_speed = 0.1
var pan_speed = 1.0  # Sensitivity for click-and-drag panning
var is_panning = false
var last_mouse_position = Vector2.ZERO
func _input(event):
# Zoom in and out with the mouse wheel
if event is InputEventMouseButton:
if event.button_index == MOUSE_BUTTON_WHEEL_UP:
camera.zoom -= Vector2(zoom_speed, zoom_speed)
elif event.button_index == MOUSE_BUTTON_WHEEL_DOWN:
camera.zoom += Vector2(zoom_speed, zoom_speed)
# Clamp zoom values
camera.zoom.x = clamp(camera.zoom.x, 0.2, 5)
camera.zoom.y = clamp(camera.zoom.y, 0.2, 5)
# Start panning when the left mouse button is pressed
if event is InputEventMouseButton and event.button_index == MOUSE_BUTTON_LEFT:
is_panning = event.pressed
if is_panning:
last_mouse_position = event.position
# Handle panning while dragging
elif event is InputEventMouseMotion and is_panning:
var mouse_delta = last_mouse_position - event.position
camera.position += mouse_delta * camera.zoom * pan_speed
last_mouse_position = event.positionIn the future, we are going to want to enable and disable this as it leaves the containers. For now, my only goal is to test that we can render the video back out — ideally, with a label on it. Next, we need to add yet another camera; this camera will represent the actual rendering output, the goal will eventually be to add guides to the edges and snapping zones. I will call it render_camera .
In an effort to keep things simple, but still make sure I can see what I am testing properly, I am going to go ahead and create an early iteration of frame-drawing. This will allow us to visualize where the values are going to be. Eventually, this will take a resolution and we will properly set all of the necessary values to match this resolution. This is a bit of an intense script, but it draws a rectangular sprite for us and adds it to our sub-viewport.
func create_camera_frame():
 # Get the camera's visible area
 var half_screen_size = render_camera.get_viewport_rect().size * render_camera.zoom * 0.5
 var camera_position = render_camera.global_position

 # Calculate the dimensions of the frame
 var top_left = camera_position - half_screen_size
 var size = half_screen_size * 2

 # Create an Image and ImageTexture
 var img = Image.create(int(size.x), int(size.y), false, Image.FORMAT_RGBA8)

 # Draw the borders (frame) on the image
 var color = Color(1, 1, 0, 1)  # Yellow
 var thickness = 4  # Border thickness
 for x in range(int(size.x)):
  for y in range(thickness):  # Top border
   img.set_pixel(x, y, color)
  for y in range(int(size.y) - thickness, int(size.y)):  # Bottom border
   img.set_pixel(x, y, color)
 for y in range(int(size.y)):
  for x in range(thickness):  # Left border
   img.set_pixel(x, y, color)
  for x in range(int(size.x) - thickness, int(size.x)):  # Right border
   img.set_pixel(x, y, color)

 # Create an ImageTexture from the Image
 var texture = ImageTexture.create_from_image(img)

 # Add the frame to a Sprite2D
 if not frame_sprite:
  frame_sprite = Sprite2D.new()
  render_viewport.add_child(frame_sprite)
 frame_sprite.texture = texture

 # Position the sprite to align with the camera's visible area
 frame_sprite.global_position = top_left + half_screen_size  # Center the sprite
 frame_sprite.z_index = 10  # Ensure it renders on top
It worked — I am not exactly sure why that massive black box is there, but I think it has something to do with the view-port among other things… Eventually I will fix this, but again — it won’t be worth testing if my concept doesn’t work.
Next, I will implement basic scrubbing with our range slider. First and foremost, back when we import the video we will need to save the new player by adding it to a videos list.
func import_file_from_manager(path : String) -> void:
 var imported_file = load(path)
 print(imported_file)
 if imported_file is VideoStreamTheora:
  var newplayer = VideoStreamPlayer.new()
  newplayer.stream = imported_file
  newplayer.autoplay = true
  render_viewport.add_child(newplayer)
  newplayer.play()
  newplayer.paused = true
  videos.append(newplayer)
Additionally, we need to set the slider up to work with our video’s stream size:
func import_file_from_manager(path : String) -> void:
 var imported_file = load(path)
 print(imported_file)
 if imported_file is VideoStreamTheora:
  var newplayer = VideoStreamPlayer.new()
  newplayer.stream = imported_file
  newplayer.autoplay = true
  render_viewport.add_child(newplayer)
  newplayer.play()
  newplayer.paused = true
  videos.append(newplayer)
  var slider = $midsection/timeline/ColorRect/tempslider
  slider.max_value = newplayer.get_stream_length()
Now we will set the slider to change the position of the stream in the video:
func _on_tempslider_value_changed(value: float) -> void:
 videos[0].set_stream_position(value)
Unfortunately, trying to test this I made a discovery:

This unfortunately puts scrubbing on hold for now. Of course, the eventual plan is to support different file formats, so this is an issue but might be mitigated by GDExtensions in the future. It might make more sense to just wait for Godot to release this feature, as I have a plan to easily pipeline functions in and out of this OggTheora player, we just need to be able to do the editing in the middle.
June 2026
The part of this article you just read was written back in 2025, in January, and is one of my many side-projects that has been on the backburner waiting for me to come back. Well, I am happy to announce that the latest version of Godot finally features the set_stream_position functionality. I was able to make our little ‘scrub test’ and it was successful. With this, I decided to start the overhaul on this project:

Though the project is still pending some UI major upgrades and completion, at this point it at least looks like an actual video editor. I also haven’t done much work to the theme, which I will be completely changing and possibly offering multiple options for. There are a now a number of controls for the player; a looping control, a time scale control, a restart control, a play control, a scrub bar, and two labels for the current time elapsed.
The bulk of my new work has gone into the new timeline. I wanted this to align from the bottom to the top, but I just cannot get the VBoxContainer to do that for me, possibly because it is in a scroll container. The tracks you see, however, are real tracks that I imported through the file menu. They may be dragged around, selected, and multi-selected. In the future this will offer properties and tween options in the menu to the left. The timeline labels and the lines are both added via their respective scripts:
# labels
extends Control

func _draw():
 var font = ThemeDB.fallback_font

 for i in range(size.x / 25):
  var x = i * 25

  if i % 4 == 0:
   draw_line(Vector2(x, 20), Vector2(x, size.y), Color.WHITE)
   draw_string(
    font,
    Vector2(x + 2, 14),
    str(i / 4)
   )

  elif i % 2 == 0:
   draw_line(Vector2(x, 30), Vector2(x, size.y), Color.GRAY)
   draw_string(font, Vector2(x + 2, 14), str(i / 4) + ".5")

  else:
   draw_line(Vector2(x, 40), Vector2(x, size.y), Color.DARK_GRAY)

# timeline
func create_timeline_texture(length_seconds: float) -> Texture2D:
 var width := int(length_seconds * 100.0) # 100 px = 1 second
 var height := 64

 var image := Image.create(width, height, false, Image.FORMAT_RGBA8)
 image.fill(Color.TRANSPARENT)
 for x in range(width):
  if x % 100 == 0:
   # 1 second
   for y in range(20, height):
    image.set_pixel(x, y, Color.WHITE)

  elif x % 50 == 0:
   # Half second
   for y in range(30, height):
    image.set_pixel(x, y, Color(0.8, 0.8, 0.8))

  elif x % 25 == 0:
   # Quarter second
   for y in range(40, height):
    image.set_pixel(x, y, Color(0.5, 0.5, 0.5))
 return ImageTexture.create_from_image(image)
There are also tracks that feature individual media, which is most of where the dragging happens.

(Also the default Godot theme changed and is great!)
func set_media(video : VideoStreamPlayer, media_name : String):
 $track_texture.texture = video.get_video_texture()
 $track_name.text = media_name
 set_length(video.get_stream_length())

func set_length(value : float):
 time_length = value
 size = Vector2(value * 10, 69.0)
 $hover_border.size = size

func create_border_texture(tex_size: Vector2,
  border_color : Color = Color.FLORAL_WHITE) -> Texture2D:
 var img := Image.create(
  int(tex_size.x),
  int(tex_size.y),
  false,
  Image.FORMAT_RGBA8
 )

 img.fill(Color.TRANSPARENT)
 var thickness := 2

 # Top / Bottom
 for x in range(img.get_width()):
  for t in range(thickness):
   img.set_pixel(x, t, border_color)
   img.set_pixel(x, img.get_height() - 1 - t, border_color)

 # Left / Right
 for y in range(img.get_height()):
  for t in range(thickness):
   img.set_pixel(t, y, border_color)
   img.set_pixel(img.get_width() - 1 - t, y, border_color)

 return ImageTexture.create_from_image(img)

func _on_mouse_entered() -> void:
 if not selected:
  $hover_border.texture = create_border_texture(size)

func _on_mouse_exited() -> void:
 if not selected:
  $hover_border.texture = null

func deselect():
 selected = false
 $hover_border.texture = null

func _on_gui_input(event: InputEvent) -> void:
 if event is InputEventMouseButton:
  if event.button_index == MOUSE_BUTTON_LEFT:
   if event.pressed:
    ScrubEditor.drag_start_pos = get_global_mouse_position()
    if Input.is_action_pressed("multiselect"):
     ScrubEditor.selected_elements.append(self)
    else:
     ScrubEditor.deselect_items()
     ScrubEditor.selected_elements.append(self)
    $hover_border.texture = create_border_texture(size, Color.INDIAN_RED)
    selected = true
   else:
    ScrubEditor.is_dragging = false

 elif event is InputEventMouseMotion:
  if Input.is_mouse_button_pressed(MOUSE_BUTTON_LEFT) and !ScrubEditor.is_dragging:
   if get_global_mouse_position().distance_to(
    ScrubEditor.drag_start_pos
   ) > 8.0:
    ScrubEditor.is_dragging = true
    ScrubEditor.drag_anchor_x = position.x
   $hover_border.texture = create_border_texture(size, Color.INDIAN_RED)
All of this gives us some basic capabilities; I can import tracks, move them around and select them, though I can’t actually play the assembled video just yet or fully edit to the extent I want to. Still, looking at this demo it doesn’t seem that far off.
closing thoughts
A video editor is certainly an ambitious project, especially when you’re balancing all of the projects I already am. After all, I am already years late on releasing ‘the big one’ OliveCreator . However, I build this software for fun and I am certainly still able to complete projects in this way, I am just very spontaneous. The good thing about having more projects is there is always something to work on, especially if I don’t feel like working on a certain thing at that time. The bad thing is I have a stack of projects ranging from 50–90-percent complete, and keeping all of these things in your head at the same time is overwhelming. Just know, there are many projects beyond even the ones I mention here and even when I am not programming at all I am still thinking of how to solve problems.
While all video-editor software projects are always ambitious, I see a much simpler pipeline for this project thanks to Godot. Every render is setting each frame in the engine and taking a screenshot from the render camera. Then we could very easily call a 3rd party MPEG library, downloaded separately of course because it is open-source, and make a full MP4 video. Not sure how Audio will factor into all of this, or even how I separate the audio, but all problems have a solution. Zooming Either way I think my little demo here is certainly a proof of
Now that Godot actually features the ability to create this project, it has been added to my painfully long list of projects. I will keep this blog updated on the project as I continue to make progress. It might be nice to write an article simply going over all of the open projects, because with all the web-framework extensions it is super easy to lose track and forget I even made some of the stuff. This is certainly a fun project, it is kind of important to me as video editing is one of the major creative disciplines I miss out on because of my choice in Operating Systems. Sure, I could probably use Wine for something, but then I would probably have to pay for it as well and I don’t want to go through the hassle. Especially with the trend of subscription-based licenses; the real solution is to have an open-source video editor, and Kdenlive is absolutely not good enough for me. So I guess I’m building my own. You only live once, and soon we shall all die. All the more reason to create as much as possible. As per usual, I end with a thank you. It’s fun to create, but much more fun to share your creation with others.
메타데이터
- post_id
- 511cc1de2ddb
- slug
- a-proof-of-concept-for-yet-another-crazy-project-511cc1de2ddb
- url
- https://medium.com/chifi-media/a-proof-of-concept-for-yet-another-crazy-project-511cc1de2ddb
- canonical_url
- https://medium.com/chifi-media/a-proof-of-concept-for-yet-another-crazy-project-511cc1de2ddb
- author_url
- https://medium.com/@emmaccode
- status
- ok
- fetched_at
- 2026-06-23 17:05:31