TinyLlama on Kubernetes: How to Run Your Own LLM Cluster for under $200/INR 25K!
Have you ever wanted to be that cool kid running your own Large Language Model (LLM) cloud? The one where you don’t have to pay per token…
TinyLlama on Kubernetes: How to Run Your Own LLM Cluster for under $200/INR 25K!
Have you ever wanted to be that cool kid running your own Large Language Model (LLM) cloud? The one where you don’t have to pay per token or worry about some megacorp reading your private chats? But then you look at the price of A100 GPUs and cry into your empty e-wallet after paying all the EMIs?
Yeah, I’ve been there. My Bangalore home isn’t exactly a hyperscale datacenter, and I certainly don’t have a spare $30,000 (INR * ~100/-) lying around for a graphics card.
But what if I told you that you could run a real, generating, chatty LLM on a stack of single-board computers that are barely bigger than a standard credit card in a toilet converted into mini datacenter? And that the whole setup costs less than a decent dinner out for 4 pax?
Today, we’re gonna do exactly that. We’re deploying TinyLlama (the “Nano” model of the moment) on a minimal KubeRay cluster, all hosted on a stack of Raspberry Pis. It’s minimal, it’s low-powered, and it’s surprisingly fun.
This is your 101-level guide to becoming a pocket-sized AI overlord. No PhD required. Let’s get small!
The Micro Vision: Why Small AI Matters
The AI world is obsessed with “massive.” Giant clusters, trillions of parameters, models that cost millions to train. But there’s a quieter, parallel revolution happening: Small Language Models.
Models like TinyLlama (1.1 billion parameters) are specifically designed to be highly efficient. They might not invent a new theory of physics, but they can summarize text, generate code snippets, and have a decent chat.
And because they are small, they don’t need massive, power-hungry GPUs. They can run on the modest ARM processors found in Raspberry Pis.
Why are we doing this?
- Because we can: Turning credit-card-sized computers into an AI cluster is peak nerd glory.
- To learn Kubernetes: This is a low-stakes way to get comfortable with the orchestration monster that powers the internet.
- Edge AI: This is the future. Imagine your doorbell, security camera, or smart speaker having its own private LLM, processing data locally without sending it to the cloud.
Phase 1: The Tiny Lego Pieces (The Hardware)
To build our minimal cluster, you need a few components. Think of this as the “bring your own Pi” phase.
My Setup (The “Bangalore Micro-Cloud”):
- Head Node (1x): Raspberry Pi 4 (8GB RAM). This is the “brain.” It manages the cluster, runs the Ray dashboard, and handles scheduling. It needs more RAM because it’s the boss.
- Worker Nodes (3x): Raspberry Pi 3 Model B+ (1GB RAM). These are the “muscles.” They will run the actual LLM replicas. They are here for the 1.1 billion parameter glory.
Other Essentials:
- SD Cards: Fast ones (Class 10/UHS-1) are your friend. At least 32GB.
- Power Supply: Make sure your Pis have good, stable power. A bad USB cable is the enemy of stability.
- Network Switch: A simple Gigabit switch to connect the Pis. They will talk to each other a lot.
[embed]
Phase 2: From Pi to K3S (The Software Setup)
We need to turn these single-board computers into a cohesive cluster. This involves a few layers of magic.
1. The OS (The Foundation)
We are installing Raspberry Pi OS Lite (64-bit). We want the Lite version because we don’t need a desktop GUI wasting precious RAM. 64-bit is essential for compatibility with modern container tools.
2. K3s: Kubernetes, But Lighter (The Orchestration)
Installing full-blown Kubernetes on a Pi 3 will make it explode (spiritually). We use K3s instead. It’s a certified Kubernetes distribution specifically designed for edge, IoT, and ARM devices.
You can install it on all nodes with a single command! It’s that good.
A Note on the Pis: When you run kubectl get nodes, you want to see all your nodes listed as Ready. But Pis can be moody. While building this, my rpi2 randomly went into an <unknown> state. This is often a sign of Memory Exhaustion (OOM). Loading an LLM while building dependencies can lock up a small Pi. Be gentle with them!
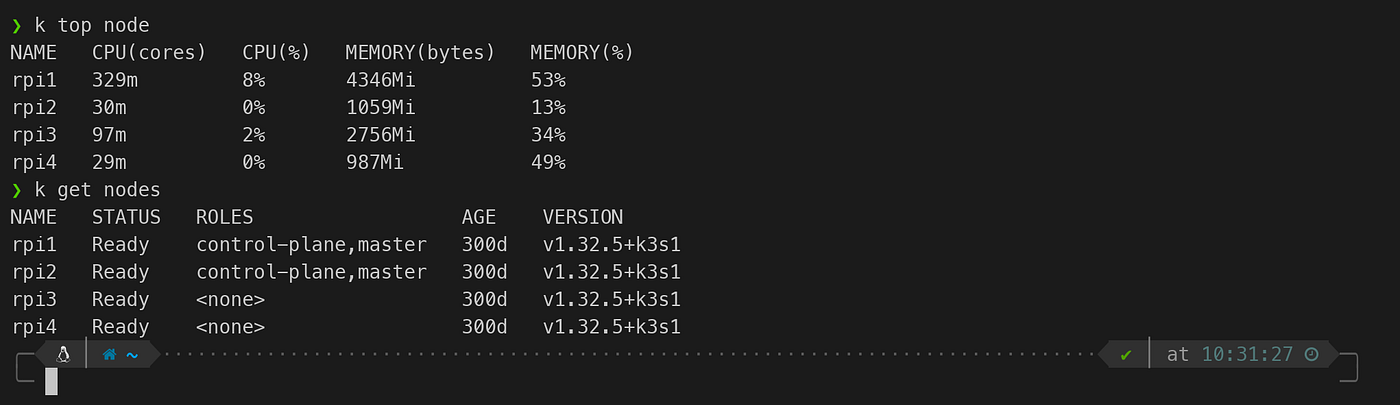
Two Pi’s are Master nodes and remaining two are Worker nodes
Phase 3: Unleash the Ray (KubeRay Deployment)
Now for the main event: Ray. Ray is the unified framework for scaling AI and Python workloads. KubeRay makes it easy to run Ray clusters on top of Kubernetes.
1. The Ray Job (Local Setup)
We are going to submit our LLM service as a Ray Job. This is the right move for our Pi cluster.
- It’s stable: It handles the
runtime_envsetup (installing libraries) on the cluster side. - Architecture match: Your laptop is probably x86. The Pis are ARM64. If you try to push a local x86 virtual environment to the cluster, it will crash with a “wrong architecture” error. Ray Jobs prevent this disaster by building the correct ARM64 environment on the Pis themselves.
2. The Excludes List (Crucial for Pis)
When you run ray job submit, Ray wants to be helpful and zip up your entire working directory to upload. On my Bangalore connection, this was a disaster.
My virtual environment (ray-env) was full of massive compiled libraries like grpc and numpy. We only need to upload our script, not hundreds of megabytes of binaries. To fix this, you must use an excludes list in your job submission.
A clean .rayignore file with entries like ray-env/, __pycache__/, and *.so will drop your upload from ~300MB to ~10KB. This is the difference between success and a 500 Request Entity Too Large error from the Pis.
Phase 4: The Striking Use Case (The Neighborhood Watchman)
To really show off what a distributed Raspberry Pi cluster can do, we need a use case that isn’t just “chatting with a bot,” but one that actually utilizes the parallel nature of Ray.
Let’s build a Real-Time Edge Vision Intelligence system: “The Neighborhood Watchman” — a distributed multi-camera threat & package detection system.
How it Works on Your Cluster:
Instead of one Pi struggling to process a single video feed, you use Ray to turn your cluster into a Distributed Vision Pipeline. Each Pi in your stack takes on a specific role in real-time.
- Node 1 (The Scout): Ingests raw RTSP video feeds from your front door or balcony camera. It performs simple motion checks.
- Node 2 & 3 (The Detectors): When motion is found, Ray’s Object Detection Actors (running a tiny model like
YOLOv8-nano) kick in. They identify if the object is a "Person," "Delivery Truck," or "Package." - Node 4 (The Brain): If a person is detected, this node triggers your TinyLlama model to generate a natural language notification: “A delivery person is at the door with a package; Please unlock the gate using atomberg app!”
Phase 5: Show Me the Code (The Python Integration)
We are deploying two distinct services on our cluster that work together:
- TinyLlamaService (The Brain): A natural language model (in GGUF format) optimized for CPUs using
llama-cpp-python. - ObjectDetector (The Eyes): A computer vision model (YOLOv8-nano) that spreads its replicas across your worker nodes.
Here is the Python script (redacted code for security reasons) that brings them both together:
import ray
from ray import serve
import time
import requests
import json

# Ensure Ray Serve binds to all interfaces (0.0.0.0) so traffic from outside K8s can reach it.
serve.start(http_options={"host": "0.0.0.0", "port": 8000})

@serve.deployment
class TinyLlamaService:
    def __init__(self):
        from llama_cpp import Llama
        # Path to your TinyLlama .gguf file.
        # Crucial: This file MUST be present at this path on EVERY node.
        self.llm = Llama(model_path="./tinyllama-1.1b-chat.Q4_K_M.gguf", n_ctx=2048, n_threads=2)

    async def __call__(self, starlette_request):
        data = await starlette_request.body()
        prompt = data.decode("utf-8")

        # Simple generation parameters. max_tokens=64 is safe for Pi 3.
        output = self.llm(prompt, max_tokens=64, echo=False)
        return output["choices"]["text"]

@serve.deployment(num_replicas=2) # Spread across your Pi workers!
class ObjectDetector:
    def __init__(self):
        from ultralytics import YOLO
        # The "Nano" version of YOLO is mandatory for Pis.
        self.model = YOLO("yolov8n.pt")

    def __call__(self, image_url_or_data):
        # Ray's Object Detection Actors kick in to handle the heavy math.
        results = self.model(image_url_or_data)

        # Simple summary of detections
        detections = results.boxes.data
        if len(detections) > 0:
            return f"Objects Detected: {len(detections)}"
        return "No threats detected."

@serve.deployment
class PipelineAggregator:
    def __init__(self, brain_handle, detector_handle):
        self.brain = brain_handle
        self.detector = detector_handle

    async def __call__(self, starlette_request):
        # 1. Start the Distributed Vision Pipeline
        # Call the ObjectDetector (spread across rpi3 nodes)
        detection_summary = await self.detector.remote("sample_video_or_image_url")
        print(f"[Pipeline] Detector says: {detection_summary}")

        # 2. Trigger your TinyLlama model to generate a natural language summary
        # Call the TinyLlama Brain (running on rpi4 head node)
        prompt = f"The security camera found this: {detection_summary}. Draft a concise notification for the homeowner."
        response = await self.brain.remote(prompt)
        print(f"[Pipeline] Brain says: {response}")

        return f"Pipeline execution complete. Brain said: {response}"

# 3. Bind and Run
brain_app = TinyLlamaService.bind()
detector_app = ObjectDetector.bind()

# The aggregator links the Brain and the Detector handles together
app = PipelineAggregator.bind(brain_app, detector_app)
serve.run(app, name="llm_vision_app")
The Final Word
Building a minimal KubeRay cluster on Raspberry Pis is an amazing exercise. You will encounter memory limits, network quirks, and architecture mismatches. But the payoff of hitting that endpoint and seeing your own local, distributed vision intelligence system respond is peak technical satisfaction.
It’s small. It’s private. It’s entirely yours.
So go forth, grab some Pis, SD cards, and get small. Your pocket-sized AI overlord awaits!
Happy Hacking! (Written with love, from my minimal K3S cluster in Bangalore, Karnataka, to yours.)
Bored?
Let’s wake up the right side of your brain 🧠🎮
Ready for a quick break? Go play Pac-Man here: https://pac.autoops.in (Pro tip: open it in incognito 😉 go to Advanced and click Proceed to pac.autoops.in) And yes — you guessed it right… This isn’t just any Pac-Man. It’s running on a Pi cluster 😎⚡
Tiny computers. Big nostalgia. Endless fun. Try it out and tell me your high score! 👾
메타데이터
- post_id
- 54cebc01d7ca
- slug
- tinyllama-on-kubernetes-how-to-run-your-own-llm-cluster-for-under-200-inr-25k-54cebc01d7ca
- url
- https://medium.com/tech-learners-journal/tinyllama-on-kubernetes-how-to-run-your-own-llm-cluster-for-under-200-inr-25k-54cebc01d7ca
- canonical_url
- https://medium.com/tech-learners-journal/tinyllama-on-kubernetes-how-to-run-your-own-llm-cluster-for-under-200-inr-25k-54cebc01d7ca
- author_url
- https://medium.com/@VinayUmesh
- status
- ok
- fetched_at
- 2026-06-15 20:49:13