From Chaos to Control: The Critical Role of AWS Resource Tagging
Automating AWS Resource Tagging Compliance
From Chaos to Control: The Critical Role of AWS Resource Tagging
Automating AWS Resource Tagging Compliance

The Critical Role of AWS Resource Tagging (picture by author)
In today’s cloud-driven enterprise environment, organizations are deploying countless resources across multiple AWS accounts and regions. Without a proper tagging strategy, managing these resources can quickly become chaotic and costly. A well-implemented tagging policy is not just a best practice — it’s a crucial component of effective cloud governance, cost management, and security compliance.
While organizations can implement various approaches to manage and enforce AWS resource tagging policies, in this article, I will demonstrate two effective methods that provide comprehensive control over AWS resource tagging.
- **AWS Service Control Policies** (SCPs): This method acts as a preventive control by enforcing mandatory tags at the time of resource creation across the organization.
- **AWS Config Rules with Lambda** Function: This method provides detective controls and automated remediation for tagging violations after resources are created.
Both approaches serve different purposes in the tagging enforcement lifecycle, with SCPs preventing non-compliant resources from being created, and AWS Config with Lambda functions detecting and fixing existing tagging violations.
To follow along this guide, please make sure to setup your AWS account first (You can sign up here and follow this tutorial to set it up).
Table of Contents
- Step 1: Enabling SCPs
- Step 2: Creating our SCP
- Step 3: Attaching our SCP
- Step 4: Testing our SCP implementation
- Step 1: Creating our IAM Role
- Step 2: Creating our EventBridge rule
- Step 3: Creating our Lambda function
Understanding AWS Tags
A tag is a *key-value pair* applied to a resource to hold metadata about that resource. Each tag is a label consisting of a key and an optional value. Not all services and resource types currently support tags (see Services that support the Resource Groups Tagging API). Other services may support tags via their own APIs. It should be noted that tags are not encrypted and should not be used to store sensitive data, such as personally identifiable information (PII).
Tags that a user creates and applies to AWS resources using the AWS CLI, API, or the AWS Management Console are known as user-defined tags.
This tagging system enables you to group and manage resources based on various criteria such as their intended purpose, the team responsible for them, the deployment environment, or any other classification that matters to your business operations.
Challenges
There are many challenges that can be encountered without proper tagging:
Cost Management Chaos:
- Inability to accurately allocate costs to specific projects or departments
- Difficulty in identifying unused or unnecessary resources
- Challenges in budget forecasting and optimization
- Limited visibility into resource utilization by team or project
Security and Compliance Risks:
- Difficulty in identifying resource owners during security incidents
- Challenges in maintaining compliance with regulatory requirements
- Inability to track sensitive data locations
- Problems with audit trail maintenance
Operational Inefficiencies:
- Time wasted in manually identifying resource purposes
- Increased risk of accidental resource termination
- Difficulty in maintaining resource inventory
- Challenges in automation and resource lifecycle management
Resource Management Complications:
- Inconsistent naming conventions across teams
- Difficulty in identifying environment types (production, development, testing)
- Problems with backup and disaster recovery planning
- Challenges in implementing automated scaling policies
These challenges highlight why organizations need a comprehensive tagging strategy supported by proper enforcement mechanisms. A well-structured tagging policy becomes the foundation for efficient cloud operations, cost optimization, and security compliance.
Service control policies (SCPs)
Service control policies (SCPs) are a set of policies that allow organizations to manage permissions using AWS Organizations. SCPs help control access to AWS services and resources provisioned across multiple accounts created within an organization. In addition, SCPs enable you to set up permission guardrails by defining the maximum available permissions for IAM principals in an account, enabling organizations to enforce compliance, security, and governance policies. By defining SCPs with AWS Organizations, you can enable teams responsible for protecting information security to establish controls that all IAM principals (users and roles) must adhere to.
Step 1: Enabling SCPs
1/ Sign in to your management account. In the AWS Management Console search for “AWS Organizations”.

AWS Management Console — Search (picture by author)
2/ Click on “AWS Organizations” and once the page loads, click on “Policies”.

AWS Organizations — Policies (picture by author)
3/ Scroll down to “Service control policies” and click on it.

Service control policies (picture by author)
4/ Click on “Enable service control policies”.

Enable service control policies (picture by author)
Step 2: Creating our SCP
1/ Click on “Create policy”.

Create policy (picture by author)
2/ Under “Details”, for “Policy name” give a name to your policy and for “Policy description — optional” give a description.
Name: MandatoryTagging-Policy-RN Description: Ensures the required tags are added to resources being provisioned

SCP Details (picture by author)
3/ Under “Tags”, click on “Add tag”. Below is what I am using.
Name: MandatoryTagging-Policy-RN Project: MandatoryTagging Purpose: Learning Owner: Roger Environment: Production

SCP Tags (picture by author)
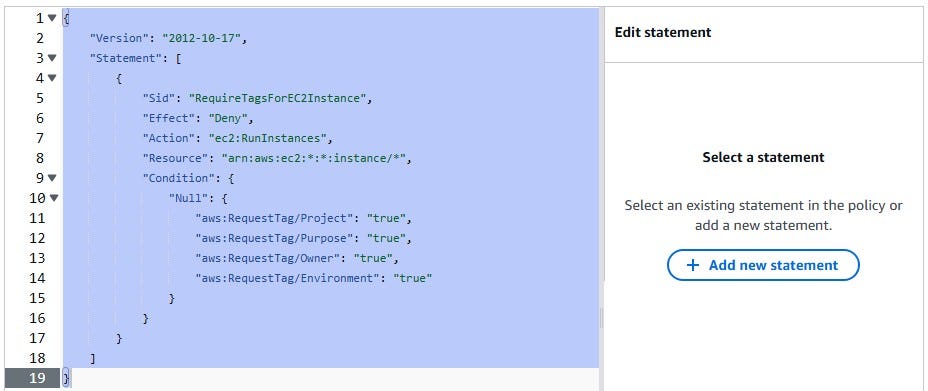
4/ For the policy statement, copy/paste the JSON code below.
{
  "Version": "2012-10-17",
  "Statement": [
    {
      "Sid": "RequireTagsForEC2Instance",
      "Effect": "Deny",
      "Action": "ec2:RunInstances",
      "Resource": "arn:aws:ec2:*:*:instance/*",
      "Condition": {
        "Null": {
          "aws:RequestTag/Project": "true",
          "aws:RequestTag/Purpose": "true",
          "aws:RequestTag/Owner": "true",
          "aws:RequestTag/Environment": "true"
        }
      }
    }
  ]
}
Explanation: This SCP (Service Control Policy) denies the creation of EC2 instances if it doesn’t include the mandatory tags: Project, Purpose, Owner, Environment.
The policy uses a “Null” condition to check if any of these tags are missing. If any tag is missing, the resource creation will be denied. This ensures all new resources have consistent tagging across the organization.
5/ Click on “Create policy”.

Create policy (picture by author)
You should see the “Successfully created the policy named ‘MandatoryTagging-Policy-RN’.” message.

Policy successfully created (picture by author)
Step 3: Attaching our SCP
1/ Click on the policy we just created (e.g. MandatoryTagging-Policy-RN).

Policy selected (picture by author)
2/ Under the Actions menu, click “Attach policy”.

Attach policy (picture by author)
3/ On the next screen we will select the root account, as this affects all accounts.

Attach policy to the root account (picture by author)
4/ Click on “Attach policy”. You should see the “Successfully attached the policy ‘MandatoryTagging-Policy-RN’ to the root.” message.

Policy succesfully attached to the root account (picture by author)
Step 4: Testing our SCP implementation
Let’s verify that our SCP functions correctly by attempting to provision an EC2 instance without the required tags. Since AWS best practices discourage deploying resources in management accounts, we will test our SCP implementation in one of our member accounts instead. This test will demonstrate how the policy blocks non-compliant resource creation and enforces our tagging requirements.
1/ Sign in to your AWS member account. 2/ Open the Amazon EC2 console at https://console.aws.amazon.com/ec2/. 3/ Select the desired Region. (e.g. us-east-1). 4/ Click on “Launch instance”.

Amazon EC2 Console (picture by author)
5/ On the next screen, we will give a name to our EC2 instance (TestingTaggingSCP) and leave all the rest as default.

Launch Instance (picture by author)
6/ Click on “Launch Instance”. 7/ We should see an error, since we didn’t add all the required tags.
You are not authorized to perform this operation. User: arn:aws:sts:::assumed-role/ is not authorized to perform: ec2:RunInstances on resource: arn:aws:ec2:us-east-1:****:instance/ with an explicit deny in a service control policy

Launch Instance error due to SCP (picture by author)
8/ If we go back, add all the required tags and try to launch the instance, it works now.

Adding required tags to our EC2 instance (picture by author)

Success — Launch Instance (picture by author)

EC2 Instance required tags (picture by author)
Lambda Function
To automate remediation for tagging violations after resources are created, we will implement a Lambda function that automatically corrects non-compliant resources. This serverless function will work in conjunction with AWS Config rules to detect resources missing the required tags and apply the appropriate tags based on our organization’s tagging strategy.
By implementing this automated remediation process, we ensure continuous compliance with our tagging policies while reducing manual intervention and potential human errors.
Step 1: Creating our IAM Role
First, we need to create an IAM role that grants our Lambda function the necessary permissions to read and modify tags on EC2 instances. This role will provide the function with secure, limited access to perform its remediation tasks.
1/ Search for “IAM” in the AWS Management Console and click on it.

AWS Management Console — Search (picture by author)
2/ On the left menu, click on “Roles” and then “Create role”.

IAM Menu— Roles (picture by author)
3/ Under “Select trusted entity”, click on “AWS service” and under “Use case”, select “Lambda” from the dropdown. Click on “Next”.

IAM trusted entity (picture by author)
4/ On the “Add permissions” screen, select the following and click on “Next”.
AmazonEC2FullAccess (to be able to edit the tags) AWSLambdaBasicExecutionRole (allow creation of CloudWatch Logs) AWSLambda_FullAccess (allows Lambda to be invoked)
5/ Give a name (e.g. Lambda-Enforce-Tagging-Role-RN) and a description to the IAM role. Scroll down and click on “Create role”.

IAM — Create Role (picture by author)
You should see the “Role Lambda-Enforce-Tagging-Role-RN created” message.

IAM Role — Success (picture by author)
Step 2: Creating our EventBridge rule
AWS EventBridge is a serverless event bus service that helps you connect your applications with data from various sources. We will use it to:
- Capture AWS Config Rules Compliance Change events
- Route these events to specified targets:
- A CloudWatch log group for monitoring
- A Lambda function for automated remediation
1/ Search for “EventBridge” in the AWS Management Console and click on it.

AWS Management Console — Search (picture by author)
2/ On the left menu, click on “Rules” and then on “Create rule”.

AWS EventBridge — Rules (picture by author)
3/ Give a name (e.g. Lambda-Enforce-Tagging-RN) and a description to the rule. Make sure to select “Rule with an event pattern”. Click on “Next”

Rule details (picture by author)
4/ Select “Other”.

Build Event pattern (picture by author)
5/ Scroll down to the “Event pattern” section and select “Custom pattern (JSON editor)”. Copy/paste the JSON code below and click on “Next”.
{
  "source": ["aws.config"],
  "detail-type": ["Config Rules Compliance Change"],
  "detail": {
    "configRuleName": ["required-tags"],
    "newEvaluationResult": {
      "complianceType": ["NON_COMPLIANT"]
    }
  }
}
Event pattern (picture by author)
6/ Under “Target 1”, click on “AWS Service” (1). Under “Select a target” select “Lambda function” (2). Select “Target in this account” (3), search for your Lambda function (e.g. Lambda-Enforce-Tagging-RN) and click on it to select (4). Make sure to select “Use execution role (recommended)” (5). For Execution role, click on “Use existing role” (6) and select the role you created for the Lambda function (e.g. Lambda-Enforce-Tagging-Role-RN) (7).

Select target(s) — Target 1 (picture by author)
7/ Click on “Add another target”.
8/ Under “Target 2”, click on “AWS Service” (1). Under “Select a target” select “CloudWatch log group” (2). For “Log Group” select your defined log group (3) (e.g. /aws/events/EventBridge-Lambda-Enforce-Tagging-RN).

Select target(s) — Target 2 (picture by author)
9/ Click “Next”.
10/ On the next screen add tags (optional) and click “Next”.
11/ Review everything and click “Create rule”.
You should see the “Rule Lambda-Enforce-Tagging-RN was created successfully” message.

Step 3: Creating our Lambda function
1/ Search for “Lambda” in the AWS Management Console and click on it.

AWS Management Console — Search (picture by author)
2/ Click on “Create function”.

Lambda — Create function (picture by author)
3/ On the next screen, select “Author from scratch”. Give it a name to the function (e.g. LambdaEnforceTagging-RN). For the runtime, select “Python 3.13” and leave “x86_64” for the architecture.

Lambda — Configs (picture by author)
4/ Under “Permissions”, click on “Change default execution role” and select “Use an existing role”. Search for the IAM Role we created earlier (e.g. Lambda-Enforce-Tagging-Role-RN) and select it. Finally, click on “Create function”.

Lambda — Permissions (picture by author)
5/ For the Lambda function, copy/paste the Python code below.
You can also clone the repository that has the code if you prefer: https://github.com/rnem/scripts.git
import json
import boto3

def lambda_handler(event, context):
    # Parse the Config Rules Compliance Change event
    detail = event['detail']
    resource_id = detail['resourceId']
    resource_type = detail['resourceType']
    compliance_type = detail['newEvaluationResult']['complianceType']
    aws_region = detail['awsRegion']
    account_id = detail['awsAccountId']

    # Only process NON_COMPLIANT resources
    if compliance_type == 'NON_COMPLIANT' and resource_type == 'AWS::EC2::Instance':
        try:
            # Initialize EC2 client
            ec2 = boto3.client('ec2', region_name=aws_region)

            # Define required tags with specific values
            required_tags = {
                'Project': None,  # Any value is acceptable
                'Purpose': 'Learning',
                'Owner': 'Roger',
                'Environment': 'Production'
            }

            # Get existing tags
            response = ec2.describe_tags(
                Filters=[{'Name': 'resource-id', 'Values': [resource_id]}]
            )
            existing_tags = {tag['Key']: tag['Value'] for tag in response['Tags']}

            # Determine which tags need to be updated
            tags_to_apply = []
            new_tags = []
            updated_tags = []

            for key, required_value in required_tags.items():
                if key not in existing_tags:
                    # Tag doesn't exist
                    tags_to_apply.append({
                        'Key': key,
                        'Value': required_value if required_value is not None else 'DefaultProject'
                    })
                    new_tags.append({'Key': key, 'Value': required_value if required_value is not None else 'DefaultProject'})
                elif required_value is not None and existing_tags[key] != required_value:
                    # Tag exists but has wrong value
                    tags_to_apply.append({
                        'Key': key,
                        'Value': required_value
                    })
                    updated_tags.append({
                        'Key': key,
                        'OldValue': existing_tags[key],
                        'NewValue': required_value
                    })

            # Only make API call if there are tags to update
            if tags_to_apply:
                response = ec2.create_tags(
                    Resources=[resource_id],
                    Tags=tags_to_apply
                )

                if new_tags:
                    print(f"Applied the following new tags to instance {resource_id}:")
                    for tag in new_tags:
                        print(f"  {tag['Key']}: {tag['Value']}")

                if updated_tags:
                    print(f"The following tags were updated for instance {resource_id}:")
                    for tag in updated_tags:
                        print(f"  {tag['Key']}: {tag['OldValue']} -> {tag['NewValue']}")

                return {
                    'statusCode': 200,
                    'body': json.dumps({
                        'message': f'Successfully updated tags for instance {resource_id}',
                        'applied_tags': tags_to_apply
                    })
                }
            else:
                print(f"No tags needed to be updated for instance {resource_id}")
                return {
                    'statusCode': 200,
                    'body': json.dumps('No tag updates required')
                }

        except Exception as e:
            print(f"Error applying tags to instance {resource_id}: {str(e)}")
            raise e

    else:
        print(f"No action needed for {resource_id} - Compliance status: {compliance_type}")
        return {
            'statusCode': 200,
            'body': json.dumps('No action required')
        }
6/ Click on “Deploy”.

Lambda — Deploy (picture by author)
You should see the “Successfully updated the function *****.” message.

Lambda — Deployed (picture by author)
7/ Under “Configuration”, click on “Edit”.

Lambda — Configuration (picture by author)
8/ Increase the Lambda function timeout. (e.g. 1 minute).
NOTE: For environments with a large number of EC2 instances requiring remediation, consider increasing the Lambda function’s timeout value to accommodate the processing time needed for tag updates across multiple resources.

Lambda — Timeout (picture by author)
9/ Click on “Save”. You should see now the timeout updated.

Lambda — Timeout updated (picture by author)
10/ Now we need to add an EventBridge (CloudWatch Events) trigger on our Lambda Function. Click on the “Configuration” tab (1) and then on Triggers (2). Once done, click on “Add trigger” (3).

Lambda — Add trigger (picture by author)
11/ Search for EventBridge and click on it.

Add trigger (picture by author)
12/ Select “Existing rule” and search for the EventBridge rule that you created earlier (e.g. Lambda-Enforce-Tagging-RN). Click on “Add”.

Add trigger configuration (picture by author)
You should see the following when done.

13/ Copy the function ARN.

Lambda — Function ARN (picture by author)
14/ Click on the “CloudShell” icon to open the shell.

CloudShell (picture by author)
15/ Copy/paste the code below to the shell and hit enter. Make sure to update source-arn with your Lambda function ARN.
aws lambda add-permission \
    --function-name "LambdaEnforceTagging-RN" \
    --statement-id "AddConfigPermission" \
    --action "lambda:InvokeFunction" \
    --principal "config.amazonaws.com" \
    --source-arn "arn:aws:events:us-east-1:*****:rule/Lambda-Enforce-Tagging-RN"

aws lambda add-permission \
    --function-name "LambdaEnforceTagging-RN" \
    --statement-id "EventBridgeInvoke" \
    --action "lambda:InvokeFunction" \
    --principal "events.amazonaws.com" \
    --source-arn "arn:aws:events:us-east-1:*****:rule/Lambda-Enforce-Tagging-RN"
You should see the following once done.
{
    "Statement": "{\"Sid\":\"AddConfigPermission\",\"Effect\":\"Allow\",\"Principal\":{\"Service\":\"config.amazonaws.com\"},\"Action\":\"lambda:InvokeFunction\",\"Resource\":\"arn:aws:lambda:us-east-1:******:function:LambdaEnforceTagging-RN\"}"
}

{
    "Statement": "{\"Sid\":\"EventBridgeInvoke\",\"Effect\":\"Allow\",\"Principal\":{\"Service\":\"events.amazonaws.com\"},\"Action\":\"lambda:InvokeFunction\",\"Resource\":\"arn:aws:lambda:us-east-1:******:function:LambdaEnforceTagging-RN\"}"
}
AWS Config
AWS Config is a service that allows you to audit and evaluate the configuration of your AWS resources, track changes over time, and assess compliance against defined rules. It provides a detailed view of your resources, their relationships, and how they have changed, enabling you to streamline troubleshooting, manage compliance, and audit security.
Step 1: Setting it up
1/ Search for “AWS Config” in the AWS Management Console and click on it.

AWS Management Console — Search (picture by author)
2/ Once the page loads, click on “Get started”.

AWS Config — Get started (picture by author)
3/ Under “Settings”, click on “Specific resource types”. Then search “ec2” on the dropdown and select “AWS EC2 Instance”. Select “Continuous” for the Frequency.

AWS Config — Settings (picture by author)
Under “Data governance”, leave the option to create a role selected.
4/ For “Delivery channel”, select the option to “Create a bucket” and give it a name for your S3 bucket (e.g. config-bucket-tagging).

AWS Config — Delivery Channel (picture by author)
5/ On the next screen, review everything and click on “Confirm”.

AWS Config Settings — Review (picture by author)
You should be taken to the AWS Config Dashboard page next.

AWS Config — Dashboard (picture by author)
Step 2: Creating our AWS Config rule
6/ Click on “Rules” and then “Add rule”.

AWS Config — Rules (picture by author)
7/ Under “Specify rule type”, select “Add AWS managed rule” (1). Under “AWS Managed Rules”, search for “required-tags” and click on it (2). Then click on “Next”.

AWS Config — Rule Type (picture by author)
8/ Give a name and a description to the rule.

Configure rule — Details (picture by author)
Scroll down to the “Evaluation mode” section. Click on “Resources” (1), then select “AWS resources” (2) from the dropdown. Search for “AWS EC2 Instance” (3) and click on it, when it finds it.

Configure rule — Evaluation mode (picture by author)
Under “Parameters”, we will add our required tags: Project, Purpose, Owner and Environment. Once done, click on “Next”.

Configure rule — Parameters (picture by author)
9/ Review everything and click on “Save”.

Review and create (picture by author)
You should see the “The rule: required-tags has been added to your account.” message.

Configure rule — Rule created (picture by author)
Step 3: Verifying
After implementing the AWS Config rule, it continuously evaluates the configuration of AWS resources within our environment, specifically focusing on EC2 instances in this case. Our member account contains two EC2 instances: one provisioned earlier with all required tags in compliance with our policy, and another instance that lacks the mandatory tags.
After a brief monitoring period (typically 2–5 minutes), AWS Config detects and reports our non-compliant resource.

AWS Config rule — Noncompliant resource (picture by author)
Click on the rule and navigate to the “Resources in scope” section to view the compliance status of the EC2 instances. The dashboard clearly displays two EC2 instances with different compliance states: one instance meeting all tagging requirements (marked as compliant), and another instance that fails to meet the tagging standards (marked as non-compliant). This visual representation helps quickly identify which resource(s) require attention for tag remediation.

AWS Config rule — Resources in scope (picture by author)
Validation
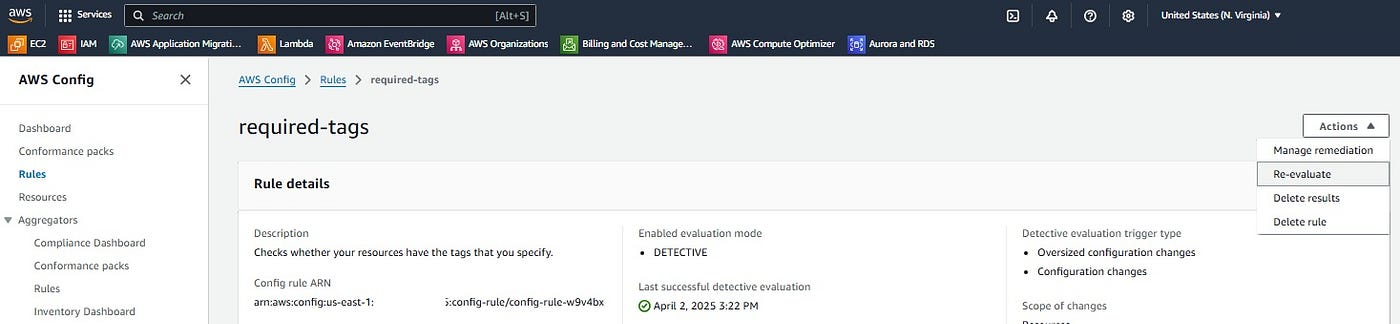
To trigger a new evaluation of our AWS Config rule and test the Lambda function’s tagging behavior, navigate to the AWS Config Rules dashboard and click the “Re-evaluate” button. This manual re-evaluation will check the EC2 instances against our required tagging standards and trigger the EventBridge rule if any non-compliant resources are found.
AWS Config rule — Re-evaluate (picture by author)
NOTE: Last successful detective evaluation April 2, 2025 3:22 PM. This is Central Time.
Now let’s navigate to the CloudWatch log group “/aws/events/EventiBridge-Lambda-Enforce-Tagging-RN” where EventBridge logs the Config compliance change events. This allows us to verify that the events are being properly captured by our EventBridge rule.

CloudWatch Log groups — EventBridge (picture by author)

Log Events — EventBridge (picture by author)
{
    "version": "0",
    "id": "f9f******678",
    "detail-type": "Config Rules Compliance Change",
    "source": "aws.config",
    "account": "*****",
    "time": "2025-04-02T20:22:51Z",
    "region": "us-east-1",
    "resources": [],
    "detail": {
        "resourceId": "i-04*****a84",
        "awsRegion": "us-east-1",
        "awsAccountId": "*****",
        "configRuleName": "required-tags",
        "recordVersion": "1.0",
        "configRuleARN": "arn:aws:config:us-east-1:*****:config-rule/config-rule-w9v4bx",
        "messageType": "ComplianceChangeNotification",
        "newEvaluationResult": {
            "evaluationResultIdentifier": {
                "evaluationResultQualifier": {
                    "configRuleName": "required-tags",
                    "resourceType": "AWS::EC2::Instance",
                    "resourceId": "i-04*****a84",
                    "evaluationMode": "DETECTIVE"
                },
                "orderingTimestamp": "2025-04-02T19:45:55.566Z"
            },
            "complianceType": "NON_COMPLIANT",
            "resultRecordedTime": "2025-04-02T20:22:50.813Z",
            "configRuleInvokedTime": "2025-04-02T20:22:50.662Z"
        },
        "notificationCreationTime": "2025-04-02T20:22:51.597Z",
        "resourceType": "AWS::EC2::Instance"
    }
}
This corresponds to our non-compliant EC2 instance, as shown below.

Non-compliant EC2 Instance (picture by author)
Finally, to verify the Lambda function’s execution and its tagging operations, let’s check the CloudWatch log group “/aws/lambda/LambdaEnforceTagging-RN” where we can inspect the detailed logs showing which tags were newly applied or updated on the non-compliant EC2 instances.

Log Events — Lambda (picture by author)
START RequestId: fe1*******0da3 Version: $LATEST
Applied the following new tags to instance i-04*****a84:
Owner: Roger
Environment: Production
The following tags were updated for instance i-04*****a84:
Purpose: Other -> Learning
END RequestId: fe1*******0da3
After refreshing the page, we can verify that the EC2 instance now has all the required tags properly set according to our specifications:
- Purpose: Learning
- Owner: Roger
- Environment: Production

Remediated EC2 Instance (picture by author)
These tags were automatically applied/updated by our Lambda function in response to the AWS Config compliance change event.
Finally, after re-evaluating the AWS Config rule, all EC2 instances should now show as COMPLIANT since our Lambda function has automatically applied and updated the required tags.

AWS Config — Final results (picture by author)
Conclusion:
Congratulations on making it to the end of this article! By following the steps outlined here you’ve learned two powerful approaches to enforce AWS resource tagging compliance. 🎉
First, you discovered how Service Control Policies (SCPs) act as a preventive control, ensuring resources can only be created when they meet your organization’s tagging requirements.
Then, you explored how to implement an automated detective and remediation solution using AWS Config, EventBridge, and Lambda, which automatically identifies and fixes tagging violations on existing resources.
By combining these two methods, you now have a robust tagging strategy that both prevents non-compliant resources from being created and automatically remediates any existing resources that don’t meet your organization’s tagging standards.
This comprehensive approach ensures consistent resource tagging across your AWS environment, making resource management and cost allocation more efficient.
If you enjoyed this article and found it helpful, please don’t forget to leave a heart ❤, comment 💬, clap 👏🏻, and share ➦ it to show your support.
Also, don’t forget to connect, follow me for more articles and support me by buying me a coffee. :-) Thank you!
References:
- https://docs.aws.amazon.com/whitepapers/latest/tagging-best-practices/what-are-tags.html
- https://aws.amazon.com/solutions/guidance/tagging-on-aws/
- https://aws.amazon.com/organizations/
- https://docs.aws.amazon.com/organizations/latest/userguide/orgs_manage_policies_scps.html
- https://docs.aws.amazon.com/IAM/latest/UserGuide/id_roles.html
- https://aws.amazon.com/eventbridge/
- https://aws.amazon.com/config/
- https://docs.aws.amazon.com/config/latest/developerguide/WhatIsConfig.html
메타데이터
- post_id
- 54dfd539dc64
- slug
- from-chaos-to-control-the-critical-role-of-aws-resource-tagging-54dfd539dc64
- url
- https://medium.com/@rogernem/from-chaos-to-control-the-critical-role-of-aws-resource-tagging-54dfd539dc64
- canonical_url
- https://medium.com/@rogernem/from-chaos-to-control-the-critical-role-of-aws-resource-tagging-54dfd539dc64
- author_url
- https://medium.com/@rogernem
- status
- ok
- fetched_at
- 2026-06-27 07:40:21



