Delegated Authentication vs. App-Only Authentication in Microsoft Entra ID
This guide provides a hands-on walk-through detailing the fundamental differences between Delegated Authentication and Application-Only…
Delegated Authentication vs. App-Only Authentication in Microsoft Entra ID
This guide provides a hands-on walk-through detailing the fundamental differences between Delegated Authentication and Application-Only (App-Only) Authentication within Microsoft Entra ID, including step-by-step instructions on how to configure and validate these flows in a practical environment.
Identity Architecture Paradigms
Delegated Authentication (User-Context Access)
- Core Definition: Access permissions are granted to an application to act explicitly on behalf of a signed-in user.
- Authentication Flow: The end-user must interactively log in and explicitly approve the scopes/permissions requested by the application.
- Primary Use Cases: Tailored for client-facing applications and interactive scenarios where user authorization is a prerequisite to access an API (i.e., non-machine-to-machine communications).
App-Only Authentication (Application-Context Access)
- Core Definition: The application possesses pre-approved permissions authorized directly by a tenant administrator, allowing it to act independently.
- Authentication Flow: The application operates autonomously using its own identity (Service Principal credentials) without requiring a user session or runtime consent.
- Primary Use Cases: Designed for automated background services, daemon applications, scheduled scripts, and secure machine-to-machine integrations.
Step-by-Step Implementation: Configuring & Testing Delegated Authentication
Phase 1: Application Registration in Microsoft Entra ID
a. Register the Application
Log into the Microsoft Entra ID portal, navigate to the App registrations section from the left navigation pane, and click to register a new application. Provide a clear name for the registration (e.g., DemoUser). Under the Redirect URI settings, select Web as the platform type and enter your designated callback URL

b. Configure API Permissions
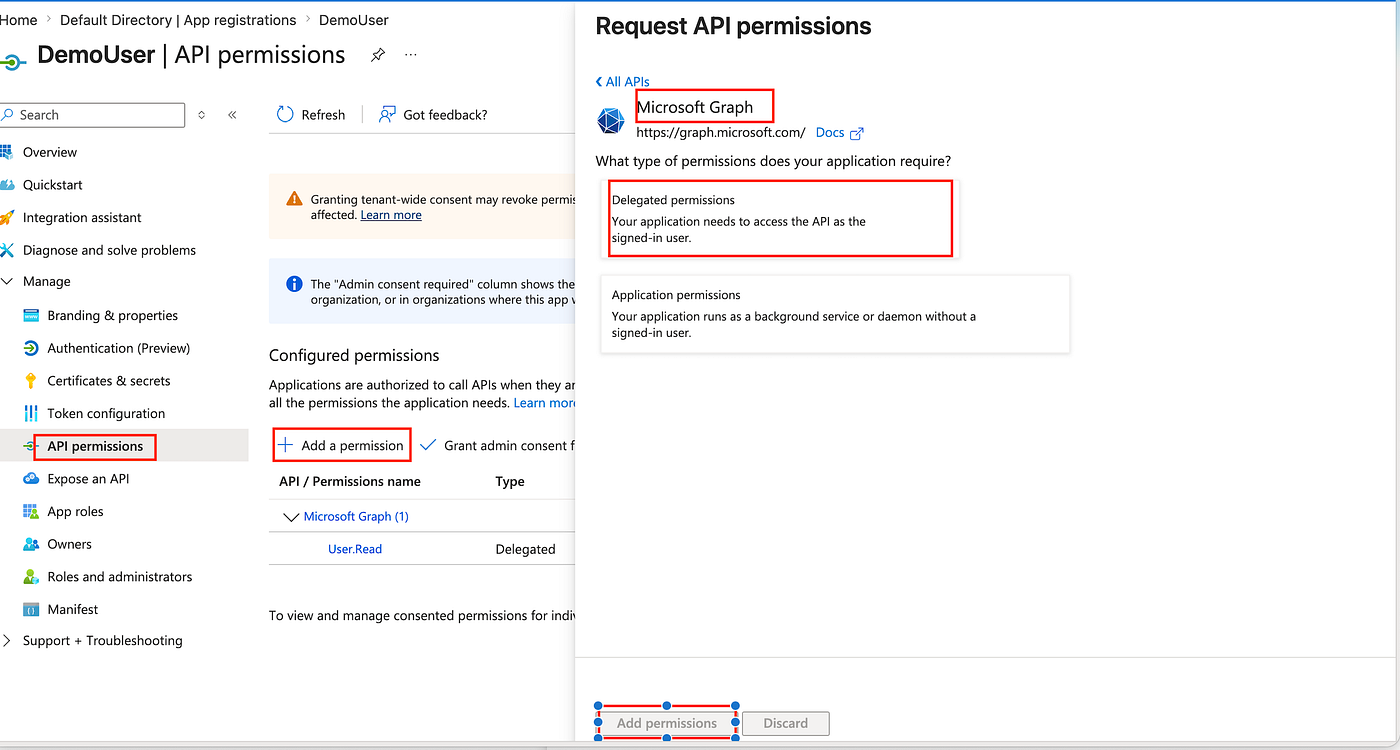
Select your newly registered application (DemoUser) and click on API permissions in the left menu blade. Click Add a permission, choose Microsoft Graph from the list of available APIs, and explicitly select Delegated permissions.
c. Assign the Email Scope
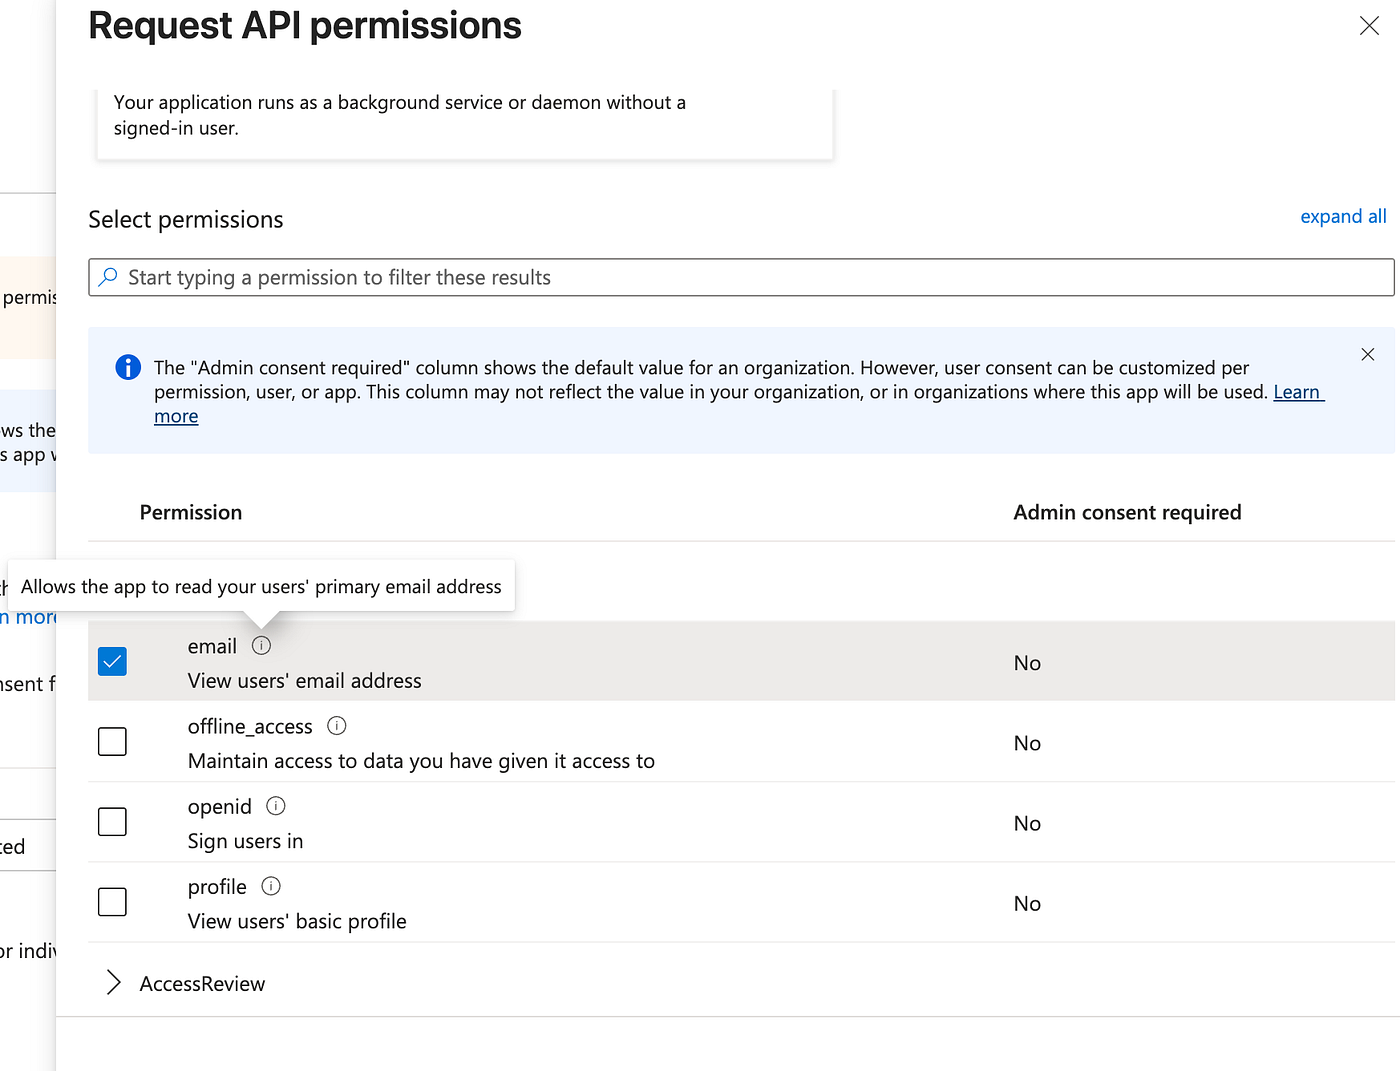
Locate and check the email permission, which allows the application to read the primary email address of the authenticated user at runtime.
d. Verify Configured Scopes
Review the assigned delegated permissions. Note that the standard User.Read permission is provisioned automatically upon initial application creation.

e. Generate Client Credentials
Navigate to the Certificates & secrets blade on the left menu and generate a new client secret. Ensure you copy and store the secret value immediately; once you leave this screen, the value is permanently masked and cannot be recovered. The Entra ID portion of the configuration is now complete.
f. Extract Environment Endpoints
Navigate back to the Overview blade and select the Endpoints tab to gather the essential values required for API client configuration:
- Application (Client) ID
- Client Secret
- Directory (Tenant) ID
- OAuth 2.0 Authorization Endpoint (v2)
- OAuth 2.0 Token Endpoint (v2)
- Scope
Phase 2: Configuring Postman for API Validation
a. Define the Collection and Token Parameters
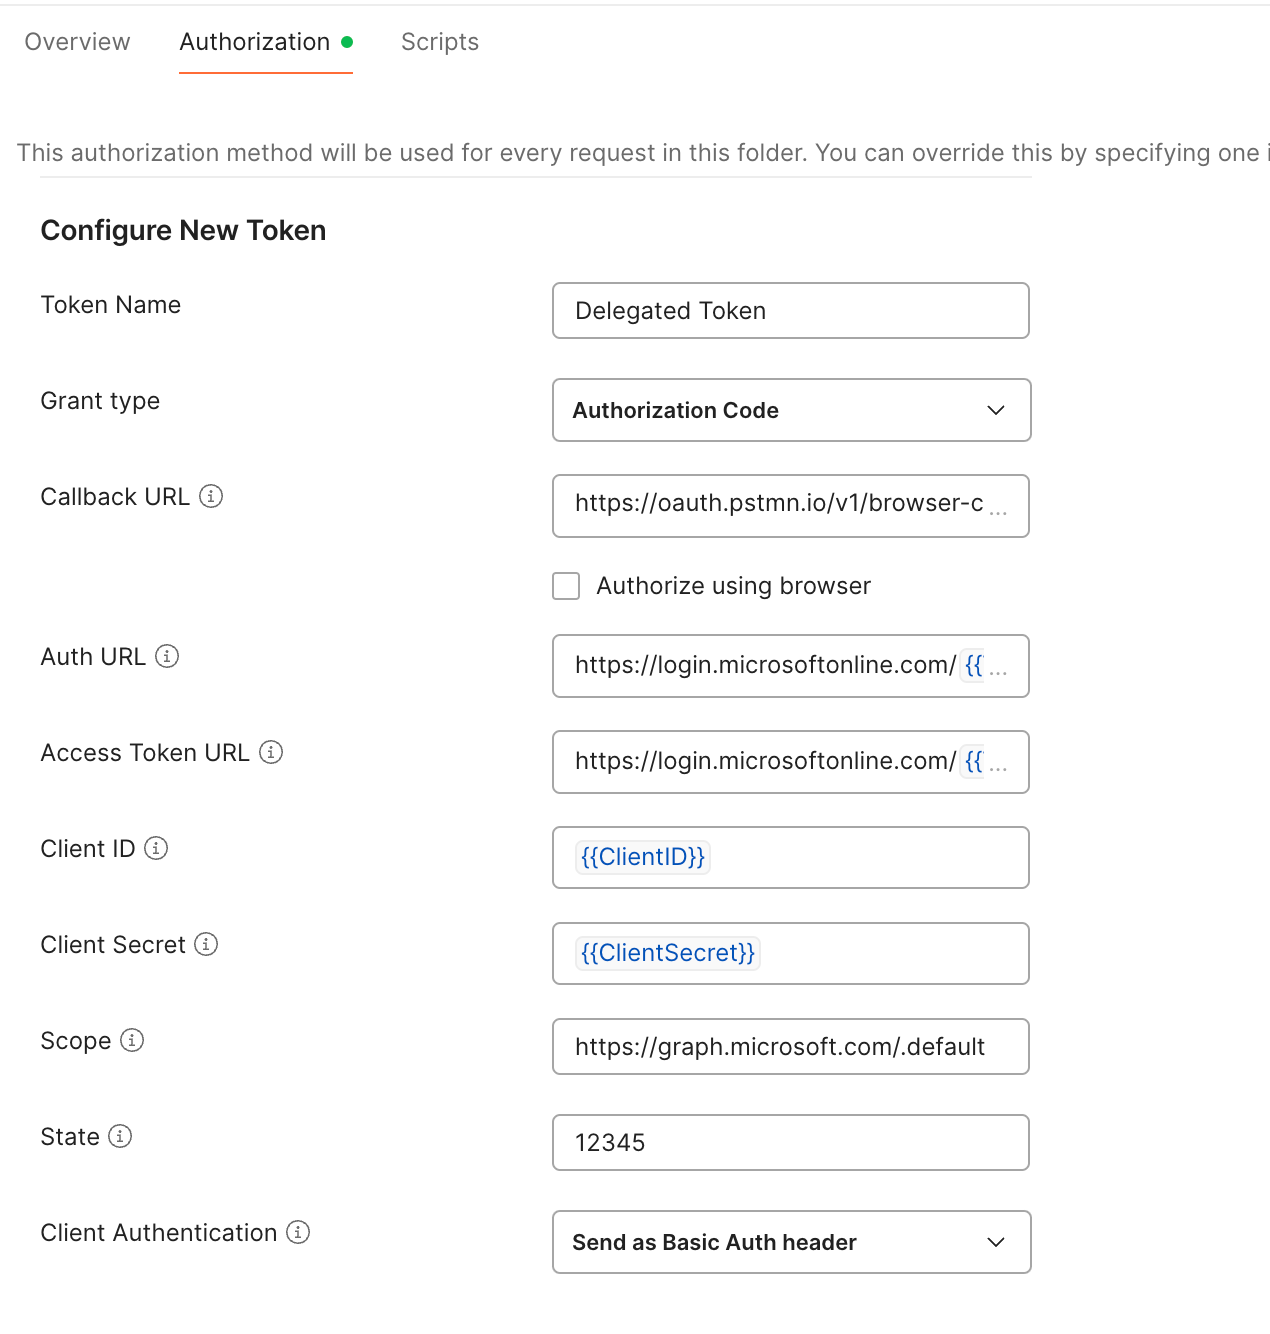
Create a new collection within Postman, navigate to the Authorization tab, and set up a new token with the following properties:
- Grant Type: Authorization Code
- Endpoints: Substitute the full authorization and token URLs with the explicit v2 endpoints extracted during step 1f.
- Scope: default value needed for Microsoft Graph API.
b. Request the Access Token
Scroll to the bottom of the configuration screen and click Get New Access Token. This initiates an interactive Microsoft Entra ID authentication window requiring the user to log in and explicitly consent to the app’s requested scopes.
c. Execute Authenticated API Calls
Once authentication and consent are successfully processed, Postman will generate the OAuth access token. This token can now be seamlessly appended to requests targeting your protected backend APIs.
Step-by-Step Implementation: Configuring & Testing App-only Authentication
Phase 1: BackEnd Application Registration in Microsoft Entra ID
a. Register the BackEnd Application
Log into the Microsoft Entra ID portal, navigate to the App registrations section from the left navigation pane, and click to register a new application. Provide a clear name for the registration (e.g., BackEndApp). Leave the default value of all other configuration .
b-Configure Scope (Application ID URI)
Select your newly registered application (BackEndApp) and click on Expose an API in the left menu blade. Click Application ID URI, and create the new URI. Either choose the default name or of your choice.
c-Configure App Roles
Select your newly registered application (BackEndApp) and click on App roles in the left menu blade. Click Create app role tab, and create the new roles (i.e. read, write, API operation specific etc) applicable for backend APIs.
Phase 2: Client Application Registration in Microsoft Entra ID
a. Register the BackEnd Application
Log into the Microsoft Entra ID portal, navigate to the App registrations section from the left navigation pane, and click to register a new application. Provide a clear name for the registration (e.g., ClientApp). Leave the default value of all other configuration .
b. Configure API Permissions
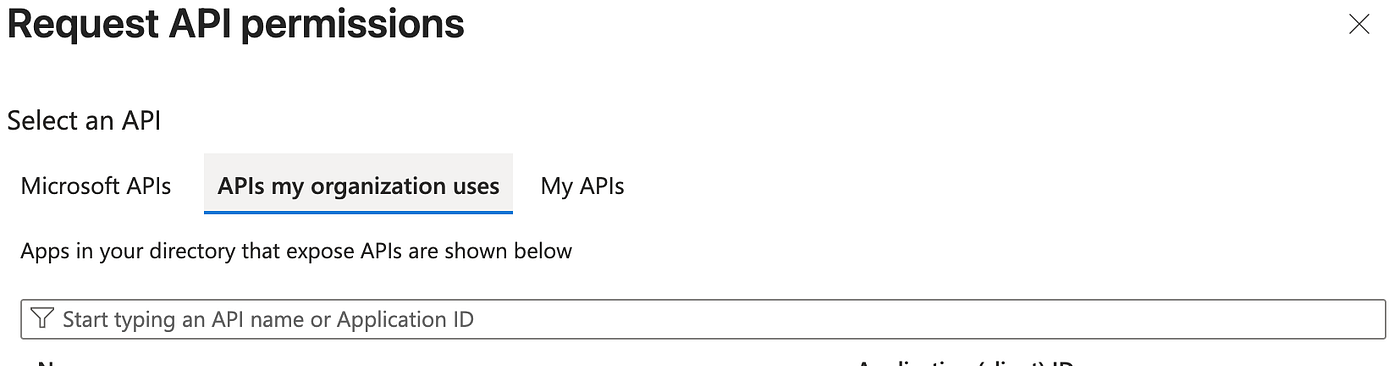
Select your newly registered application (ClientApp) and click on API permissions in the left menu blade. Click Add a permission, search for BackendApp created previously from the list of APIs my organization uses, and explicitly select the permissions/roles required for the App. Select Grant admin consent for Default Directory to provide admin consent.
c-Generate Client Credentials
Navigate to the Certificates & secrets blade on the left menu and generate a new client secret. Ensure you copy and store the secret value immediately; once you leave this screen, the value is permanently masked and cannot be recovered. The Entra ID portion of the configuration is now complete.
d. Extract Environment Endpoints
Navigate back to the Overview blade and select the Endpoints tab to gather the essential values required for API client configuration:
- Application (Client) ID
- Client Secret
- Directory (Tenant) ID
- OAuth 2.0 Token Endpoint (v2)
- Scope= Application ID URI
Phase 2: Configuring Postman for API Validation
a. Define the Collection/Request and Token Parameters
Create a new collection/Request within Postman, navigate to the Authorization tab, Go to Configure New Token and set up a new token with the following properties:
- Token Name: Name to identify the generated token
- Grant Type: Client Credentials
- Endpoints: Substitute the full token URLs with the explicit v2 endpoints extracted during step 1d.
- Client ID and Client Secret: Value extracted in previous step 1d.
- Scope: Append “/.default” in scope/Application ID URI value.
b. Request the Access Token
Scroll to the bottom of the configuration screen and click Get New Access Token. This initiates an interactive Microsoft Entra ID authentication window and generates the OAuth token.
c. Execute Authenticated API Calls
This OAuth token can now be seamlessly appended to requests targeting your protected backend APIs.
Technical Documentation & References
For comprehensive integration details and advanced workflows, refer to the official Microsoft Learn documentation links highlighted in:
메타데이터
- post_id
- 55c8efea3cb6
- slug
- delegated-authentication-vs-app-only-authentication-in-microsoft-entra-id-55c8efea3cb6
- url
- https://medium.com/@sachin.knit05/delegated-authentication-vs-app-only-authentication-in-microsoft-entra-id-55c8efea3cb6
- canonical_url
- https://medium.com/@sachin.knit05/delegated-authentication-vs-app-only-authentication-in-microsoft-entra-id-55c8efea3cb6
- author_url
- https://medium.com/@sachin.knit05
- status
- ok
- fetched_at
- 2026-06-23 07:05:20


