Smart Auto-Scaling for Amazon EKS: Meet Karpenter
If you're running workloads on Kubernetes, you've probably faced the constant balancing act between over-provisioning (wasting money) and…
Smart Auto-Scaling for Amazon EKS: Meet Karpenter

If you're running workloads on Kubernetes, you've probably faced the constant balancing act between over-provisioning (wasting money) and under-provisioning (hurting performance). This is where Karpenter comes in — an intelligent, high-performance autoscaler purpose-built for Kubernetes.
What is Karpenter?
Karpenter is an open-source autoscaler supported by Amazon Web Services (AWS). While it's optimized for Amazon EKS (Elastic Kubernetes Service), it's also compatible with other cloud providers and even on-prem environments.
What Does Karpenter Do?
- Monitors Pod Requests: It watches for unscheduled pods that couldn’t be placed due to resource shortages.
- Creates New Nodes: It quickly launches the optimal EC2 instances based on your pods' needs.
- Terminates Unused Nodes: Frees up cost by automatically shutting down underutilized or idle nodes.
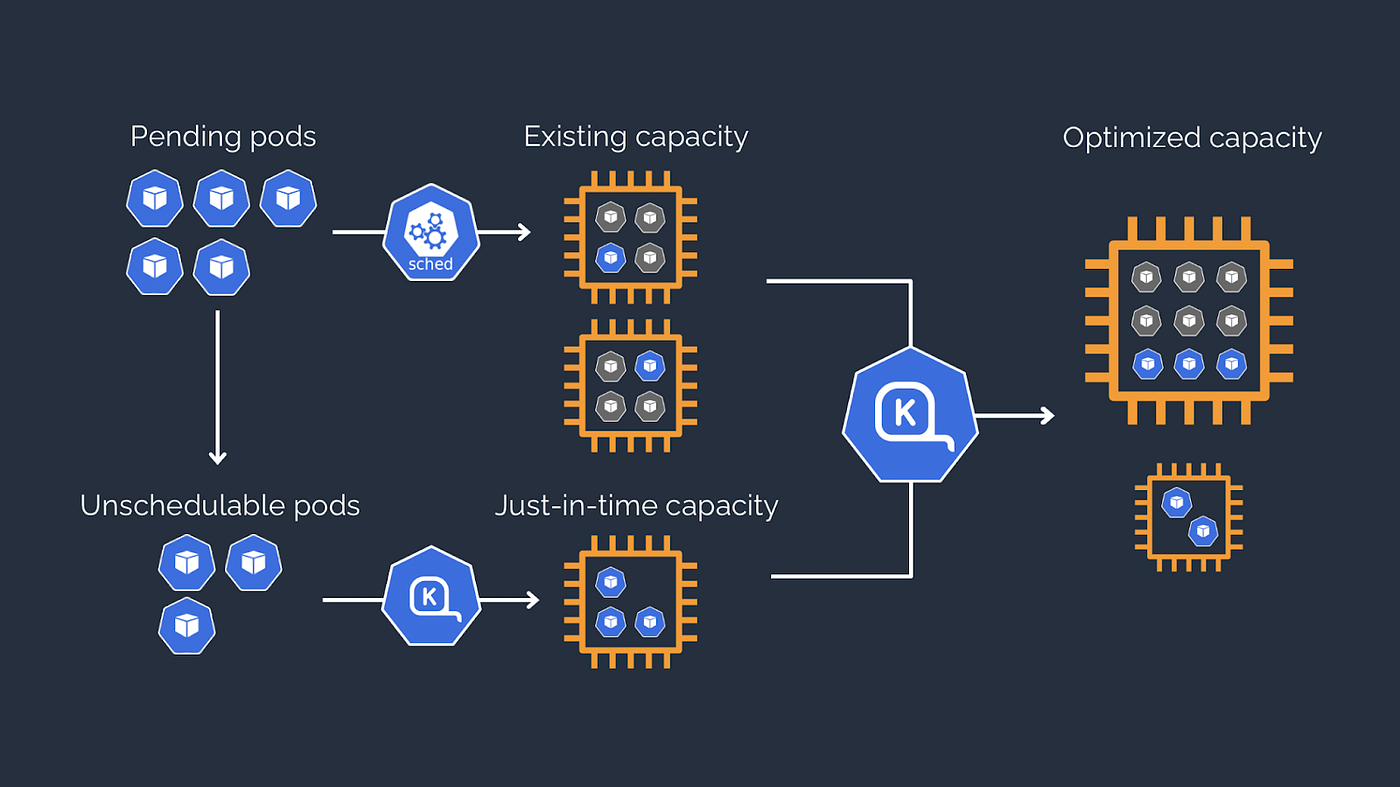
Karpenter steps in when "unschedulable" pods arise in a Kubernetes cluster because they cannot fit onto existing nodes.
Karpenter analyzes the resources required by these unschedulable pods.
Based on these needs, it automatically provisions new nodes of the appropriate size and type "just-in-time" to host those specific pods.
This new capacity, combined with the existing capacity, forms an "optimized capacity" where the pods can run.
Consequently, Karpenter dynamically and efficiently manages cluster capacity by preventing unnecessary resources and ensuring pods run quickly.
Key Benefits
- Fast Response Time: Instantly reacts to workload changes.
- Flexibility: Doesn’t rely on pre-defined node groups — scales precisely based on pod requirements.
- Cost Efficiency: Reduces unnecessary spending on idle resources.
- High Availability: Ensures your applications always have the resources they need.
Karpenter vs. Traditional Cluster Autoscaler
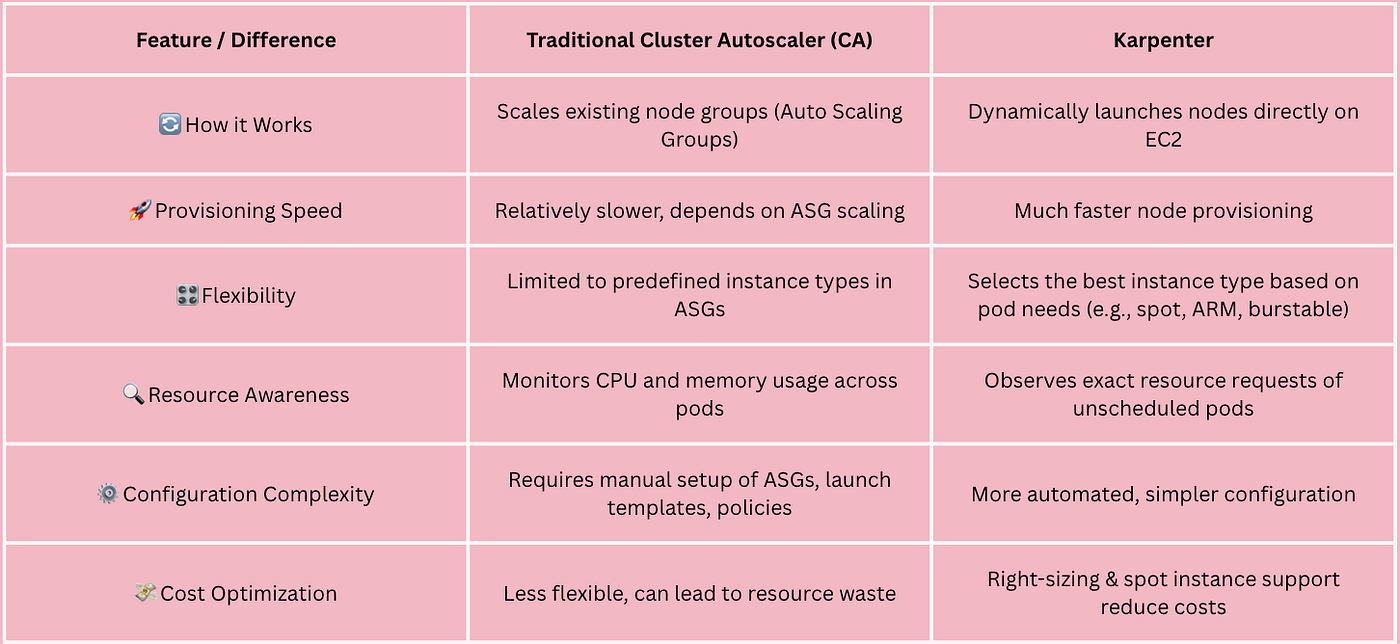
Karpenter stands out by offering pod-level precision scaling, meaning you no longer need to guess node group sizes or types. It provisions the right compute for each workload automatically.
The following table provides a side-by-side comparison between Karpenter and the traditional Cluster Autoscaler, highlighting key differences.
Step-by-Step: Deploying Karpenter on Amazon EKS
Here’s a quick-start guide to create a demo EKS cluster and deploy Karpenter using eksctl, helm, and a few commands. The entire process takes less than 1 hour and costs less than $0.25 if you clean up afterward.
Prerequisites
The following tools must be installed:
- AWS CLI
- kubectl (Kubernetes CLI)
- eksctl (v0.202.0 or newer)
- helm
Then the AWS CLI must be configured using the following command:
aws configureTo verify that it has been configured correctly, the following command should be executed:
aws sts get-caller-identityDefining Environment Variables
export KARPENTER_NAMESPACE="kube-system"
export KARPENTER_VERSION="1.5.0"
export K8S_VERSION="1.32"
export AWS_PARTITION="aws"
export CLUSTER_NAME="karpenter-demo"
export AWS_DEFAULT_REGION="eu-west-1"
export AWS_ACCOUNT_ID="$(aws sts get-caller-identity --query Account --output text)"
export TEMPOUT="$(mktemp)"
export ALIAS_VERSION="$(aws ssm get-parameter --name "/aws/service/eks/optimized-ami/${K8S_VERSION}/amazon-linux-2023/x86_64/standard/recommended/image_id" --query Parameter.Value | xargs aws ec2 describe-images --query 'Images[0].Name' --image-ids | sed -r 's/^.*(v[[:digit:]]+).*$/\1/')"
echo "${KARPENTER_NAMESPACE}" "${KARPENTER_VERSION}" "${K8S_VERSION}" "${CLUSTER_NAME}" "${AWS_DEFAULT_REGION}" "${AWS_ACCOUNT_ID}" "${TEMPOUT}" "${ALIAS_VERSION}"Create a Basic Cluster with eksctl
Download and deploy the CloudFormation template
To deploy the necessary AWS infrastructure for Karpenter, run the following command,this command performs the following actions:
- Downloads the CloudFormation template for Karpenter from the specified version.
- Saves the template to a temporary file defined by the TEMPOUT variable.
- Deploys the template using the AWS CLI, creating or updating a CloudFormation stack named Karpenter-${CLUSTER_NAME}.
- Grants the stack permission to create IAM resources (CAPABILITY_NAMED_IAM).
- Passes the cluster name as a parameter to the template via --parameter-overrides.
curl -fsSL https://raw.githubusercontent.com/aws/karpenter-provider-aws/v"${KARPENTER_VERSION}"/website/content/en/preview/getting-started/getting-started-with-karpenter/cloudformation.yaml  > "${TEMPOUT}" \
&& aws cloudformation deploy \
--stack-name "Karpenter-${CLUSTER_NAME}" \
--template-file "${TEMPOUT}" \
--capabilities CAPABILITY_NAMED_IAM \
--parameter-overrides "ClusterName=${CLUSTER_NAME}"
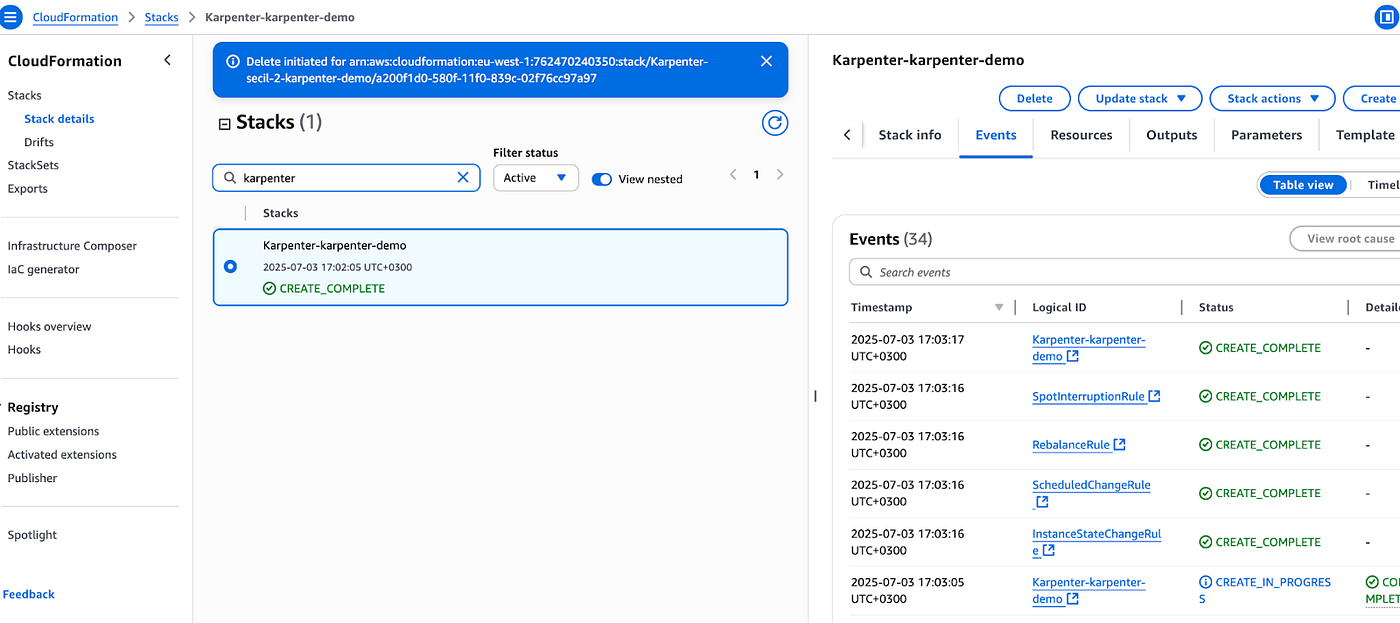
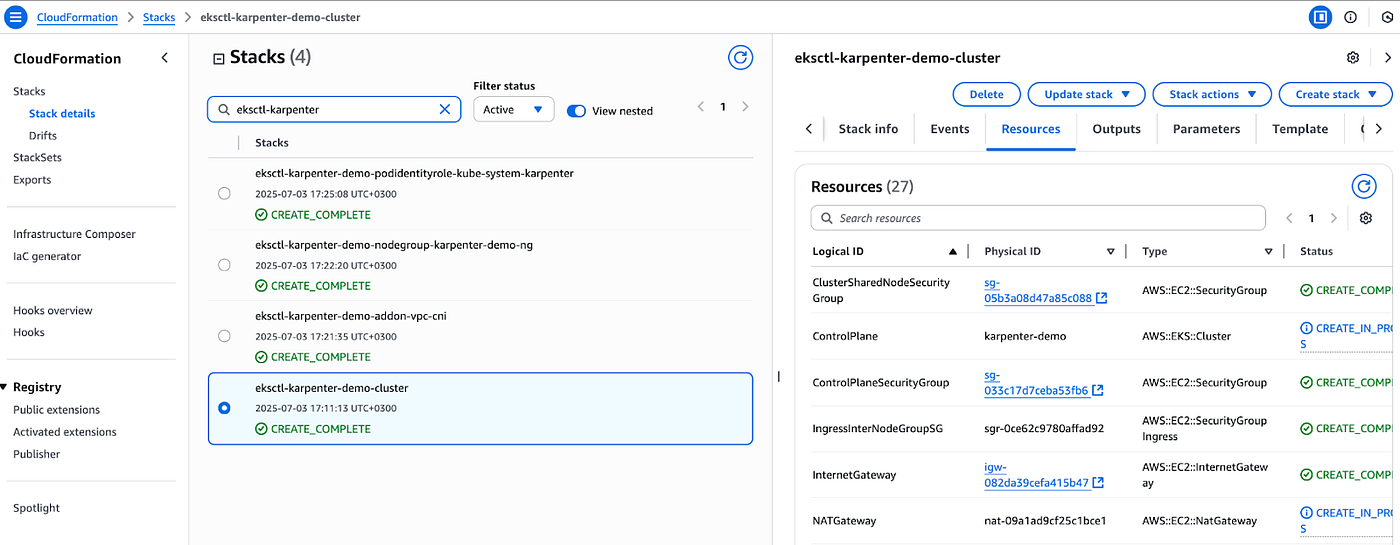
This can be verified by navigating to the AWS CloudFormation Console, selecting the appropriate region, and checking the Stacks section.
Create EKS Cluster via Managed Node Groups
An Amazon EKS cluster can be provisioned with support for Karpenter using a declarative eksctl configuration. The required IAM roles, OIDC integration, and pod identity associations are defined within the configuration file. A managed node group is also included, along with the necessary EKS add-ons such as the pod identity agent. With this setup, the cluster is prepared for dynamic node provisioning by Karpenter.
To create an EKS cluster configured for Karpenter, use the following eksctl configuration:
eksctl create cluster -f - <<EOF
---
apiVersion: eksctl.io/v1alpha5
kind: ClusterConfig
metadata:
  name: ${CLUSTER_NAME}
  region: ${AWS_DEFAULT_REGION}
  version: "${K8S_VERSION}"
  tags:
    karpenter.sh/discovery: ${CLUSTER_NAME}

iam:
  withOIDC: true
  podIdentityAssociations:
  - namespace: "${KARPENTER_NAMESPACE}"
    serviceAccountName: karpenter
    roleName: ${CLUSTER_NAME}-karpenter
    permissionPolicyARNs:
    - arn:${AWS_PARTITION}:iam::${AWS_ACCOUNT_ID}:policy/KarpenterControllerPolicy-${CLUSTER_NAME}

iamIdentityMappings:
- arn: "arn:${AWS_PARTITION}:iam::${AWS_ACCOUNT_ID}:role/KarpenterNodeRole-${CLUSTER_NAME}"
  username: system:node:{{EC2PrivateDNSName}}
  groups:
  - system:bootstrappers
  - system:nodes
  ## If you intend to run Windows workloads, the kube-proxy group should be specified.
  # For more information, see https://github.com/aws/karpenter/issues/5099.
  # - eks:kube-proxy-windows

managedNodeGroups:
- instanceType: m5.large
  amiFamily: AmazonLinux2023
  name: ${CLUSTER_NAME}-ng
  desiredCapacity: 2
  minSize: 1
  maxSize: 10

addons:
- name: eks-pod-identity-agent
EOF
The following commands set and print out the values of:
CLUSTER_ENDPOINT – the endpoint URL of your EKS (Elastic Kubernetes Service) cluster.
KARPENTER_IAM_ROLE_ARN – the ARN of the IAM role.
export CLUSTER_ENDPOINT="$(aws eks describe-cluster --name "${CLUSTER_NAME}" --query "cluster.endpoint" --output text)"
export KARPENTER_IAM_ROLE_ARN="arn:${AWS_PARTITION}:iam::${AWS_ACCOUNT_ID}:role/${CLUSTER_NAME}-karpenter"

echo "${CLUSTER_ENDPOINT} ${KARPENTER_IAM_ROLE_ARN}"
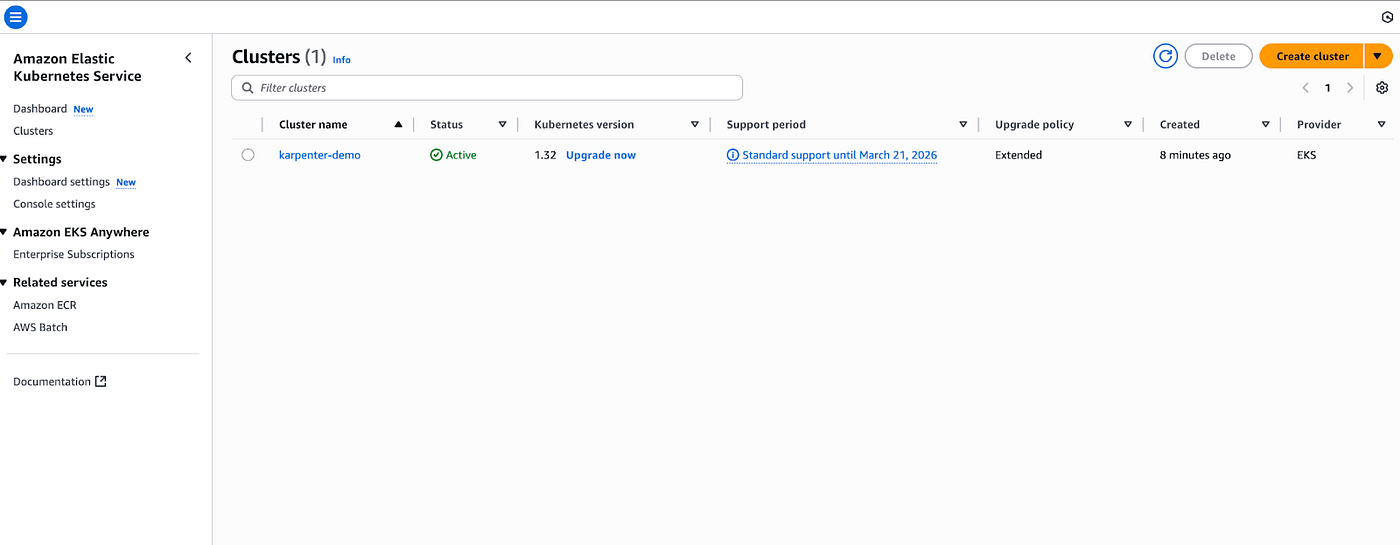
The EKS cluster status can be confirmed by visiting the Amazon EKS Console, selecting the relevant region, and reviewing the Clusters section.
Note for the curious
How eksctl sets up an EKS cluster using CloudFormation
The eksctl CLI reads the YAML configuration file provided by the user.
Based on this configuration, it generates multiple CloudFormation templates in the background.
These templates define the EKS control plane, IAM roles, VPC (if not already created), node groups, and add-ons.
eksctl then automatically creates and deploys these CloudFormation stacks to AWS account.
The stacks can be seen in the AWS CloudFormation Console.
If any step fails, eksctl will log the error and show which part of the infrastructure failed to deploy.
To allow Karpenter to launch Spot Instances, a service-linked IAM role for spot.amazonaws.com must be created. This can be done by running the following command prior to deploying the Karpenter controller, in order to avoid the ServiceLinkedRoleCreationNotPermitted error.
aws iam create-service-linked-role --aws-service-name spot.amazonaws.com || true

# If the role has already been successfully created, you will see:
# An error occurred (InvalidInput) when calling the CreateServiceLinkedRole operation: Service role name AWSServiceRoleForEC2Spot has been taken in this account, please try a different suffix.
Windows Support Notice
In order to run Windows workloads, Windows support should be enabled in your EKS Cluster.
Install Karpenter via Helm
To remove cached credentials for the public ECR Helm registry, the following command can be used.
This is useful when switching accounts, automating logout in scripts, or ensuring a clean state before or after Helm operations involving OCI registries.
helm registry logout public.ecr.awsThe following commands are used to install Karpenter using Helm.
helm upgrade --install karpenter oci://public.ecr.aws/karpenter/karpenter --version "${KARPENTER_VERSION}" --namespace "${KARPENTER_NAMESPACE}" --create-namespace \
  --set "settings.clusterName=${CLUSTER_NAME}" \
  --set "settings.interruptionQueue=${CLUSTER_NAME}" \
  --set controller.resources.requests.cpu=1 \
  --set controller.resources.requests.memory=1Gi \
  --set controller.resources.limits.cpu=1 \
  --set controller.resources.limits.memory=1Gi \
  --wait
As the OCI Helm chart is signed by Cosign as part of the release process you can verify the chart before installing it by running the following command.
cosign verify public.ecr.aws/karpenter/karpenter:1.5.2 \
  --certificate-oidc-issuer=https://token.actions.githubusercontent.com \
  --certificate-identity-regexp='https://github\.com/aws/karpenter-provider-aws/\.github/workflows/release\.yaml@.+' \
  --certificate-github-workflow-repository=aws/karpenter-provider-aws \
  --certificate-github-workflow-name=Release \
  --certificate-github-workflow-ref=refs/tags/v1.5.2 \
  --annotations version=1.5.2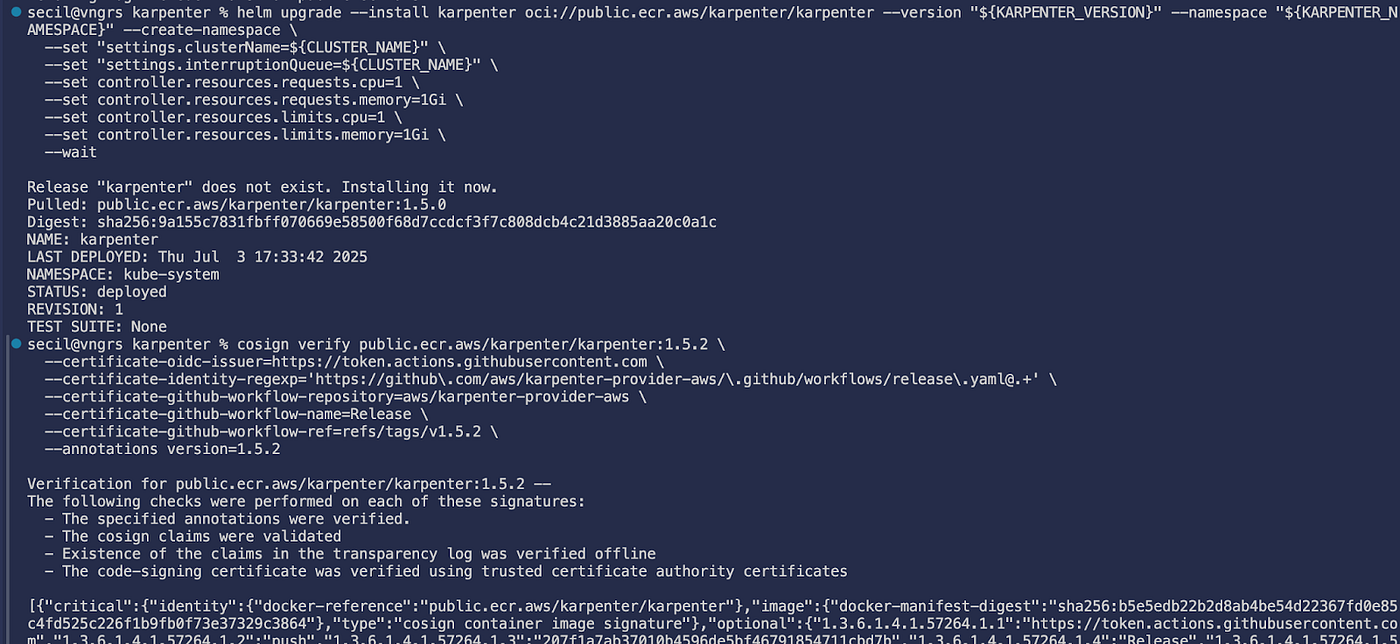
If cosign is not installed, it can be installed using the following command:
brew install cosignCreate a NodePool
In Karpenter, a NodePool is a core resource that defines how nodes should be provisioned. It replaces the need for rigid node groups (like in traditional cluster autoscalers) and enables more dynamic, responsive, and cost-effective scaling.
Without a NodePool, Karpenter wouldn’t know:
- What kind of instances are suitable for your workloads
- Where (which VPC/subnet) to launch them
- Whether to use on-demand or spot capacity
- Which instance types to avoid or prefer
- How much total capacity it’s allowed to scale to
In short, NodePools define the provisioning boundaries and preferences, allowing Karpenter to make intelligent, automated scaling decisions.
To define a NodePool and an EC2NodeClass, run the following command:
cat <<EOF | envsubst | kubectl apply -f -
apiVersion: karpenter.sh/v1
kind: NodePool
metadata:
  name: default
spec:
  template:
    spec:
      requirements:
        - key: kubernetes.io/arch
          operator: In
          values: ["amd64"]
        - key: kubernetes.io/os
          operator: In
          values: ["linux"]
        - key: karpenter.sh/capacity-type
          operator: In
          values: ["on-demand"]
        - key: karpenter.k8s.aws/instance-category
          operator: In
          values: ["c", "m", "r"]
        - key: karpenter.k8s.aws/instance-generation
          operator: Gt
          values: ["2"]
      nodeClassRef:
        group: karpenter.k8s.aws
        kind: EC2NodeClass
        name: default
      expireAfter: 720h # 30 * 24h = 720h
  limits:
    cpu: 1000
  disruption:
    consolidationPolicy: WhenEmptyOrUnderutilized
    consolidateAfter: 1m
---
apiVersion: karpenter.k8s.aws/v1
kind: EC2NodeClass
metadata:
  name: default
spec:
  role: "KarpenterNodeRole-${CLUSTER_NAME}" # replace with your cluster name
  amiSelectorTerms:
    - alias: "al2023@${ALIAS_VERSION}"
  subnetSelectorTerms:
    - tags:
        karpenter.sh/discovery: "${CLUSTER_NAME}" # replace with your cluster name
  securityGroupSelectorTerms:
    - tags:
        karpenter.sh/discovery: "${CLUSTER_NAME}" # replace with your cluster name
EOF
Testing Auto-Scaling with a Sample Deployment
To test auto-scaling behavior, it is necessary to create and scale a deployment.
Creating a Kubernetes Deployment
The following manifest creates a Kubernetes Deployment named inflate initially configured with zero replicas, enabling manual scaling during auto-scaling tests. The deployment utilizes the pause:3.7 container image from the EKS Distro public registry, primarily to simulate CPU resource consumption without running actual workloads. Each pod requests 1 vCPU, ensuring node provisioning occurs when replicas are scaled up. Security best practices are enforced through the use of a non-root user, specific UID/GID settings, and by disabling privilege escalation. Additionally, the terminationGracePeriodSeconds is set to 0, ensuring pods are terminated immediately during scaling or deletion events.
Apply the Deployment manifest using the following command:
cat <<EOF | kubectl apply -f -
apiVersion: apps/v1
kind: Deployment
metadata:
  name: inflate
spec:
  replicas: 0
  selector:
    matchLabels:
      app: inflate
  template:
    metadata:
      labels:
        app: inflate
    spec:
      terminationGracePeriodSeconds: 0
      securityContext:
        runAsUser: 1000
        runAsGroup: 3000
        fsGroup: 2000
      containers:
      - name: inflate
        image: public.ecr.aws/eks-distro/kubernetes/pause:3.7
        resources:
          requests:
            cpu: 1
        securityContext:
          allowPrivilegeEscalation: false
EOF
Scaling Workload Up
The following command increases the number of replicas from 0 to 5, causing five pods to be scheduled.
Because each pod requests 1 vCPU, this scaling action creates resource demand that Karpenter can detect.
This approach is commonly used in testing scenarios to verify that nodes are automatically provisioned when workload demands increase.
kubectl scale deployment inflate --replicas 5
To monitor Karpenter in action, use the following command:
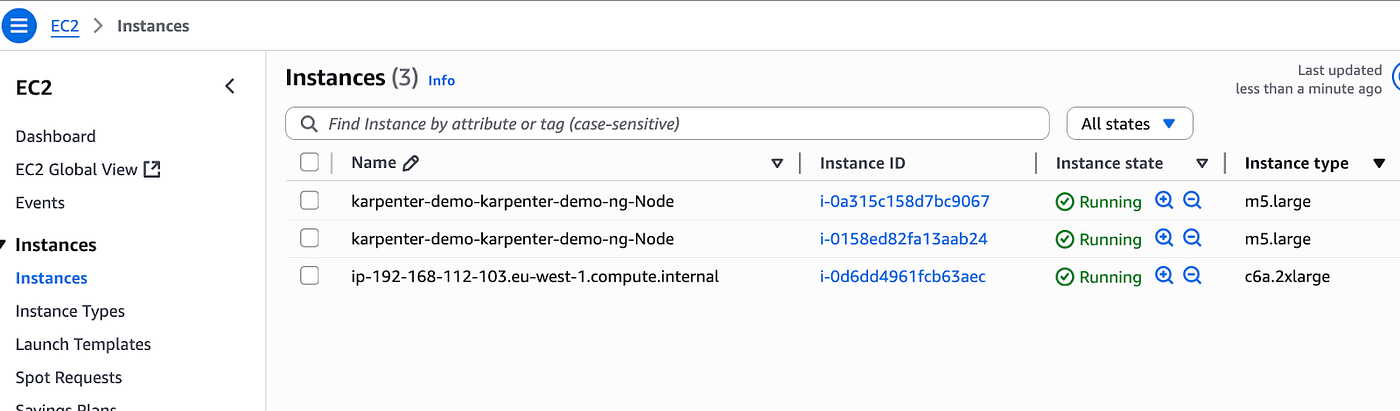
kubectl logs -f -n "${KARPENTER_NAMESPACE}" -l app.kubernetes.io/name=karpenter -c controllerAfter scaling the deployment, the EC2 instances can be observed in the AWS Management Console under the EC2 > Instances section.
In this example, two m5.large instances named karpenter-demo-karpenter-demo-ng-Node are part of the managed node group.
Additionally, a c6a.2xlarge instance named according to its internal DNS indicates that it was provisioned by Karpenter in response to increased resource demand.
All instances show the Running state, confirming that the cluster scaled as expected.
This provides visual confirmation that Karpenter successfully provisioned new compute capacity to meet the workload requirements.
Scaling Workload Down & Observe Node Termination
Now, delete the deployment using the following command:
kubectl delete deployment inflateAfter a short period, Karpenter will automatically terminate the now-empty nodes due to consolidation.
Clean Up
To avoid additional charges, remove the demo infrastructure from your AWS account by running the following commands:
helm uninstall karpenter - namespace "${KARPENTER_NAMESPACE}"aws cloudformation delete-stack - stack-name "Karpenter-${CLUSTER_NAME}"eksctl delete cluster - name "${CLUSTER_NAME}"Warnings and Operational Considerations
DNS Policy Notice
Karpenter uses the ClusterFirst pod DNS policy by default. This is the Kubernetes cluster default and this ensures that Karpenter can reach-out to internal Kubernetes services during its lifetime. There may be cases where you do not have the DNS service that you are using on your cluster up-and-running before Karpenter starts up. The most common case of this is you want Karpenter to manage the node capacity where your DNS service pods are running.
If you need Karpenter to manage the DNS service pods’ capacity, this means that DNS won’t be running when Karpenter starts-up. In this case, you will need to set the pod DNS policy to Default with — set dnsPolicy=Default. This will tell Karpenter to use the host’s DNS resolution instead of the internal DNS resolution, ensuring that you don’t have a dependency on the DNS service pods to run. More details on this issue can be found in the following Github issues: #2186 and #4947.
Warning
Karpenter creates a mapping between CloudProvider machines and CustomResources in the cluster for capacity tracking. To ensure this mapping is consistent, Karpenter utilizes the following tag keys:
- karpenter.sh/managed-by
- karpenter.sh/nodepool
- kubernetes.io/cluster/${CLUSTER_NAME}
Because Karpenter takes this dependency, any user that has the ability to Create/Delete these tags on CloudProvider machines will have the ability to orchestrate Karpenter to Create/Delete CloudProvider machines as a side effect. We recommend that you enforce tag-based IAM policies on these tags against any EC2 instance resource (i-*) for any users that might have CreateTags/DeleteTags permissions but should not have RunInstances/TerminateInstances permissions.
Final Thoughts
Karpenter gives you fine-grained control, faster reaction time, and smarter cost optimization — all while simplifying the scaling complexity. If you’re using Amazon EKS, trying out Karpenter is a no-brainer.
Scale smarter. Save more. Ship faster.
References
Linkedin/karpenter-aws-eks-how-improve-your-application-soumyadip-chatterjee-rheuc
메타데이터
- post_id
- 577f8a8d3c1a
- slug
- smart-auto-scaling-for-amazon-eks-meet-karpenter-577f8a8d3c1a
- url
- https://medium.com/vngrs/smart-auto-scaling-for-amazon-eks-meet-karpenter-577f8a8d3c1a
- canonical_url
- https://medium.com/vngrs/smart-auto-scaling-for-amazon-eks-meet-karpenter-577f8a8d3c1a
- author_url
- https://medium.com/@secilns
- status
- ok
- fetched_at
- 2026-06-09 21:21:26