How to Make a Simple REST API Using Laravel 13 | CRUD Blog
In modern application development, REST (Representational State Transfer) APIs have become the primary standard for connecting frontend and…
How to Make a Simple REST API Using Laravel 13 | CRUD Blog
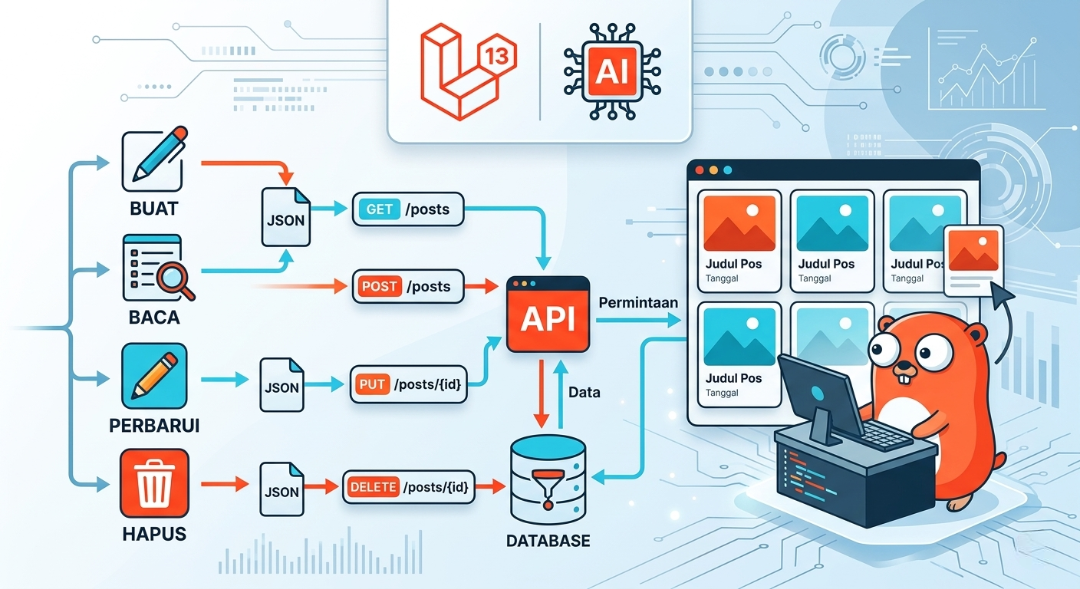
In modern application development, REST (Representational State Transfer) APIs have become the primary standard for connecting frontend and backend systems. REST provides a lightweight, flexible, and easy-to-understand architecture for data communication, making it the go-to choice for web and mobile applications. While alternative protocols like gRPC offer high performance through binary serialization and HTTP/2, REST using JSON remains the industry favorite for public-facing APIs due to its simplicity, ease of debugging, and widespread browser support.
Laravel, one of the most popular PHP frameworks, continues to evolve to enhance developer experience. The latest version, Laravel 13, has officially branded itself as an “AI-Native Framework”. This release focuses on “Quality of Life” improvements, shifting away from boilerplate code towards a more modern, attribute-based structure, while providing first-party tools to integrate Artificial Intelligence directly into your backend.
In this guide, we will walk through building a complete CRUD (Create, Read, Update, Delete) REST API for a blog application using Laravel 13.
Prerequisites
Before we dive into the code, ensure your local environment meets the following requirements:
- PHP 8.3 or higher (Laravel 13 requires a minimum of PHP 8.3).
- Composer (PHP package manager).
- MySQL or another supported database.
- Postman or Insomnia for testing your API endpoints.
Step 1: Installing Laravel 13
To begin, you can initialize a new Laravel 13 project via Composer. Open your terminal and run the following command:
composer create-project laravel/laravel blog-apiAlternatively, if you have the Laravel Installer, you can simply run laravel new blog-api. Once the application is initialized, navigate into your project folder.
Step 2: Database Configuration
Open your project’s .env file located in the root directory. Adjust the following variables to match your local MySQL configuration:
DB_CONNECTION=mysql
DB_HOST=127.0.0.1
DB_PORT=3306
DB_DATABASE=laravel_blog
DB_USERNAME=root
DB_PASSWORD=
After updating the .env file, create the database manually in your MySQL server if it doesn't already exist.
Step 3: Preparing the Migration
In Laravel, we use migrations to define our database schema. For our blog application, we need a blogs table. You can create both the model and the migration file simultaneously using a single Artisan command:
php artisan make:model Blog -mNavigate to database/migrations/*_create_blogs_table.php and define the columns in the up function:
public function up(): void
{
    Schema::create('blogs', function (Blueprint $table) {
        $table->id();
        $table->string('title');
        $table->text('content');
        $table->timestamps();
    });
}
Now, run the migration to create the table in your database:
php artisan migrateStep 4: The Modern Laravel 13 Model
One of the most significant changes in Laravel 13 is the move toward PHP Attributes. Traditionally, developers used protected properties like $fillable or $table inside the model class. In Laravel 13, we say "goodbye" to these properties in favor of a cleaner, attribute-based approach.
Think of attributes like “fragile” stickers on a package; the system understands how to handle the class just by looking at the “sticker” on the outside, rather than digging into the internal properties. Your Blog model at app/Models/Blog.php should now look like this:
namespace App\Models;

use Illuminate\Database\Eloquent\Model;
use Illuminate\Database\Eloquent\Attributes\ObservedBy;
use Illuminate\Database\Eloquent\Attributes\Fillable;

#[Fillable(['title', 'content'])]
class Blog extends Model
{
    // The class body remains clean and readable
}
Step 5: Creating the CRUD Controller
Now, we need a controller to handle the business logic. Generate a controller using the following command:
php artisan make:controller BlogControllerOpen app/Http/Controllers/BlogController.php and implement the CRUD functions:
- Index (Read All): Returns a list of all blogs.
- Store (Create): Validates and saves a new blog.
- Show (Read One): Retrieves a single blog by its ID.
- Update: Modifies an existing blog entry.
- Destroy (Delete): Removes a blog from the database.
Here’s the code :
<?php
namespace App\Http\Controllers;

use App\Models\Blog;
use Illuminate\Http\Request;

class BlogController extends Controller
{
    public function index()
    {
        $blogs = Blog::all();

        return response()->json([
            ‘status’ => ‘success’,
            ‘source’ => ‘database’,
            ‘data’ => $blogs
        ]);
    }

    public function store(Request $request)
    {
        $validated = $request->validate([
            ‘title’ => ‘required|string|max:255',
            ‘content’ => ‘required|string’,
        ]);

        $blog = Blog::create([
            ‘title’ => $validated[‘title’],
            ‘content’ => $validated[‘content’],
        ]);

        return response()->json($blog, 201);
    }

    public function show($id)
    {
        $blog = Blog::find($id); // [1, 8]

        if (!$blog) {
            return response()->json([‘message’ => ‘Blog not found’], 404);
        }

        return response()->json($blog);
    }

    public function update(Request $request, $id)
    {
        $blog = Blog::find($id); // [1, 8]

        if (!$blog) {
            return response()->json([‘message’ => ‘Blog not found’], 404);
        }

        return response()->json($blog);
    }

    public function destroy($id)
    {
        $blog = Blog::find($id); // [1, 8]

        if (!$blog) {
            return response()->json(['message' => 'Blog not found'], 404);
        }

        return response()->json(['message' => 'Blog deleted successfully']);
    }
}
Using an ORM (Object-Relational Mapping) like Laravel’s Eloquent is highly recommended for development speed and maintainability. While raw SQL might be slightly faster, ORM allows your team to write readable code that is easy to review and helps avoid vendor lock-in.
Step 6: Defining API Routes
In Laravel 13, you need to ensure your API routes are registered. Create or open routes/api.php and define your resource routes:
use App\Http\Controllers\BlogController;
use Illuminate\Support\Facades\Route;
Route::apiResource('blogs', BlogController::class);add api.php route into laravel bootstrap config in bootsrap/app.php .
return Application::configure(basePath: dirname(__DIR__))
    ->withRouting(
        ------------
        api: __DIR__.'/../routes/api.php', // add this line
        ------------
    )
Here is the route list that has been added.

Step 7: Optimizing Performance with Redis
For high-traffic applications, hitting the database for every single request can be inefficient. A common issue is the N+1 query problem, where the system makes too many individual requests to the disk-based database, causing latency.
By implementing Redis Caching, you can boost your API performance significantly — sometimes up to 500% faster. Using a Cache Aside strategy, your API will first check Redis for the requested data. If it exists (Cache Hit), it returns instantly. If not (Cache Miss), it fetches from the database, stores it in Redis with a TTL (Time to Live), and then returns it.
// Example: Caching the blog index for 1 hour
$blogs = Redis::get('all_blogs');
if (!$blogs) {
$blogs = Blog::all();
Redis::setex('all_blogs', 3600, json_encode($blogs));
}This simple optimization reduces disk “chatter” and serves data from RAM, which provides sub-millisecond access times.
Step 8: Leveraging Laravel 13’s AI Features
Because Laravel 13 is AI-native, you can now easily integrate AI agents to enhance your blog. For example, you could use the built-in AI SDK to automatically generate a summary or “poem” for a new blog post upon creation.
use Laravel\AI\Agent;$response = AI::agent()
->instructions('You are a helpful blog assistant.')
->prompt('Write a short summary for this blog title: ' . $title);This allows you to build sophisticated, AI-powered applications without the need for complex third-party packages.
Conclusion
Building a REST API with Laravel 13 is more efficient than ever thanks to modern PHP Attributes, AI-native tools, and robust ORM capabilities. By following these steps and considering advanced optimizations like Redis caching, you can create a backend that is not only functional but high-performing and scalable.
If this Laravel 13 tutorial helped you, please show your support by giving this article some claps! You can give up to 50 claps 👏 to show your appreciation. Your engagement helps the community and allows more developers to find these insights. Don’t forget to follow for more elite software engineering content!
메타데이터
- post_id
- 5aa7d1801e6a
- slug
- how-to-make-a-simple-rest-api-using-laravel-13-crud-blog-5aa7d1801e6a
- url
- https://blog.stackademic.com/how-to-make-a-simple-rest-api-using-laravel-13-crud-blog-5aa7d1801e6a
- canonical_url
- https://blog.stackademic.com/how-to-make-a-simple-rest-api-using-laravel-13-crud-blog-5aa7d1801e6a
- author_url
- https://medium.com/@fatoni-ach
- status
- ok
- fetched_at
- 2026-06-15 20:49:13