Cube with Textures in OpenGL Using GLUT
Texture mapping a cube in OpenGL
Cube with Textures in OpenGL Using GLUT
In this tutorial, we’ll learn how to create a rotating 3D cube using OpenGL with the GLUT library. Each face of the cube will have a different texture (image), like wood, metal, or grass, making the cube look realistic.
What Is OpenGL and GLUT?
- OpenGL: A tool for creating 2D and 3D graphics. It’s used to make things like 3D shapes and animations.
- GLUT: Stands for OpenGL Utility Toolkit. It’s a helper library that makes it easier to work with OpenGL by handling things like creating windows, managing inputs (keyboard, mouse), and other basic tasks.
What Is a Texture?
A texture is an image that can be “wrapped” around 3D objects, making them look more realistic. In this project, we’ll use different textures for each side of the cube.
Not a paid member yet? **Click here to read this tutorial for free**.
What You Need
- A C++ compiler (like MinGW or Visual Studio)
- OpenGL and GLUT installed
- Six images for the cube’s textures (wood.jpg, metal.jpg, grass.jpg, flower.jpg, sun.jpg, animal.jpg)
Step 1: Setting Up GLUT
First, we need to set up GLUT to create a window for our cube.
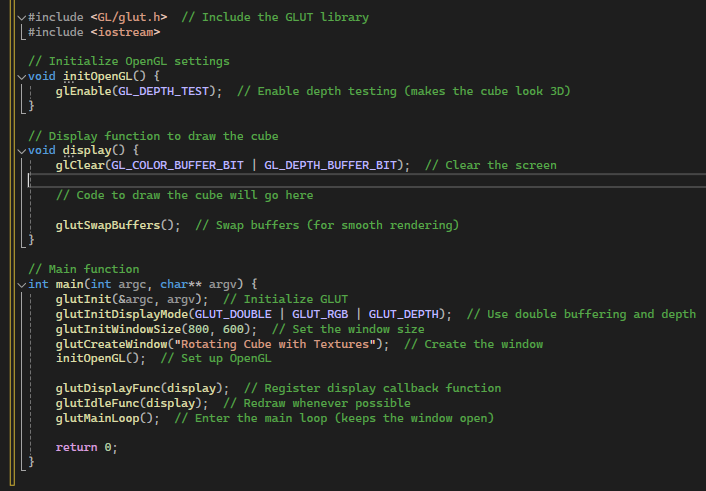
Explanation:
- glutInit: Initializes GLUT.
- glutCreateWindow: Opens a window.
- glEnable(GL_DEPTH_TEST): Enables depth testing, which makes the cube look correct in 3D (so nearer faces cover farther faces).
Step 2: Loading Textures
We need to load images as textures to apply to the cube’s faces. We can use the stb_image library to load image files.
First, download and include the stb_image.h file in your project.
Now, let’s create a function to load a texture from an image file:

This function loads an image and creates an OpenGL texture from it.
Step 3: Drawing the Cube with Textures
Now, we will draw the cube and apply a different texture to each face. We use the glBegin(GL_QUADS) and glEnd() functions to draw each face of the cube.

This code draws each side of the cube and applies the corresponding texture.
Step 4: Rotating the Cube
We can make the cube rotate by updating the rotation angles every time the cube is drawn.

Here, glRotatef() rotates the cube around the x-axis and y-axis. The angles are updated to create the spinning effect.
Step 5: Output and Complete Code
Simply download the project files, run the code, and see the textured cube in action.
👉 **Click here to download the complete source code with textures** 👈
Here’s the output of rotating cube with texture OpenGL code that combines everything we’ve done:

program output
Conclusion
Congratulations! You’ve successfully created a rotating cube with different textures on each face using OpenGL and GLUT. You can further customize this project by experimenting with different textures, adjusting rotation speeds, or adding lighting effects for more realism.
메타데이터
- post_id
- 5c1ea214bb0f
- slug
- rotating-cube-with-textures-in-opengl-using-glut-5c1ea214bb0f
- url
- https://medium.com/@zmarkm2021/rotating-cube-with-textures-in-opengl-using-glut-5c1ea214bb0f
- canonical_url
- https://medium.com/@zmarkm2021/rotating-cube-with-textures-in-opengl-using-glut-5c1ea214bb0f
- author_url
- https://medium.com/@zmarkm2021
- status
- ok
- fetched_at
- 2026-06-20 20:29:01