An Introduction to OpenCL
Architecture, Memory, and Your First Kernel
An Introduction to OpenCL
Architecture, Memory, and Your First Kernel
Photo by Andrey Matveev on Unsplash
Non member read here..
As software developers, we are deeply accustomed to sequential thinking. For decades, standard application logic has assumed a single processor executing one instruction after another. When performance bottlenecks arose, we relied on Moore’s Law and hardware vendors to scale up single-core clock speeds. Today, however, performance scaling is driven by massive parallelism. Modern systems pack hundreds or thousands of computational cores into GPUs, DSPs, and specialized hardware accelerators. Unlocking this hardware requires a paradigm shift. You cannot simply compile traditional C++ or Python code and expect it to distribute across 2,000 GPU streams. This is where OpenCL (Open Computing Language) comes in.
Maintained by the Khronos Group, OpenCL is an open, royalty- free standard for cross-platform, parallel programming of heterogeneous systems. It provides a uniform framework to target CPUs, GPUs, FPGAs, and digital signal processors without rewriting your core algorithms from scratch.
The Heterogeneous Architecture Model
To write effective OpenCL code, you must understand its dual architecture model. OpenCL strictly divides your hardware landscape into two entities:
- The Host: Typically the central processing unit (CPU) running a standard operating system. The host acts as the orchestrator or “manager” of the entire application. It executes the main runtime loop, manages memory allocations, and dispatches workloads.
- The Compute Device: The accelerator hardware (e.g., an NVIDIA or AMD GPU, or an Intel Xeon Phi) that executes the heavy mathematical computations. A single host can control multiple compute devices.
Each Compute Device is structurally subdivided into one or more Compute Units (analogous to a GPU Streaming Multiprocessor or a CPU core block), which are further split into multiple Processing Elements (the raw physical ALUs performing calculations in parallel).
The host-side code is written in standard C, C++, or Python and compiles to standard CPU instructions. The device-side code (the parallel algorithm itself) is compiled at runtime using an embedded compiler supplied by the hardware vendor.
The Execution Model: NDRange and Work-Items
When you want to run a parallel task on a compute device, you define a function called a Kernel. Instead of iterating through data via a for loop, you instruct OpenCL to spawn an N-Dimensional Grid of threads called an NDRange. An NDRange can be 1D, 2D, or 3D depending on how your data maps naturally (e.g., a 1D array, a 2D image texture, or a 3D fluid simulation block). The hierarchy of execution looks like this:
- Work-item: A single thread of execution within the NDRange. Each work-item executes the exact same kernel function but processes different data coordinates.
- Work-group: A collection of work-items grouped together into a cohesive block. Work-items belonging to the same work-group run concurrently on the same physical Compute Unit, allowing them to synchronize and share memory with extremely low latency.
Within your kernel code, you can query your precise position in the space using built-in indexing functions: get_global_id(dim) : Returns your absolute coordinate across the entire NDRange grid. get_local_id(dim) : Returns your relative coordinate inside your specific work-group.
The OpenCL Memory Hierarchy
One of the trickiest parts for developers migrating from CPU programming to OpenCL is memorymanagement. Compute devices do not share a unified memory space with the host CPU by default. Data must be explicitly allocated on the device, transferred over a PCIe bus, processed, and then read back.
OpenCL structures device-accessible memory into four distinct spaces:
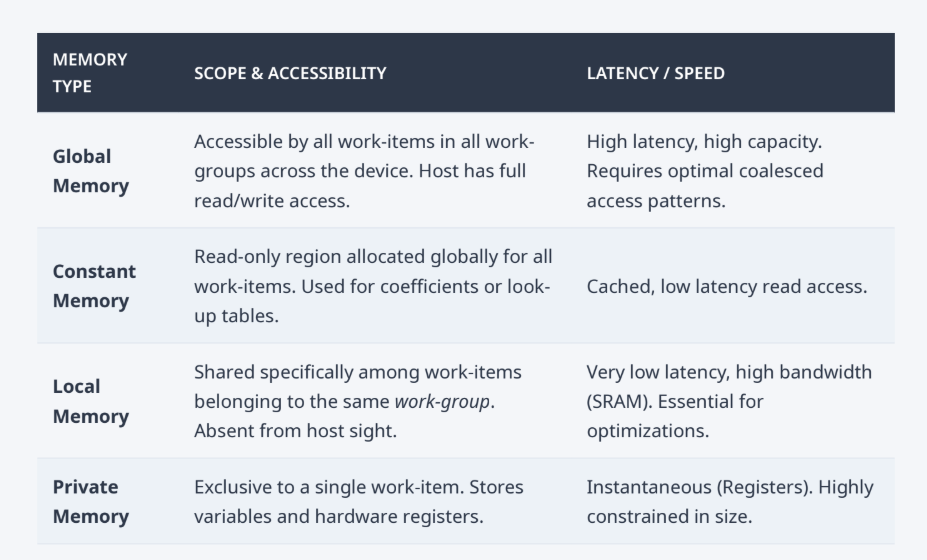
Hands-On: Your First OpenCL Kernel
Let’s look at a concrete example. Suppose we want to perform a vector addition: adding two arrays A and B together element-by-element, saving the result to array C. Mathematically, for every element i, the equation is:
C[i] = A[i] + B[i] In standard sequential CPU C/C++, you would write a loop:
for (int i = 0; i < N; i++) {
C[i] = A[i] + B[i];
}
In OpenCL, we completely eliminate the loop construct. Instead, the loop index is replaced by the global work-item identifier. Here is what the actual device kernel looks like in OpenCL C:
__kernel void vector_add(__global const float *A,
__global const float *B,
__global float *C)
{
// Get the unique index of the current work-item
int i = get_global_id(0);
// Perform the addition for this specific element
C[i] = A[i] + B[i];
}
Breaking Down the Kernel Code: kernel : A keyword indicating that this function can be invoked from the host application and executed on the device. global : Tells the compiler that these pointers reside within the Device’s Global Memory space. get_global_id(0) : Grabs the thread index along the first dimension (dimension 0). If you submit an NDRange of size 1,024, OpenCL handles spinning up 1,024 instances of this function, passing an ID from 0 to 1,023 to each thread implicitly.
The Boilerplate Pipeline (Host Setup)
While writing the kernel code is straightforward, setting up the host pipeline requires meticulous, explicit initialization. Because OpenCL works across any hardware brand, it provides an abstraction layer to locate platforms and contexts. The typical sequence a developer implements on the host is:
- Discover Platforms: Query the system to find available hardware platforms (e.g., an Intel Platform, an AMD Platform, an NVIDIA Platform).
- Query Devices: From a given platform, locate specific devices (e.g., target the discrete GPU specifically).
- Create a Context: Establish an environment where the host can manage memory and execute commands with the device.
- Create a Command Queue: Set up the communications pipeline through which the host issues tasks to the device.
- Allocate Device Buffers: Use clCreateBuffer() to allocate space within the device’s Global Memory space.
- Write Memory: Transfer your input arrays (A and B) from the host RAM to the device memory buffers.
- Compile Kernel at Runtime: Pass your kernel source text to OpenCL, compile it specifically for that targeted device, and extract the kernel executable handle.
- Set Kernel Arguments: Point the kernel’s parameters to your device buffers.
- Enqueue NDRange: Launch the calculation into the command queue using clEnqueueNDRangeKernel() .
- Read Back Results: Pull the computed values © out of the device buffer back into host RAM for application use.
Conclusion & Next Steps
OpenCL demands explicit control over every stage of hardware execution — from compilation pipelines to exact memory transfers. While this requires a non-trivial amount of initial boilerplate code compared to generic sequential programming, the control it grants you over target devices is unparalleled. It provides bare-metal execution performance while maintaining portability across varying architectures.
In our next post, we will construct a full, working host program in C++ to compile and execute our ector_add kernel. Until then, think about your current projects: what processing bottlenecks or heavy iteration loops do you have that could benefit from being split across thousands of simultaneous streams?
You can also download the pdf of the post from here …
메타데이터
- post_id
- 5f98d4b3605d
- slug
- an-introduction-to-opencl-5f98d4b3605d
- url
- https://medium.com/swe-insights/an-introduction-to-opencl-5f98d4b3605d
- canonical_url
- https://medium.com/swe-insights/an-introduction-to-opencl-5f98d4b3605d
- author_url
- https://medium.com/@manish434k
- status
- ok
- fetched_at
- 2026-07-13 06:23:13






